Summer shandy pairs perfectly with juicy grilled chicken skewers marinated with zesty flavors that match its citrus notes. A fresh garden salad with seasonal veggies and tangy feta offers a light, crisp contrast.
Crisp fish tacos with lime crema enhance the drink’s refreshing taste, while tangy lemon bars make a sweet and tart dessert to round out the meal. These sides elevate any summer gathering beautifully.

As the summer sun warms the world, people seek refreshing beverages to keep cool. Enter summer shandy: a delightful mix of beer and lemonade that captures the essence of the season.
A sunny afternoon, laughter in the air, and a cold shandy in hand. It’s an experience worth sharing, much like a delightful story.
In my journey as a registered dietitian and food enthusiast, I’ve come across many recipes. But summer shandy stands out, marrying flavors seamlessly to create a drink that’s easy to make and hard to resist. Now, are you ready to learn about this fantastic concoction?
What is Summer Shandy?
Summer shandy is a delightful beverage that combines beer and lemonade. Traditionally made with Hefeweizen, a type of wheat beer, it often showcases bright, citrusy notes from the lemonade.
The drink’s origins trace back to the German tradition of mixing beer with lemonade or lemon soda, where it adds a refreshing twist to the rich flavors of beer.
This drink is a testament to creativity in the beverage world. It gives you a cheerful uplift on a hot day, making it an ideal addition to summer barbecues and gatherings.
You will also like the following Drinks And Dips recipes!
What Does It Taste Like?
Summer shandy bursts with refreshing flavors. The combination of beer and lemonade creates a lightly sweet and tangy drink. You get the fruity notes of lemon dancing with the bread-like qualities of the Hefeweizen. It’s effervescent, crisp, and just acidic enough to awaken your taste buds.
Why This Recipe Works
Now let’s explore why this summer shandy recipe is a winner. Here are four compelling reasons:
1. Balanced Flavors: The balance of sweetness and acidity from the lemonade ensures that the drink is refreshing without being overly sugary.
2. Easy to Prepare: This recipe is simple. You combine ingredients, give it a nice stir, and voila! You have a delightful drink ready for your guests.
3. Customizable: Feel like playing mixologist? This recipe offers plenty of room for flexibility. You can adjust the sweetness or even try different fruits for a unique twist.
4. Perfect for Summer Days: The combination of cold beer and zesty lemon makes it the ideal beverage for hot days. It’s practically a summer essential!
Ingredients for Summer Shandy
Here’s what you’ll need to create this refreshing beverage:
- 4 (12-ounce) bottles of cold Hefeweizen beer
- ½ cup freshly squeezed lemon extract
- 1 cup purified water
- 1 tablespoon fresh mint leaves
- ½ cup chilled sparkling mineral water
- ½ cup fine granulated sugar
- 1 teaspoon grated ginger

Step-by-Step Instructions
Let’s break down the process to make summer shandy step by step.
Step 1: Gather Your Ingredients
Collect all the ingredients listed above. Having everything on your countertop makes the process smoother and quicker.
Step 2: Prepare the Lemon Extract
In a mixing bowl, combine the freshly squeezed lemon extract and granulated sugar. Stir until the sugar dissolves completely. This creates your lemonade base for the summer shandy.
Step 3: Add Purified Water
Pour in 1 cup of purified water. This helps dilute the lemon extract and sugar mixture, ensuring the drink isn’t overwhelmingly sweet or tart.
Step 4: Introduce Fresh Mint
Finely chop the fresh mint leaves and add them to the mixture. The mint complements the lemon and beer beautifully, bringing an extra layer of freshness.
Step 5: Mix with Beer
Slowly pour in the Hefeweizen beer. Do this gently—no one wants a foamy mess! Stir the mixture lightly, ensuring all ingredients combine without losing too much carbonation.
Step 6: Add Sparkling Water
For an added fizz, pour in the chilled sparkling mineral water. This step makes your shandy even more refreshing, enhancing the effervescence.
Step 7: Incorporate Grated Ginger
Finally, stir in the grated ginger. This ingredient provides a unique twist, lending a subtle spiciness to the drink that pairs well with the lemon and beer.
Step 8: Refrigerate
Let your summer shandy chill in the refrigerator for about 30 minutes. This ensures it’s crisp and cold when served.
Notes
Before you dive into enjoyment, here are some tips to consider:
- Experiment with Sweetness: Adjust the sugar based on your preference. You can use honey or agave syrup for a natural sweetener.
- Ginger Variations: If you love ginger, consider using ginger beer instead of regular beer.
- Serve with Ice: For an extra refreshing experience, serve over ice. Just be cautious; too much ice can dilute the flavor.
- Garnish Creatively: Don’t hesitate to garnish with extra lemon slices or mint. It adds flair and enhances flavor.
- Make Ahead: Prepare the lemonade mixture ahead of time and mix with beer right before serving.
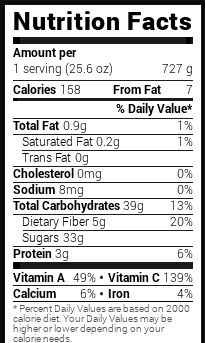
Nutrition Information
Summer Shandy Recipe Nutrition Facts

How to Store the Leftovers?
If you find yourself with leftover summer shandy (which is rare!), it’s best to store it in a tightly sealed container in the refrigerator.
However, for optimal flavor and fizz, try to consume it within 24 hours. The longer it resides in storage, the flatter it becomes—defeating its refreshing appeal.

Sides for Summer Shandy
Now that your drink is ready, consider serving it with these delightful sides, which pair perfectly:
1. Grilled Corn on the Cob: This summer staple, buttered and sprinkled with salt, makes a delightful companion. The sweet corn complements lemonade’s citrusy flavor well.
2. Caprese Skewers: Pieces of fresh mozzarella, basil, and cherry tomatoes drizzled with balsamic glaze can offer a savory contrast to shandy’s sweetness.
3. Spicy Shrimp Tacos: These lightly spiced tacos or fish tacos provide a kick that balances the refreshing nature of summer shandy.
4. Mediterranean Chickpea Salad: A cool, vibrant chickpea salad with cucumbers, tomatoes, and olives creates a fresh, zesty flavor profile that pairs wonderfully.
More often than not, the sides you choose will enhance your overall summer experience, ensuring it’s memorable.
Alternative Ingredient Choices
Don’t have everything on hand? Here are substitutes if some ingredients go missing from your pantry:
1. Wheat Beer Alternatives: If you can’t find Hefeweizen, other wheat beers or light lagers will do the trick. Look for something crisp and not overly heavy.
2. Lemonade Alternatives: If you don’t have fresh lemons, consider using store-bought lemonade or lemon-lime soda. Both can deliver refreshing results.
3. Mint Substitutes: No mint? No problem! Fresh basil can add a unique flavor to your drink or even green tea for an herbal twist.
4. Ginger Options: Running low on fresh ginger? Ground ginger can work in a pinch, though fresh offers a brighter flavor.

Summer Shandy Recipe
Equipment
- Mixing bowl
Ingredients
- 4 12-ounce bottles of cold Hefeweizen beer
- ½ cup freshly squeezed lemon extract
- 1 cup purified water
- 1 tablespoon fresh mint leaves
- ½ cup chilled sparkling mineral water
- ½ cup fine granulated sugar
- 1 teaspoon grated ginger
Instructions
Step 1: Gather Your Ingredients
- Collect all the ingredients listed above. Having everything on your countertop makes the process smoother and quicker.
Step 2: Prepare the Lemon Extract
- In a mixing bowl, combine the freshly squeezed lemon extract and granulated sugar. Stir until the sugar dissolves completely. This creates your lemonade base for the summer shandy.
Step 3: Add Purified Water
- Pour in 1 cup of purified water. This helps dilute the lemon extract and sugar mixture, ensuring the drink isn’t overwhelmingly sweet or tart.
Step 4: Introduce Fresh Mint
- Finely chop the fresh mint leaves and add them to the mixture. The mint complements the lemon and beer beautifully, bringing an extra layer of freshness.
Step 5: Mix with Beer
- Slowly pour in the Hefeweizen beer. Do this gently—no one wants a foamy mess! Stir the mixture lightly, ensuring all ingredients combine without losing too much carbonation.
Step 6: Add Sparkling Water
- For an added fizz, pour in the chilled sparkling mineral water. This step makes your shandy even more refreshing, enhancing the effervescence.
Step 7: Incorporate Grated Ginger
- Finally, stir in the grated ginger. This ingredient provides a unique twist, lending a subtle spiciness to the drink that pairs well with the lemon and beer.
Step 8: Refrigerate
- Let your summer shandy chill in the refrigerator for about 30 minutes. This ensures it’s crisp and cold when served.
Notes
- Experiment with Sweetness: Adjust the sugar based on your preference. You can use honey or agave syrup for a natural sweetener.
- Ginger Variations: If you love ginger, consider using ginger beer instead of regular beer.
- Serve with Ice: For an extra refreshing experience, serve over ice. Just be cautious; too much ice can dilute the flavor.
- Garnish Creatively: Don’t hesitate to garnish with extra lemon slices or mint. It adds flair and enhances flavor.
- Make Ahead: Prepare the lemonade mixture ahead of time and mix with beer right before serving.
Nutrition
Frequently Asked Questions
1. Can I make a non-alcoholic version?
Absolutely! Simply replace the Hefeweizen with a non-alcoholic beer or sparkling water. The lemonade mixture will still give you that refreshing summer taste.
2. What’s the best way to serve summer shandy?
Serve it chilled, preferably in a clear glass that showcases the lovely color. Garnishing with lemon slices or fresh mint adds a visual appeal.
3. How long does summer shandy last?
Once mixed, it’s best consumed within 24 hours. If kept sealed in the fridge, it might last longer but will lose fizz and freshness.
4. Can I mix other flavors into summer shandy?
Yes! You can experiment with various flavors like raspberry, peach, or even lavender lemonade for a unique twist.
Conclusion
Summer shandy is more than a beverage; it’s a celebration of sunny days and happiness shared with friends and family. With this easy, delicious recipe, you can bring that joy to your table and quench the summer thirst that’s waiting to be indulged.
So, fire up your grill, grab your ingredients, and toast to wonderful moments. There’s nothing quite like the first sip when you sit back, relax, and bask in the sunshine. Cheers to summer!