When it comes to breakfast, I always think of what can be paired together to create a delightful experience. Imagine sitting around a table with loved ones, taking a bite of something indulgent while sipping fresh coffee.
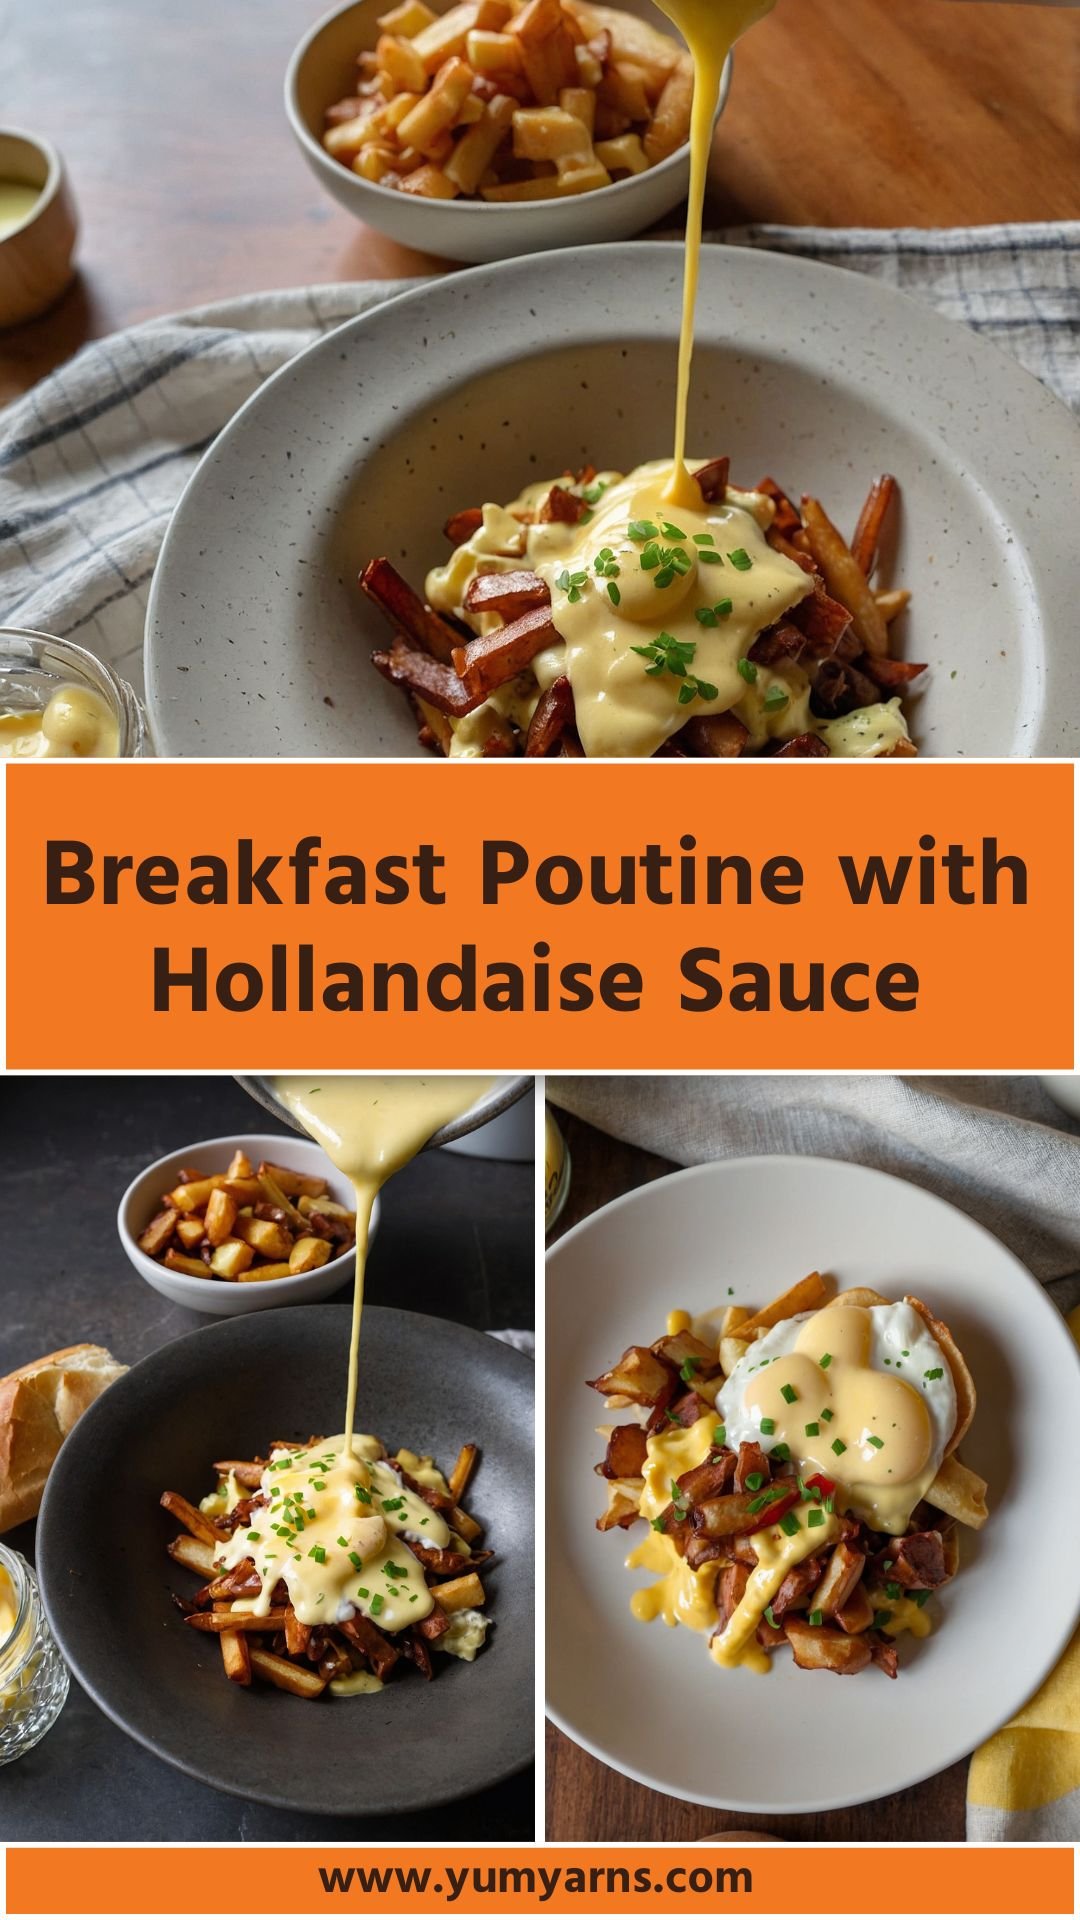
Poutine is often associated with late-night snacks after a long night out, but wait until you try breakfast poutine. Its decadent combination of fries, cheese curds, and a dreamy hollandaise sauce is not only filling but a fantastic way to kick-start your day.
Now, what should you serve alongside this dish? A light, refreshing fruit salad can be a great contrast. Something with juicy watermelon, zesty citrus, and a sprinkle of mint offers a lovely palate cleanser.
Alternatively, a side of avocado toast brings in healthy fats that balance out the richness of the poutine. If you want to keep things casual, why not throw in some crispy breakfast sausage or scrambled eggs on the side? These simple additions round out a hearty breakfast.

Let me take you on a journey into my kitchen where the magic happens. Breakfast poutine has become a staple for a weekend brunch in my home. I love its comforting yet indulgent flavor profile.
Now, it may seem like splurging on a decadent dish first thing in the morning isn’t the best idea, but believe me, this recipe is great for a reason. It is hearty, satisfying, and gives you the energy boost needed to tackle your day, all while leaving your taste buds singing.
This breakfast poutine uses wholesome ingredients that I genuinely enjoy. Each bite is filled with crispy potatoes, savory bacon, and that ooey-gooey hollandaise sauce. I have poured my heart into perfecting this recipe, making it approachable for anyone who considers breakfast to be the most important meal of the day.
You will also like the following Breakfast recipes!
Ingredients
For the Fries
- 4 large potatoes (cut into thin, long strips)
- 1-2 teaspoons cayenne pepper
- Salt and black pepper (to taste)
- 1 tablespoon dried parsley flakes
- 2 tablespoons dried chives
- 1 teaspoon smoked paprika
For the Toppings
- 8 strips bacon (chopped)
- 5 ounces cooked ham (diced)
- 4 ounces mushrooms (thinly sliced)
- 1/2 white onion (thinly sliced)
- 2 green onions (thinly sliced)
- 1/2 bell pepper (diced)
- 1 cup cheese curds (or shredded mozzarella)
- 4 large eggs
For the Hollandaise Sauce
- 1/2 cup butter (melted until very hot)
- 3 egg yolks
- 1 tablespoon fresh lemon juice
- 1/4 teaspoon cayenne pepper
- A pinch of salt
- 1 teaspoon Dijon mustard

How to Make Breakfast Poutine with Hollandaise Sauce
Step 1: Prepare the Fries
Start by preheating your oven to 425°F (220°C). Cut the potatoes into thin strips, resembling classic French fries. Place the potato strips in a bowl. Drizzle them with oil and sprinkle with salt, cayenne pepper, smoked paprika, dried parsley, and chives. Spread them out evenly on a baking sheet and bake for about 25-30 minutes, flipping halfway through until they are golden brown and crispy.
Step 2: Cook the Toppings
While the fries are in the oven, it’s time to work on the delicious toppings. In a skillet over medium heat, cook the bacon until crispy. Remove the bacon from the skillet, leaving the drippings. In that same skillet, add mushrooms, onion, bell pepper, and ham. Sauté for around 5-7 minutes or until the veggies are softened and the ham is heated through. Remove from the heat and set aside.
Step 3: Poach the Eggs
Bring a pot of water to a gentle simmer and add a splash of vinegar. Crack each egg into a small bowl, then gently slide it into the simmering water.
Poach the eggs for 3-4 minutes, until the whites are set but the yolks still runny. Carefully remove the eggs with a slotted spoon and place them on a paper towel to drain.
Step 4: Make the Hollandaise Sauce
Now, let’s whip up that hollandaise! In a bowl, whisk together the egg yolks and lemon juice. Slowly drizzle in the hot melted butter, whisking continuously until the mixture is creamy and well combined. Add cayenne pepper, salt, and Dijon mustard to finish. If it’s too thick, you can thin it with a teaspoon of warm water.
Step 5: Assemble the Poutine
Grab a plate and start layering! Begin with a generous portion of fries. Next, spoon over your sautéed mixture of vegetables and meats. Scatter the cheese curds on top and place a perfectly poached egg over everything.
Finish with a drizzle of that glorious hollandaise sauce. If you’re feeling adventurous, add more cayenne on top for a little kick!
Nutrition Information


Recipe Notes
- Potatoes: Russet potatoes are the best for fries. They’re starchy and yield the perfect crispiness.
- Cheese Curds: Fresh cheese curds are essential for that authentic poutine texture. If unavailable, shredded mozzarella will do just fine.
- Bacon: Feel free to use turkey bacon or skip the meat entirely for a vegetarian option!
- Hollandaise Sauce: Fresh lemon juice is crucial. It brightens up the sauce significantly.
- Veggies: Add any favorites. Spinach and tomatoes make great friends in this dish too.
- Eggs: Poached eggs can be tricky. Practice making them for a brunch effort. Once you get them right, you’ll be an egg master!
Recipe Variations
- Mexican Breakfast Poutine: Swap out the hollandaise for a zesty avocado salsa; add jalapeños for heat.
- Southern Style: Use sausage gravy instead of hollandaise to give it a comforting twist.
- Veggie Delight: Load it up with seasonal vegetables like zucchini and squash.
- Creamy Spinach: Toss in fresh spinach and wilt it before adding to the base for an extra green kick.
- Sweet Potato Fries: Substitute regular potatoes with sweet potatoes for a sweeter base.
- Herbed Hollandaise: Stir in fresh herbs like dill or cilantro for an added layer of flavor.

Breakfast Poutine With Hollandaise Sauce
Equipment
- Skillet
- Bowls
Ingredients
For the Fries
- 4 large potatoes cut into thin, long strips
- 1-2 teaspoons cayenne pepper
- Salt and black pepper to taste
- 1 tablespoon dried parsley flakes
- 2 tablespoons dried chives
- 1 teaspoon smoked paprika
For the Toppings
- 8 strips bacon chopped
- 5 ounces cooked ham diced
- 4 ounces mushrooms thinly sliced
- 1/2 white onion thinly sliced
- 2 green onions thinly sliced
- 1/2 bell pepper diced
- 1 cup cheese curds or shredded mozzarella
- 4 large eggs
For the Hollandaise Sauce
- 1/2 cup butter melted until very hot
- 3 egg yolks
- 1 tablespoon fresh lemon juice
- 1/4 teaspoon cayenne pepper
- A pinch of salt
- 1 teaspoon Dijon mustard
Instructions
Step 1: Prepare the Fries
- Start by preheating your oven to 425°F (220°C). Cut the potatoes into thin strips, resembling classic French fries. Place the potato strips in a bowl. Drizzle them with oil and sprinkle with salt, cayenne pepper, smoked paprika, dried parsley, and chives. Spread them out evenly on a baking sheet and bake for about 25-30 minutes, flipping halfway through until they are golden brown and crispy.
Step 2: Cook the Toppings
- While the fries are in the oven, it’s time to work on the delicious toppings. In a skillet over medium heat, cook the bacon until crispy. Remove the bacon from the skillet, leaving the drippings. In that same skillet, add mushrooms, onion, bell pepper, and ham. Sauté for around 5-7 minutes or until the veggies are softened and the ham is heated through. Remove from the heat and set aside.
Step 3: Poach the Eggs
- Bring a pot of water to a gentle simmer and add a splash of vinegar. Crack each egg into a small bowl, then gently slide it into the simmering water.
- Poach the eggs for 3-4 minutes, until the whites are set but the yolks still runny. Carefully remove the eggs with a slotted spoon and place them on a paper towel to drain.
Step 4: Make the Hollandaise Sauce
- Now, let’s whip up that hollandaise! In a bowl, whisk together the egg yolks and lemon juice. Slowly drizzle in the hot melted butter, whisking continuously until the mixture is creamy and well combined. Add cayenne pepper, salt, and Dijon mustard to finish. If it’s too thick, you can thin it with a teaspoon of warm water.
Step 5: Assemble the Poutine
- Grab a plate and start layering! Begin with a generous portion of fries. Next, spoon over your sautéed mixture of vegetables and meats. Scatter the cheese curds on top and place a perfectly poached egg over everything.
- Finish with a drizzle of that glorious hollandaise sauce. If you’re feeling adventurous, add more cayenne on top for a little kick!
Notes
- Potatoes: Russet potatoes are the best for fries. They’re starchy and yield the perfect crispiness.
- Cheese Curds: Fresh cheese curds are essential for that authentic poutine texture. If unavailable, shredded mozzarella will do just fine.
- Bacon: Feel free to use turkey bacon or skip the meat entirely for a vegetarian option!
- Hollandaise Sauce: Fresh lemon juice is crucial. It brightens up the sauce significantly.
- Veggies: Add any favorites. Spinach and tomatoes make great friends in this dish too.
- Eggs: Poached eggs can be tricky. Practice making them for a brunch effort. Once you get them right, you’ll be an egg master!
Nutrition
Frequently Asked Questions
1. Can I make this recipe ahead of time?
Absolutely! You can prepare the fries and toppings ahead and simply heat them when you’re ready to serve. The hollandaise sauce is best served fresh, but you can reheat it gently in a double boiler.
2. How can I make this dish gluten-free?
This recipe is naturally gluten-free unless you use flour-based sauces or certain brands of cheese. Always check labels and ensure any bread products used are gluten-free.
3. Is there a vegetarian version of breakfast poutine?
Yes, simply skip the bacon and ham. Load up on vegetables and use a vegetarian-friendly hollandaise to keep it satisfying
4. What can I substitute for hollandaise sauce?
If you’re looking for something simpler, try a flavorful avocado crema or even a jarred salsa Verde.
5. How can I keep the fries crispy?
Serve the fries immediately after baking. If you need to prepare them in advance, place them in a single layer on a wire rack in the oven to maintain their crispness.
6. Are there any health benefits to this dish?
While breakfast poutine is indulgent, using whole ingredients like fresh vegetables can add nutrients. Eggs provide protein, and the inclusion of chives and parsley packs in antioxidants
Conclusion
Breakfast poutine with hollandaise sauce is not just a dish; it’s an experience. Each forkful is loaded with flavor and comfort.
Bringing together the crispy fries, savory toppings, and that rich, creamy sauce creates a symphony of satisfaction your taste buds will love. The journey from the kitchen prep to the dining table is worth every effort. Whether it’s a special Sunday brunch or a casual gathering, this breakfast delight will leave a lasting impression.
Now, I’m off to make another batch because, let’s be honest, once you try this, you’ll want to embrace breakfast poutine every morning! So roll up your sleeves and dive in. Enjoy!