Before diving into the delightful world of savory sausage strata, let’s talk about the perfect accompaniments. A bright, refreshing salad can be a fantastic side. Consider a simple arugula salad dressed with lemon vinaigrette to balance the richness of the strata. If you prefer something heartier, serve it alongside roasted vegetables. They add color and a little crunch.
Finally, don’t forget a nice cup of coffee or a light sparkling water. You could even include a splash of orange juice for a breakfast brunch feel. Now that we’ve set the stage for this culinary adventure, let’s explore what exactly savory sausage strata is.

Picture this: it’s a lazy Sunday morning or perhaps a festive holiday brunch. The smell of something delicious wafts through the house, luring you from your dreamland. That something is savory sausage strata, a comforting egg casserole dish that friends and family will gather around. If you love hearty meals that are flexible and easy to prepare, you’re in for a treat today!
Allow me to introduce you to my take on savory sausage strata, a dish that has transformed breakfast and brunch for many. All you really need to know is that this isn’t just a casserole; it’s a celebration of flavor and texture. Whether you are preparing for a large gathering or a cozy family breakfast, this recipe simplifies the process. So grab your apron and get ready to explore this savory delight!
What is Savory Sausage Strata?
Savory sausage strata is an Italian-inspired egg bake, typically made with layers of bread, sausage, eggs, and cheese. Think of it like a bread pudding but loaded with breakfast flavors. Most recipes involve soaking cubes of bread in a mixture of eggs and milk, then layering them with cooked sausage, vegetables, and cheese.
The origins of strata can be traced back to Italian cuisine, where it was made from leftover bread, a way to avoid waste. Today, in homes across the world, it has become a beloved dish at brunches and holiday gatherings. The combination of ingredients allows for endless variations, making it a flexible and forgiving dish that can cater to diverse tastes.
You will also like the following Breakfast recipes!
- French Toast Croque Madame Recipe
- Simple Cheesy Skillet Hash Browns And Eggs
- Bacon Cheddar And Chive Quiche With A Hash Brown Crust
What is the Flavor Profile of This Dish?
Imagine a warm and savory hug for your taste buds! Savory sausage strata delivers a symphony of flavors. The breakfast sausage provides a delightful richness and a touch of spice, while the cheese lends a creamy, salty element. Eggs create a custard-like texture that holds everything together, accentuated by the fresh taste of sautéed onions and garlic. The addition of spinach introduces a slight earthiness, balancing the dish and adding a pop of color.
Each bite will unfold layers of flavor, from the hearty bread soaking up the seasoned egg mixture to the melty cheese stretching with every forkful. There’s a delightful contrast of textures—crispy edges from baking and a tender, soft center. It’s really comfort food in every sense. Now, you might be wondering—what makes this recipe stand out? Let’s dive deeper.
What Makes This Recipe Different from Other Savory Sausage Strata?
This savory sausage strata isn’t just another recipe; it brings something special to your table. First, it uses high-quality ingredients. For instance, shredding your own cheese instead of using pre-packaged varieties enhances flavor and texture. I always stress the importance of quality. You’ll taste the difference!
Moreover, my approach involves not overloading it with too many additional ingredients, which can sometimes muddle the flavors. By keeping it simple while emphasizing the key ingredients—like delicious breakfast sausage and freshly sautéed veggies—you’ll experience flavors that shine through.
What’s more, this strata can be prepped in advance. This means you can spend more time with your loved ones and less time stressing in the kitchen. You can serve it straight from the oven or reheat it, enjoying the same delightful warmth the next day.
Ingredients You’ll Need
To create this savory masterpiece, gather the following ingredients:
- 16 ounces breakfast sausage
- 4 tablespoons neutral oil, divided
- 2 minced garlic cloves
- ½ diced yellow onion
- 8 large eggs
- 4 ounces baby spinach
- 4 tablespoons unsalted butter, softened and divided
- 1 ½ cups heavy cream
- 22 ounces Italian loaf, torn into pieces
- 8 ounces shredded white cheddar cheese
- 2 sliced green onions, divided
- Salt and pepper to taste
Having each of these items prepared will make the cooking process a breeze. Now, let’s roll up our sleeves and get down to the nitty-gritty of making this savory sausage strata.

Step by Step Directions
Step 1: Cook the Sausage
Start by heating 2 tablespoons of neutral oil in a large skillet over medium heat. Crumble the breakfast sausage into the pan. Allow it to brown and cook through, breaking it apart with a wooden spoon. This usually takes about 5 to 7 minutes. Once the sausage is browned, add the diced onion and garlic, sautéing until onions become translucent and fragrant.
Step 2: Sauté the Spinach
Next, quickly toss in the baby spinach. Stir it for a few minutes until wilted. Don’t you love how vibrant it looks? Remove this mixture from the heat and let it cool slightly.
Step 3: Prepare the Egg Mixture
In a large bowl, whisk together the eggs and heavy cream. Season with salt and pepper to taste. You want to mix this until it’s well combined. A massive fluffy cloud of eggs and cream is waiting.
Step 4: Combine Ingredients
Now, let’s bring it all together. Slowly fold the torn Italian bread pieces into the egg mixture, allowing it to soak. This will ensure the bread absorbs moisture and flavor. After a few moments, add the cooled sausage, onion, garlic, and spinach mixture into the bowl. Finally, add half of the shredded cheddar cheese. Give this a good stir until everything is coated.
Step 5: Prepare the Baking Dish
Preheat your oven to 350°F (175°C). Grease a 9×13-inch baking dish with the remaining 2 tablespoons of oil and 2 tablespoons of butter. You can also use a non-stick spray if you prefer.
Step 6: Assemble the Strata
Pour the entire mixture into the greased baking dish. Spread it evenly, ensuring no dry bread pieces are left. Sprinkle the remaining cheddar cheese on top, and don’t shy away from adding a few green onions for garnish.
Step 7: Bake
Cover the dish with aluminum foil and bake it for 30 minutes. After that, remove the foil and bake for an additional 20-30 minutes, or until the strata is golden brown and has puffed up beautifully. When it looks irresistible, it’s ready to be enjoyed!
Tips on Making Savory Sausage Strata
Here are some additional tips to help you nail this savory dish:
- Use Day-Old Bread: Day-old bread works best for soaking up the egg mixture. Fresh bread gets too mushy.
- Let it Sit: If you have time, let the assembled strata sit in the refrigerator for a few hours or overnight. This allows the flavors to meld beautifully.
- Experiment with Cheeses: Swap the white cheddar for other varieties like gouda or pepper jack for exciting flavors.
- Season Well: Don’t be shy about seasoning. A pinch of crushed red pepper or fresh herbs can elevate this dish.
- Serve with Salsa or Hot Sauce: Adding a drizzle of salsa or hot sauce on top can provide a delightful kick.
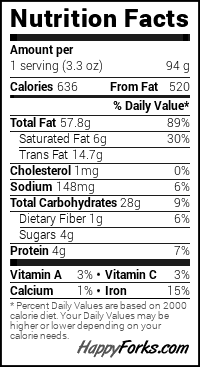
Nutrition Information
Knowing what you’re putting into your body is important. Here’s a general idea of the nutrition per serving (based on 10 servings):
- Calories: 350
- Protein: 20g
- Fat: 25g
- Carbohydrates: 20g
- Fiber: 2g
- Sugars: 1g
These values can vary based on ingredient choices. So, adjust according to what suits your diet best.
How Can I Store This Savory Sausage Strata?
Storing the strata is easy. If you have leftovers (which you will), simply cover it with plastic wrap or transfer it to an airtight container. It can be kept in the refrigerator for up to 3–4 days. For prolonged freshness, consider freezing.
To freeze, allow it to cool completely. Then, wrap individual portions in plastic wrap or foil, placing each in a freezer bag. Thaw overnight in the fridge when you’re ready to reheat. Bake in a preheated oven at around 350°F (175°C) until heated through.

Ingredient Substitutes
If you find yourself missing some ingredients, don’t worry! Here are several substitutes you can consider:
- Breakfast Sausage: Swap for turkey sausage or a plant-based sausage for a lighter option. The flavors may vary, but the essence will still shine.
- Heavy Cream: Whole milk or half-and-half can be used in place of heavy cream, though it will result in a different texture.
- Baby Spinach: Kale or Swiss chard can provide a similar flavor profile, adding a nice depth.
- Cheddar Cheese: If you don’t have cheddar, consider mozzarella or feta. Both will change the profile slightly but will still produce a delicious dish.

Savory Sausage Strata
Equipment
- pan
- Bowl
Ingredients
- 16 ounces breakfast sausage
- 4 tablespoons neutral oil divided
- 2 minced garlic cloves
- ½ diced yellow onion
- 8 large eggs
- 4 ounces baby spinach
- 4 tablespoons unsalted butter softened and divided
- 1 ½ cups heavy cream
- 22 ounces Italian loaf torn into pieces
- 8 ounces shredded white cheddar cheese
- 2 sliced green onions divided
- Salt and pepper to taste
Instructions
Step 1: Cook the Sausage
- Start by heating 2 tablespoons of neutral oil in a large skillet over medium heat. Crumble the breakfast sausage into the pan. Allow it to brown and cook through, breaking it apart with a wooden spoon. This usually takes about 5 to 7 minutes. Once the sausage is browned, add the diced onion and garlic, sautéing until onions become translucent and fragrant.
Step 2: Sauté the Spinach
- Next, quickly toss in the baby spinach. Stir it for a few minutes until wilted. Don’t you love how vibrant it looks? Remove this mixture from the heat and let it cool slightly.
Step 3: Prepare the Egg Mixture
- In a large bowl, whisk together the eggs and heavy cream. Season with salt and pepper to taste. You want to mix this until it’s well combined. A massive fluffy cloud of eggs and cream is waiting.
Step 4: Combine Ingredients
- Now, let’s bring it all together. Slowly fold the torn Italian bread pieces into the egg mixture, allowing it to soak. This will ensure the bread absorbs moisture and flavor. After a few moments, add the cooled sausage, onion, garlic, and spinach mixture into the bowl. Finally, add half of the shredded cheddar cheese. Give this a good stir until everything is coated.
Step 5: Prepare the Baking Dish
- Preheat your oven to 350°F (175°C). Grease a 9×13-inch baking dish with the remaining 2 tablespoons of oil and 2 tablespoons of butter. You can also use a non-stick spray if you prefer.
Step 6: Assemble the Strata
- Pour the entire mixture into the greased baking dish. Spread it evenly, ensuring no dry bread pieces are left. Sprinkle the remaining cheddar cheese on top, and don’t shy away from adding a few green onions for garnish.
Step 7: Bake
- Cover the dish with aluminum foil and bake it for 30 minutes. After that, remove the foil and bake for an additional 20-30 minutes, or until the strata is golden brown and has puffed up beautifully. When it looks irresistible, it’s ready to be enjoyed!
Notes
- Use Day-Old Bread: Day-old bread works best for soaking up the egg mixture. Fresh bread gets too mushy.
- Let it Sit: If you have time, let the assembled strata sit in the refrigerator for a few hours or overnight. This allows the flavors to meld beautifully.
- Experiment with Cheeses: Swap the white cheddar for other varieties like gouda or pepper jack for exciting flavors.
- Season Well: Don’t be shy about seasoning. A pinch of crushed red pepper or fresh herbs can elevate this dish.
- Serve with Salsa or Hot Sauce: Adding a drizzle of salsa or hot sauce on top can provide a delightful kick.
Nutrition
Frequently Asked Questions
1. Can I make savory sausage strata ahead of time?
Absolutely! You can assemble everything the night before, refrigerate it, and bake in the morning. This is one of its many joys—convenience.
2. What is the best type of bread for strata?
A sturdy bread like Italian, French, or sourdough is ideal. The firmer texture helps it soak up the egg mixture without turning mushy.
3. Can I add other vegetables to this dish?
Yes! Feel free to toss in bell peppers, mushrooms, or zucchini for added flavor and texture. Get creative!
4. Is savory sausage strata suitable for freezing?
Certainly! Once cooled, slice into portions and freeze. It can be a lifesaver for busy days when you want something comforting.
5. You mentioned cheese substitutes. What’s the impact of using different cheeses?
Different cheeses bring their unique flavors. You’ll find that switching cheddar for gouda brings a smokier flavor, while mozzarella offers a milder taste. Experiment to find your favorite!
Conclusion
Savory sausage strata is more than just a dish—it’s an experience that unites flavors, textures, and friends. I hope you find joy in preparing this recipe as much as I love sharing it with you. With just a bit of planning and these simple steps, breakfast can become the highlight of your day, not just a quick meal.
As you serve this comforting casserole, think of it as a canvas. You can customize it, share it, and enjoy it as often as you like. So let’s savor the moments around the table and celebrate good food and good company with every delicious bite of savory sausage strata! Your brunch game just leveled up. Enjoy!