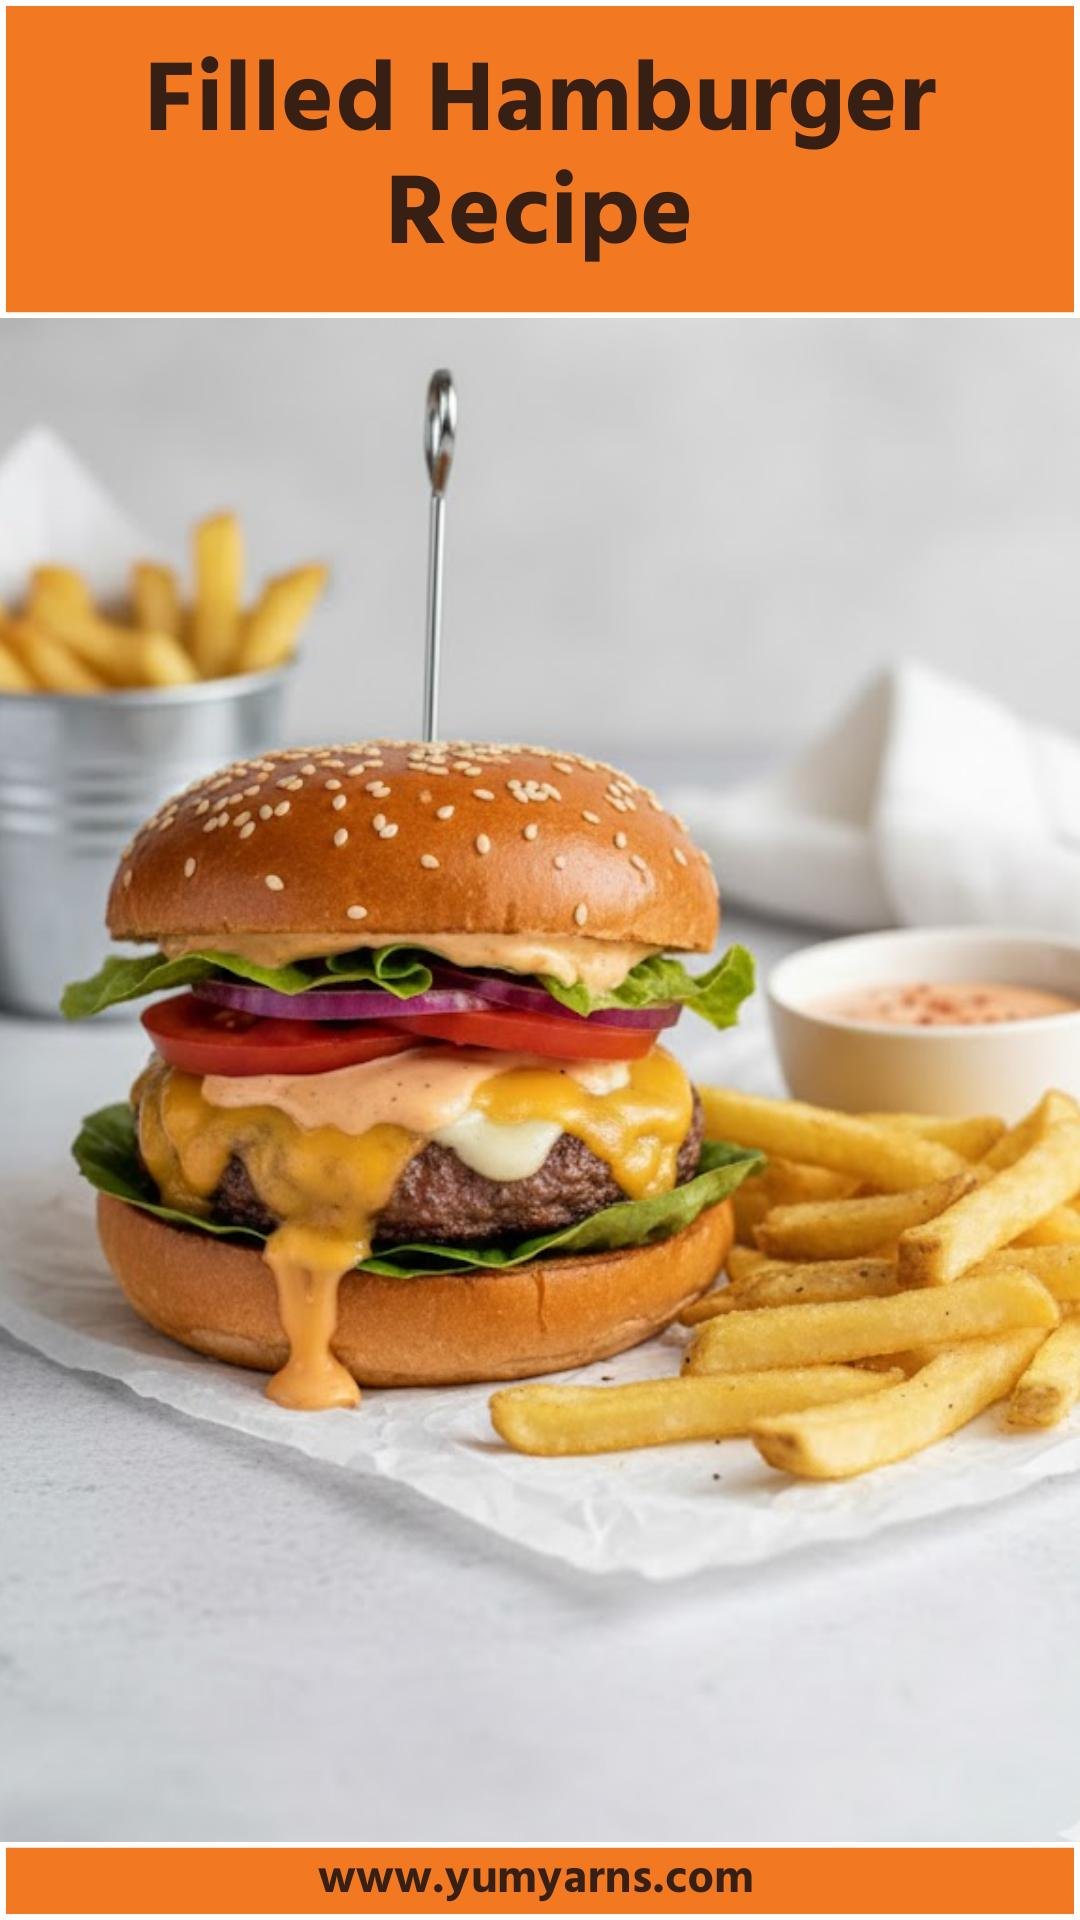
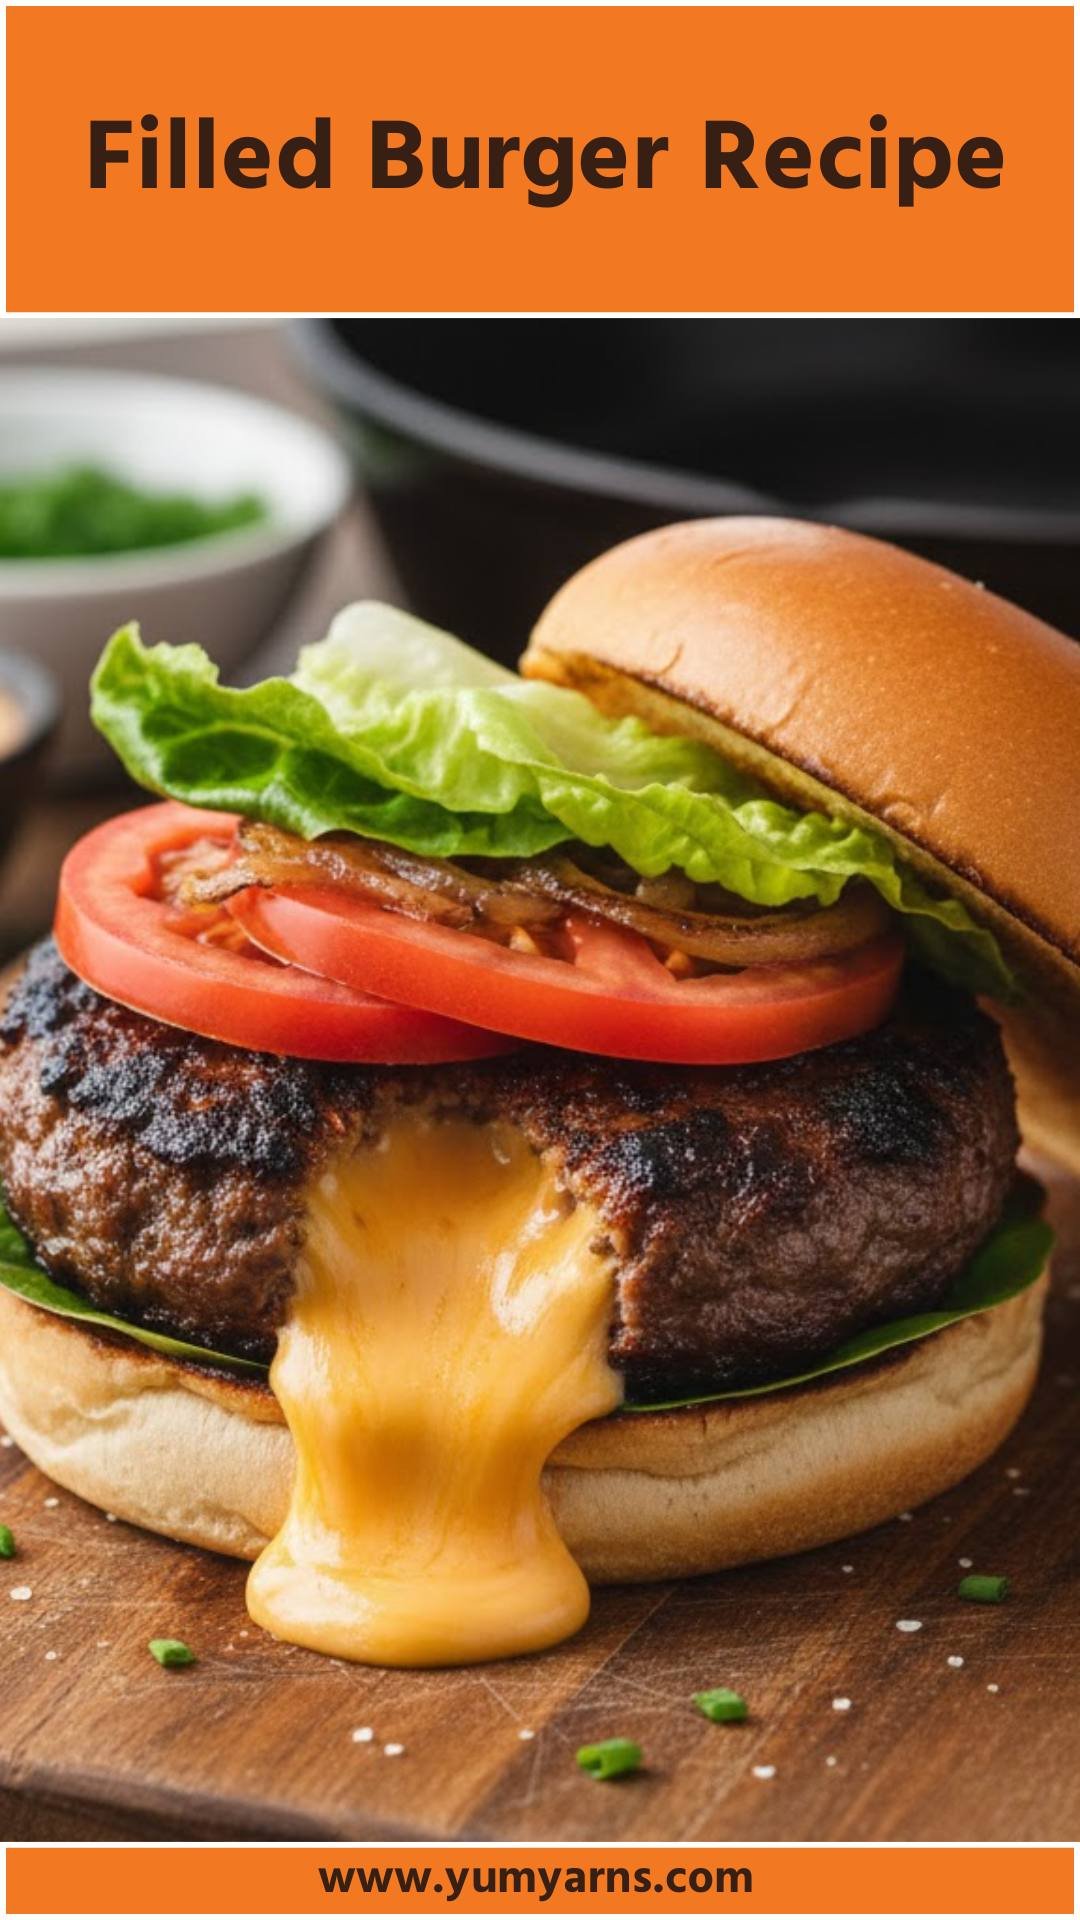
Nothing screams summer like a backyard barbecue, does it? Set the scene with ample sunshine, laughter echoing in the air, and the tantalizing smell of burgers on the grill. As I stand over the sizzling grill, I can’t help but think about the perfect sides to serve alongside my filled hamburgers – think crunchy coleslaw, seasoned potato wedges, or pasta salad. But let’s be honest; the star of the show is always the burger. These filled hamburgers, bursting with flavor from the bacon and cheese, will steal the spotlight at your next gathering.

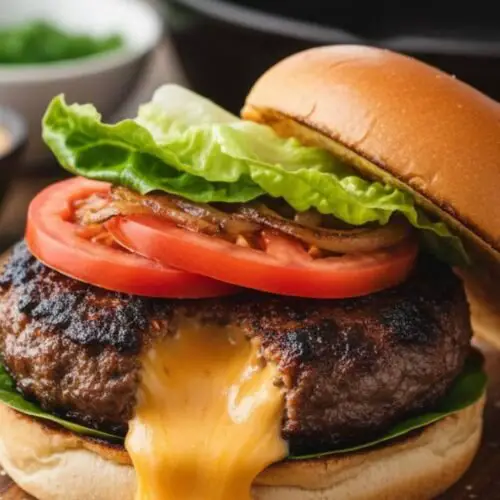
Filled hamburgers are a delightful twist on a classic dish that brings together the familiar comfort of a cheeseburger with an exciting surprise inside. Imagine biting into a juicy patty, only to discover melted cheese and crispy bacon awaiting you in every bite. Trust me; once you try these, traditional burgers will seem a bit bland in comparison. Whether you’re firing up the grill for friends or treating your family to a weeknight feast, this recipe delivers satisfaction and flavor.
You Might Also Like These Recipes!
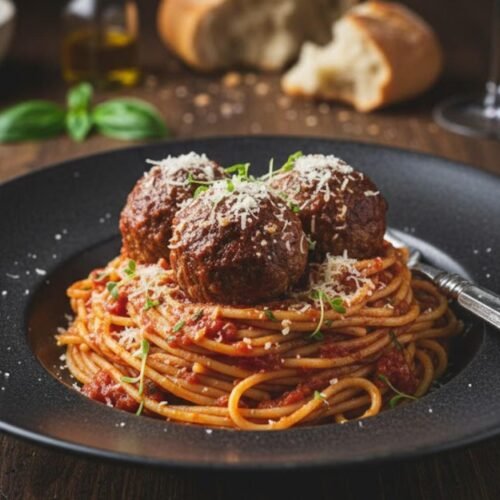
Fancy Spaghetti and Meatballs Recipe
What is Filled Hamburger Recipe?
At its core, the filled hamburger is a stuffed burger created by mixing ground beef with bacon and cheddar cheese, resulting in a decadent patty. The stuffing ensures that every bite bursts with flavor and juiciness, taking the burger experience to the next level. It doesn’t just stop there, though; these patties can be topped with your favorite condiments and served on toasted buns to create your ideal burger experience.
What Does It Taste Like?
The experience of biting into a filled hamburger is like a flavor explosion. You start with the savory depth of the ground beef, perfectly complemented by the saltiness of the bacon. The melted cheddar cheese oozes out, adding a creamy richness. The addition of your chosen condiments and fresh veggies contributes to a delightful texture. It’s a balance of savory, creamy, and, if you’re feeling adventurous, a little spicy if you add some kick to the sauce.
Why This Recipe Works?
This recipe stands out because it utilizes simple yet high-quality ingredients. The combination of crispy bacon and melting cheese turned inside the patty ensures that each bite is indulgent. Plus, the homemade burger sauce adds a tangy kick that pairs beautifully with the hearty meat. The fact that you can prep the patties ahead of time means these burgers are not just delicious but also practical for busy days.
Ingredients

Here’s what you’ll need to get started on making these amazing filled hamburgers:
– 6 slices of thick-cut bacon
– 1 pound of extra lean ground beef (96/4 is my go-to)
– 1/2 cup of shredded sharp cheddar cheese
– 1 tablespoon of Worcestershire sauce
– 1/2 teaspoon of kosher salt
– 1/4 teaspoon of black pepper
– 4 slices of your favorite cheese (optional, I often go for pepper jack for a kick)
– For serving: toasted burger buns, fresh lettuce, juicy tomatoes, sliced red onions, dashes of burger sauce, ketchup, mustard, or mayonnaise
– Burger Sauce:
– 1/2 cup mayonnaise
– 2 tablespoons ketchup
– 1 tablespoon sweet pickle relish
– 1 tablespoon Worcestershire sauce
– 1 teaspoon Dijon mustard
– 1/4 teaspoon garlic powder
– 1/4 teaspoon smoked paprika
– Dash of cayenne, if you’re feeling adventurous
– Kosher salt and black pepper, to taste
Feel free to consider adding some minced garlic or finely chopped jalapeños to the burger mix for extra flavor, creating a delicious twist without overwhelming the base flavors.
How to Make Filled Hamburger Recipe?
Making filled hamburgers is straightforward and can be a fun experience, especially if you get the kids involved. Here’s a step-by-step guide to understand the process simply. Let’s dive in!
Step-by-Step Directions
Step 1: Cook the Bacon

Start by cooking the bacon in a skillet over medium heat. You want it cooked through but not crispy since it will finish cooking within the patties. Once done, remove it from the pan and let it cool slightly before chopping it into small bits.
Step 2: Mix the Ingredients

In a large mixing bowl, combine the ground beef, chopped bacon, shredded cheddar cheese, Worcestershire sauce, salt, and black pepper. Make sure to blend everything together gently with your hands – but don’t overdo it! The key is just enough mixing to spread the ingredients without making the mixture dense.
Step 3: Form the Patties

Divide that delightful mixture into four equal portions. You’ll want to pat them into burger shapes, making sure to form them slightly thinner rather than thick. This is important because they will shrink a bit while cooking, and a thinner patty ensures they cook evenly.
Step 4: Chill the Patties (Optional)
")
If time allows, cover and refrigerate the formed patties for about an hour. This step is helpful in making sure your burgers keep their shape while grilling. Plus, it allows the flavors to mingle a bit.
Step 5: Prepare the Burger Sauce

While the patties chill, you can easily whip up the burger sauce. In a small bowl, stir together mayo, ketchup, sweet pickle relish, Worcestershire sauce, Dijon mustard, garlic powder, smoked paprika, and a dash of cayenne (only if you want some heat). Season with salt and pepper to your preference. Store the sauce in the fridge until you’re ready to assemble the burgers.
Step 6: Prep Your Toppings

While everything is chilling, get your toppings ready. Slice the tomatoes, tear off some crisp lettuce, and slice the onions. Just a little bit of prep work makes a world of difference when it comes time to serve.
Step 7: Grill Time!

Take your chilled patties and place them onto a preheated grill or grill pan. Cook them for about 3 minutes on one side before flipping them over. Cook for another 3 minutes, checking that the internal temperature hits 160°F. If you’re adding extra cheese slices to melt on top, do this right after you flip the burgers, allowing about 2 minutes before covering them to let the cheese melt.
Step 8: Assemble Your Burger

Now that your patties are perfectly cooked, it’s time to build your masterpiece. Serve them on toasted buns and pile on the fresh toppings: lettuce, tomatoes, onions, and that zesty burger sauce, or any condiments you like.
Step 9: Enjoy!

Dig in! These filled hamburgers are perfect for a summer gathering, and they are sure to be a hit with everyone.
Notes
– Quality Meat: Use high-quality meat for better flavor. Leaner beef reduces grease but can taste less rich.
– Stray from Staleness: Variate toppings by switching up vegetables or sauces according to personal preferences.
– Temperature Matters: Keep an eye on doneness with a meat thermometer for food safety.
– Keep It Juicy: Avoid over-mixing to ensure your patties are juicy and tender.
– Rest Time: Let the cooked burgers rest for a few minutes before serving to lock in moisture.
Storage Tips
These filled hamburgers are best enjoyed fresh but can be stored for up to three days in the fridge. Place the patties in an airtight container after fully cooling down. If you have leftover burger sauce, store it separately in the fridge for up to a week. You can also freeze uncooked patties for up to two months. Just make sure to wrap them individually in plastic wrap for easy grilling later.
Nutrition Information
Each filled hamburger contains approximately 520 calories, rich in protein from the beef and cheese, as well as healthy fats from the bacon. The homemade burger sauce adds flavor without unnecessary preservatives. For a balanced meal, pair your burger with plenty of veggies on the side.
Sides for Filled Hamburger Recipe
1. Crunchy Coleslaw: A creamy coleslaw pairs wonderfully with the richness of the burgers, cutting through the flavors beautifully.
2. Sweet Potato Fries: The sweetness of these fry contrasts nicely with the savory flavors of the burger while offering extra nutrients.
3. Grilled Corn on the Cob: Fun to eat and brings a summer vibe to your table. Slather with a bit of butter, and you’re golden!
4. Potato Salad: A classic option that’s always a crowd-pleaser; add in mustard or bacon for a delicious twist.
5. Garden Salad: A simple mixed salad with your favorite greens and vinaigrette adds freshness and balance to the meal.
What are some alternative choices to the ingredients in case they are not in your pantry?
1. Ground Turkey: Swap the ground beef for ground turkey for a leaner option.
2. Sriracha in Sauce: If out of cayenne, add Sriracha or your favorite hot sauce for spice.
3. Dijon Mustard: If you don’t have Dijon on hand, yellow mustard works fine.
4. Gouda Cheese: Try gouda or mozzarella instead of cheddar for a creamy alternative.
5. Ranch Dressing: Use ranch dressing in place of the sauce for a different flavor twist.
Filled Hamburger Recipe
Equipment
- Grill or grill pan
- Mixing bowl
- Knife
- Cutting board
Ingredients
- Here’s what you’ll need to get started on making these amazing filled hamburgers:
- – 6 slices of thick-cut bacon
- – 1 pound of extra lean ground beef 96/4 is my go-to
- – 1/2 cup of shredded sharp cheddar cheese
- – 1 tablespoon of Worcestershire sauce
- – 1/2 teaspoon of kosher salt
- – 1/4 teaspoon of black pepper
- – 4 slices of your favorite cheese optional, I often go for pepper jack for a kick
- – For serving: toasted burger buns fresh lettuce, juicy tomatoes, sliced red onions, dashes of burger sauce, ketchup, mustard, or mayonnaise
– Burger Sauce:
- – 1/2 cup mayonnaise
- – 2 tablespoons ketchup
- – 1 tablespoon sweet pickle relish
- – 1 tablespoon Worcestershire sauce
- – 1 teaspoon Dijon mustard
- – 1/4 teaspoon garlic powder
- – 1/4 teaspoon smoked paprika
- – Dash of cayenne if you’re feeling adventurous
- – Kosher salt and black pepper to taste
- Feel free to consider adding some minced garlic or finely chopped jalapeños to the burger mix for extra flavor creating a delicious twist without overwhelming the base flavors.
Instructions
Step 1: Cook the Bacon
- Start by cooking the bacon in a skillet over medium heat. You want it cooked through but not crispy since it will finish cooking within the patties. Once done, remove it from the pan and let it cool slightly before chopping it into small bits.
Step 2: Mix the Ingredients
- In a large mixing bowl, combine the ground beef, chopped bacon, shredded cheddar cheese, Worcestershire sauce, salt, and black pepper. Make sure to blend everything together gently with your hands – but don’t overdo it! The key is just enough mixing to spread the ingredients without making the mixture dense.
Step 3: Form the Patties
- Divide that delightful mixture into four equal portions. You’ll want to pat them into burger shapes, making sure to form them slightly thinner rather than thick. This is important because they will shrink a bit while cooking, and a thinner patty ensures they cook evenly.
Step 4: Chill the Patties (Optional)
- If time allows, cover and refrigerate the formed patties for about an hour. This step is helpful in making sure your burgers keep their shape while grilling. Plus, it allows the flavors to mingle a bit.
Step 5: Prepare the Burger Sauce
- While the patties chill, you can easily whip up the burger sauce. In a small bowl, stir together mayo, ketchup, sweet pickle relish, Worcestershire sauce, Dijon mustard, garlic powder, smoked paprika, and a dash of cayenne (only if you want some heat). Season with salt and pepper to your preference. Store the sauce in the fridge until you’re ready to assemble the burgers.
Step 6: Prep Your Toppings
- While everything is chilling, get your toppings ready. Slice the tomatoes, tear off some crisp lettuce, and slice the onions. Just a little bit of prep work makes a world of difference when it comes time to serve.
Step 7: Grill Time!
- Take your chilled patties and place them onto a preheated grill or grill pan. Cook them for about 3 minutes on one side before flipping them over. Cook for another 3 minutes, checking that the internal temperature hits 160°F. If you’re adding extra cheese slices to melt on top, do this right after you flip the burgers, allowing about 2 minutes before covering them to let the cheese melt.
Step 8: Assemble Your Burger
- Now that your patties are perfectly cooked, it’s time to build your masterpiece. Serve them on toasted buns and pile on the fresh toppings: lettuce, tomatoes, onions, and that zesty burger sauce, or any condiments you like.
Step 9: Enjoy!
- Dig in! These filled hamburgers are perfect for a summer gathering, and they are sure to be a hit with everyone.
Notes
Nutrition
FAQs
Q1: Can I grill these burgers?
A1: Absolutely! These burgers are perfect for grilling. Just ensure you preheat your grill for even cooking.
Q2: What can I use if I’m out of Worcestershire sauce?
A2: If you’re in a pinch, soy sauce can be a good substitute. It adds a deep flavor, similar to Worcestershire.
Q3: Can I prepare the patties ahead of time?
A3: Yes! You can prepare the patties a day in advance and store them in the refrigerator until you’re ready to grill.
Q4: What if I want a spice kick?
A4: Besides the cayenne in the sauce, consider adding diced jalapeños or a spicy cheese like pepper jack in the burger mix.
Q5: How can I tell when my burgers are done?
A5: Use a meat thermometer to check for 160°F in the center of the patties to ensure they are fully cooked.
Conclusion
Filled hamburgers are a delightful twist on classic summer fare, bringing joy and satisfaction with every mouthwatering bite. Simple, delicious, and filled with flavor, these burgers are easy to make and sure to impress your guests or family. By blending quality ingredients with a bit of creativity, you can make every meal an occasion worth celebrating. So grab your apron, fire up the grill, and let the flavors shine! Let me know how yours turn out; I can’t wait to hear about the delicious bites you create!


")