Feta Pesto Pasta – Yum Yarns

Feta Pesto Pasta

If you’re anything like me, summer days are all about easy meals that satisfy without a lot of fuss. I love serving feta pesto pasta alongside grilled chicken or shrimp skewers. Add a side of garlic bread, and you’ve got a complete meal that feels special without the time commitment. This dish is perfectly at home on any picnic or family gathering, and trust me, it disappears fast!

Feta Pesto Pasta

Feta pesto pasta is the ultimate dish for anyone who appreciates vibrant flavors combined with ease of preparation. It’s one of those recipes that transforms simple ingredients into something else entirely. Whether you whip it up for a summer cookout or make it ahead for lunch during a busy week, this pasta is versatile and deserves a spot in your recipe rotation.

You Might Also Like These Recipes!

What is feta pesto pasta?

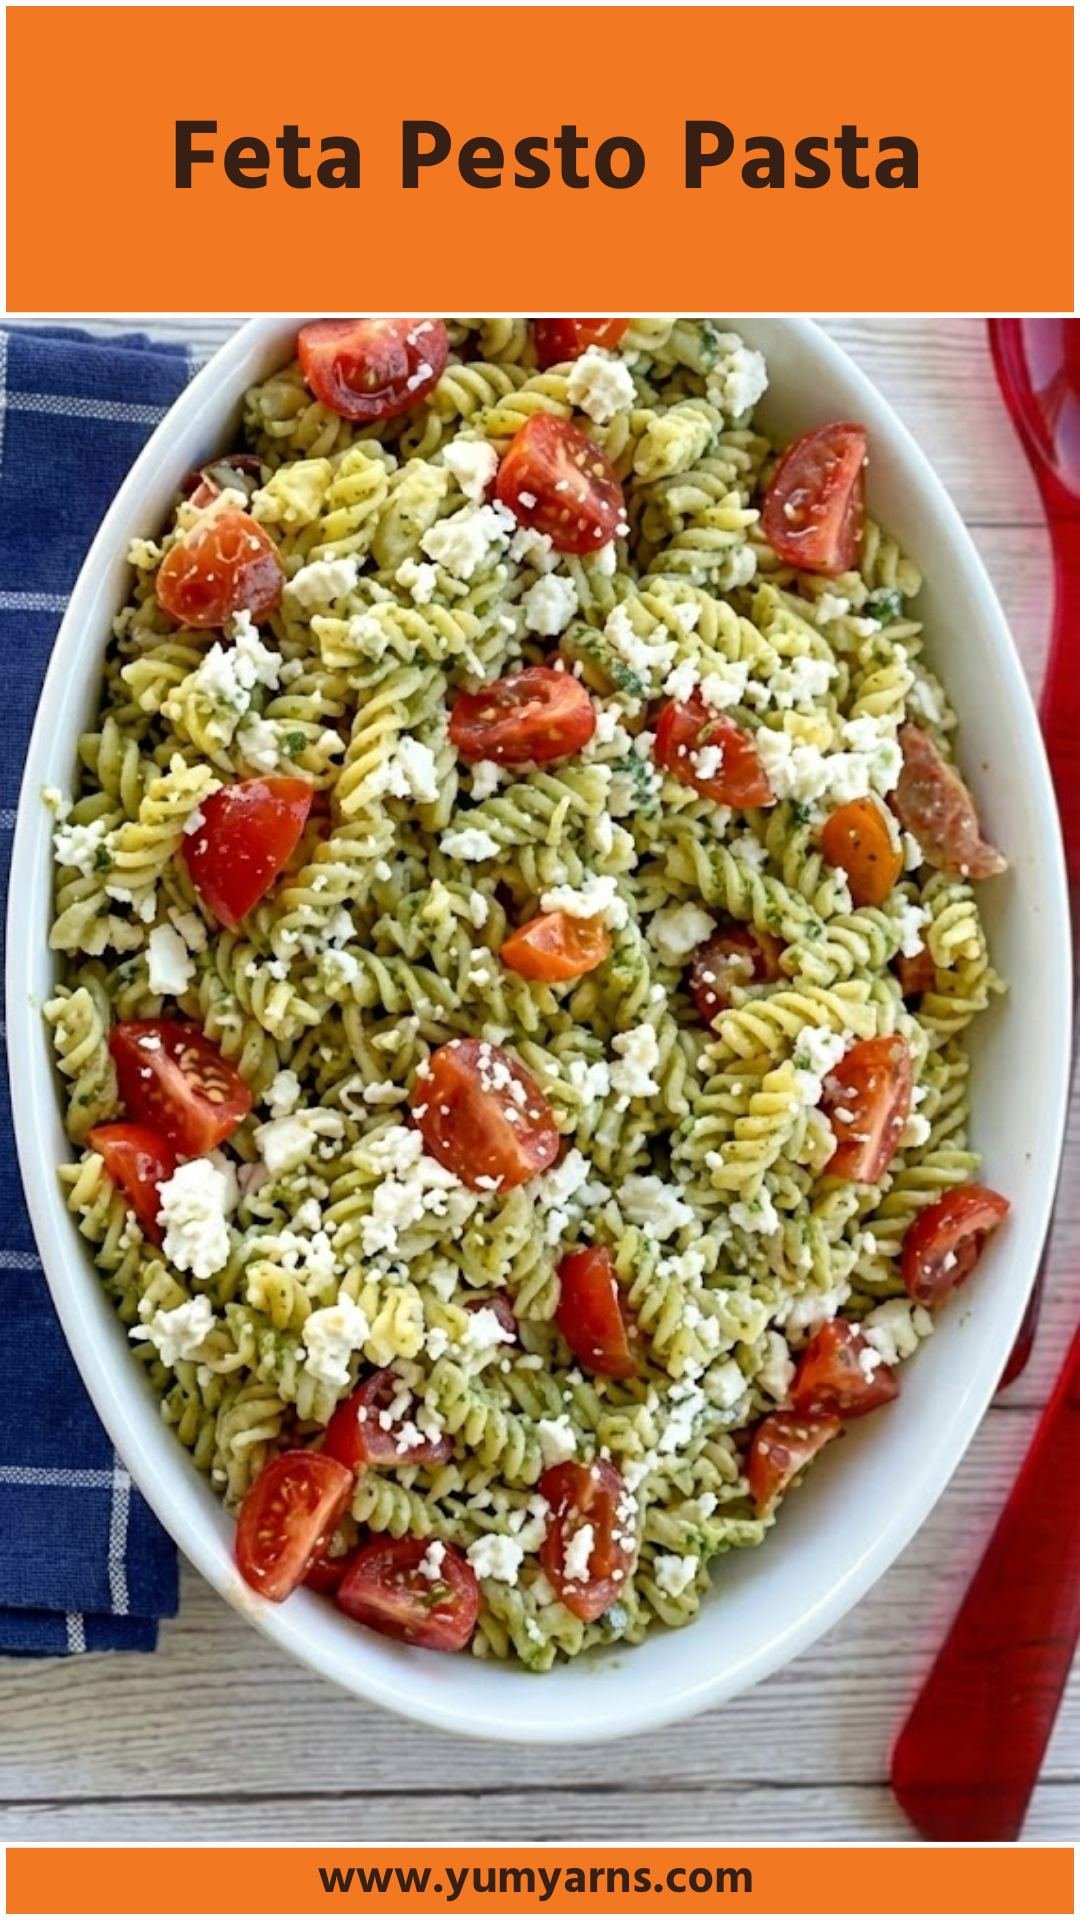
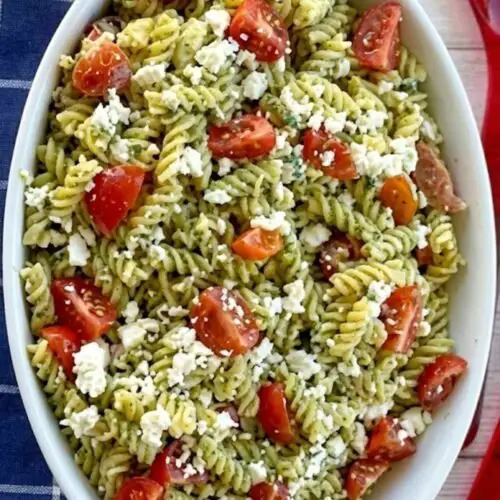
At its core, feta pesto pasta is a delightful combination of al dente pasta spirals, creamy feta cheese, and luscious pesto sauce. The beauty of this dish lies in its simplicity. You get the rich flavors of basil and pine nuts from the pesto, balanced with the salty tang of crumbled feta. It’s an easy dish that can be enjoyed warm or cold, making it a go-to for any occasion.

Why This Recipe Works?

What makes this feta pesto pasta work so well is the way the ingredients meld together. The creamy mayonnaise helps to create a luscious coating for the pasta, while the feta cheese adds a salty punch that enhances the flavor of the pesto. The cherry tomatoes bring freshness and a burst of sweetness. And let’s not forget the spice from the cracked black pepper—it ties everything together beautifully.

Ingredients You’ll Need To Make This Feta Pesto Pasta

Ingredients You'll Need To Make This Feta Pesto Pasta

To make this vibrant pasta dish, here are the ingredients you’ll want to gather:

– 400 grams Pasta Spirals (any type you prefer, I recommend fusilli for better sauce clinging)

– 100 grams of Basil & Pine Nut Pesto (or your favorite variety)

– 100 grams of Traditional Mayonnaise (helps create creaminess)

– 30 grams of Grated Cheese (I recommend Parmesan for a nutty flavor)

– 30 grams of Crumbled Danish Feta (or any feta you enjoy)

– 250 grams of Cherry Tomatoes, halved (adds sweetness and color)

– 1/2 teaspoon of Cracked Black Pepper (for a gentle kick)

Optional: A handful of fresh basil leaves, chopped (for garnish and fresh flavor)

Optional: A squeeze of lemon juice (to brighten the dish)

How to Make Feta Pesto Pasta?

Let’s dive into the steps of making this pasta. It’s as easy as boiling, mixing, and serving! Each step will guide you to ensure that your dish turns out perfect every time.

Step-by-Step Directions

Step 1: Cook the Pasta

Start by bringing a large saucepan filled with salted water to a rolling boil. Add the pasta spirals and cook them according to the package directions, usually about 8 minutes for al dente. Once they’re cooked, drain them well in a colander and rinse under cold running water to stop the cooking process. Set aside to cool and let the flavors develop.

Step 2: Mix the Dressing

Step 2: Mix the Dressing

In a medium-sized mixing bowl, combine the pesto, mayonnaise, grated cheese, and cracked black pepper. Use a whisk or a fork to mix until everything is well-blended. This creamy dressing is where the magic happens because it will bring all the flavors together.

Step 3: Combine Ingredients

Step 3: Combine Ingredients

In a large mixing bowl, add the drained pasta spirals. Pour the creamy pesto mixture over the pasta and gently fold it in using a large wooden spoon. Next, add the halved cherry tomatoes. Don’t forget to crumble half of the feta cheese into the mix. Carefully combine all the ingredients—you want everything coated nicely with the dressing.

Step 4: Final Touches

Once everything is mixed, crumble the remaining feta over the top for a beautiful presentation. You can serve this pasta right away, or if you prefer it chilled, pop it in the refrigerator until you’re ready to serve. This dish keeps well in an airtight container for up to three days in the refrigerator.

Step 5: Enjoy!

Dig in! Serve it up alongside your favorite proteins or enjoy it as a stand-alone dish. This pasta salad is sure to impress.

Tips

Pasta Choice: For added texture, try using whole wheat or gluten-free pasta.

Customization: Feel free to toss in your favorite veggies such as bell peppers or spinach for extra crunch and nutrition.

Make it Vegan: Substitute the mayonnaise with a vegan alternative and use cashew cheese for the feta.

Extra Flavor: Add a dash of hot sauce or chili flakes for some heat.

Garnish Smart: Fresh herbs like parsley or basil make beautiful and tasty garnishes.

How to Store the Leftovers?

To keep your feta pesto pasta fresh, transfer any leftovers into an airtight container. It will stay delicious in the fridge for up to three days. Just give it a gentle stir before serving to reinvigorate the flavors.

Nutrition Information

This dish provides a well-rounded meal packed with carbohydrates from the pasta, healthy fats from the pesto and feta, and vitamins from the tomatoes. Each serving is roughly 400 calories, but this can vary based on specific ingredient brands and portions.

What are some recommended side dishes for feta pesto pasta?

Garlic Bread:Perfectly complements the creamy pasta with garlic-infused carbs.

Grilled Vegetables:A colorful, healthy side that adds a great smoky flavor.

Caprese Salad:Fresh and bright, balancing the richness of the pasta.

Roasted Chickpeas:For added crunch and protein, these deliver a satisfying contrast.

Caesar Salad:A classic choice that adds some crunch and a tangy dressing to the meal.

If the items are not available in your pantry, what are some substitute options for the ingredients?

Pasta Spirals:Substitute with any pasta shape you have on hand, such as penne or rotini.

Basil & Pine Nut Pesto:Homemade pesto can work well, or try sun-dried tomato pesto for a twist.

Traditional Mayonnaise:Greek yogurt can be a healthier alternative that adds protein.

Danish Feta:Goat cheese or blue cheese are tasty substitutes that will offer a unique flavor.

Cherry Tomatoes:Roma or grape tomatoes are fine substitutes, or you can use sun-dried tomatoes for a different flavor.

Feta Pesto Pasta

Feta Pesto Pasta

Tina Cooper
Feta pesto pasta is the ultimate dish for anyone who appreciates vibrant flavors combined with ease of preparation. It's one of those recipes that transforms simple ingredients into something else entirely. Whether you whip it up for a summer cookout or make it ahead for lunch during a busy week, this pasta is versatile and deserves a spot in your recipe rotation.
Prep Time 10 minutes
Cook Time 8 minutes
Course Side Dish
Cuisine Italian
Servings 4
Calories 400 kcal

Equipment

  • Large saucepan
  • Mixing bowls
  • wooden spoon
  • colander

Ingredients
  

  • To make this vibrant pasta dish here are the ingredients you’ll want to gather:
  • – 400 grams Pasta Spirals any type you prefer, I recommend fusilli for better sauce clinging
  • – 100 grams of Basil & Pine Nut Pesto or your favorite variety
  • – 100 grams of Traditional Mayonnaise helps create creaminess
  • – 30 grams of Grated Cheese I recommend Parmesan for a nutty flavor
  • – 30 grams of Crumbled Danish Feta or any feta you enjoy
  • – 250 grams of Cherry Tomatoes halved (adds sweetness and color)
  • – 1/2 teaspoon of Cracked Black Pepper for a gentle kick
  • – Optional: A handful of fresh basil leaves chopped (for garnish and fresh flavor)
  • – Optional: A squeeze of lemon juice to brighten the dish

Instructions
 

Step 1: Cook the Pasta

  • Start by bringing a large saucepan filled with salted water to a rolling boil. Add the pasta spirals and cook them according to the package directions, usually about 8 minutes for al dente. Once they’re cooked, drain them well in a colander and rinse under cold running water to stop the cooking process. Set aside to cool and let the flavors develop.

Step 2: Mix the Dressing

  • In a medium-sized mixing bowl, combine the pesto, mayonnaise, grated cheese, and cracked black pepper. Use a whisk or a fork to mix until everything is well-blended. This creamy dressing is where the magic happens because it will bring all the flavors together.

Step 3: Combine Ingredients

  • In a large mixing bowl, add the drained pasta spirals. Pour the creamy pesto mixture over the pasta and gently fold it in using a large wooden spoon. Next, add the halved cherry tomatoes. Don’t forget to crumble half of the feta cheese into the mix. Carefully combine all the ingredients—you want everything coated nicely with the dressing.

Step 4: Final Touches

  • Once everything is mixed, crumble the remaining feta over the top for a beautiful presentation. You can serve this pasta right away, or if you prefer it chilled, pop it in the refrigerator until you’re ready to serve. This dish keeps well in an airtight container for up to three days in the refrigerator.

Step 5: Enjoy!

  • Dig in! Serve it up alongside your favorite proteins or enjoy it as a stand-alone dish. This pasta salad is sure to impress.

Notes

Pasta Choice: For added texture, try using whole wheat or gluten-free pasta.
Customization: Feel free to toss in your favorite veggies such as bell peppers or spinach for extra crunch and nutrition.
Make it Vegan: Substitute the mayonnaise with a vegan alternative and use cashew cheese for the feta.
Extra Flavor: Add a dash of hot sauce or chili flakes for some heat.
Garnish Smart: Fresh herbs like parsley or basil make beautiful and tasty garnishes.

Nutrition

Serving: 4gCalories: 400kcal
Keyword Feta Pesto Pasta
Tried this recipe?Let us know how it was!

FAQs

1. Can I make this dish ahead of time?

Absolutely! Feta pesto pasta can be made a day in advance. Just store it in the refrigerator and give it a good stir before serving.

2. Is feta pesto pasta gluten-free?

It can be! Just use your favorite gluten-free pasta for a gluten-free version without sacrificing flavor.

3. Can I add protein to this dish?

Definitely! Grilled chicken, shrimp, or canned chickpeas would be excellent, hearty additions that will make it a complete meal.

4. How can I make this a one-pot dish?

You can prepare the pasta and the pesto sauce together in one pot. Cook the pasta, then add your sauce and any veggies or proteins along with it to simplify washing up!

5. What can I do with leftover feta pesto pasta?

It makes a great addition to a lunchbox and can be eaten cold or reheated. You can also use it as a filling for stuffed bell peppers!

Conclusion

Feta pesto pasta is a simple, delightful dish that proves comfort food can also be fresh and wholesome. With just a handful of ingredients and a few steps, you can prepare a meal that everyone will love. So the next time you’re looking for something quick to whip up, or perhaps a side for a summer barbecue, remember this recipe! It’s versatile, easy to make, and a guaranteed crowd-pleaser. Enjoy your cooking adventures!

You Might Also Like These Latest Recipes!

Fat Chowder – Yum Yarns

Fat Chowder

Picture this: a chilly evening, maybe after a playful day outdoors. You walk into the warmth of your kitchen, greeted by the soothing scent of something delicious bubbling away on the stove. What pairs beautifully with my delightful Fat Chowder? A crusty loaf of bread or homemade biscuits to dip into this creamy goodness. Trust me, that bite of warm, fluffy bread scooped into rich chowder is something you’ll reminisce about long after the last spoonful is gone.

Fat Chowder

Fat Chowder is a comforting dish that warms both the body and soul. It’s rich, creamy, and just the right amount of indulgent—all while being surprisingly easy to whip up. With roots in American cuisine, this chowder serves as a perfect meal for those cool nights when all you need is a hearty bowl of goodness. This recipe marries simple ingredients to create something you’ll crave time and again.

You Might Also Like These Recipes!

What is Fat Chowder?

Fat Chowder is a creamy soup that typically features potatoes, sweet corn, and a hint of smokiness from bacon, creating a filling and satisfying dish. It’s not just soup; it’s so much more. Each spoonful delivers creamy textures combined with hearty bites of potatoes and the delightful crunch of bacon. It’s straightforward but incredibly comforting, making it a go-to recipe for busy nights or relaxed weekends.

How Does It Taste Like?

The taste of Fat Chowder can best be described as a luxurious experience. The creaminess envelops your tongue, while the sweetness from the corn perfectly balances the saltiness of the bacon. The potatoes add a hearty feel, while black pepperting the flavor with just a hint of spice. It’s like a warm hug in a bowl.

Why You’ll Love This?

This Fat Chowder is not just any soup; it’s a blend of nostalgia and flavor that makes any meal special. You’ll love how quickly it comes together, and the best part? It’s perfect for make-ahead meals. Whether you’re serving it at a family gathering or enjoying it for a quiet night at home, this dish is bound to make you smile.

The Ingredients

The Ingredients

4 medium potatoes, peeled and diced

½ cup crispy bacon, chopped

1 medium yellow onion, finely chopped

3 cups cream-style corn

2 cups water

2 teaspoons salt (or to taste)

Ground black pepper, to taste

2 cups half-and-half

1 teaspoon garlic powder (for added flavor)

1 tablespoon fresh chives, chopped (for freshness)

These ingredients meld together to create a chowder that’s filled with layers of flavor, ensuring every bite is enjoyable and satisfying.

How to Make Fat Chowder?

Creating Fat Chowder is really a straightforward process, and it begins with gathering your ingredients. The beauty of making chowder is in the simplicity and heartiness of the components. Let’s take it step by step.

Step 1: Gather Your Ingredients

Prepare your workspace by bringing out all your ingredients. A little organization goes a long way here. Chop and dice everything; having everything prepped will make cooking a breeze.

Step 2: Cook the Bacon

Step 2: Cook the Bacon

In a large pot over medium-high heat, add your chopped bacon. Let it sizzle and cook until it’s crisped up nicely—around 5 to 7 minutes. This step is not just about cooking the bacon; it’s about infusing the oil with flavor.

Step 3: Drain and Save Some Grease

Step 3: Drain and Save Some Grease

Once the bacon is cooked to perfection, carefully drain it on a paper towel. Don’t toss the leftover grease just yet! Keep about 2 tablespoons in the pot. This will help in sautéing the next ingredients and give the chowder that smoky taste.

Step 4: Sauté the Potatoes and Onion

Now, toss your diced potatoes and chopped onion into the pot. Stir them around and cook for about 5 minutes. This process softens the onion and begins to cook the potatoes, which enhances their flavor.

Step 5: Add Corn and Water

Next up, pour in the cream-style corn and the 2 cups of water. At this point, season with salt (remember to taste as you go) and pepper. Stir it all together, and bring this mixture up to a boil.

Step 6: Simmer It Down

Once at a boil, reduce the heat to low, cover the pot, and let it simmer. This will allow the flavors to come together beautifully. Stir occasionally, and let it simmer for around 20 minutes until the potatoes are tender.

Step 7: Incorporate the Half-and-Half

While your chowder is simmering, warm the half-and-half in a small saucepan until it starts to just bubble. Remove it from the heat right before it boils (nobody wants curdled cream in their chowder!). Mix the warmed half-and-half into the chowder and give it a nice stir.

Step 8: Serve the Chowder

Your Fat Chowder is ready to be served! Ladle it into bowls, perhaps garnish with a sprinkle of chives, and watch as everyone enjoys.

Tips On Making Fat Chowder

Use Fresh Ingredients: Fresh potatoes and sweet corn truly elevate the flavor.

Bacon Choices Matter: Use high-quality bacon for the best flavor. Thick-cut bacon gives you that delightful crunch and taste.

Cream vs. Half-and-Half: If you want it even creamier, consider using heavy cream instead of half-and-half.

Customize Your Seasonings: Feel free to add more seasonings like thyme or even a dash of cayenne pepper for a little heat.

Heat Control: When simmering, ensure the heat isn’t too high, as you don’t want it to scorch on the bottom.

Storage Tips

This chowder does great in the fridge. Allow it to cool, then transfer it into an airtight container. It will keep well for about 3 to 4 days. You can also freeze it for up to 2 months—just ensure it’s in a freezer-safe container. To reheat, thaw it in the refrigerator overnight, then warm it on the stove, adding a splash of water or extra half-and-half as needed to bring back the consistency.

Nutrition Information

Fat Chowder brings together a variety of nutrients. Each hearty serving contains protein and fiber from the potatoes and corn, while the bacon adds some essential fats. It’s high in calories due to the cream content but can be enjoyed in moderation, especially on those chilly days.

Serving Suggestions

With Crusty Bread: Serve your chowder with slices of crusty bread for dipping.

Topped with Cheese: A sprinkle of shredded cheddar or crumbled feta adds a nice touch and flavor.

With Side Salads: Pair with a refreshing green salad for a complete meal.

Spritz of Lemon Juice: A dash of lemon brightens up the chowder and enhances its flavors.

Garnish with Fresh Herbs: Fresh chives or parsley can elevate the presentation and taste.

What Other Substitutes Can I Use in Fat Chowder?

Quinoa or Rice: For a gluten-free alternative to potatoes, add cooked quinoa or rice.

Vegetable Bros: Swap potatoes for sweet potatoes for a different texture and sweetness.

Vegetarian Option: Replace bacon with smoked paprika for that beloved smoky flavor without meat.

Different Chowder Bases: Use chicken or vegetable broth instead of water for a deeper flavor.

Dairy Alternatives: For a dairy-free version, consider cashew cream or coconut milk in place of half-and-half.

Fat Chowder

Fat Chowder

Tina Cooper
Fat Chowder is a comforting dish that warms both the body and soul. It’s rich, creamy, and just the right amount of indulgent—all while being surprisingly easy to whip up. With roots in American cuisine, this chowder serves as a perfect meal for those cool nights when all you need is a hearty bowl of goodness. This recipe marries simple ingredients to create something you’ll crave time and again.
Prep Time 10 minutes
Cook Time 40 minutes
Course Main Course
Cuisine American
Servings 8
Calories 500 kcal

Equipment

  • Large pot
  • small saucepan
  • wooden spoon
  • Knife
  • Cutting board

Ingredients
  

  • – 4 medium potatoes peeled and diced
  • – ½ cup crispy bacon chopped
  • – 1 medium yellow onion finely chopped
  • – 3 cups cream-style corn
  • – 2 cups water
  • – 2 teaspoons salt or to taste
  • – Ground black pepper to taste
  • – 2 cups half-and-half
  • – 1 teaspoon garlic powder for added flavor
  • – 1 tablespoon fresh chives chopped (for freshness)
  • These ingredients meld together to create a chowder that’s filled with layers of flavor ensuring every bite is enjoyable and satisfying.

Instructions
 

  • Creating Fat Chowder is really a straightforward process, and it begins with gathering your ingredients. The beauty of making chowder is in the simplicity and heartiness of the components. Let’s take it step by step.

Step 1: Gather Your Ingredients

  • Prepare your workspace by bringing out all your ingredients. A little organization goes a long way here. Chop and dice everything; having everything prepped will make cooking a breeze.

Step 2: Cook the Bacon

  • In a large pot over medium-high heat, add your chopped bacon. Let it sizzle and cook until it’s crisped up nicely—around 5 to 7 minutes. This step is not just about cooking the bacon; it’s about infusing the oil with flavor.

Step 3: Drain and Save Some Grease

  • Once the bacon is cooked to perfection, carefully drain it on a paper towel. Don’t toss the leftover grease just yet! Keep about 2 tablespoons in the pot. This will help in sautéing the next ingredients and give the chowder that smoky taste.

Step 4: Sauté the Potatoes and Onion

  • Now, toss your diced potatoes and chopped onion into the pot. Stir them around and cook for about 5 minutes. This process softens the onion and begins to cook the potatoes, which enhances their flavor.

Step 5: Add Corn and Water

  • Next up, pour in the cream-style corn and the 2 cups of water. At this point, season with salt (remember to taste as you go) and pepper. Stir it all together, and bring this mixture up to a boil.

Step 6: Simmer It Down

  • Once at a boil, reduce the heat to low, cover the pot, and let it simmer. This will allow the flavors to come together beautifully. Stir occasionally, and let it simmer for around 20 minutes until the potatoes are tender.

Step 7: Incorporate the Half-and-Half

  • While your chowder is simmering, warm the half-and-half in a small saucepan until it starts to just bubble. Remove it from the heat right before it boils (nobody wants curdled cream in their chowder!). Mix the warmed half-and-half into the chowder and give it a nice stir.

Step 8: Serve the Chowder

  • Your Fat Chowder is ready to be served! Ladle it into bowls, perhaps garnish with a sprinkle of chives, and watch as everyone enjoys.

Notes

Use Fresh Ingredients: Fresh potatoes and sweet corn truly elevate the flavor.
Bacon Choices Matter: Use high-quality bacon for the best flavor. Thick-cut bacon gives you that delightful crunch and taste.
Cream vs. Half-and-Half: If you want it even creamier, consider using heavy cream instead of half-and-half.
Customize Your Seasonings: Feel free to add more seasonings like thyme or even a dash of cayenne pepper for a little heat.
Heat Control: When simmering, ensure the heat isn’t too high, as you don’t want it to scorch on the bottom.

Nutrition

Serving: 8gCalories: 500kcal
Keyword Fat Chowder
Tried this recipe?Let us know how it was!

FAQs

1. Can I make Fat Chowder in advance?

Yes! Fat Chowder can be made ahead of time and stored in the fridge. It even tastes better the next day as the flavors have more time to meld.

2. How can I thicken my chowder?

If you prefer a thicker consistency, consider mashing a portion of the potatoes or adding a slurry made from cornstarch and water.

3. Is Fat Chowder suitable for freezing?

Absolutely! Just be sure to cool it down properly and use a suitable container before freezing.

4. Can I add other vegetables?

Definitely! Feel free to add vegetables like carrots, celery, or even some lentils for extra nutrition.

5. How can I make it spicy?

Add some diced jalapeños or a sprinkle of red pepper flakes while cooking to give it a spicy kick.

Conclusion

Fat Chowder is a fantastic dish that brings comfort and satisfaction all in one bowl. With simple, accessible ingredients and a straightforward cooking process, it’s perfect for both novice cooks and seasoned kitchen warriors. Whether you enjoy it with friends or savor it alone, this chowder will remind you of warm, happy moments around the table. So go ahead, make a big batch, and let the cozy vibes roll in!

You Might Also Like These Latest Recipes!

Fancy Spaghetti and Meatballs – Yum Yarns

Fancy Spaghetti and Meatballs

You know, there’s something about a big bowl of spaghetti and meatballs that just feels like home. Picture this—a chilly evening, friends gathered around the table, and the warmth of a delicious meal filling the air. This fancy spaghetti and meatballs dish is perfect for pairing with a simple green salad and crusty garlic bread. Trust me, those extra touches make all the difference! Not only does it feed the belly, but it also warms the soul. Let’s dive into this comforting, yet sophisticated recipe together, shall we?

Fancy Spaghetti and Meatballs

Fancy spaghetti and meatballs is a delightful twist on the traditional Italian-American dish. This recipe elevates the classic by adding rich flavors, high-quality ingredients, and a touch of love. When I think about spaghetti and meatballs, it brings back memories of family gatherings, cozy dinners, and heartfelt conversations. It’s one of those recipes that never fails to impress, making it perfect for dinner parties or just a cozy night in—because who doesn’t want to feast on something delicious?

You Might Also Like These Recipes!

What is Fancy Spaghetti and Meatballs?

Simply put, fancy spaghetti and meatballs takes the familiar pasta dish we all know and transforms it into something special. It features perfectly seasoned, homemade meatballs made from a blend of beef and sausage, swimming in a rich marinara sauce. When served over al dente spaghetti and topped with fresh basil and Parmesan cheese, it’s hard not to be smitten. This dish celebrates the celebration of flavors, texture, and the joy of sharing great food with good company.

Why This Recipe Works

The key to enhancing the flavor lies in the balance of ingredients. Using a mix of lean ground beef and sweet Italian sausage brings depth to the meatballs—juicy and packed with flavor. The addition of freshly minced garlic and a hint of Parmesan adds a great umami hit. And the marinara sauce? It’s a multi-layered affair, with sautéed onions and garlic providing the aromatic base, while the crushed tomatoes simmer away into the perfect, hearty sauce. When combined, these elements create a robust dish that’s just unforgettable.

What You’ll Need to Make This Dish

Here’s what you’ll need to gather to make your fancy spaghetti and meatballs shine:

Ingredients for the Meatballs (makes about 22-23 meatballs):

Ingredients for the Meatballs (makes about 22-23 meatballs)

– 3 slices of white bread, crusts removed and torn into pieces

– 2/3 cup cold water

– 1 lb of lean ground beef (7%-15% fat)

– 1 lb of sweet Italian sausage, casings removed

– 1/4 cup grated Parmesan cheese, plus more for serving

– 1 medium-sized onion, finely chopped

– 4 cloves of garlic, minced

– 1 tsp sea salt

– 1/2 tsp black pepper

– 1 large egg

– About 3/4 cup all-purpose flour for dredging meatballs

– 3 Tbsp light olive oil or vegetable oil for sautéing

Ingredients for the Sauce:

– 1 medium yellow onion, chopped (about 1 cup)

– 4 cloves of garlic, minced

– 56 oz crushed tomatoes (from 2 – 28 oz cans)

– 2 bay leaves (optional)

– Salt & pepper to taste

– 2 Tbsp fresh basil, finely chopped, and more for garnish

Other Ingredients:

– 1 lb spaghetti (or your preferred pasta)

– 1 tsp red pepper flakes (optional, for a hint of heat)

– 2 teaspoons Italian seasoning (to elevate flavor)

How to Make Fancy Spaghetti and Meatballs

The process of creating this delicious dish is simple and straightforward. Get ready to tantalize those taste buds with a few easy steps. Let’s get cooking!

Step 1: Soak the Bread

Start by combining the torn pieces of bread and cold water in a bowl. Set this aside for about 5 minutes. The goal is to let the bread soak up the water. Once it’s nice and soggy, use a fork to mash it to a pulp. This is your base for the meatballs, adding moisture and texture.

Step 2: Prepare the Meatball Mixture

Step 2: Prepare the Meatball Mixture

In a large mixing bowl, or if you’re feeling fancy, use a stand mixer with a paddle attachment. Add the soaked bread (after mashing), the ground beef, sweet Italian sausage, grated Parmesan cheese, minced garlic, sea salt, black pepper, and egg. Mix everything together until it’s well combined, but try not to overwork it. The more you mix, the denser the meatballs can become, and that’s not what we want.

Step 3: Shape and Brown the Meatballs

Step 3: Shape and Brown the Meatballs

Using your hands, scoop out the mixture to form meatballs about 1.5 inches in diameter—the size of a generous flat ice cream scoop works great. Once shaped, roll them in flour, giving them a light coat. Next, heat the oil in a deep skillet or Dutch oven over medium heat. When the oil shimmers, add the meatballs in batches. Make sure not to overcrowd the pan! Brown them for about 6 minutes, turning occasionally—it’s okay if they aren’t fully cooked through yet. Remove them from the pan and set them aside.

Step 4: Sauté the Onion and Garlic

Using the same skillet, add a bit more oil if needed. Toss in your chopped onion, stirring often until it becomes soft and golden, about 5 minutes. Then, mix in the minced garlic and stir for another 1-2 minutes until fragrant.

Step 5: Create the Marinara Sauce

Now it’s time to introduce the crushed tomatoes and bay leaves to the pan. Bring this to a light boil—just making sure it’s bubbling nicely.

Step 6: Combine the Meatballs and Sauce

Gently add the browned meatballs back into the pan and partially cover it with a lid. Let everything simmer for about 30 minutes. Occasionally give those meatballs a turn so they soak up all the goodness. As the sauce thickens, it’ll hug those meatballs perfectly. Just before finishing, stir in the fresh basil and adjust seasoning with salt and pepper to taste.

Step 7: Cook the Spaghetti

While the meatballs are doing their thing in the sauce, fill a large pot with water, sprinkle in a generous amount of salt, and bring it to a boil. Toss in the spaghetti and cook according to package instructions until it’s al dente. Drain the pasta but keep a small amount of pasta water handy—this can help adjust the sauce if you need it. Return the pasta to the pot.

Step 8: Toss and Serve

Pour the meatballs and sauce over the spaghetti, tossing gently to combine. For a family-style presentation, transfer everything to a larger serving platter. Garnish with grated Parmesan cheese and fresh basil for that visual appeal. Serve hot and watch it disappear!

Tips

Use fresh herbs: They enhance the flavor significantly compared to dried. Fresh basil or parsley on top makes for a gorgeous presentation, too.

Don’t skip the rest time for meatballs: Letting them rest before cooking helps them hold shape better.

Cook in batches: If you crowd the pan, the meatballs won’t brown properly—plus, they could stick together.

Finish cooking in the sauce: This keeps the meatballs tender and flavorful.

Use quality pasta: A good quality spaghetti makes a world of difference when it comes to taste and texture.

How to Store Leftovers

Leftovers can be stored in an airtight container for up to 3 days in the refrigerator. If you want to freeze them, portion them into freezer-safe bags and store for up to 3 months. Just thaw and reheat thoroughly over medium heat. You can add a splash of water to loosen the sauce if it thickens too much while reheating!

Nutrition Information

Per serving, this fancy spaghetti and meatballs contains approximately 550 calories, with a good balance of protein from the meatballs, fiber from the tomato sauce, and carbs from the spaghetti. It’s a filling meal that feels indulgent while still being hearty.

How Would I Recommend Serving Fancy Spaghetti and Meatballs?

1. With a side of garlic bread: Saving some crusty bread to soak up that delicious sauce is an absolute must.

2. Pair with a fresh salad: A simple arugula or mixed green salad with balsamic dressing allows for a light contrast to the main dish.

3. Wine pairing: A glass of Chianti or Merlot enhances the meal’s flavors and adds a touch of Italian spirit.

4. Finish with a drizzle of good olive oil: A splash of high-quality olive oil before serving elevates flavor and adds richness.

5. Top with fresh mozzarella: Adding slices of fresh mozzarella can give a creamy twist that complements the flavors beautifully.

What Alternatives Can You Use for the Ingredients if Not Available?

1. Lean Ground Turkey or Chicken: For a lighter meatball alternative, consider using lean ground turkey or chicken.

2. Panko Breadcrumbs: In place of traditional white bread, panko adds a delightful crunch—just soak them in water as you would with bread.

3. San Marzano Tomatoes: For a sweeter taste, opt for San Marzano crushed tomatoes instead of regular crushed tomatoes.

4. Gluten-Free Pasta: If you need a gluten-free option, most brands now offer excellent gluten-free spaghetti made from rice or chickpeas.

5. Plant-Based Sausage: For a vegetarian option, swap in plant-based sausage to keep the flavors rich without the meat.

Fancy Spaghetti and Meatballs

Fancy Spaghetti and Meatballs

Tina Cooper
Fancy spaghetti and meatballs is a delightful twist on the traditional Italian-American dish. This recipe elevates the classic by adding rich flavors, high-quality ingredients, and a touch of love.
Prep Time 20 minutes
Cook Time 45 minutes
Course Main Course
Cuisine American
Servings 6
Calories 550 kcal

Equipment

  • Large mixing bowl
  • Heavy skillet
  • Large pot
  • Baking sheet
  • wooden spoon

Ingredients
  

  • – 3 slices of white bread crusts removed and torn into pieces
  • – 2/3 cup cold water
  • – 1 lb of lean ground beef 7%-15% fat
  • – 1 lb of sweet Italian sausage casings removed
  • – 1/4 cup grated Parmesan cheese plus more for serving
  • – 1 medium-sized onion finely chopped
  • – 4 cloves of garlic minced
  • – 1 tsp sea salt
  • – 1/2 tsp black pepper
  • – 1 large egg
  • – About 3/4 cup all-purpose flour for dredging meatballs
  • – 3 Tbsp light olive oil or vegetable oil for sautéing

Ingredients for the Sauce:

  • – 1 medium yellow onion chopped (about 1 cup)
  • – 4 cloves of garlic minced
  • – 56 oz crushed tomatoes from 2 – 28 oz cans
  • – 2 bay leaves optional
  • – Salt & pepper to taste
  • – 2 Tbsp fresh basil finely chopped, and more for garnish

Other Ingredients:

  • – 1 lb spaghetti or your preferred pasta
  • – 1 tsp red pepper flakes optional, for a hint of heat
  • – 2 teaspoons Italian seasoning to elevate flavor

Instructions
 

  • The process of creating this delicious dish is simple and straightforward. Get ready to tantalize those taste buds with a few easy steps. Let’s get cooking!

Step 1: Soak the Bread

  • Start by combining the torn pieces of bread and cold water in a bowl. Set this aside for about 5 minutes. The goal is to let the bread soak up the water. Once it’s nice and soggy, use a fork to mash it to a pulp. This is your base for the meatballs, adding moisture and texture.

Step 2: Prepare the Meatball Mixture

  • In a large mixing bowl, or if you’re feeling fancy, use a stand mixer with a paddle attachment. Add the soaked bread (after mashing), the ground beef, sweet Italian sausage, grated Parmesan cheese, minced garlic, sea salt, black pepper, and egg. Mix everything together until it’s well combined, but try not to overwork it. The more you mix, the denser the meatballs can become, and that’s not what we want.

Step 3: Shape and Brown the Meatballs

  • Using your hands, scoop out the mixture to form meatballs about 1.5 inches in diameter—the size of a generous flat ice cream scoop works great. Once shaped, roll them in flour, giving them a light coat. Next, heat the oil in a deep skillet or Dutch oven over medium heat. When the oil shimmers, add the meatballs in batches. Make sure not to overcrowd the pan! Brown them for about 6 minutes, turning occasionally—it’s okay if they aren’t fully cooked through yet. Remove them from the pan and set them aside.

Step 4: Sauté the Onion and Garlic

  • Using the same skillet, add a bit more oil if needed. Toss in your chopped onion, stirring often until it becomes soft and golden, about 5 minutes. Then, mix in the minced garlic and stir for another 1-2 minutes until fragrant.

Step 5: Create the Marinara Sauce

  • Now it’s time to introduce the crushed tomatoes and bay leaves to the pan. Bring this to a light boil—just making sure it’s bubbling nicely.
  • Step 6: Combine the Meatballs and Sauce
  • Gently add the browned meatballs back into the pan and partially cover it with a lid. Let everything simmer for about 30 minutes. Occasionally give those meatballs a turn so they soak up all the goodness. As the sauce thickens, it’ll hug those meatballs perfectly. Just before finishing, stir in the fresh basil and adjust seasoning with salt and pepper to taste.

Step 7: Cook the Spaghetti

  • While the meatballs are doing their thing in the sauce, fill a large pot with water, sprinkle in a generous amount of salt, and bring it to a boil. Toss in the spaghetti and cook according to package instructions until it’s al dente. Drain the pasta but keep a small amount of pasta water handy—this can help adjust the sauce if you need it. Return the pasta to the pot.

Step 8: Toss and Serve

  • Pour the meatballs and sauce over the spaghetti, tossing gently to combine. For a family-style presentation, transfer everything to a larger serving platter. Garnish with grated Parmesan cheese and fresh basil for that visual appeal. Serve hot and watch it disappear!

Notes

Use fresh herbs: They enhance the flavor significantly compared to dried. Fresh basil or parsley on top makes for a gorgeous presentation, too.
Don’t skip the rest time for meatballs: Letting them rest before cooking helps them hold shape better.
Cook in batches: If you crowd the pan, the meatballs won’t brown properly—plus, they could stick together.
Finish cooking in the sauce: This keeps the meatballs tender and flavorful.
Use quality pasta: A good quality spaghetti makes a world of difference when it comes to taste and texture.

Nutrition

Serving: 6gCalories: 550kcal
Tried this recipe?Let us know how it was!

FAQs

1. Can I make this dish ahead of time?

Yes! You can prepare the meatballs and sauce in advance. Assemble the dish before serving for the best taste.

2. What do I do if my meatballs fall apart while cooking?

Ensure the meat mixture is well combined but not overmixed, which can lead to tough meatballs. If they still fall apart, you can add a bit more grated cheese or a touch of breadcrumbs.

3. Can I use whole wheat spaghetti?

Absolutely! Whole wheat spaghetti works great and adds a slightly nuttier flavor and additional fiber.

4. Is it okay to use pre-made marinara sauce?

Sure! If you’re short on time, a quality jarred marinara sauce can be a good substitute for a homemade sauce. Just add fresh herbs to elevate the flavor.

5. What else can I add to the meatballs for extra flavor?

Feel free to experiment with adding herbs like oregano, parsley, or finely chopped veggies like grated zucchini or bell peppers for extra moisture and taste.

Conclusion

There you have it—fancy spaghetti and meatballs that are sure to impress anyone sitting at your dinner table. Each bite is a celebration of flavor and warmth, reminding us of the joy of cooking and sharing meals. I can’t wait for you to try this recipe and make it your own, perhaps by adding your favorite twists along the way. So don your apron, gather your loved ones, and get cooking!

You Might Also Like These Latest Recipes!

Fancy Salsa – Yum Yarns

Fancy Salsa

Picture this: a summer evening, friends gathered on the patio, laughter echoing amidst the hummed tunes of a nearby BBQ. The sun begins to dip, painting the sky with hues of orange and pink. If there’s one thing that elevates those golden memories, it’s the incredibly vibrant and zesty salsa I always whip up. It’s the perfect companion for crispy tortilla chips and serves as an outstanding topping for grilled meats or tacos. Trust me—once you make this salsa, you’ll wonder how you ever lived without it.

Fancy Salsa

Salsa is a cornerstone of Mexican cuisine, and it never fails to bring a kick of flavor to any gathering. This isn’t just any salsa; I’m here to share my take on a dish I like to call “fancy salsa.” It takes the classic recipe and jazzes it up with fresh ingredients and a hint of creativity to make it the star of your next party or family meal. Let’s dive into what makes this salsa so special.

You Might Also Like These Recipes!

What is Fancy Salsa?

Fancy salsa is a fresher, more vibrant version of traditional salsa. It showcases a mix of ripe tomatoes and zesty jalapeños, elevated with the addition of herbs and spices that bring the flavor to life. This salsa is versatile, bursting with freshness, and it captures the essence of summer, all in a single bowl.

How Does It Taste Like?

Expect your taste buds to revel in a delightful harmony of flavors. The jalapeño peppers add a toothsome kick, while the tomatoes provide a juicy sweetness. The zing from the onion and the freshness of the cilantro create a balanced dance of taste that makes each bite exciting. With just a sprinkle of cumin and a splash of lime juice, it rounds out beautifully, leaving you wanting more.

Why You’ll Love This?

What’s not to love? This fancy salsa is quick to prepare, making it an excellent choice for busy weeknights or casual gatherings. It’s fresh, vibrant, and adaptable; you can swap ingredients based on what you have on hand. Plus, it elevates any dish, whether it’s scooped up with chips or drizzled over grilled chicken.

The Ingredients

– 6 ripe tomatoes, chopped (mix different sizes for visual appeal)

– 1/2 onion, finely chopped

– 2 tablespoons fresh lemon or lime juice (about 1/2 of a lemon, juiced)

– 4 small jalapeño peppers, seeded and chopped (leave the seeds in for extra heat)

– 3 garlic cloves, minced

– 1 1/2 to 2 teaspoons ground cumin

– 1 teaspoon sea salt (plus more to taste)

– 1/4 to 1/2 cup fresh cilantro, roughly chopped

1 small cucumber, peeled and diced (for crunch)

1/2 teaspoon smoked paprika (for depth of flavor)

How to Make Fancy Salsa?

Let’s roll up our sleeves and get started! Making this fancy salsa is as simple as tossing everything in a food processor. Follow these steps to create the flavorful masterpiece that everyone will adore.

Step-by-Step Directions

Step 1: Prepare Your Ingredients

Take a moment to gather and wash all your fresh produce. Ensuring you have everything at hand will streamline the process. Dice your tomatoes, chop the onion, peel and mince the garlic, chop the jalapeños, and roughly chop the cilantro. If you’re using cucumber, peel and dice that too.

Step 2: Blend It Up

Add all your prepped ingredients into the bowl of a food processor. I recommend placing the jalapeños, onion, and garlic in first. This prevents the tomatoes from releasing too much liquid early on. Layer in the cilantro, diced tomatoes, and diced cucumber.

Step 3: Pulse Sparingly

Give it about 10 pulses. You want the ingredients nicely combined but don’t let it become too watery. You’re looking for a chunky consistency. If you enjoy your salsa a little smoother, you can always pulse it a few more times, but I find that the bite of chunky salsa is far more enjoyable.

Step 4: Taste and Adjust

Give your salsa a taste test. Feeling adventurous? Want a bit more kick? Adjust the seasoning by adding extra cumin, salt, or lime juice as desired. Remember to stir these in by hand rather than blending them in; that way, you keep the texture intact.

Step 5: Chill and Serve

Transfer your salsa to a bowl, and cover it with plastic wrap. Allow it to chill in the fridge for at least an hour, if possible—this lets the flavors meld beautifully. Fancy salsa can typically last about a week in an airtight container, but good luck keeping it around that long!

How to make Fancy Salsa

Tips On Making Fancy Salsa

Use fresh ingredients: Always opt for ripe tomatoes and fresh herbs to get that vibrant flavor.

Adjust the heat: If you prefer milder salsa, you can skip the jalapeño seeds or use less of them.

Customize your recipe: Feel free to add in other veggies, such as bell peppers or corn, for more texture.

Consider the acidity: If the salsa tastes too sweet, add more lime or lemon juice to balance it out.

Let it rest: Giving it time in the fridge allows those flavors to deepen, so don’t skip the chill time if you can help it!

Storage Tips

Store your fancy salsa in an airtight container in the refrigerator. It will keep well for about a week. Always label your container with the date you made it so you can enjoy it at its best while it’s fresh. If you find yourself with an abundance of salsa leftovers, consider freezing it in portions for later use!

Nutrition Information

This fancy salsa is not just delicious; it’s also healthy! Each serving is low in calories yet packed with vitamins and antioxidants from the fresh veggies. Plus, it’s naturally gluten-free and vegan, making it a guilt-free addition to your diet.

Serving Suggestions

With Tortilla Chips: Grab your favorite crispy, salty tortilla chips for a classic pairing.

On Tacos: Spoon it over fish tacos for a zesty addition that brightens every bite.

As a Marinade: Use it as a marinade for grilled chicken or tofu to infuse flavor.

Mixed into Quinoa Bowls: Fold it into quinoa or brown rice to add freshness and excitement.

Brunch Time: Serve it alongside your favorite brunch dish, like avocado toast or egg dishes, for a flavorful twist.

What Other Substitutes Can I Use in Fancy Salsa?

Tomatoes: Swap in cherry tomatoes for a sweeter touch or canned diced tomatoes for convenience.

Onion: Red onion can provide a milder flavor, while green onions offer a fresh kick.

Cilantro: If you’re not a fan, parsley is a great substitute for a similar green note.

Lime Juice: If lemons are what you have, they work equally well.

Jalapeño: Serrano peppers can be used if you’d like a little more heat!

Fancy Salsa

Fancy Salsa

Tina Cooper
Discover an easy and delicious recipe for fancy salsa that’s bursting with fresh flavors. Perfect for chips, tacos, and more!
Prep Time 15 minutes
Course Appetizer
Cuisine Mexican
Servings 6
Calories 90 kcal

Equipment

  • Food processor
  • Mixing bowl
  • airtight container

Ingredients
  

  • – 6 ripe tomatoes chopped (mix different sizes for visual appeal)
  • – 1/2 onion finely chopped
  • – 2 tablespoons fresh lemon or lime juice about 1/2 of a lemon, juiced
  • – 4 small jalapeño peppers seeded and chopped (leave the seeds in for extra heat)
  • – 3 garlic cloves minced
  • – 1 1/2 to 2 teaspoons ground cumin
  • – 1 teaspoon sea salt plus more to taste
  • – 1/4 to 1/2 cup fresh cilantro roughly chopped
  • – 1 small cucumber peeled and diced (for crunch)
  • – 1/2 teaspoon smoked paprika for depth of flavor

Instructions
 

Step 1: Prepare Your Ingredients

  • Take a moment to gather and wash all your fresh produce. Ensuring you have everything at hand will streamline the process. Dice your tomatoes, chop the onion, peel and mince the garlic, chop the jalapeños, and roughly chop the cilantro. If you’re using cucumber, peel and dice that too.

Step 2: Blend It Up

  • Add all your prepped ingredients into the bowl of a food processor. I recommend placing the jalapeños, onion, and garlic in first. This prevents the tomatoes from releasing too much liquid early on. Layer in the cilantro, diced tomatoes, and diced cucumber.

Step 3: Pulse Sparingly

  • Give it about 10 pulses. You want the ingredients nicely combined but don’t let it become too watery. You’re looking for a chunky consistency. If you enjoy your salsa a little smoother, you can always pulse it a few more times, but I find that the bite of chunky salsa is far more enjoyable.

Step 4: Taste and Adjust

  • Give your salsa a taste test. Feeling adventurous? Want a bit more kick? Adjust the seasoning by adding extra cumin, salt, or lime juice as desired. Remember to stir these in by hand rather than blending them in; that way, you keep the texture intact.

Step 5: Chill and Serve

  • Transfer your salsa to a bowl, and cover it with plastic wrap. Allow it to chill in the fridge for at least an hour, if possible—this lets the flavors meld beautifully. Fancy salsa can typically last about a week in an airtight container, but good luck keeping it around that long!

Notes

Use fresh ingredients: Always opt for ripe tomatoes and fresh herbs to get that vibrant flavor.
Adjust the heat: If you prefer milder salsa, you can skip the jalapeño seeds or use less of them.
Customize your recipe: Feel free to add in other veggies, such as bell peppers or corn, for more texture.
Consider the acidity: If the salsa tastes too sweet, add more lime or lemon juice to balance it out.
Let it rest: Giving it time in the fridge allows those flavors to deepen, so don’t skip the chill time if you can help it!

Nutrition

Serving: 6gCalories: 90kcal
Keyword Fancy Salsa
Tried this recipe?Let us know how it was!

FAQs

1. Can I make this salsa ahead of time?

Absolutely! It’s actually best if you can let it sit in the fridge for a few hours or a day.

2. How spicy is this salsa?

This salsa has a moderate heat level, thanks to the jalapeños. If you prefer it milder, you can adjust the amount you use.

3. Can I use canned tomatoes?

Sure! If fresh tomatoes aren’t available, use high-quality canned tomatoes for a similar flavor. Just drain them well.

4. What can I do with leftover salsa?

Aside from just eating it with chips, you can use it in eggs, as a topping for grilled meats, or mixed into soups for added flavor.

5. How should I serve this at a party?

Present it in a colorful bowl with some tortilla chips and perhaps some sliced veggies for dipping. You can also set it out with a spread of tacos!

Conclusion

There you have it: fancy salsa that will certainly impress your friends and family without fuss. Its vibrant colors and punchy flavors make it endlessly enjoyable, no matter how you choose to serve it. This is not just a recipe; it’s an invitation to bring people together, share stories, and create delightful memories. So, next time you’re hosting a gathering or simply want to jazz up your dinner, give this fancy salsa a go. You won’t regret it!

You Might Also Like These Latest Recipes!

Fancy Salsa Recipe

Fancy French Toast – Yum Yarns

Fancy French Toast

As the sun rises, casting a warm glow through the kitchen window, I can’t help but dream about the delightful sounds of butter sizzling on a hot skillet. There’s just something magical about brunch gatherings where faces light up at the mere sight of a plate filled with fluffy French toast. If I’m being honest, this fancy French toast recipe serves as the main attraction, while crispy bacon or fresh fruit salad plays supporting roles. Whipping up this dish is pure joy, perfect for those lazy Sunday mornings or special occasions when you want to impress. Let’s get cooking!

Fancy French Toast

Fancy French toast isn’t just breakfast; it’s an experience full of texture and flavor. We’re talking about a delightful twist on the classic dish, transforming simple bread into a golden brown delicacy that melts in your mouth. Whether you’re hosting friends or treating yourself, this dish brings warmth and happiness to the table.

You Might Also Like These Recipes!

What is fancy French toast?

Fancy French toast elevates the beloved breakfast staple by combining fresh ingredients and exquisite toppings. It typically features thicker slices of bread soaked in a rich custard mixture, then cooked to a perfect golden brown. The result? A dish that’s decadent yet simple enough to whip up any day of the week. When topped with seasonal fruits, a drizzle of maple syrup, or a dollop of whipped cream, it transforms into a visually stunning centerpiece.

Why this recipe works?

The magic of fancy French toast lies in the combination of basic ingredients that pack a powerful punch. Using a rich custard made from eggs, milk, and a hint of sugar ensures that the toast is not just sweet but has a luxurious texture. Adding cinnamon provides warmth, while a splash of vanilla gives depth. Thicker bread, ideally a brioche or challah, holds up to soaking, creating a creamy, soft interior and a delightfully crisp exterior when cooked.

What You’ll need to make this dish?

To make this fancy French toast, gather the following ingredients:

3 large eggs

1 cup whole milk (for a richer flavor)

1 tablespoon brown sugar

1 teaspoon pure vanilla extract

½ teaspoon ground cinnamon

¼ teaspoon nutmeg  (this is my secret ingredient for extra warmth)

1 pinch of salt

8 slices of thick bread (brioche, challah, or sourdough work wonderfully)

How to make fancy French toast?

Let’s dive into these simple steps. With just a few minutes of preparation, you’ll be on your way to flipping golden treasures.

Step-by-Step Directions

Step 1: Gather your ingredients

Start by assembling all your ingredients in one spot. It makes the process smoother. Trust me; no one likes to scramble for that missing egg!

Step 2: Prepare the custard mixture

In a large mixing bowl, crack your eggs and whisk them vigorously. Add the whole milk and continue whisking until combined smoothly. Then, sprinkle in the brown sugar, vanilla extract, cinnamon, nutmeg, and a pinch of salt. This is where the magic begins; you want a smooth, creamy mixture that smells delightful!

Step 3: Heat your pan

Grab a frying pan or griddle and heat it over medium heat. Drizzle a little oil or melt some butter on the surface. You want a light coating that will help achieve that perfect golden-brown crust.

Step 4: Soak the bread

Take your thick slices of bread and dip them into the custard mixture one at a time. Allow each slice to soak well, but don’t let it get too soggy. You want them saturated, not falling apart!

Step 5: Cook the bread

Carefully place the soaked slices onto the hot skillet. Let them cook for about 2-3 minutes on one side until the edges look firm and golden. Flip and repeat on the other side. Maintain a watchful eye; you want that beautiful, golden hue without burning!

Step 6: Serve and enjoy

Once both sides are beautifully browned, remove the French toast from the pan, plate them, and serve hot. Top with your favorites and dive into crispy, fluffy goodness!

How to make Fancy French Toast

Tips

Use day-old bread: It absorbs the custard better than fresh bread.

Experiment with flavors: Try adding orange zest to your custard for a zesty kick.

Don’t rush the soaking: Let your bread soak long enough to absorb the flavors fully.

Keep cooked toast warm: If making a large batch, pop them in a warm oven (about 200°F) until ready to serve.

Get creative with toppings: Whipped cream, fresh fruits, or a dusting of powdered sugar can bring your dish to life!

How to store leftovers?

If you have any leftovers (which I seriously doubt, but just in case!), allow them to cool completely, then store in an airtight container in the refrigerator for up to 3 days. When you’re ready to eat, simply reheat in a toaster, oven, or microwave until warmed through.

Nutrition Information

Each serving of this fancy French toast includes approximately 180 calories, along with healthy fats from the eggs and milk, essential for a balanced breakfast. The bread adds carbohydrates for energy, while cinnamon and nutmeg provide antioxidants. Although it’s indulgent, it can still fit into an overall nutritious breakfast plan when enjoyed in moderation.

How would I recommend serving fancy French toast?

Here are some delightful serving suggestions:

Top with fresh berries:Blueberries, strawberries, or raspberries add bright flavors and pops of color.

Drizzle with maple syrup:A generous pour of pure maple syrup never hurts!

Sprinkle with powdered sugar:A light dusting makes it look like you’ve put in some serious effort!

Add a dollop of whipped cream:That fluffy goodness takes it to another level!

Serve with crispy bacon:The salty-sweet combo is a classic for a reason.

What alternatives can you use for the ingredients if not available?

If you’re in a pinch, here are some solid substitutes:

Eggs:Use flaxseed meal (1 tablespoon mixed with 2.5 tablespoons water) per egg for a vegan option.

Whole milk:Nut milk (almond, oat, or soy) works as a dairy-free alternative.

Brown sugar:Honey or maple syrup can add a lovely sweetness instead.

Bread:Use gluten-free bread for a gluten-free option.

Nutmeg:All-spice or pumpkin spice can step in for an extra kick.

Fancy French Toast

Fancy French Toast

Tina Cooper
Fancy French toast isn’t just breakfast; it’s an experience full of texture and flavor. We’re talking about a delightful twist on the classic dish, transforming simple bread into a golden brown delicacy that melts in your mouth.
Prep Time 10 minutes
Cook Time 15 minutes
Course Breakfast
Cuisine French
Servings 6
Calories 180 kcal

Equipment

  • Mixing bowl
  • Whisk
  • Frying pan
  • Spatula

Ingredients
  

  • To make this fancy French toast gather the following ingredients:
  • 3 large eggs
  • 1 cup whole milk for a richer flavor
  • 1 tablespoon brown sugar
  • 1 teaspoon pure vanilla extract
  • ½ teaspoon ground cinnamon
  • ¼ teaspoon nutmeg this is my secret ingredient for extra warmth
  • 1 pinch of salt
  • 8 slices of thick bread brioche, challah, or sourdough work wonderfully

Instructions
 

Step 1: Gather your ingredients

  • Start by assembling all your ingredients in one spot. It makes the process smoother. Trust me; no one likes to scramble for that missing egg!

Step 2: Prepare the custard mixture

  • In a large mixing bowl, crack your eggs and whisk them vigorously. Add the whole milk and continue whisking until combined smoothly. Then, sprinkle in the brown sugar, vanilla extract, cinnamon, nutmeg, and a pinch of salt. This is where the magic begins; you want a smooth, creamy mixture that smells delightful!

Step 3: Heat your pan

  • Grab a frying pan or griddle and heat it over medium heat. Drizzle a little oil or melt some butter on the surface. You want a light coating that will help achieve that perfect golden-brown crust.

Step 4: Soak the bread

  • Take your thick slices of bread and dip them into the custard mixture one at a time. Allow each slice to soak well, but don’t let it get too soggy. You want them saturated, not falling apart!

Step 5: Cook the bread

  • Carefully place the soaked slices onto the hot skillet. Let them cook for about 2-3 minutes on one side until the edges look firm and golden. Flip and repeat on the other side. Maintain a watchful eye; you want that beautiful, golden hue without burning!

Step 6: Serve and enjoy

  • Once both sides are beautifully browned, remove the French toast from the pan, plate them, and serve hot. Top with your favorites and dive into crispy, fluffy goodness!

Notes

 Use day-old bread: It absorbs the custard better than fresh bread.
 Experiment with flavors: Try adding orange zest to your custard for a zesty kick.
 Don’t rush the soaking: Let your bread soak long enough to absorb the flavors fully.
Keep cooked toast warm: If making a large batch, pop them in a warm oven (about 200°F) until ready to serve.
 Get creative with toppings: Whipped cream, fresh fruits, or a dusting of powdered sugar can bring your dish to life!

Nutrition

Serving: 6gCalories: 180kcal
Keyword Fancy French Toast
Tried this recipe?Let us know how it was!

FAQs

1. Can I make this French toast ahead of time?

Absolutely! You can prepare the custard mixture and soak the bread slices a few hours in advance. Keep them in the fridge until you’re ready to cook.

2. Can fancy French toast be frozen?

Yes! Cooked French toast can be frozen in an airtight container. Just reheat in a toaster or microwave when you’re ready to enjoy them!

3. What type of bread is best for French toast?

Thicker breads like brioche or challah are ideal because they soak up the custard without turning mushy. However, any bread can work in a pinch!

4. How can I make French toast less sweet?

You can reduce the amount of sugar in the custard or skip the syrup when serving; the spices will still add plenty of flavor.

5. Is there a way to make this recipe dairy-free?

Sure! Substitute whole milk with coconut or almond milk and ensure to use dairy alternatives for any toppings.

Conclusion

Fancy French toast is a showstopper that brings warmth and joy to breakfast or brunch. With simple, fresh ingredients, you can create a dish that’s not just beautiful but delicious and satisfying too. Whether you enjoy it with family or friends or as a sweet treat to start your day, each forkful is a reminder of the comforts of home and good company. So, gather your ingredients, heat that pan, and get ready to savor a breakfast that’s sure to impress!

You Might Also Like These Latest Recipes!

Fancy French Toast Recipe

Fajita Shredded Chicken – Yum Yarns

fajita shredded chicken

When I think of fajita shredded chicken, I can’t help but picture a fabulous Friday night feast. Picture a table laid out with warm corn tortillas, vibrant toppings, and plenty of laughter filling the air. Dinner is simple: you just take a tortilla, pile it high with shredded chicken, sautéed peppers, and any fixings you prefer—maybe a sprinkle of cheddar cheese, fresh cilantro, or a dollop of guacamole. Now that’s a win-win! It’s one of those dishes that just feels like a gathering.

fajita shredded chicken

Fajita shredded chicken has carved a special place in my heart—and my kitchen. This dish is a simple blend of slow-cooked chicken, zesty spices, and a medley of bell peppers that comes together beautifully in a rush of flavors. With the glory of a slow cooker, this meal takes minimal effort while delivering maximum taste. Perfect for busy weeknights or large gatherings, fajita shredded chicken is versatile enough to adapt to your family’s tastes. Plus, leftovers are perfect for meal prep!

What is the Flavor Profile of This Dish?

The flavor profile of fajita shredded chicken is a delightful balance of savory and slightly spicy. The salsa brings a vibrant freshness that pairs beautifully with the earthiness of the cumin and chili powder. The sweet crunch of bell peppers adds a wonderful texture, while the garlic heightens the overall taste experience. Together, they create a rich, satisfying dish that’s sure to please everyone at the table.

What Makes This Recipe Different From Other Fajita Shredded Chicken?

What sets my fajita shredded chicken apart from others is simplicity and the use of fresh salsa right from the grocery store. I also introduce a surprising twist by adding fresh lime juice that brightens the whole dish. Additionally, instead of sticking to just one flavor profile, I like to mix in various bell peppers for added crunch and sweetness, making each bite a burst of tasty fun. This recipe is packed with veggies and made with healthier choices without compromising on flavor.

You will also like the following Lunch and Dinner recipes!

The Ingredients You’ll Need

Here’s what you’ll need to whip up a batch of sizzling fajita shredded chicken:

– 1 lb boneless, skinless chicken breasts

– 1 (500mL) container of fresh salsa (or jarred salsa)

– 2 cloves garlic, finely minced

– 1 tbsp chili powder

– 1 tsp cumin

– 1 tsp sea salt

– 1 large yellow onion, thinly sliced

– 1 red bell pepper, thinly sliced

– 1 green bell pepper, thinly sliced

– 1 yellow bell pepper, thinly sliced

– 1 lime, juiced

– Optional toppings:

– 1/2 cup shredded cheddar cheese

– 1 tbsp freshly chopped cilantro

– Corn tortillas for serving

fajita shredded chicken copycat recipe

How to Make Fajita Shredded Chicken?

Making fajita shredded chicken is straightforward and takes just a few steps. Just gather your ingredients and follow along. Let’s get started!

Step-by-Step Directions

Step 1: Prepare the Chicken and Spices

Begin by placing the boneless, skinless chicken breasts in your slow cooker. Next, add your fresh salsa, minced garlic, chili powder, cumin, and salt directly on top. Squeeze the lime juice over everything to add an extra layer of flavor.

Step 2: Set the Slow Cooker

Cover the slow cooker and set it on high for about 4 hours, or on low for 8 hours. This slow cooking process is essential as it allows the chicken to absorb those wonderful flavors.

Step 3: Shred the Chicken

About 30 minutes before the cooking time is up, carefully remove the chicken breasts from the slow cooker. Using two forks, shred the chicken into bite-sized pieces.

Step 4: Add the Vegetables

With the chicken out, switch the slow cooker setting to high. Now, toss in your sliced onions and bell peppers. It’s vital to ensure that they mingle with the delicious juices left in the slow cooker. Cook for the remaining 30 minutes.

Step 5: Combine and Serve

After the cooking time is complete, return the shredded chicken to the slow cooker with the peppers and onions. Stir the mixture well to combine everything. If you’re feeling fancy, top with grated cheddar cheese and sprinkle with fresh cilantro.

Step 6: Enjoy!

To serve, warm corn tortillas if desired. Pile your fajita shredded chicken high and add your favorite toppings. Dig in and savor the flavor!

Tips On Making Fajita Shredded Chicken

Season the Chicken: If you have time, marinating your chicken in the spices a few hours beforehand can elevate the flavor significantly.

Salsa Selection: For a milder dish, opt for a medium or mild salsa; for a spicy kick, go for hot salsa.

Vegetable Variations: Swap in other colorful vegetables like zucchini or jalapeños for extra flavor.

Serving Options: Besides tortillas, serve this chicken over rice, in lettuce wraps, or on nachos for some fun variations.

Cook in Bulk: Double the recipe and freeze leftovers for busy weeknights. Just thaw and reheat for a quick meal!

Storage Tips

Store any leftovers in airtight containers. This vinaigrette dish usually keeps well in the fridge for about 3-4 days. If you want to store it longer, consider freezing the chicken and veggies in portions. To reheat, just defrost overnight in the fridge and then warm in a skillet or microwave.

Nutrition Information

Each serving of fajita shredded chicken contains approximately 230 calories, making it a healthy option packed with protein. The mix of vegetables adds vitamins and minerals, ensuring that you’re getting both nourishment and enjoyment in every bite.

how to make fajita shredded chicken

Serving Suggestions

Fajitas: Serve the chicken with warmed corn tortillas for a classic experience.

Taco Salad: Layer the shredded chicken over greens, tomatoes, and avocados for a fresh salad.

Nachos: Top corn chips with chicken, cheese, and avocado for a festive snack.

Stuffed Peppers: Use the chicken as a filling for bell peppers baked with cheese on top.

Rice Bowls: Serve alongside quinoa or brown rice for a hearty main course.

Substitute Options for Ingredients

Chicken: Use turkey or tofu for a different protein source.

Fresh Salsa: Homemade salsa or tomato sauce can work in a pinch.

Chili Powder: Paprika combined with a bit of cayenne can substitute for chili powder.

Cheddar Cheese: Try crumbled feta or cotija for a unique twist.

Bell Peppers: Any color peppers work, or even other vegetables like mushrooms or carrots.

fajita shredded chicken copycat recipe

Fajita Shredded Chicken

When I think of fajita shredded chicken, I can’t help but picture a fabulous Friday night feast. Picture a table laid out with warm corn tortillas, vibrant toppings, and plenty of laughter filling the air
Prep Time 10 minutes
Cook Time 4 hours
Total Time 4 hours 10 minutes
Course Main dish
Cuisine Mexican
Servings 6
Calories 230 kcal

Equipment

  • Slow cooker
  • Cutting board
  • Knife
  • Fork

Ingredients
  

  • – 1 lb boneless skinless chicken breasts
  • – 1 500mL container of fresh salsa (or jarred salsa)
  • – 2 cloves garlic finely minced
  • – 1 tbsp chili powder
  • – 1 tsp cumin
  • – 1 tsp sea salt
  • – 1 large yellow onion thinly sliced
  • – 1 red bell pepper thinly sliced
  • – 1 green bell pepper thinly sliced
  • – 1 yellow bell pepper thinly sliced
  • – 1 lime juiced

– Optional toppings:

  • – 1/2 cup shredded cheddar cheese
  • – 1 tbsp freshly chopped cilantro
  • – Corn tortillas for serving

Instructions
 

Step 1: Prepare the Chicken and Spices

  • Begin by placing the boneless, skinless chicken breasts in your slow cooker. Next, add your fresh salsa, minced garlic, chili powder, cumin, and salt directly on top. Squeeze the lime juice over everything to add an extra layer of flavor.

Step 2: Set the Slow Cooker

  • Cover the slow cooker and set it on high for about 4 hours, or on low for 8 hours. This slow cooking process is essential as it allows the chicken to absorb those wonderful flavors.

Step 3: Shred the Chicken

  • About 30 minutes before the cooking time is up, carefully remove the chicken breasts from the slow cooker. Using two forks, shred the chicken into bite-sized pieces.

Step 4: Add the Vegetables

  • With the chicken out, switch the slow cooker setting to high. Now, toss in your sliced onions and bell peppers. It’s vital to ensure that they mingle with the delicious juices left in the slow cooker. Cook for the remaining 30 minutes.

Step 5: Combine and Serve

  • After the cooking time is complete, return the shredded chicken to the slow cooker with the peppers and onions. Stir the mixture well to combine everything. If you’re feeling fancy, top with grated cheddar cheese and sprinkle with fresh cilantro.

Step 6: Enjoy!

  • To serve, warm corn tortillas if desired. Pile your fajita shredded chicken high and add your favorite toppings. Dig in and savor the flavor!

Notes

Season the Chicken: If you have time, marinating your chicken in the spices a few hours beforehand can elevate the flavor significantly.
Salsa Selection: For a milder dish, opt for a medium or mild salsa; for a spicy kick, go for hot salsa.
Vegetable Variations: Swap in other colorful vegetables like zucchini or jalapeños for extra flavor.
Serving Options: Besides tortillas, serve this chicken over rice, in lettuce wraps, or on nachos for some fun variations.
Cook in Bulk: Double the recipe and freeze leftovers for busy weeknights. Just thaw and reheat for a quick meal!

Nutrition

Calories: 230kcal
Keyword Fajita Shredded Chicken
Tried this recipe?Let us know how it was!

FAQs

1. Can I use frozen chicken breasts?

– Yes, but be sure to thaw them before cooking. Frozen chicken will require more cooking time and may not shred as easily.

2. Can I make this dish in an Instant Pot instead?

– Absolutely! Cook on high pressure for 15-20 minutes, then shred the chicken and stir in the sautéed vegetables.

3. Is this recipe gluten-free?

– Yes, the ingredients used are naturally gluten-free. Just ensure that the corn tortillas you use are labeled gluten-free as well.

4. How can I make it spicier?

– Add diced jalapeños or a splash of hot sauce to the slow cooker for a spicy kick

5. Can it be made ahead of time?

– Certainly! Prepare the dish in advance and store it in the refrigerator. Reheating is simple and retains the flavors.

Conclusion

Fajita shredded chicken is more than just a meal; it’s an experience that brings people together. Packed with fresh flavors and vibrant colors, this dish allows for creativity in the kitchen. Whether you’re gathering friends for a festive night or looking for an easy weeknight dinner, this recipe has you covered. Trust me, you’ll be coming back to it time and again for its simplicity and taste. So gather your ingredients, and let’s make some unforgettable dinner memories! Enjoy!

You’ll also like these latest recipes!

Spinach and Artichoke Stuffed Beignets – Yum Yarns

spinach and artichoke stuffed beignets

When it comes to food, creating the perfect meal is often about balance. You want to consider contrasting flavors and textures that complement each other. Spinach and artichoke stuffed beignets exude a creamy, savory richness that begs for something on the lighter or tangier side. Here’s what I would consider pairing with them:

1. Fresh Garden Salad: A simple salad with crisp romaine, cherry tomatoes, and a tangy vinaigrette will cut through the richness of the beignets. You get crunch and freshness in every bite.

2. Citrusy Dipping Sauce: A zesty lemon or lime aioli can provide a refreshing acid that elevates each bite. The citrus notes can lighten the heaviness of the beignets.

3. Herbed Yogurt Sauce: A cool sauce made from Greek yogurt, dill, and garlic can offer a creamy yet refreshing counterpoint to the fried dough.

With these ideas in mind, let’s dive into the delightful journey of making spinach and artichoke stuffed beignets.

spinach and artichoke stuffed beignets

Every now and then, something magical happens in the kitchen. One moment you’re mixing ingredients, and the next you have a dish that makes you want to dance. For me, that dish is spinach and artichoke stuffed beignets. Picture this: crispy dough on the outside, and a luscious, cheesy filling bursting inside. These beignets are a delightful crossover between savory pastries and appetizers, perfect for gatherings or just a cozy evening at home.

What makes this recipe even more special is how the flavors and textures mingle. The gentle crunch of the beignet contrasts wonderfully with the creamy stuffing of artichokes and spinach. Plus, frying these little beauties fills the kitchen with tantalizing aromas that invite everyone to gather. Trust me; your friends will flock to the kitchen like bees to honey!

So, let’s grab our aprons and embark on this culinary adventure.

Why This Recipe Works?

Here are a few compelling reasons why this recipe is worth trying:

1. Unique Flavor Profile
Spinach isn’t just for salads. Mixing it with artichokes and creamy cheeses creates a flavor explosion. The tangy artichokes balance the earthiness of spinach while the cheese adds a savory depth.

2. Versatile Dish
These beignets can be served as appetizers, snacks, or even as part of a main course. You can adapt them to fit any occasion, whether it’s a casual get-together or a more formal gathering.

3. Comfort Food with a Twist
Fried dough filled with a cheesy filling evokes comfort. However, with the addition of spinach and artichoke, it feels elevated. It’s like your favorite comfort food but dressed up for a fancy night out!

4. Perfect for Meal Prep
This recipe is excellent for making ahead. You can prepare the filling and components a day in advance. When it’s time to eat, you’ll just fry them fresh for maximum crunch!

You will also like the following Appetizers recipes!

How Does It Taste Like?

If you’ve ever indulged in a classic spinach and artichoke dip, imagine that flavor encapsulated in a warm, crispy beignet. The moment you take a bite, your taste buds are treated to a creamy and cheesy filling, with bursts of flavor from the artichokes. The beignet itself carries a subtle sweetness that contrasts beautifully with the richness inside. The touch of garlic in the filling only heightens the experience.

The textures play a significant role too. The crunchy exterior gives way to a soft, gooey center that is simply irresistible. That bite is a delightful combination of flavors and sensations that keeps you reaching for more.

What Sets This Recipe Apart from Other Spinach and Artichoke Stuffed Beignet Variations?

What distinguishes this version of spinach and artichoke stuffed beignets from others is its approach to flavor balance.

Fresh Ingredients: This recipe emphasizes using natural flavors by incorporating fresh, quality ingredients—like real artichoke hearts and pure cheeses. While some recipes may rely on a blend of store-bought components, here you’re creating magic from scratch.

Textural Integrity: Many beignets can become soggy if the filling is too wet. The technique of thoroughly draining the spinach ensures a perfect consistency, leading to a beautiful beignet that doesn’t lose its shape.

A Balanced Portion of Filling: The use of cream cheese as a base provides creaminess, while the Parmesan and mozzarella combined lend texture and bite. This triad creates a filling that is rich but not overwhelmingly heavy.

Lastly, there’s a little twist in the oil used for frying. Neutral oils allow the flavors to shine without imparting unnecessary taste, keeping the dish enjoyable.

The Ingredients

For the Spinach and Artichoke Filling

  • 1 (15 oz.) can of artichoke hearts, rinsed, drained, and finely chopped: Adds a distinct tanginess.
  • 1 teaspoon minced garlic: This is the flavor booster that elevates the dish.
  • 1 cup frozen chopped spinach, thawed and thoroughly drained: A must for that filling green taste.
  • ¼ cup finely grated Parmesan cheese: Contributes a nutty and savory undertone.
  • 2 (8 oz.) packages of cream cheese, softened to room temperature: Creates a creamy, luscious filling.
  • 4 ounces shredded mozzarella cheese: For that melty goodness.
  • Salt and freshly ground black pepper, to taste.

For the Beignets

  • ¾ cup tangy buttermilk: Adds flavor and helps the dough rise.
  • 3 tablespoons granulated sugar: Provides a subtle sweetness to the dough.
  • 4 teaspoons active dry yeast: Acts as a leavening agent.
  • 1 tablespoon unsalted butter, melted: Enhances richness.
  • 3 ½ cups bread flour: Gives the dough structure.
  • 1 large egg, lightly beaten at room temperature: Binds the mixture.
  • 2 ounces finely grated Parmesan cheese: To integrate that beautiful cheese flavor into the dough.
  • ½ teaspoon baking soda: Helps with the rise.
  • ¼ teaspoon fine salt: For flavor enhancement.
  • 1 cup warm water (95–115°F): Activates the yeast.

To Fry

  • Neutral frying oil (such as canola or vegetable oil).
how to make spinach and artichoke stuffed beignets

Instructions

Step 1: Prepare the Filling

Start by creating your delicious filling. Combine the chopped artichokes, minced garlic, drained spinach, both cheeses, and a pinch of salt and pepper in a bowl. Mix well until combined. Taste and adjust seasoning as necessary. Set this aside while you prepare the dough.

Step 2: Make the Dough

In a small bowl, mix the warm water and sugar. Add the yeast and let it sit for about 5–10 minutes until it becomes frothy.

In a large mixing bowl, combine the bread flour, Parmesan cheese, baking soda, and salt. Whisk them together. Make a well in the center and add the buttermilk, melted butter, the frothy yeast mixture, and the beaten egg. Mix until a rough dough forms. Don’t worry if it looks a bit shaggy.

Step 3: Knead the Dough

Transfer the dough onto a lightly floured surface. Knead for around 5–7 minutes until the dough is smooth and elastic. It should spring back at a gentle touch. Place it in a greased bowl, cover it, and let it rise for about 1 hour until doubled in size.

Step 4: Combine Filling and Dough

Once your dough has risen, punch it down gently. Turn it out onto a floured surface and roll it out into a rectangle about a quarter of an inch thick. Cut out squares, about 3 inches by 3 inches.

Take approximately a tablespoon of the filling and place it in the center of each square. Fold the corners over to seal the filling inside fully. Make sure they are well-sealed so they don’t burst while frying.

Step 5: Fry the Beignets

In a deep pot or a fryer, heat the neutral oil over medium-high heat until it reaches 350°F. Carefully place a few filled beignets into the hot oil, doing so in batches to avoid overcrowding.

Fry until golden brown, about 2-3 minutes per side. Remove them and place them on paper towels to drain excess oil. Repeat the process with the remaining beignets.

Step 6: Serve

Enjoy your freshly fried spinach and artichoke stuffed beignets warm. Consider serving with your favorite dipping sauce for added flavor!

Notes

Ensure proper drainage of spinach: Excess moisture can lead to soggy filling. Squeeze out as much water as possible.
Use a thermometer for frying oil: This ensures that your beignets cook evenly without burning.
Don’t overload the fryer: Fry in small batches to maintain consistent oil temperature.
Experiment with fillings: Feel free to add herbs or modify the cheeses based on your preference.
Cool completely before storing: This helps maintain freshness if you plan to save leftovers.

Nutrition Information

(These values are approximate and can vary based on specific ingredients used.)

Serving size: 1 beignet
Calories: 250
Total Fat: 15g
Saturated Fat: 8g
Cholesterol: 50mg
Sodium: 400mg
Total Carbohydrates: 25g
Dietary Fiber: 1g
Sugars: 1g
Protein: 7g

spinach and artichoke stuffed beignets copycat recipe

How Do You Store Spinach and Artichoke Stuffed Beignets?

If you happen to have any beignets left after your gathering (a rare occurrence, I must say), you can store them easily. Allow them to cool completely before placing them in an airtight container. They will keep in the fridge for about 3-4 days. For longer storage, you can freeze them. When you’re ready to eat, simply reheat in the oven or air fryer for crispiness.

Sides for Spinach and Artichoke Stuffed Beignets

1. Garlic Bread
Garlic bread is a classic side. It’s crunchy, buttery, and packs a punch of flavor that harmonizes wonderfully with the cheesy beignets.

2. Roasted Vegetables
A medley of seasonal roasted vegetables can lighten the meal. Seasoned simply with olive oil, salt, and pepper, roasted carrots, bell peppers, and zucchini are easy to prepare and provide a colorful plate.

3. Bruschetta
Bruschetta with tomatoes, basil, and a drizzle of balsamic glaze combines freshness and tangs. This appetizer pairs well and builds on the Mediterranean vibe of the stuffed beignets.

What Alternatives Can You Use for the Ingredients If They Are Not Present in Your Kitchen?

1. Fresh Spinach Instead of Frozen
You can use fresh spinach in place of frozen. Just sauté it briefly to wilt and drain extra moisture.

2. Ricotta or Goat Cheese Instead of Cream Cheese
If you want a lighter filling, ricotta cheese offers a lovely creaminess. Goat cheese also adds a tangy flavor that can elevate the filling.

3. Any Cheese for Variations
Mozzarella can be swapped for gouda or cheddar for a different flavor profile. Experimenting with cheese can lead to exciting results.

4. All-Purpose Flour Instead of Bread Flour
If you don’t have bread flour, all-purpose flour will work in a pinch. Just note that the texture might be slightly different, but still delicious!

how to make spinach and artichoke stuffed beignets

Spinach and Artichoke Stuffed Beignets

When it comes to food, creating the perfect meal is often about balance. You want to consider contrasting flavors and textures that complement each other
Prep Time 30 minutes
Cook Time 20 minutes
Total Time 50 minutes
Course Appetizer
Cuisine American
Servings 10
Calories 250 kcal

Equipment

  • Bowls

Ingredients
  

For the Spinach and Artichoke Filling

  • 1 15 oz. can of artichoke hearts, rinsed, drained, and finely chopped: Adds a distinct tanginess.
  • 1 teaspoon minced garlic: This is the flavor booster that elevates the dish.
  • 1 cup frozen chopped spinach thawed and thoroughly drained: A must for that filling green taste.
  • ¼ cup finely grated Parmesan cheese: Contributes a nutty and savory undertone.
  • 2 8 oz. packages of cream cheese, softened to room temperature: Creates a creamy, luscious filling.
  • 4 ounces shredded mozzarella cheese: For that melty goodness.
  • Salt and freshly ground black pepper to taste.

For the Beignets

  • ¾ cup tangy buttermilk: Adds flavor and helps the dough rise.
  • 3 tablespoons granulated sugar: Provides a subtle sweetness to the dough.
  • 4 teaspoons active dry yeast: Acts as a leavening agent.
  • 1 tablespoon unsalted butter melted: Enhances richness.
  • 3 ½ cups bread flour: Gives the dough structure.
  • 1 large egg lightly beaten at room temperature: Binds the mixture.
  • 2 ounces finely grated Parmesan cheese: To integrate that beautiful cheese flavor into the dough.
  • ½ teaspoon baking soda: Helps with the rise.
  • ¼ teaspoon fine salt: For flavor enhancement.
  • 1 cup warm water 95–115°F: Activates the yeast.

To Fry

  • Neutral frying oil such as canola or vegetable oil.

Instructions
 

Step 1: Prepare the Filling

  • Start by creating your delicious filling. Combine the chopped artichokes, minced garlic, drained spinach, both cheeses, and a pinch of salt and pepper in a bowl. Mix well until combined. Taste and adjust seasoning as necessary. Set this aside while you prepare the dough.

Step 2: Make the Dough

  • In a small bowl, mix the warm water and sugar. Add the yeast and let it sit for about 5–10 minutes until it becomes frothy.
  • In a large mixing bowl, combine the bread flour, Parmesan cheese, baking soda, and salt. Whisk them together. Make a well in the center and add the buttermilk, melted butter, the frothy yeast mixture, and the beaten egg. Mix until a rough dough forms. Don’t worry if it looks a bit shaggy.

Step 3: Knead the Dough

  • Transfer the dough onto a lightly floured surface. Knead for around 5–7 minutes until the dough is smooth and elastic. It should spring back at a gentle touch. Place it in a greased bowl, cover it, and let it rise for about 1 hour until doubled in size.

Step 4: Combine Filling and Dough

  • Once your dough has risen, punch it down gently. Turn it out onto a floured surface and roll it out into a rectangle about a quarter of an inch thick. Cut out squares, about 3 inches by 3 inches.
  • Take approximately a tablespoon of the filling and place it in the center of each square. Fold the corners over to seal the filling inside fully. Make sure they are well-sealed so they don’t burst while frying.

Step 5: Fry the Beignets

  • In a deep pot or a fryer, heat the neutral oil over medium-high heat until it reaches 350°F. Carefully place a few filled beignets into the hot oil, doing so in batches to avoid overcrowding.
  • Fry until golden brown, about 2-3 minutes per side. Remove them and place them on paper towels to drain excess oil. Repeat the process with the remaining beignets.

Step 6: Serve

  • Enjoy your freshly fried spinach and artichoke stuffed beignets warm. Consider serving with your favorite dipping sauce for added flavor!

Notes

  • Ensure proper drainage of spinach: Excess moisture can lead to soggy filling. Squeeze out as much water as possible.
  • Use a thermometer for frying oil: This ensures that your beignets cook evenly without burning.
  • Don’t overload the fryer: Fry in small batches to maintain consistent oil temperature.
  • Experiment with fillings: Feel free to add herbs or modify the cheeses based on your preference.
  • Cool completely before storing: This helps maintain freshness if you plan to save leftovers.

Nutrition

Calories: 250kcalCarbohydrates: 25gProtein: 7gFat: 15gSaturated Fat: 8gCholesterol: 50mgSodium: 400mgFiber: 1gSugar: 1g
Keyword Spinach and Artichoke Stuffed Beignets
Tried this recipe?Let us know how it was!

Frequently Asked Questions

1. Can I make the filling ahead of time?

 Yes! You can prepare the filling a day in advance and store it in the refrigerator. This not only saves time but also allows the flavors to meld beautifully.

2. Are there any non-dairy alternatives for this recipe?

 Absolutely! You can use non-dairy cream cheese and substitute the cheeses with vegan options. Almond milk can work as a substitute for buttermilk if needed.

3. Can beignets be baked instead of fried?

 While frying gives that iconic texture and flavor, you can bake them for a healthier option. Brush them with oil or butter and bake in a preheated oven at 375°F until golden brown.

4. What dips pair well with these beignets?

 A ranch dip, marinara sauce, or a spicy aioli can pair well. They enhance the flavors and add a new dynamic to the dish.

Conclusion

Spinach and artichoke stuffed beignets are more than just a trendy dish; they are a celebration of flavor and creativity in the kitchen. They bring warmth and joy with every crispy bite. As a food enthusiast and recipe creator, I can genuinely say this dish perfectly balances indulgence and fun. Whether you’re sharing with friends or keeping them all to yourself (who could blame you?), they’re bound to steal the show.

So, when the craving strikes, whip up a batch and enjoy the magic that happens. With every golden bite, you’ll find yourself transported to a place where comfort food reigns supreme—and that place is right in your kitchen. Happy cooking!

You’ll also like these latest recipes!

Potato Rings and Homemade Buttermilk Ranch – Yum Yarns

Potato Rings and Homemade Buttermilk Ranch

Before diving into the deliciousness of potato rings and homemade buttermilk ranch, let’s consider what might complement this dish perfectly. These crispy, savory delights are versatile and can fit into many meals. You could pair them with grilled chicken, which offers a protein-packed option. Think tender, juicy pieces seasoned to perfection that resonate with the crispy texture of potato rings.

Another excellent pairing might be a fresh side salad. A simple mix of greens with a tangy vinaigrette can balance the richness of the fried potato rings. Additionally, consider serving them as an appetizer alongside some buffalo wings for that classic game-day feel.

Lastly, don’t forget about beverages! An icy cold beer or a refreshing homemade lemonade can elevate your eating experience. With these pairings in mind, let’s get into the heart of the matter: how to create potato rings with homemade buttermilk ranch.

Potato Rings and Homemade Buttermilk Ranch

Life is about the little joys, and one of those joys is indulging in golden, crunchy potato rings dipped in silky, homemade buttermilk ranch dressing. Growing up, potato rings were my go-to snack at summer barbecues and family gatherings. There’s something incredibly satisfying about the crispy exterior and the soft potato inside. Pair that with a rich ranch sauce, and you’ve got a treat that’s hard to resist.

Truth be told, ranch dressing is like the secret superhero of the culinary world—it goes with just about everything, and homemade versions have a freshness that’s hard to replicate. As a food enthusiast, I spent years experimenting to perfect this recipe, drawing on my love for cooking and the joy of sharing meals with family and friends.

What are Potato Rings with Homemade Buttermilk Ranch?

Potato rings are a delightful snack or appetizer made by slicing potatoes into thick rings, coating them in a crispy batter, and frying them until golden brown. Imagine biting into a crunchy ring, followed by the fluffy interior that hugs your taste buds with warmth.

Now, the buttermilk ranch dressing is another star of the show. It’s made from a blend of mayonnaise, buttermilk, and fresh herbs, resulting in a creamy, slightly tangy dip that pairs perfectly with the potato rings. This dish is more than just a combination of ingredients; it’s a celebration of flavors, textures, and nostalgia.

How Does It Taste Like?

Let’s describe the flavor experience. The first bite into a potato ring is pure joy—the crunch of the coating gives way to the soft, starchy goodness of the potato. The addition of spices like garlic powder and smoked paprika adds depth and warmth, creating a complex profile.

Then you dip it into the ranch. The cool creaminess of the dressing perfectly offsets the fried crunch of the potato, while the fresh herbs bring a fragrant brightness to the dish. This combination is not just tasty; it creates an experience layered with flavors, memories, and enjoyment.

You will also like the following Side dishes recipes!

Why You’ll Love This?

Here are a few compelling reasons to fall in love with this dish:

Comfort Food: There’s something eternally comforting about fried potatoes. They evoke feelings of warmth and happiness.
Versatile Snacking: Great for gatherings, game days, or a cozy dinner at home.
Simple Ingredients: You might already have most of the ingredients in your pantry, making it an easy recipe to whip up.
Homemade Goodness: Preparing your ranch dressing takes this dish to an artisanal level, surpassing store-bought alternatives.
Family-Friendly: Kids and adults alike will be clamoring for these delightful rings. If you’re looking for a hit at your next gathering, this is it.

Ingredients

To make potato rings and homemade buttermilk ranch, gather the following ingredients:

For the Potato Rings

3 large russet potatoes, peeled, cleaned, and cut into chunky pieces
2 large eggs, lightly beaten
⅔ cup all-purpose flour
⅓ cup rice flour
2 tablespoons garlic powder
1 tablespoon onion powder
1 tablespoon smoked paprika
½ cup caramelized yellow onions, finely chopped
3 tablespoons fresh chives, thinly sliced
¼ cup unsalted butter, softened
⅓ cup plus 2 tablespoons heavy whipping cream
Salt and freshly cracked black pepper, to taste
2 quarts vegetable oil, for frying
Optional: 1 teaspoon smoked sea salt
Optional: 1 teaspoon chipotle powder

For the Buttermilk Ranch Sauce

½ cup light mayonnaise
¼ cup low-fat buttermilk
1 ½ teaspoons freshly squeezed lemon juice
½ teaspoon dry mustard
1 teaspoon dill, minced
2 tablespoons flat-leaf parsley, finely minced
1 tablespoon fresh chives, thinly sliced
Salt and freshly cracked black pepper, to taste

How to make Potato Rings and Homemade Buttermilk Ranch

Step by Step Directions

Creating these delicious potato rings step-by-step ensures you capture all the flavors and textures.

Step 1: Prepare the Potatoes

Start by peeling the potatoes and cutting them into thick rings. Aim for about half an inch in thickness. Rinse them in cold water to remove excess starch, then pat them dry with a towel. This helps in achieving that perfect crunch.

Step 2: Make the Coating

In one bowl, whisk together the all-purpose flour, rice flour, garlic powder, onion powder, smoked paprika, salt, and pepper. The rice flour adds a nice crunch to the rings. In a separate bowl, mix the two beaten eggs and add the caramelized yellow onions and fresh chives.

Step 3: Dredge the Potato Rings

Take a potato ring, dip it into the egg mixture until fully coated, then dredge it in the flour mix. Ensure it’s well covered on all sides. Repeat this for all the potato rings, placing them on a tray. This double coating technique creates that beloved crunch.

Step 4: Heat the Oil

In a large pot, heat the vegetable oil over medium-high heat. You want it hot enough for frying, around 350°F (175°C). To test if the oil is ready, drop a small piece of bread into it; if it bubbles and browns quickly, you’re good to go.

Step 5: Fry the Rings

Carefully drop in a few potato rings at a time. Avoid overcrowding the pan. Fry until golden brown and crispy, usually 4-5 minutes per side. Use a slotted spoon to transfer them to a plate lined with paper towels to drain excess oil.

Step 6: Make the Buttermilk Ranch Sauce

In a bowl, mix the mayonnaise, buttermilk, lemon juice, dry mustard, dill, parsley, and chives. Season with salt and pepper. A good taste test here is essential – you want it flavorful but not overpowering.

Tips on Making Potato Rings with Homemade Buttermilk Ranch

Cut Uniformly: Ensure the potato rings are evenly cut for even cooking.
Don’t Skip the Soaking: Soaking the potatoes in cold water for about 30 minutes before frying can yield an even better texture.
Use a Cooking Thermometer: It helps in ensuring that your oil is at the right temperature, preventing undercooking or burning.
Keep Them Warm: If you’re frying in batches, keep the cooked potato rings warm in an oven set to low (about 200°F) until you’re ready to serve.
Experiment with Flavors: Feel free to add different spices to your coating. A pinch of cayenne pepper can add a lovely kick!

Nutrition Information

Understanding the nutrition of your food is crucial, especially for those conscious of their intake. Below is a rough estimation for one serving of potato rings with ranch:

Calories: ~400
Protein: 8g
Fat: 25g
Carbohydrates: 40g
Fiber: 3g

The nutritional content may vary based on the specific brands and quantities of ingredients you choose.

Potato Rings and Homemade Buttermilk Ranch copycat recipe

How Do You Store Potato Rings with Homemade Buttermilk Ranch?

If you find yourself with leftover potato rings, here’s how to properly store them:

Refrigerate: Once they have cooled, place them in an airtight container. They’ll last in the fridge for up to 3 days.
Reheat: To keep that crispy texture, reheat the potato rings in an oven at 375°F for about 10-15 minutes. Avoid using the microwave, as it may make them soggy.

What Other Substitutes Can You Use in Potato Rings with Homemade Buttermilk Ranch?

If you want to get creative, here are five substitution suggestions:

Sweet Potatoes: Swap out regular potatoes for sweet potatoes for a slightly different flavor and added sweetness.
Chickpea Flour: Replace rice flour with chickpea flour for a gluten-free option packed with protein.
Greek Yogurt: Use plain Greek yogurt instead of mayonnaise for the ranch for a healthier version that’s still creamy.
Mixed Herbs: Instead of using just chives and parsley, you can add basil or cilantro to the ranch for a flavor twist.
Panko Breadcrumbs: For an extra crunch, coat the potato rings with panko breadcrumbs before frying.

Potato Rings and Homemade Buttermilk Ranch copycat recipe

Potato Rings and Homemade Buttermilk Ranch

Before diving into the deliciousness of potato rings and homemade buttermilk ranch, let’s consider what might complement this dish perfectly. These crispy, savory delights are versatile and can fit into many meals.
Prep Time 15 minutes
Cook Time 20 minutes
Total Time 35 minutes
Course Side Dish
Cuisine American
Servings 8
Calories 400 kcal

Equipment

  • Bowl

Ingredients
  

For the Potato Rings

  • 3 large russet potatoes peeled, cleaned, and cut into chunky pieces
  • 2 large eggs lightly beaten
  • cup all-purpose flour
  • cup rice flour
  • 2 tablespoons garlic powder
  • 1 tablespoon onion powder
  • 1 tablespoon smoked paprika
  • ½ cup caramelized yellow onions finely chopped
  • 3 tablespoons fresh chives thinly sliced
  • ¼ cup unsalted butter softened
  • cup plus 2 tablespoons heavy whipping cream
  • Salt and freshly cracked black pepper to taste
  • 2 quarts vegetable oil for frying
  • Optional: 1 teaspoon smoked sea salt
  • Optional: 1 teaspoon chipotle powder

For the Buttermilk Ranch Sauce

  • ½ cup light mayonnaise
  • ¼ cup low-fat buttermilk
  • 1 ½ teaspoons freshly squeezed lemon juice
  • ½ teaspoon dry mustard
  • 1 teaspoon dill minced
  • 2 tablespoons flat-leaf parsley finely minced
  • 1 tablespoon fresh chives thinly sliced
  • Salt and freshly cracked black pepper to taste

Instructions
 

Step 1: Prepare the Potatoes

  • Start by peeling the potatoes and cutting them into thick rings. Aim for about half an inch in thickness. Rinse them in cold water to remove excess starch, then pat them dry with a towel. This helps in achieving that perfect crunch.

Step 2: Make the Coating

  • In one bowl, whisk together the all-purpose flour, rice flour, garlic powder, onion powder, smoked paprika, salt, and pepper. The rice flour adds a nice crunch to the rings. In a separate bowl, mix the two beaten eggs and add the caramelized yellow onions and fresh chives.

Step 3: Dredge the Potato Rings

  • Take a potato ring, dip it into the egg mixture until fully coated, then dredge it in the flour mix. Ensure it’s well covered on all sides. Repeat this for all the potato rings, placing them on a tray. This double coating technique creates that beloved crunch.

Step 4: Heat the Oil

  • In a large pot, heat the vegetable oil over medium-high heat. You want it hot enough for frying, around 350°F (175°C). To test if the oil is ready, drop a small piece of bread into it; if it bubbles and browns quickly, you’re good to go.

Step 5: Fry the Rings

  • Carefully drop in a few potato rings at a time. Avoid overcrowding the pan. Fry until golden brown and crispy, usually 4-5 minutes per side. Use a slotted spoon to transfer them to a plate lined with paper towels to drain excess oil.

Step 6: Make the Buttermilk Ranch Sauce

  • In a bowl, mix the mayonnaise, buttermilk, lemon juice, dry mustard, dill, parsley, and chives. Season with salt and pepper. A good taste test here is essential – you want it flavorful but not overpowering.

Notes

  • Cut Uniformly: Ensure the potato rings are evenly cut for even cooking.
  • Don’t Skip the Soaking: Soaking the potatoes in cold water for about 30 minutes before frying can yield an even better texture.
  • Use a Cooking Thermometer: It helps in ensuring that your oil is at the right temperature, preventing undercooking or burning.
  • Keep Them Warm: If you’re frying in batches, keep the cooked potato rings warm in an oven set to low (about 200°F) until you’re ready to serve.
  • Experiment with Flavors: Feel free to add different spices to your coating. A pinch of cayenne pepper can add a lovely kick!

Nutrition

Calories: 400kcalCarbohydrates: 40gProtein: 8gFat: 25gFiber: 3g
Keyword Potato Rings and Homemade Buttermilk Ranch
Tried this recipe?Let us know how it was!

Frequently Asked Questions

1. Can I bake potato rings instead of frying them?

 Absolutely! You can bake them at 425°F for about 25-30 minutes, flipping halfway through. Brush them lightly with oil for a golden finish.

2. Can I make the buttermilk ranch ahead of time?

 Yes! The ranch can be made a day in advance. Just store it in the fridge; it often tastes better after the flavors have melded.

3. What can I add to the potato rings for variety?

 You could add grated cheese to the coating, spices like garlic powder or cayenne, or even incorporate some finely chopped vegetables for crunch.

4. What oil is best for frying?

 Oils with high smoke points like vegetable, canola, or peanut oil work best for frying. Avoid using olive oil due to its lower smoke point.

5. Can I freeze the potato rings?

 Yes! After frying, allow them to cool completely, then place them in a freezer-safe bag. They can be frozen for up to three months; reheat in the oven straight from the freezer.

6. Is there a healthier version of this recipe?

 Definitely! Consider using an air fryer for the potato rings and substituting Greek yogurt for mayonnaise in the ranch dressing.

Conclusion

Potato rings with homemade buttermilk ranch are more than just a snack; they’re a culinary embrace that brings comfort and satisfaction. Whether you’re entertaining guests or simply indulging in a bite yourself, these rings are bound to impress.

As a food blogger, my goal is to share recipes that are not just easy to make but are brimming with flavor and nostalgia. I hope this recipe finds a place in your kitchen, ready to become a favorite in your culinary repertoire. Whether paired with grilled chicken or enjoyed solo with ranch, potato rings will surely make every moment delicious.

You’ll also like these latest recipes!

Farfalle with Creamy White Bean and Roasted Garlic Sauce – Yum Yarns

farfalle with a creamy white bean and roasted garlic sauce

Before we dive into the tantalizing recipe for farfalle with a creamy white bean and roasted garlic sauce, let’s discuss what you can serve alongside it to brighten your meal. This pasta dish is rich and creamy, so balance is key. Here are some delightful pairings that will harmonize beautifully with the dish:

  1. A Light Salad: Think of a simple arugula salad drizzled with lemon juice and olive oil. The peppery notes of arugula will cut through the creaminess, making it a refreshing complement.
  2. Grilled Vegetables: Bell peppers, zucchini, and asparagus tossed with olive oil and grilled until slightly charred add a smoky contrast that brings out the flavors in the pasta.
  3. Crusty Bread: A warm loaf of ciabatta or sourdough is perfect for sopping up that creamy sauce. Trust me, you won’t want to leave a bit behind!
  4. Wine Selection: Pair this dish with a light white wine—something like a Sauvignon Blanc or a Pinot Grigio. The acidity of the wine will balance the dish’s richness.
  5. Cheese Board: If you’re feeling fancy, set out a cheese board with sharp cheeses, olives, and nuts. It’s always a crowd-pleaser.
  6. Dessert: Consider a light dessert like sorbet or a fruit tart to round off your meal without overwhelming the palate.

Now that we’ve got our side dishes covered, let’s celebrate the heart of our meal—the farfalle with a creamy white bean and roasted garlic sauce.

farfalle with a creamy white bean and roasted garlic sauce

Why This Recipe is Great for You

Here’s why I love this recipe. First, it’s rich in plant-based protein thanks to the white beans. These little gems are not only filling but also packed with fiber. This means staying full longer and avoiding that mid-afternoon slump. Plus, roasted garlic gives a delightful, mellow sweetness that infuses the whole dish.

Additionally, the creamy sauce is made without heavy cream. Instead, it gets its texture from the beans and a touch of stock. You’ll be surprised how creamy this sauce becomes.

As someone who frequently juggles meal prep amidst a busy schedule, this dish is a lifesaver. It’s easy to whip up in under 30 minutes, and the ingredients are mostly pantry staples. There’s also something satisfying about knowing you’re making a meal from scratch, especially when it tastes this good.

Let’s get into how I’ve used the ingredients in this recipe. Farfalle, with its butterfly shape, captures sauce like a champion. The fresh herbs—thyme and sage—bring a garden-fresh aroma. And let’s not forget the spices. Ground cumin and coriander ground the dish, adding warmth and depth. While smoked paprika is optional, it adds a hint of smokiness that elevates the overall flavor.

You will also like the following Lunch and Dinner recipes!

Here’s What You’ll Need:

  • ½ pound dry farfalle pasta: I like to use whole wheat for added nutrition. The farfalle holds the creamy sauce so well.
  • 3 tablespoons extra-virgin olive oil: A good oil can make a difference. It should have a fruity flavor profile.
  • 1 small shallot, finely chopped: Shallots have a milder taste than onions, adding subtle sweetness.
  • 1 tablespoon fresh thyme, minced: This herb brings a lovely earthy flavor.
  • 2 teaspoons fresh sage, minced: The sage adds a warm, aromatic note that pairs perfectly with the beans.
  • 1 ½ teaspoons ground cumin: This steals the show; its warm aromatics are essential in this recipe.
  • 1 teaspoon ground coriander: Another layer of flavor that complements cumin’s earthiness.
  • ½ teaspoon smoked paprika (optional): A little goes a long way, especially if you like a smoky kick.
  • 1 head roasted garlic, cloves peeled: Roasting garlic mellows its flavor, making it sweet and creamy.
  • 1 (15oz) can Progresso White Beans, drained and rinsed: These beans are a great source of protein and fiber.
  • 2 ½ to 3 cups Progresso Chicken Stock or Progresso Vegetable Stock: Using a good-quality stock enhances the flavor profile.
  • Salt and freshly cracked black pepper, to taste: Essential for bringing everything together.
  • Garnish: Chopped fresh parsley for vibrancy, and grated Parmesan or Pecorino Romano if you want an umami kick.
how to make farfalle with a creamy white bean and roasted garlic sauce

Recipe Instructions

Step 1: Prepare the Pasta

Begin by boiling a large pot of salted water. Add the farfalle and cook according to the package instructions until al dente. This usually takes about 10–12 minutes. Drain the pasta, reserving a cup of the cooking water. This water is gold for adjusting the sauce later.

Step 2: Sauté Aromatics

In a large skillet, heat the olive oil over medium heat. Once it shimmers, add the finely chopped shallot. Sauté for about 2–3 minutes until softened. You don’t want them to brown.

Next, stir in the minced thyme and sage, cooking them for another minute until fragrant. Your kitchen will smell heavenly right about now.

Step 3: Spice It Up

Now add the ground cumin and coriander, and if you’re using it, the smoked paprika. Cook for about 30 seconds. This will bring out their flavors.

Step 4: Create the Creamy Sauce

Add the roasted garlic cloves to the skillet, smashing them gently with a wooden spoon. They should break apart easily, blending into your sauté. Next, add the drained white beans and 2 ½ cups of stock. Bring this mixture to a gentle simmer.

Allow it to bubble away for about 5 minutes. Use your wooden spoon to mash the beans slightly—this will help thicken the sauce.

Step 5: Incorporate Pasta

Now, introduce the cooked farfalle to the skillet. Toss everything together, ensuring the pasta is well coated in the creamy sauce. If the sauce seems too thick, gradually stir in the reserved pasta water until you achieve your desired consistency.

Taste and season with salt and freshly cracked black pepper.

Step 6: Garnish and Serve

Plate your pasta up and sprinkle with freshly chopped parsley. If you’re in the mood for an extra flavor boost, add a sprinkle of Parmesan or Pecorino Romano.

This dish is perfect served immediately, but I find it even better the next day as the flavors meld together beautifully.

Recipe Notes

  • Farfalle Pasta: Its unique shape captures the sauce well, making every bite flavorful.
  • Olive Oil: Choose a good quality oil to maximize flavor. A robust extra virgin will give depth to your dish.
  • Shallot vs. Onion: Both are great, but shallots have milder, sweeter notes that complement rather than overpower the dish.
  • Fresh Herbs: They add brightness and aroma. Don’t skip them; they’re essential.
  • Ground Spices: Cumin and coriander should not be substituted with whole spices. Ground forms are necessary for an even taste throughout the dish.
  • Roasted Garlic: If you’re roasting garlic yourself, pop it in the oven with a drizzle of olive oil wrapped in foil for 20–30 minutes at 400°F until soft and golden.

Nutrition Information

Each serving of marinated tomatoes offers a low-calorie treat rich in vitamins and antioxidants. The specific values will depend on portions, but here’s a rough breakdown:

  • Calories: 400
  • Protein: 21g
  • Total Fat: 35g
  • Carbohydrates: 120g
  • Fiber: 1g
  • Sugars: 2g
  • Vitamin C: 15% Daily Value
farfalle with a creamy white bean and roasted garlic sauce copycat recipe

Recipe Variations

  • Add Protein: Chicken or shrimp could be great additions if you desire meat.
  • Swap the Beans: Chickpeas or cannellini beans would also work beautifully here.
  • Vegetable Boost: Consider adding spinach or kale for added greens or some sundried tomatoes for a burst of flavor.
  • Cheesy Version: Incorporate goat cheese or feta for a tangy twist.
  • Spicy Kick: Add a pinch of red pepper flakes if you like a bit of heat.
  • Gluten-Free Option: There are great gluten-free pasta options available that will hold up nicely in this dish.
farfalle with a creamy white bean and roasted garlic sauce copycat recipe

Farfalle with Creamy White Bean and Roasted Garlic Sauce

Before we dive into the tantalizing recipe for farfalle with a creamy white bean and roasted garlic sauce, let’s discuss what you can serve alongside it to brighten your meal. This pasta dish is rich and creamy, so balance is key
Prep Time 20 minutes
Cook Time 20 minutes
Total Time 40 minutes
Course Dinner
Cuisine Italian-American
Servings 4
Calories 400 kcal

Equipment

  • Pot

Ingredients
  

  • ½ pound dry farfalle pasta: I like to use whole wheat for added nutrition. The farfalle holds the creamy sauce so well.
  • 3 tablespoons extra-virgin olive oil: A good oil can make a difference. It should have a fruity flavor profile.
  • 1 small shallot finely chopped: Shallots have a milder taste than onions, adding subtle sweetness.
  • 1 tablespoon fresh thyme minced: This herb brings a lovely earthy flavor.
  • 2 teaspoons fresh sage minced: The sage adds a warm, aromatic note that pairs perfectly with the beans.
  • 1 ½ teaspoons ground cumin: This steals the show; its warm aromatics are essential in this recipe.
  • 1 teaspoon ground coriander: Another layer of flavor that complements cumin’s earthiness.
  • ½ teaspoon smoked paprika optional: A little goes a long way, especially if you like a smoky kick.
  • 1 head roasted garlic cloves peeled: Roasting garlic mellows its flavor, making it sweet and creamy.
  • 1 15oz can Progresso White Beans, drained and rinsed: These beans are a great source of protein and fiber.
  • 2 ½ to 3 cups Progresso Chicken Stock or Progresso Vegetable Stock: Using a good-quality stock enhances the flavor profile.
  • Salt and freshly cracked black pepper to taste: Essential for bringing everything together.
  • Garnish: Chopped fresh parsley for vibrancy and grated Parmesan or Pecorino Romano if you want an umami kick.

Instructions
 

Step 1: Prepare the Pasta

  • Begin by boiling a large pot of salted water. Add the farfalle and cook according to the package instructions until al dente. This usually takes about 10–12 minutes. Drain the pasta, reserving a cup of the cooking water. This water is gold for adjusting the sauce later.

Step 2: Sauté Aromatics

  • In a large skillet, heat the olive oil over medium heat. Once it shimmers, add the finely chopped shallot. Sauté for about 2–3 minutes until softened. You don’t want them to brown.
  • Next, stir in the minced thyme and sage, cooking them for another minute until fragrant. Your kitchen will smell heavenly right about now.

Step 3: Spice It Up

  • Now add the ground cumin and coriander, and if you’re using it, the smoked paprika. Cook for about 30 seconds. This will bring out their flavors.

Step 4: Create the Creamy Sauce

  • Add the roasted garlic cloves to the skillet, smashing them gently with a wooden spoon. They should break apart easily, blending into your sauté. Next, add the drained white beans and 2 ½ cups of stock. Bring this mixture to a gentle simmer.
  • Allow it to bubble away for about 5 minutes. Use your wooden spoon to mash the beans slightly—this will help thicken the sauce.

Step 5: Incorporate Pasta

  • Now, introduce the cooked farfalle to the skillet. Toss everything together, ensuring the pasta is well coated in the creamy sauce. If the sauce seems too thick, gradually stir in the reserved pasta water until you achieve your desired consistency.
  • Taste and season with salt and freshly cracked black pepper.

Step 6: Garnish and Serve

  • Plate your pasta up and sprinkle with freshly chopped parsley. If you’re in the mood for an extra flavor boost, add a sprinkle of Parmesan or Pecorino Romano.
  • This dish is perfect served immediately, but I find it even better the next day as the flavors meld together beautifully.

Notes

  • Farfalle Pasta: Its unique shape captures the sauce well, making every bite flavorful.
  • Olive Oil: Choose a good quality oil to maximize flavor. A robust extra virgin will give depth to your dish.
  • Shallot vs. Onion: Both are great, but shallots have milder, sweeter notes that complement rather than overpower the dish.
  • Fresh Herbs: They add brightness and aroma. Don’t skip them; they’re essential.
  • Ground Spices: Cumin and coriander should not be substituted with whole spices. Ground forms are necessary for an even taste throughout the dish.
  • Roasted Garlic: If you’re roasting garlic yourself, pop it in the oven with a drizzle of olive oil wrapped in foil for 20–30 minutes at 400°F until soft and golden.

Nutrition

Calories: 400kcalCarbohydrates: 120gProtein: 21gFat: 35gFiber: 1gSugar: 2g
Keyword Farfalle with Creamy White Bean and Roasted Garlic Sauce
Tried this recipe?Let us know how it was!

FAQs

1. Can I make this dish ahead of time?

Absolutely! You can prepare the sauce and pasta separately and combine them just before serving. This dish also stores well in the fridge for up to 3 days.

2. What can I substitute for white beans?

If you don’t have white beans on hand, navy or cannellini beans work perfectly. They have a similar texture and flavor profile.

3. How can I make this vegan?

This recipe is already vegan if you skip the cheese garnish. Use vegetable stock for a completely plant-based version.

4. Can I freeze this dish?

Yes, this pasta freezes well. Just make sure to cool it completely before transferring it to an airtight container. When reheating, you may need to add a little stock to help loosen the sauce.

5. Is there a way to add more flavor?

Definitely! Experiment with different herbs or try adding a splash of white wine to the sauce for acidity and depth.

6. What’s the best way to store leftovers?

Store leftovers in an airtight container in the fridge. It’s best consumed within 3 days for the best flavor and texture.

Conclusion

Farfalle with creamy white bean and roasted garlic sauce is more than just a dish; it’s an experience that fills your kitchen with warmth and joy. Each bite offers a balance of creamy texture and spicy notes. It’s comforting while being incredibly nutritious.

And let’s be honest, who doesn’t love a meal that takes mere minutes to prep yet feels so indulgent? Plus, with opportunities for customization and tweaks, you can make it uniquely your own every time.

So, fire up that stove and treat yourself. I guarantee this dish will delight you and anyone lucky enough to share your table. Let’s enjoy delicious meals together while keeping health in mind—because that’s what it’s all about.

You’ll also like these latest recipes!

Fresh Shiitake Spring Rolls – Yum Yarns

fresh shiitake spring rolls

In Vietnamese cuisine, fresh spring rolls are a versatile delight. You can elevate your meal by serving these rolls alongside a variety of sides. Here are a few to consider:

  • Nuoc Cham Dipping Sauce: This classic Vietnamese sauce combines fish sauce, vinegar, sugar, garlic, and chili. It brings a tangy sweetness that perfectly complements the freshness of the rolls.
  • Thai Peanut Sauce: For a richer taste, try a homemade peanut sauce. Its creamy texture and nutty flavor create a lovely contrast to the crunchy veggies and tender shiitake mushrooms.
  • Citrusy Herb Salad: A light salad made with fresh herbs like cilantro, mint, and lime juice can brighten the meal and enhance the flavors of your spring rolls.
fresh shiitake spring rolls

Adventure Begins: Fresh Shiitake Spring Rolls

Imagine a warm evening, the sun setting, and the air is filled with the sounds of laughter. You gather with friends and family, eager to share something delicious. That’s when you’ll want to whip up fresh shiitake spring rolls. They are not just a dish; they’re a way to bring everyone together. Think of them as edible presents. Each bite is a surprise waiting to be discovered.

Spring rolls shine as portable snacks or light appetizers, and they boast the all-important “fresh” factor. When you bite into them, you experience that satisfying crunch combined with an explosion of flavors. But they’re more than just good eats; they also open the door to a wider culinary journey.

Why This Recipe Works

1. A Variety of Textures: The combination of crispy vegetables, tender shiitake mushrooms, and chewy rice wrappers creates a delightful mix. Each bite offers crunch, softness, and everything in between.

2. Nutrient-Rich Ingredients: Packed with fresh produce like bell peppers and avocado, these spring rolls are a feast for your health. Shiitake mushrooms are known for their immune-boosting properties, adding another layer of nutrition.

3. Quick Preparation Time: Busy weeknight? No problem! This recipe comes together in minimal time. With just a little prep work, you can enjoy these delicious rolls in no time.

4. Customizable Flavors: Want to spice things up? Feel free to swap in your favorite vegetables. You’re in control, so get creative and discover flavors you love.

How Does It Taste?

The taste of fresh shiitake spring rolls is hard to describe in words alone; it’s an experience. Imagine biting into a roll and feeling the crispness of the vegetables, followed by the earthiness of the shiitake mushrooms. 

The blend of fresh herbs like basil and cilantro adds a refreshing bouquet. Paired with a dipping sauce, each bite becomes a savory journey.

You will also like the following Lunch and Dinner recipes!

What Sets This Recipe Apart?

This version of fresh shiitake spring rolls stands out because of the balance in flavors. Many recipes may rely heavily on one or two ingredients, but this recipe incorporates a range of vibrant vegetables and herbs. You won’t just taste the mushrooms or the sauce; each ingredient interacts harmoniously, making for a well-rounded dish.

The Ingredients

For these fresh shiitake spring rolls, you’ll need:

  • 1 block of cooked rice noodles (you can also use vermicelli)
  • ¼ cup cooked rice noodles
  • 2 tablespoons chopped cashews for crunch
  • 2 tablespoons spicy almond-coconut sauce, for a kick
  • 1 tablespoon olive oil, or you can use vegetable broth for sautéing
  • ½ cup sliced shiitake mushrooms
  • 4-5 slices of various bell peppers (red or yellow for color)
  • 3 slices of ripe avocado for creaminess
  • 1 teaspoon freshly chopped basil for that vibrant flavor
how to make fresh shiitake spring rolls

Instructions

Step 1: Prepare the Noodles

Start by cooking the rice noodles according to the package instructions. It’s essential to rinse them under cold water to stop the cooking process and keep them from getting sticky.

Step 2: Sauté the Shiitake Mushrooms

In a skillet, heat olive oil over medium heat. Add the sliced shiitake mushrooms and cook until they’re tender and fragrant. This won’t take long, just about 3-4 minutes. The goal is to develop their natural umami flavor.

Step 3: Assemble the Rolls

Lay out a damp rice wrapper on a clean surface. Layer the cooked noodles, sautéed shiitake mushrooms, and colorful bell pepper slices. Don’t forget the avocado and some chopped basil for freshness.

Step 4: Roll Them Up

Starting from one end, carefully roll the wrapper over the filling. Tuck in the sides as you go to create a secure roll. Keep things tight, but not so tight that the wrapper tears.

Step 5: Serve with Dipping Sauce

Once your rolls are assembled, cut them in half for presentation. Serve alongside your choice of dipping sauce and watch everyone delight in this culinary creation.

Notes

Here are a few tips to make your spring roll experience even better:

  • Keep Wrappers Covered: Rice wrappers can dry out quickly. Keep them covered with a damp cloth while you work to prevent this.
  • Use Room Temperature Ingredients: To avoid tearing the rice paper, let your fillings reach room temperature before using them.
  • Experiment with Sauces: Don’t hesitate to try different dipping sauces. A hoisin mix or soy sauce can also add great flavors.
  • Use Fresh Agar or Tofu: If you want to keep it plant-based, swap in some fresh tofu or agar for additional texture.
  • Don’t Overfill: It might be tempting, but resist the urge to overstuff your rolls. Too much filling can lead to breakage.

Nutrition Information

For nutrition information, consider that each roll may vary based on specific ingredients and how you assemble them, but here’s a rough estimate:

  • Calories: Approximately 150-200 per roll
  • Protein: 4-5g
  • Carbohydrates: 25-30g
  • Fat: 6-8g
fresh shiitake spring rolls  copycat recipe

How Do You Store Fresh Shiitake Spring Rolls?

Fresh rolls are best enjoyed right away. If you need to store them, put them in an airtight container with a damp cloth to keep the wrappers from drying out. Consuming them within a day or two is ideal for maintaining their texture and flavor.

Sides for Fresh Shiitake Spring Rolls

When serving these rolls, consider these great side options:

  • Vietnamese Slaw: A crunchy cabbage slaw with carrots and a zingy dressing pairs well. The freshness complements the rolls, adding more texture and flavor.
  • Chilled Edamame: Lightly salted, these green delights are high in protein and provide a satisfying little bite to round out the meal.
  • Cucumber Salad: A simple cucumber salad with rice vinegar, sesame oil, and sesame seeds offers freshness and lightness, balancing the heavier flavors of the rolls.

Alternatives for Ingredients

No spring roll is the same, and substitutions can lead to exciting discoveries. Here are some ingredient alternatives:

  • Mushroom Substitute: If you can’t find shiitake, feel free to use other mushrooms like portobello or cremini for a similar texture.
  • Rice Noodles: If unavailable, try substituting with thin soba or buckwheat noodles. They will bring unique flavors and density.
  • Bell Peppers: Swap in other crunchy veggies like jicama or cucumber for crunch.
  • Nut Sauce Alternatives: If you are allergic to nuts, consider using tahini or sunflower seed butter for a different creamy effect in your sauce.
fresh shiitake spring rolls copycat recipe

Fresh Shiitake Spring Rolls

In Vietnamese cuisine, fresh spring rolls are a versatile delight. You can elevate your meal by serving these rolls alongside a variety of sides.
Prep Time 10 minutes
Cook Time 5 minutes
Total Time 15 minutes
Course Dinner
Cuisine American
Servings 2
Calories 200 kcal

Equipment

  • Skillet

Ingredients
  

  • 1 block of cooked rice noodles you can also use vermicelli
  • ¼ cup cooked rice noodles
  • 2 tablespoons chopped cashews for crunch
  • 2 tablespoons spicy almond-coconut sauce for a kick
  • 1 tablespoon olive oil or you can use vegetable broth for sautéing
  • ½ cup sliced shiitake mushrooms
  • 4-5 slices of various bell peppers red or yellow for color
  • 3 slices of ripe avocado for creaminess
  • 1 teaspoon freshly chopped basil for that vibrant flavor

Instructions
 

Step 1: Prepare the Noodles

  • Start by cooking the rice noodles according to the package instructions. It’s essential to rinse them under cold water to stop the cooking process and keep them from getting sticky.

Step 2: Sauté the Shiitake Mushrooms

  • In a skillet, heat olive oil over medium heat. Add the sliced shiitake mushrooms and cook until they’re tender and fragrant. This won’t take long, just about 3-4 minutes. The goal is to develop their natural umami flavor.

Step 3: Assemble the Rolls

  • Lay out a damp rice wrapper on a clean surface. Layer the cooked noodles, sautéed shiitake mushrooms, and colorful bell pepper slices. Don’t forget the avocado and some chopped basil for freshness.

Step 4: Roll Them Up

  • Starting from one end, carefully roll the wrapper over the filling. Tuck in the sides as you go to create a secure roll. Keep things tight, but not so tight that the wrapper tears.

Step 5: Serve with Dipping Sauce

  • Once your rolls are assembled, cut them in half for presentation. Serve alongside your choice of dipping sauce and watch everyone delight in this culinary creation.

Notes

  • Keep Wrappers Covered: Rice wrappers can dry out quickly. Keep them covered with a damp cloth while you work to prevent this.
  • Use Room Temperature Ingredients: To avoid tearing the rice paper, let your fillings reach room temperature before using them.
  • Experiment with Sauces: Don’t hesitate to try different dipping sauces. A hoisin mix or soy sauce can also add great flavors.
  • Use Fresh Agar or Tofu: If you want to keep it plant-based, swap in some fresh tofu or agar for additional texture.
  • Don’t Overfill: It might be tempting, but resist the urge to overstuff your rolls. Too much filling can lead to breakage.

Nutrition

Calories: 200kcalCarbohydrates: 30gProtein: 5gFat: 8g
Keyword Fresh Shiitake Spring Rolls
Tried this recipe?Let us know how it was!

Frequently Asked Questions

1. Can I prepare these spring rolls in advance?

Yes! You can prep the filling and store it in the fridge for a couple of days. However, it’s best to assemble the rolls shortly before serving to keep them fresh.

2. Are these spring rolls gluten-free?

Yes! Ensure you use rice paper wrappers and gluten-free noodles. Check all sauces for gluten-containing ingredients to keep it safe.

3. Can I freeze fresh spring rolls?

It’s not recommended to freeze fresh rolls, as the rice paper can become tough and unappetizing upon defrosting. Stick to refrigerating for short-term storage.

4. What’s the best way to slice these rolls?

Using a sharp knife, slice the rolls in half diagonally. This ensures a clean cut, making them easy to dip and preventing the filling from spilling out.

Conclusion

Now that you’ve learned the ropes of crafting fresh shiitake spring rolls, it’s time to roll up your sleeves and get cooking! This recipe offers flexibility, nutrition, and a symphony of flavors.

So, gather your ingredients, invite some friends over, and enjoy the delightful experience of making and sharing these incredible rolls. Trust me, each roll is a celebration of flavor, a burst of health, and a testament to the joy of good food enjoyed together. Happy rolling!

You’ll also like these latest recipes!