When it comes to creating flavor-packed burritos, nothing beats a well-made Carnitas Burrito. Just picture this: tender, slow-cooked pork, perfectly seasoned, enveloped in a warm tortilla and paired with a medley of fresh toppings.
Before diving deep into the wonder that is the Carnitas Burrito, let me first share a little secret about what goes beautifully alongside it. For me, a chilled glass of horchata always hits the spot.
The creamy, cinnamon-infused rice drink perfectly balances the savory flavors of the burrito. It’s like a mini fiesta in your mouth.

What is a Carnitas Burrito?
The Carnitas Burrito is a delightful twist on the traditional burrito. Originating from Mexico, “Carnitas” means “little meats,” and it typically refers to pork that has been cooked slowly until tender.
The meat is flavorful and juicy, often served with a variety of toppings wrapped snugly in a tortilla. This hearty meal can be customized to suit your taste buds.
You will also like the following Dinner recipes!
The Ingredients
Creating the ultimate Carnitas Burrito starts with stellar ingredients. Here’s what you’ll need:
Carnitas
4 pounds boneless pork shoulder, cut into 3-inch chunks
2 whole cinnamon sticks
1 tbsp ground cumin
1 small white onion, quartered
2 tsp kosher salt
1 orange, cut into quarters
2 tsp chili powder
1 tbsp dried Mexican oregano
Burrito
4 cups drained canned pinto beans
4 cups shredded sharp cheddar or crumbled queso fresco
4 cups fresh pico de gallo
8 large flour tortillas, warmed
4 cups creamy guacamole
4 cups cilantro-lime rice

How to Make Carnitas Burrito?
Before we dive into the step-by-step directions, let’s acknowledge the genuine satisfaction that comes with assembling this delicious meal. The joy is in the details, and in the process, you will discover your own rhythm.
Step-by-Step Directions
Step 1: Prepare the Carnitas
Start by placing the pork shoulder chunks into a slow cooker. This magical machine will help us render the meat into its tender glory. Add in the quartered onion, ground cumin, kosher salt, chili powder, and cinnamon sticks. These spices will infuse the pork with flavor that’s hard to resist.
Step 2: Add Citrus
Next, toss those orange quarters right on top. The citrus not only tenderizes the meat but also imparts a subtle sweetness. If sweetness were a hug, here it is – cozy and comforting.
Step 3: Cooking Time
Cover the slow cooker and set it to cook for about 8 hours on low. You’ll be tempted to peek, but resist the urge! Trust the process. The smell will be enchanting.
Step 4: Shred the Pork
Once the time is up, take the pork out and allow it to cool slightly. Then, use two forks to shred the meat. It should fall apart effortlessly. You can also reserve some of the juices from the slow cooker to keep the meat moist.
Step 5: Prepare the Rice and Beans
While the pork is cooking, go ahead and prepare the cilantro-lime rice and heated pinto beans separately. For the rice, mix cooked rice with lime juice and chopped cilantro. This bright addition complements the richness of the carnitas beautifully.
Step 6: Assemble the Burrito
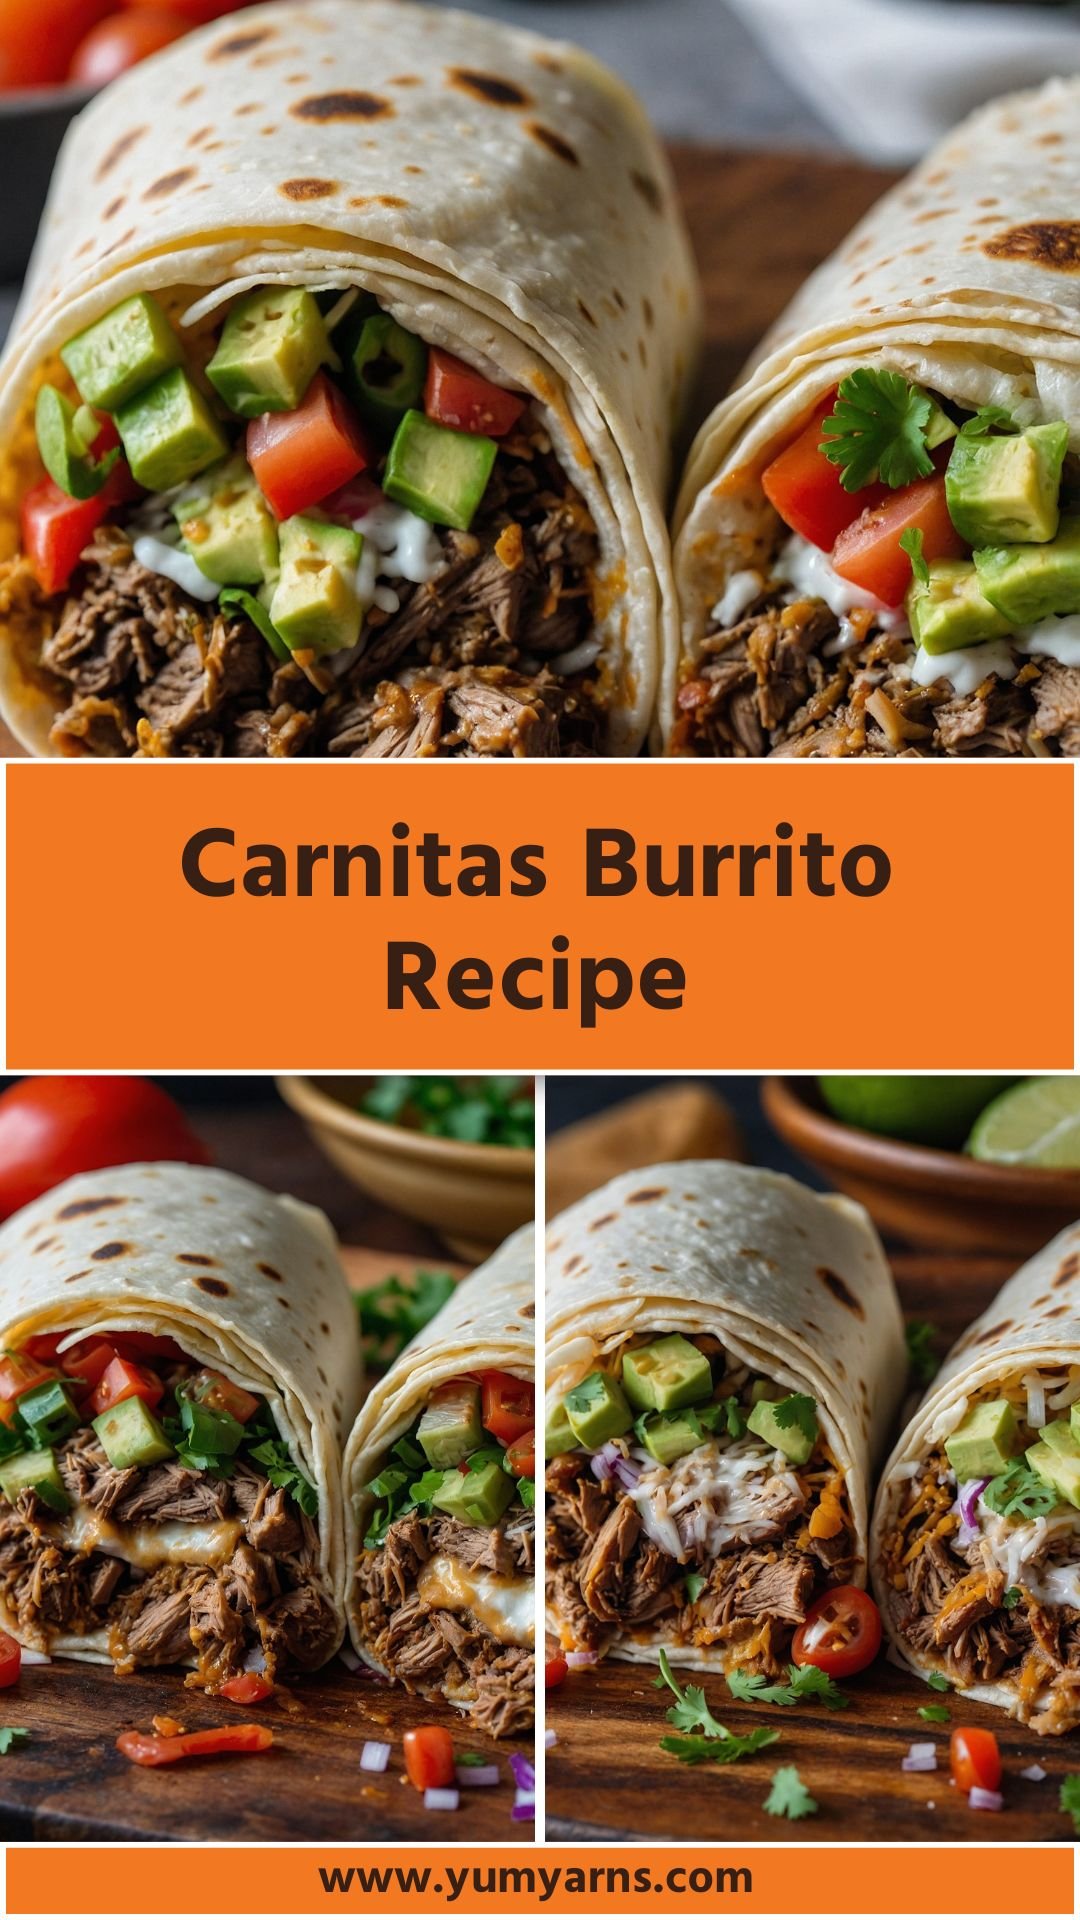
Now comes the fun part! Take a warm tortilla and layer it with a generous scoop of carnitas, rice, beans, pico de gallo, and a dollop of guacamole. Feel free to add sharp cheddar or crumble queso fresco on top to elevate the flavors.
Step 7: Wrap and Roll
Fold in the sides of the tortilla and then roll it from the bottom up. Make sure it’s snug but not too tight. You want it to hold together without squeezing out the delicious contents.
Step 8: Serve
Slice your burrito in half to reveal the colorful highlights of fresh ingredients. Serve it warm with additional salsa or guacamole on the side if you’re feeling indulgent.
Notes
Here are some tips to ensure your Carnitas Burrito is a complete success:
Use Bone-In Pork: Bone-in cuts can add extra flavor and moisture to your carnitas.
Sear the Pork First: For added depth of flavor, sear the pork chunks in a skillet before adding them to the slow cooker.
Fresh Herbs Matter: Don’t skimp on the cilantro – it adds a vibrant freshness that ties everything together.
Level Up the Guacamole: Add diced jalapeños or a splash of lime juice for an extra kick in your guacamole.
Perfectly Warm Tortillas: Warm your tortillas on a skillet for a few seconds before wrapping to make them flexible.
Storage Tips
If you have leftovers (and I doubt you will), here’s how to save them:
Refrigerate: Store the filling in an airtight container. Use it within 3-4 days.
Freeze: For longer storage, freeze the carnitas in individual portions. Thaw before reheating.
Tortilla Storage: Keep leftover tortillas wrapped in foil or in a zip-top bag to maintain their freshness.
Nutrition Information
Carnitas Burrito Recipe Nutrition Facts

Serving Suggestions
Here are some excellent ways to enhance your Carnitas Burrito experience:
Sliced Jalapeños: For those who love heat, thinly sliced jalapeños add a spicy kick.
Fresh Avocado: In addition to guacamole, fresh avocado slices bring creaminess and richness.
Lettuce Blends: Top with crunchy shredded lettuce for added texture.
Sour Cream: A dollop will add creaminess and cut through the savory flavors.
Hot Sauce: A few drops of your favorite hot sauce can elevate your burrito to new heights.

What Other Substitutes Can I Use in Carnitas Burrito?
Flexibility is the key with burritos. Here are some substitutes to consider:
Chicken: Swap the pork for shredded chicken for a lighter version.
Beef: Use flank steak for a rich, beefy flavor.
Tempeh: For a vegetarian option, tempeh can be marinated and cooked with the same spices.
Cauliflower: Roasted cauliflower gives a unique taste and texture, perfect for a vegan option.
Turkey: Ground turkey offers a leaner meat choice while still providing the necessary protein.

Carnitas Burrito Recipe
Equipment
- Slow cooker
Ingredients
Carnitas
- 4 pounds boneless pork shoulder cut into 3-inch chunks
- 2 whole cinnamon sticks
- 1 tbsp ground cumin
- 1 small white onion quartered
- 2 tsp kosher salt
- 1 orange cut into quarters
- 2 tsp chili powder
- 1 tbsp dried Mexican oregano
Burrito
- 4 cups drained canned pinto beans
- 4 cups shredded sharp cheddar or crumbled queso fresco
- 4 cups fresh pico de gallo
- 8 large flour tortillas warmed
- 4 cups creamy guacamole
- 4 cups cilantro-lime rice
Instructions
Step 1: Prepare the Carnitas
- Start by placing the pork shoulder chunks into a slow cooker. This magical machine will help us render the meat into its tender glory. Add in the quartered onion, ground cumin, kosher salt, chili powder, and cinnamon sticks. These spices will infuse the pork with flavor that’s hard to resist.
Step 2: Add Citrus
- Next, toss those orange quarters right on top. The citrus not only tenderizes the meat but also imparts a subtle sweetness. If sweetness were a hug, here it is – cozy and comforting.
Step 3: Cooking Time
- Cover the slow cooker and set it to cook for about 8 hours on low. You’ll be tempted to peek, but resist the urge! Trust the process. The smell will be enchanting.
Step 4: Shred the Pork
- Once the time is up, take the pork out and allow it to cool slightly. Then, use two forks to shred the meat. It should fall apart effortlessly. You can also reserve some of the juices from the slow cooker to keep the meat moist.
Step 5: Prepare the Rice and Beans
- While the pork is cooking, go ahead and prepare the cilantro-lime rice and heated pinto beans separately. For the rice, mix cooked rice with lime juice and chopped cilantro. This bright addition complements the richness of the carnitas beautifully.
Step 6: Assemble the Burrito
- Now comes the fun part! Take a warm tortilla and layer it with a generous scoop of carnitas, rice, beans, pico de gallo, and a dollop of guacamole. Feel free to add sharp cheddar or crumble queso fresco on top to elevate the flavors.
Step 7: Wrap and Roll
- Fold in the sides of the tortilla and then roll it from the bottom up. Make sure it’s snug but not too tight. You want it to hold together without squeezing out the delicious contents.
Step 8: Serve
- Slice your burrito in half to reveal the colorful highlights of fresh ingredients. Serve it warm with additional salsa or guacamole on the side if you’re feeling indulgent.
Notes
- Use Bone-In Pork: Bone-in cuts can add extra flavor and moisture to your carnitas.
- Sear the Pork First: For added depth of flavor, sear the pork chunks in a skillet before adding them to the slow cooker.
- Fresh Herbs Matter: Don’t skimp on the cilantro – it adds a vibrant freshness that ties everything together.
- Level Up the Guacamole: Add diced jalapeños or a splash of lime juice for an extra kick in your guacamole.
- Perfectly Warm Tortillas: Warm your tortillas on a skillet for a few seconds before wrapping to make them flexible.
Nutrition
Frequently Asked Questions
Can I use whole-wheat tortillas instead of flour tortillas?
Absolutely! Whole-wheat tortillas offer a healthier alternative, adding fiber to your meal.
How can I make my burrito gluten-free?
Use gluten-free tortillas made from corn or alternative grains. Ensure that your spices do not contain gluten.
Can I prepare the carnitas ahead of time?
Yes! You can cook and shred the carnitas a day or two in advance, then store them in the fridge until you’re ready to assemble the burritos.
What other toppings do you recommend for the burrito?
Consider adding black olives, shredded cheese, or even a sprinkle of crumbled feta for a unique twist.
How do I reheat leftover burritos?
Wrap your burrito in foil and heat in the oven at 350°F for about 15-20 minutes until warmed through. Alternatively, a microwave works well but can make the tortilla chewy
Conclusion
Delving into the world of the Carnitas Burrito has been a flavorful journey, don’t you think? Each bite brings a burst of flavors, memories, and culinary adventure. Whether you’re making it for yourself, friends, or family, this dish has a way of bringing people together.
Dive in, roll up your sleeves, and enjoy the delightful process of creating something truly special. Trust me, once you experience that slow-cooked goodness, you’ll keep coming back for more. Enjoy!