Every great breakfast or brunch deserves a delightful sidekick, and for me, that’s a zesty fruit salad. Fresh watermelon, juicy strawberries, and tangy oranges added to a bowl of creamy yogurt make the perfect counterpoint to the golden, fluffy bites of brioche French toast.
There’s something about that combination that sets your morning up for success.

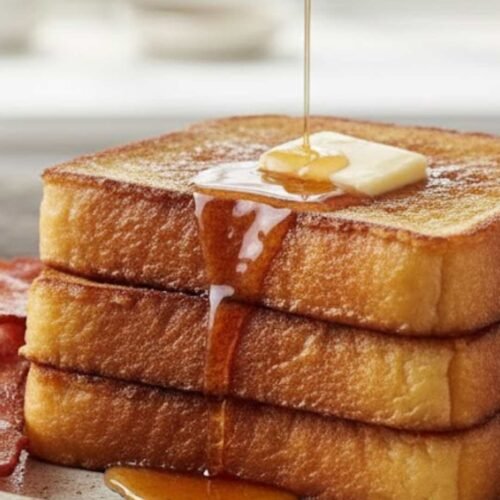
French toast has a special place in my heart. It evokes memories of lazy Sunday mornings, warm kitchens, and the sweet smell of cooking bread. Using brioche for this dish takes it to a whole new level.
With its buttery texture and slightly sweet flavor, brioche transforms a classic breakfast into something extraordinary that you can’t resist.
You Might Like These Recipes!
Breakfast Poutine With Hollandaise Sauce Recipe
What is French Toast with Brioche?
French toast is a dish made from bread soaked in an egg mixture and then fried until golden. Using brioche, a rich and soft bread, adds a luxurious touch. The thing that sets this dish apart is not just what it’s made of but the satisfying flavor and texture that come with each bite. You end up with a beautiful contrast between the crispy outside and the tender soft inside.
Why This Recipe Works
This recipe shines because it takes advantage of simple ingredients but elevates them with quality and technique. The sweetness from the brioche combined with the richness of eggs and milk creates a flavor profile that’s both comforting and indulgent. Plus, it’s quick enough to whip up on a busy morning yet fancy enough for a weekend brunch.
Ingredients You’ll Need to Make this French Toast with Brioche

– 4 large eggs
– 1 cup whole milk
– 1 tablespoon granulated sugar
– 1 teaspoon pure vanilla extract
– 1 teaspoon cinnamon (for added warmth)
– 4 tablespoons unsalted butter, divided
– 10 slices of brioche bread
– ½ cup pure maple syrup, warmed
– Fresh seasonal berries, for serving
– A sprinkle of powdered sugar, for serving (optional)
Ingredients From : fromvalerieskitchen.com
How to Make French Toast with Brioche
Making French toast may seem simple, but there are ways to maximize flavor and texture. Follow these steps, and you’ll create a dish that’s sure to impress.
Step-by-Step Directions
Step 1: Prepare the Egg Mixture

In a mixing bowl, crack 4 large eggs and whisk them until they are frothy. Next, add 1 cup of whole milk, 1 tablespoon of granulated sugar, 1 teaspoon of pure vanilla extract, and 1 teaspoon of cinnamon. Whisk everything together until well combined. This mixture will be the lifeblood of your French toast, creating a delicious custard that soaks into the brioche.
Step 2: Heat Your Skillet

Grab your trusty skillet — a 12 to 14-inch one is ideal — and place it on the stovetop over medium heat. While it heats up, add 1 tablespoon of unsalted butter and let it melt. You’ll know it’s ready when the butter starts bubbling but hasn’t browned yet.
Step 3: Coat the Brioche Slices

Dip a slice of brioche into the egg mixture, turning it over to ensure both sides are well-coated. Don’t let it soak too long; just a few seconds will do since brioche is incredibly soft and absorbs custard well.
Step 4: Cook the French Toast

Once the skillet is hot and the butter melted, place the coated brioche in the skillet. Depending on the size of your skillet, you can fry in batches. Cook for about 3 to 4 minutes on one side, or until it turns a lovely golden brown. Flip it with a spatula and allow it to cook for another 3 to 4 minutes on the opposite side.
Step 5: Keep Warm

Remove the cooked slices from the skillet and transfer them to a platter. If you’re making a large batch, you can keep them warm in a 200°F oven until all the pieces are ready.
Step 6: Finish Cooking

Wipe out the skillet with a paper towel to remove any burnt pieces. Add another tablespoon of butter and repeat the process with the remaining brioche slices, utilizing the egg mixture.
Step 7: Serve
As soon as the last slice is cooked, it’s time to serve! Drizzle with warmed maple syrup, top with fresh seasonal berries, and sprinkle with powdered sugar if you’re feeling fancy!
Tips
– Choose Quality Ingredients: The better your brioche and maple syrup, the better your French toast will taste.
– Preheat the Skillet: A properly heated skillet ensures even cooking and prevents sticking.
– Experiment with Toppings: Fresh whipped cream, yogurt, or nuts can take your French toast to the next level.
– Make Ahead: You can prepare the egg mixture the night before to save time.
– No Brioche? Any soft bread like challah or even sourdough works well as substitutions.
How to Store the Leftovers?
If you’re lucky enough to have leftovers (which I often don’t), allow the French toast to cool completely. Place slices in an airtight container and refrigerate for up to 3 days. Reheat in a skillet or oven to maintain its delightful texture. Microwaving is an option, but it may make the French toast a bit soggy.
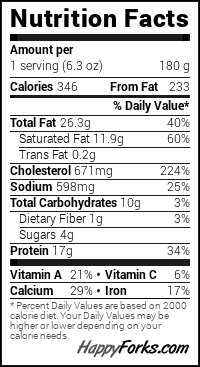
Nutrition Information
This French toast is not just a treat, but it can fit into a balanced diet. One serving contributes approximately 350 calories, along with protein from the eggs and a bit of healthy fat from the butter. To make it lighter, you can substitute whole milk with a lower-fat alternative or plant-based milk.
What are Some Recommended Side Dishes for French Toast with Brioche?
– Crispy Bacon: Adds a salty crunch that perfectly balances the sweetness.
– Sizzling Sausage Links: Offers a hearty, savory contrast to the sweet bread.
– Seasonal Fruit Salad: Bright and fresh fruits add color and a juicy burst.
– Greek Yogurt: A side of creamy yogurt can bring a tangy twist and extra protein.
– Hash Browns: Crisped potatoes give a satisfying crunch next to soft French toast.
If the Items Are Not Available in Your Pantry, What Are Some Substitute Options for the Ingredients?
– Brioche:Challah or soft white bread work beautifully as alternatives.
– Whole Milk:Almond milk or oat milk can replace whole milk for those avoiding dairy.
– Granulated Sugar:Brown sugar can add a deeper flavor to your egg mixture.
– Vanilla Extract:Vanilla bean paste makes a great stand-in, adding a lovely speckled look.
– Butter: Use coconut oil or margarine if you want a dairy-free option.

French Toast With Brioche
Equipment
- Whisk
- Mixing bowl
- Skillet
- Spatula
- Baking sheet
Ingredients
- – 4 large eggs
- – 1 cup whole milk
- – 1 tablespoon granulated sugar
- – 1 teaspoon pure vanilla extract
- – 1 teaspoon cinnamon for added warmth
- – 4 tablespoons unsalted butter divided
- – 10 slices of brioche bread
- – ½ cup pure maple syrup warmed
- – Fresh seasonal berries for serving
- – A sprinkle of powdered sugar for serving (optional)
Instructions
Step 1: Prepare the Egg Mixture
- In a mixing bowl, crack 4 large eggs and whisk them until they are frothy. Next, add 1 cup of whole milk, 1 tablespoon of granulated sugar, 1 teaspoon of pure vanilla extract, and 1 teaspoon of cinnamon. Whisk everything together until well combined. This mixture will be the lifeblood of your French toast, creating a delicious custard that soaks into the brioche.
Step 2: Heat Your Skillet
- Grab your trusty skillet — a 12 to 14-inch one is ideal — and place it on the stovetop over medium heat. While it heats up, add 1 tablespoon of unsalted butter and let it melt. You’ll know it’s ready when the butter starts bubbling but hasn’t browned yet.
Step 3: Coat the Brioche Slices
- Dip a slice of brioche into the egg mixture, turning it over to ensure both sides are well-coated. Don’t let it soak too long; just a few seconds will do since brioche is incredibly soft and absorbs custard well.
Step 4: Cook the French Toast
- Once the skillet is hot and the butter melted, place the coated brioche in the skillet. Depending on the size of your skillet, you can fry in batches. Cook for about 3 to 4 minutes on one side, or until it turns a lovely golden brown. Flip it with a spatula and allow it to cook for another 3 to 4 minutes on the opposite side.
Step 5: Keep Warm
- Remove the cooked slices from the skillet and transfer them to a platter. If you’re making a large batch, you can keep them warm in a 200°F oven until all the pieces are ready.
Step 6: Finish Cooking
- Wipe out the skillet with a paper towel to remove any burnt pieces. Add another tablespoon of butter and repeat the process with the remaining brioche slices, utilizing the egg mixture.
Step 7: Serve
- As soon as the last slice is cooked, it’s time to serve! Drizzle with warmed maple syrup, top with fresh seasonal berries, and sprinkle with powdered sugar if you’re feeling fancy!
Notes
Nutrition
FAQs
1. Can I make French toast with stale brioche?
Absolutely! In fact, stale brioche works quite well for French toast because it will soak up more of the egg mixture without falling apart.
2. Can I freeze French toast?
Yes! Allow the cooked French toast to cool completely, then place slices in a single layer in a freezer-safe bag. They can be frozen for up to 3 months. Reheat from frozen in the toaster or oven.
3. How can I make French toast healthier?
You can use whole grain brioche, reduce the sugar in the mixture, or serve it with a fruit compote instead of syrup.
4. Can I double the recipe?
Certainly! Just ensure your skillet is large enough to accommodate all the slices or work in batches.
5. How can I spice up the flavor?
Add a pinch of nutmeg or even a splash of orange juice/zest to the egg mixture for a unique twist!
Conclusion
Brioche French toast is more than just a breakfast dish; it’s an experience. With its unique texture and flavor, it captures the essence of comfort food in every bite. Whether you’re serving it up for yourself on a quiet morning or impressing friends at a brunch gathering, this recipe is sure to please.
So go ahead, dive in, and enjoy the deliciousness that only French toast made with brioche can deliver! Happy cooking!