Before we deep dive into the delightful universes of blueberry yogurt cookies, let’s set the stage for what complements these scrumptious treats. Picture this: a cozy afternoon, perhaps some friends gathered around, and the warm smell of baking wafting through the air. It’s a time to enjoy flavors that blend perfectly.
Pairing Suggestions:
Coffee: A rich cup of coffee, whether it’s a dark roast or a creamy latte, balances the sweetness of the cookies.
Tea: Herbal tea offers a fragrant contrast, especially varieties like chamomile or lemon balm.
Milk: The classic duo—milk sets off the creamy yogurt notes in each bite.
Whipped Cream: A dollop of fresh whipped cream on top can elevate these cookies into a decadent experience.
Fruit Salad: A fresh mix of seasonal fruits brightens things up and adds a refreshing crunch.
Now that we’ve teased your palate, let’s jump into the world of blueberry yogurt cookies.

Welcome, fellow cookie enthusiasts! If you love cookies that feel both indulgent and health-conscious, you’re in for a real treat. Blueberry yogurt cookies are not your average snack.
These delights pack natural flavors and benefits, thanks to the sweet blueberries and creamy yogurt. As a passionate food blogger and a registered dietitian, I’ve crafted this recipe with care, knowing that balanced snacks should taste as good as they are for your body.
What Are Blueberry Yogurt Cookies?
Blueberry yogurt cookies blur the lines between sweet and wholesome. They are soft, cake-like cookies that incorporate Greek yogurt, which lends moisture and protein.
The blueberries, bursting with flavor, add juicy pockets of sweetness that make each bite exciting. The cookie’s flavor is light, fruity, and perfect for any time of year, but they shine particularly in summer when blueberries are at their peak.
These aren’t just cookies; they’re a tribute to the joys of baking. Whether you’re whipping them up for a gathering or treating yourself, they provide a little slice of happiness.
You will also like the following Dessert recipes!
How Do They Taste?
Imagine taking a big ol’ bite. You’ll first notice the soft texture. The yogurt makes them tender, while the blueberries pop with every chew. There’s a gentle sweetness that doesn’t overpower but invites you back for more. Add a hint of lemon zest, and you’ve got a flavor explosion with a subtle hint of tartness.
If you enjoy a balance of flavor, these cookies will make you smile. They are hearty enough to feel satisfying but light enough to indulge without guilt. Whether enjoying one in the morning or as an afternoon snack, you’ll be grateful for the delightful combo.
Why You’ll Love This?
This is a unique cookie that checks multiple boxes. Here’s a list of reasons why they deserve a prominent place in your recipe rotation:
Healthy Ingredients: With Greek yogurt and fresh blueberries, you know you’re putting good stuff into your body.
Easy to Make: No fancy equipment or skills needed! These cookies come together in a flash.
Versatile: Great for breakfast, dessert, or a snack, they fit seamlessly into any occasion.
Customizable: Feeling adventurous? Add in some nuts or swap out the blueberries for your favorite fruits.
Kid-Friendly: Kids love them! They’re charming enough to make everyone smile.
Ingredients
Let’s get to the magic part—here’s what you’ll need to whip up blueberry yogurt cookies:
1 ¼ cups granulated sugar (superfine or regular)
1 large egg, lightly beaten
2 cups plain all-purpose flour
1 ½ teaspoons baking powder
1 ¼ cups thick Greek-style yogurt
½ teaspoon baking soda
¼ teaspoon fine sea salt
1 teaspoon freshly squeezed lemon juice
½ cup pearl sugar (Swedish style)
1 ¼ cups fresh wild blueberries
½ teaspoon pure vanilla extract
Zest of 1 lemon
1 tablespoon finely chopped fresh thyme (optional, adds subtle herbal note)

Step-by-Step Directions
Step 1: Preheat the Oven
First, preheat your oven to 350°F (175°C). This will ensure that your cookies bake evenly and to perfection.
Step 2: Prepare the Baking Sheet
Line a large baking sheet with parchment paper. This prevents sticking and makes cleanup a breeze.
Step 3: Mix the Dry Ingredients
In a bowl, combine the flour, baking powder, baking soda, and salt. Whisk them together to ensure an even distribution of the leavening agents.
Step 4: Combine the Wet Ingredients
In another bowl, beat together the granulated sugar and egg until creamy. Add the Greek yogurt, lemon juice, vanilla extract, and lemon zest. Mix until fully combined. You’ll find yourself drawn to the fresh citrus aroma—just stunning.
Step 5: Incorporate Dry into Wet
Gradually add the dry mixture to the wet mixture, folding gently with a spatula or wooden spoon. Avoid over-mixing to keep those cookies tender.
Step 6: Add Blueberries
Now comes the fun part! Fold in the blueberries gently, being careful not to mash them. Each blueberry should stay intact, ready to burst when bitten into.
Step 7: Scoop the Dough
Using a cookie scoop or tablespoon, place dough blobs on the prepared baking sheet. Space them a couple of inches apart, as they will spread slightly.
Step 8: Sprinkle with Pearl Sugar
If you’re feeling a bit decadent, sprinkle a little pearl sugar on top of each mound of dough. This will add a delightful crunch.
Step 9: Bake
Throw the baking sheet into the preheated oven. Bake for about 12–15 minutes or until the edges are golden brown. The centers will look slightly undercooked; that’s exactly what you want for that soft texture.
Step 10: Cool and Enjoy
Once baked, remove the cookies and let them cool on the baking sheet for a few minutes before transferring them to a wire rack. They’ll firm up as they cool. Now, go ahead and enjoy those delicious cookies with your favorite drink!
Tips on Making Blueberry Yogurt Cookies
Baking can be a science, but there are some tips to make your cookies even better:
Use Fresh Ingredients: Fresh blueberries make all the difference in flavor and texture.
Don’t Overbeat: Mix just until combined. Overworking the dough can lead to tougher cookies.
Chill the Dough: If you want thicker cookies, chill the dough for 30 minutes before baking.
Room Temperature Ingredients: Make sure your yogurt and egg are at room temperature for better mixing.
Experiment with Flavors: Consider adding nuts, spices like cinnamon, or even some chocolate chips for variety!
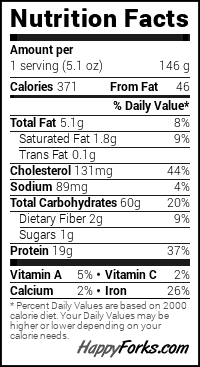
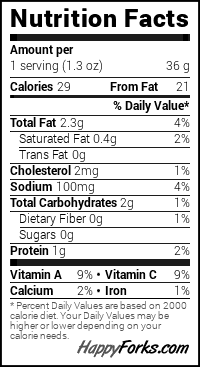
Nutrition Information
For those mindful of nutrition, here’s a quick overview per cookie (based on a batch of 24):
Calories: Approximately 150
Carbohydrates: 22g
Protein: 3g
Fat: 4g
Fiber: 1g
Sugar: 9g
Keep in mind, nutritional values can fluctuate based on exact ingredients and specific brands used.
How Do You Store These Cookies?
Storing your blueberry yogurt cookies is quite simple:
Room Temperature: Keep them in an airtight container for up to 3 days.
Refrigerate: For extended freshness, store in the fridge for up to a week. Just allow them to come to room temp before enjoying.
Freezing: You can freeze them! Allow them to cool completely, then place them in a freezer bag. They’ll last up to 2 months. Just thaw them overnight in the fridge before eating.

What Other Substitutes Can You Use in Blueberry Yogurt Cookies?
If you’re looking for alternatives or want to cater to specific dietary needs, here are some great options:
Greek Yogurt: Plain regular yogurt can work too, just keep the consistency similar for the best results.
Blueberries: Raspberries or chopped strawberries can easily replace blueberries for a different flavor twist.
Lemon Juice: Lime juice can swap in well if you’re out of lemons.
Flour: Almond flour or whole wheat flour can substitute for all-purpose flour; just be cautious of the moisture level.
Egg: For an egg-free version, a flax egg (1 tablespoon of flaxseed meal mixed with 2.5 tablespoons of water) can replace one egg.

Blueberry Yogurt Cookies
Equipment
- Bowl
- Baking sheet
Ingredients
- 1 ¼ cups granulated sugar superfine or regular
- 1 large egg lightly beaten
- 2 cups plain all-purpose flour
- 1 ½ teaspoons baking powder
- 1 ¼ cups thick Greek-style yogurt
- ½ teaspoon baking soda
- ¼ teaspoon fine sea salt
- 1 teaspoon freshly squeezed lemon juice
- ½ cup pearl sugar Swedish style
- 1 ¼ cups fresh wild blueberries
- ½ teaspoon pure vanilla extract
- Zest of 1 lemon
- 1 tablespoon finely chopped fresh thyme optional, adds subtle herbal note
Instructions
Step 1: Preheat the Oven
- First, preheat your oven to 350°F (175°C). This will ensure that your cookies bake evenly and to perfection.
Step 2: Prepare the Baking Sheet
- Line a large baking sheet with parchment paper. This prevents sticking and makes cleanup a breeze.
Step 3: Mix the Dry Ingredients
- In a bowl, combine the flour, baking powder, baking soda, and salt. Whisk them together to ensure an even distribution of the leavening agents.
Step 4: Combine the Wet Ingredients
- In another bowl, beat together the granulated sugar and egg until creamy. Add the Greek yogurt, lemon juice, vanilla extract, and lemon zest. Mix until fully combined. You’ll find yourself drawn to the fresh citrus aroma—just stunning.
Step 5: Incorporate Dry into Wet
- Gradually add the dry mixture to the wet mixture, folding gently with a spatula or wooden spoon. Avoid over-mixing to keep those cookies tender.
Step 6: Add Blueberries
- Now comes the fun part! Fold in the blueberries gently, being careful not to mash them. Each blueberry should stay intact, ready to burst when bitten into.
Step 7: Scoop the Dough
- Using a cookie scoop or tablespoon, place dough blobs on the prepared baking sheet. Space them a couple of inches apart, as they will spread slightly.
Step 8: Sprinkle with Pearl Sugar
- If you’re feeling a bit decadent, sprinkle a little pearl sugar on top of each mound of dough. This will add a delightful crunch.
Step 9: Bake
- Throw the baking sheet into the preheated oven. Bake for about 12–15 minutes or until the edges are golden brown. The centers will look slightly undercooked; that’s exactly what you want for that soft texture.
Step 10: Cool and Enjoy
- Once baked, remove the cookies and let them cool on the baking sheet for a few minutes before transferring them to a wire rack. They’ll firm up as they cool. Now, go ahead and enjoy those delicious cookies with your favorite drink!
Notes
- Use Fresh Ingredients: Fresh blueberries make all the difference in flavor and texture.
- Don’t Overbeat: Mix just until combined. Overworking the dough can lead to tougher cookies.
- Chill the Dough: If you want thicker cookies, chill the dough for 30 minutes before baking.
- Room Temperature Ingredients: Make sure your yogurt and egg are at room temperature for better mixing.
- Experiment with Flavors: Consider adding nuts, spices like cinnamon, or even some chocolate chips for variety!
Nutrition
Frequently Asked Questions
1. Can I use frozen blueberries instead of fresh?
Yes! Frozen blueberries work well, but you may need to gently fold them in, since they can be a bit more delicate.
2. How can I ensure my cookies stay soft?
Make sure not to overbake them. The cookies should look slightly undercooked in the center before cooling off, as they will firm up.
3. Can I add nuts to the recipe?
Absolutely! Chopped walnuts or pecans would add a lovely crunch and flavor dimension to the cookies.
4. What’s the raw dough like? Can I eat it safely?
The dough contains raw flour and egg, which could lead to foodborne illness if eaten raw. It’s best to bake the dough for safe consumption.
5. How can I make the cookies gluten-free?
You can replace all-purpose flour with a gluten-free flour blend. Ensure the rest of your ingredients are also gluten-free to avoid contamination.
6. Can I double the recipe?
Definitely! Just make sure you have enough space and baking sheets to accommodate all those cookies!
Conclusion
Blueberry yogurt cookies are not just baked goods; they are a wonderful blend of taste and health. They bring joy and nourishment, and their flavors can spark fond memories shared with friends over tea or coffee. With easy preparation and customizable options, these cookies deserve a regular spot on your baking sheet.
So grab your ingredients and preheat that oven! Creating these gems is an adventure in itself, and biting into one will give you that sweet satisfaction that comes only from a made-at-home treat. Whether you savor them with a cup of coffee or pack them for lunch, they’re sure to win hearts all around. Happy baking!