Before we dive into the tantalizing recipe for farfalle with a creamy white bean and roasted garlic sauce, let’s discuss what you can serve alongside it to brighten your meal. This pasta dish is rich and creamy, so balance is key. Here are some delightful pairings that will harmonize beautifully with the dish:
- A Light Salad: Think of a simple arugula salad drizzled with lemon juice and olive oil. The peppery notes of arugula will cut through the creaminess, making it a refreshing complement.
- Grilled Vegetables: Bell peppers, zucchini, and asparagus tossed with olive oil and grilled until slightly charred add a smoky contrast that brings out the flavors in the pasta.
- Crusty Bread: A warm loaf of ciabatta or sourdough is perfect for sopping up that creamy sauce. Trust me, you won’t want to leave a bit behind!
- Wine Selection: Pair this dish with a light white wine—something like a Sauvignon Blanc or a Pinot Grigio. The acidity of the wine will balance the dish’s richness.
- Cheese Board: If you’re feeling fancy, set out a cheese board with sharp cheeses, olives, and nuts. It’s always a crowd-pleaser.
- Dessert: Consider a light dessert like sorbet or a fruit tart to round off your meal without overwhelming the palate.
Now that we’ve got our side dishes covered, let’s celebrate the heart of our meal—the farfalle with a creamy white bean and roasted garlic sauce.

Why This Recipe is Great for You
Here’s why I love this recipe. First, it’s rich in plant-based protein thanks to the white beans. These little gems are not only filling but also packed with fiber. This means staying full longer and avoiding that mid-afternoon slump. Plus, roasted garlic gives a delightful, mellow sweetness that infuses the whole dish.
Additionally, the creamy sauce is made without heavy cream. Instead, it gets its texture from the beans and a touch of stock. You’ll be surprised how creamy this sauce becomes.
As someone who frequently juggles meal prep amidst a busy schedule, this dish is a lifesaver. It’s easy to whip up in under 30 minutes, and the ingredients are mostly pantry staples. There’s also something satisfying about knowing you’re making a meal from scratch, especially when it tastes this good.
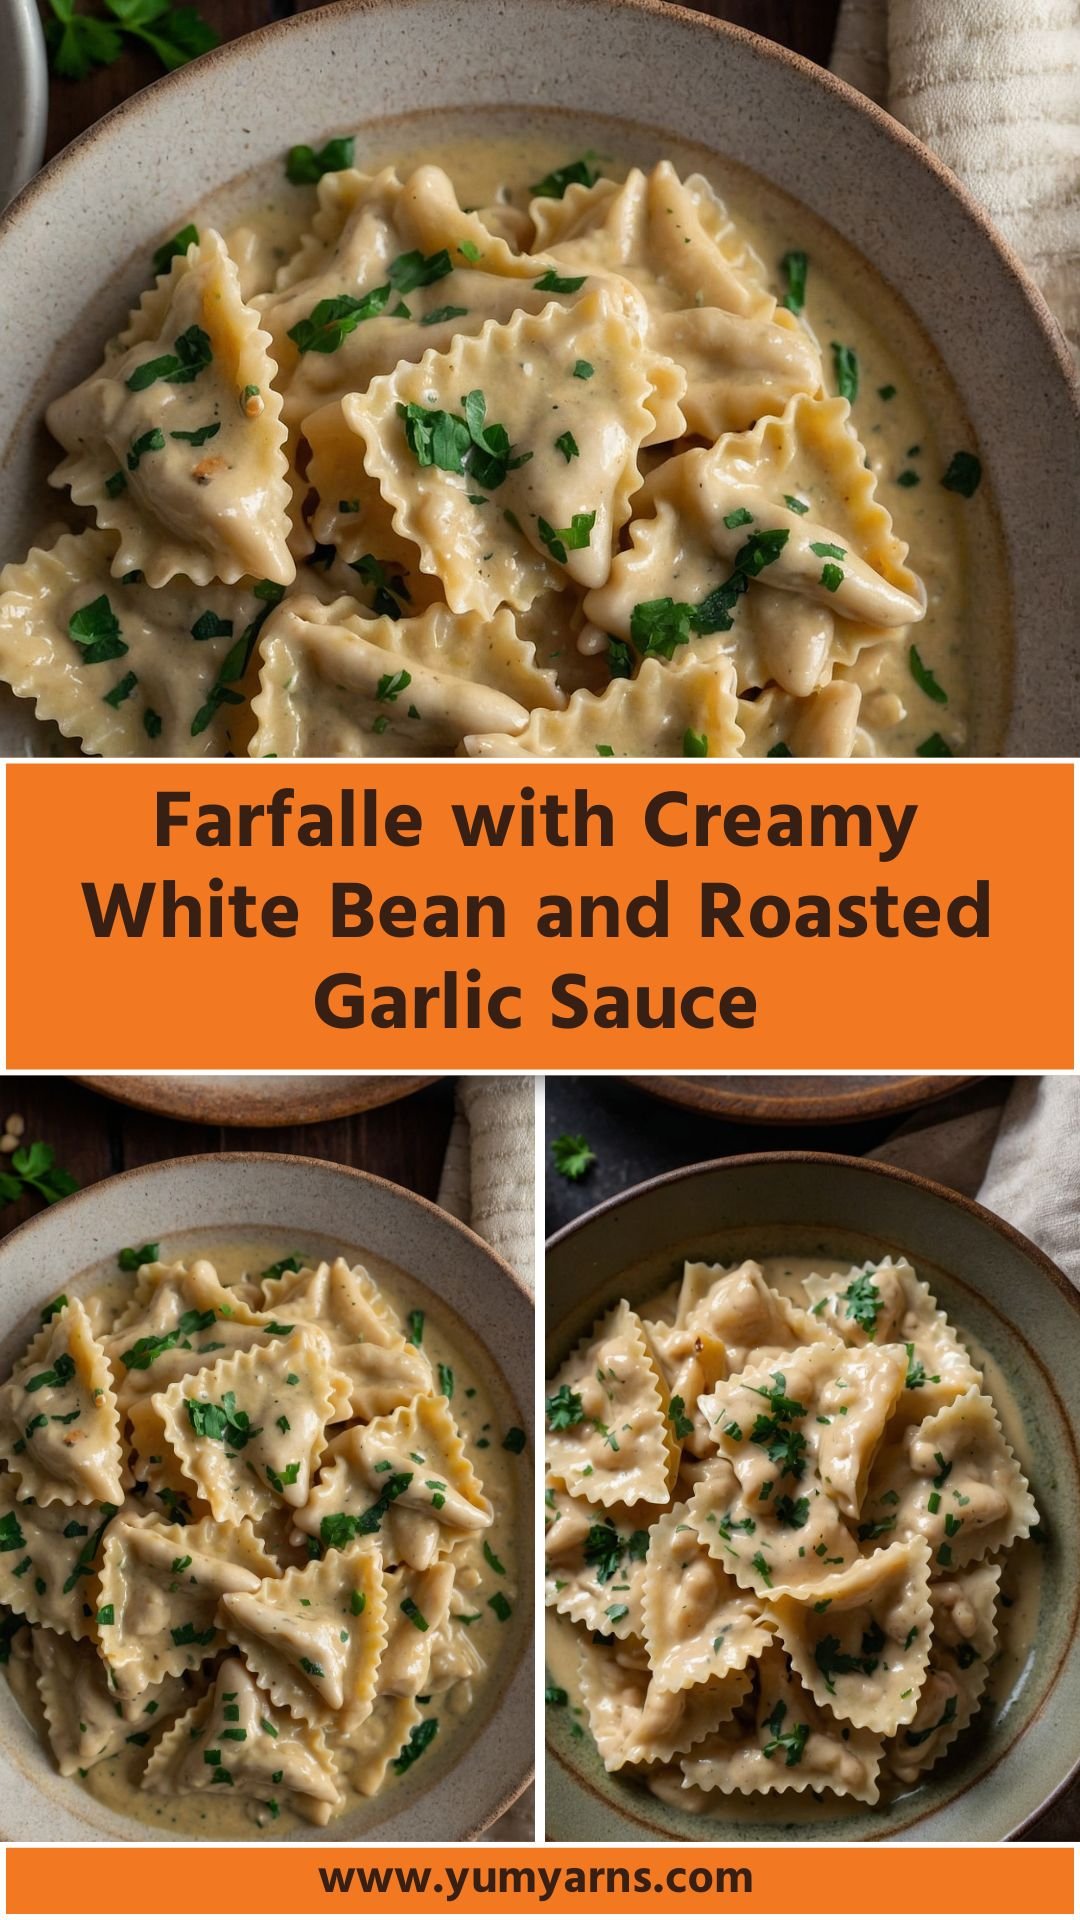
Let’s get into how I’ve used the ingredients in this recipe. Farfalle, with its butterfly shape, captures sauce like a champion. The fresh herbs—thyme and sage—bring a garden-fresh aroma. And let’s not forget the spices. Ground cumin and coriander ground the dish, adding warmth and depth. While smoked paprika is optional, it adds a hint of smokiness that elevates the overall flavor.
You will also like the following Lunch and Dinner recipes!
- How to make Spicy Thai Red Curry Soup
- Schnitzel Over Buttered Spätzle with Sweet and Sour Cabbage
- Tortilla Soup Recipe
Here’s What You’ll Need:
- ½ pound dry farfalle pasta: I like to use whole wheat for added nutrition. The farfalle holds the creamy sauce so well.
- 3 tablespoons extra-virgin olive oil: A good oil can make a difference. It should have a fruity flavor profile.
- 1 small shallot, finely chopped: Shallots have a milder taste than onions, adding subtle sweetness.
- 1 tablespoon fresh thyme, minced: This herb brings a lovely earthy flavor.
- 2 teaspoons fresh sage, minced: The sage adds a warm, aromatic note that pairs perfectly with the beans.
- 1 ½ teaspoons ground cumin: This steals the show; its warm aromatics are essential in this recipe.
- 1 teaspoon ground coriander: Another layer of flavor that complements cumin’s earthiness.
- ½ teaspoon smoked paprika (optional): A little goes a long way, especially if you like a smoky kick.
- 1 head roasted garlic, cloves peeled: Roasting garlic mellows its flavor, making it sweet and creamy.
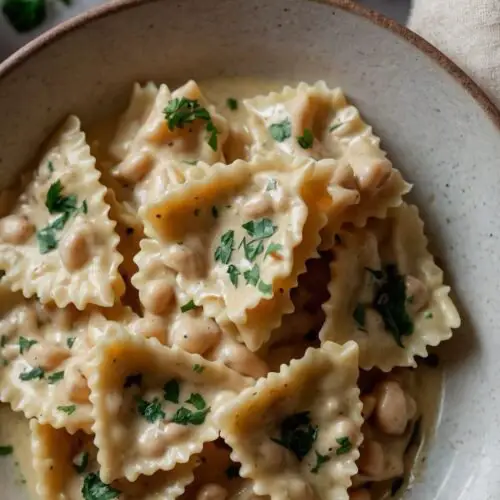
- 1 (15oz) can Progresso White Beans, drained and rinsed: These beans are a great source of protein and fiber.
- 2 ½ to 3 cups Progresso Chicken Stock or Progresso Vegetable Stock: Using a good-quality stock enhances the flavor profile.
- Salt and freshly cracked black pepper, to taste: Essential for bringing everything together.
- Garnish: Chopped fresh parsley for vibrancy, and grated Parmesan or Pecorino Romano if you want an umami kick.

Recipe Instructions
Step 1: Prepare the Pasta
Begin by boiling a large pot of salted water. Add the farfalle and cook according to the package instructions until al dente. This usually takes about 10–12 minutes. Drain the pasta, reserving a cup of the cooking water. This water is gold for adjusting the sauce later.
Step 2: Sauté Aromatics
In a large skillet, heat the olive oil over medium heat. Once it shimmers, add the finely chopped shallot. Sauté for about 2–3 minutes until softened. You don’t want them to brown.
Next, stir in the minced thyme and sage, cooking them for another minute until fragrant. Your kitchen will smell heavenly right about now.
Step 3: Spice It Up
Now add the ground cumin and coriander, and if you’re using it, the smoked paprika. Cook for about 30 seconds. This will bring out their flavors.
Step 4: Create the Creamy Sauce
Add the roasted garlic cloves to the skillet, smashing them gently with a wooden spoon. They should break apart easily, blending into your sauté. Next, add the drained white beans and 2 ½ cups of stock. Bring this mixture to a gentle simmer.
Allow it to bubble away for about 5 minutes. Use your wooden spoon to mash the beans slightly—this will help thicken the sauce.
Step 5: Incorporate Pasta
Now, introduce the cooked farfalle to the skillet. Toss everything together, ensuring the pasta is well coated in the creamy sauce. If the sauce seems too thick, gradually stir in the reserved pasta water until you achieve your desired consistency.
Taste and season with salt and freshly cracked black pepper.
Step 6: Garnish and Serve
Plate your pasta up and sprinkle with freshly chopped parsley. If you’re in the mood for an extra flavor boost, add a sprinkle of Parmesan or Pecorino Romano.
This dish is perfect served immediately, but I find it even better the next day as the flavors meld together beautifully.
Recipe Notes
- Farfalle Pasta: Its unique shape captures the sauce well, making every bite flavorful.
- Olive Oil: Choose a good quality oil to maximize flavor. A robust extra virgin will give depth to your dish.
- Shallot vs. Onion: Both are great, but shallots have milder, sweeter notes that complement rather than overpower the dish.
- Fresh Herbs: They add brightness and aroma. Don’t skip them; they’re essential.
- Ground Spices: Cumin and coriander should not be substituted with whole spices. Ground forms are necessary for an even taste throughout the dish.
- Roasted Garlic: If you’re roasting garlic yourself, pop it in the oven with a drizzle of olive oil wrapped in foil for 20–30 minutes at 400°F until soft and golden.
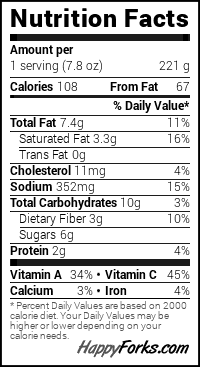
Nutrition Information
Each serving of marinated tomatoes offers a low-calorie treat rich in vitamins and antioxidants. The specific values will depend on portions, but here’s a rough breakdown:
- Calories: 400
- Protein: 21g
- Total Fat: 35g
- Carbohydrates: 120g
- Fiber: 1g
- Sugars: 2g
- Vitamin C: 15% Daily Value

Recipe Variations
- Add Protein: Chicken or shrimp could be great additions if you desire meat.
- Swap the Beans: Chickpeas or cannellini beans would also work beautifully here.
- Vegetable Boost: Consider adding spinach or kale for added greens or some sundried tomatoes for a burst of flavor.
- Cheesy Version: Incorporate goat cheese or feta for a tangy twist.
- Spicy Kick: Add a pinch of red pepper flakes if you like a bit of heat.
- Gluten-Free Option: There are great gluten-free pasta options available that will hold up nicely in this dish.
Farfalle with Creamy White Bean and Roasted Garlic Sauce
Equipment
- Pot
Ingredients
- ½ pound dry farfalle pasta: I like to use whole wheat for added nutrition. The farfalle holds the creamy sauce so well.
- 3 tablespoons extra-virgin olive oil: A good oil can make a difference. It should have a fruity flavor profile.
- 1 small shallot finely chopped: Shallots have a milder taste than onions, adding subtle sweetness.
- 1 tablespoon fresh thyme minced: This herb brings a lovely earthy flavor.
- 2 teaspoons fresh sage minced: The sage adds a warm, aromatic note that pairs perfectly with the beans.
- 1 ½ teaspoons ground cumin: This steals the show; its warm aromatics are essential in this recipe.
- 1 teaspoon ground coriander: Another layer of flavor that complements cumin’s earthiness.
- ½ teaspoon smoked paprika optional: A little goes a long way, especially if you like a smoky kick.
- 1 head roasted garlic cloves peeled: Roasting garlic mellows its flavor, making it sweet and creamy.
- 1 15oz can Progresso White Beans, drained and rinsed: These beans are a great source of protein and fiber.
- 2 ½ to 3 cups Progresso Chicken Stock or Progresso Vegetable Stock: Using a good-quality stock enhances the flavor profile.
- Salt and freshly cracked black pepper to taste: Essential for bringing everything together.
- Garnish: Chopped fresh parsley for vibrancy and grated Parmesan or Pecorino Romano if you want an umami kick.
Instructions
Step 1: Prepare the Pasta
- Begin by boiling a large pot of salted water. Add the farfalle and cook according to the package instructions until al dente. This usually takes about 10–12 minutes. Drain the pasta, reserving a cup of the cooking water. This water is gold for adjusting the sauce later.
Step 2: Sauté Aromatics
- In a large skillet, heat the olive oil over medium heat. Once it shimmers, add the finely chopped shallot. Sauté for about 2–3 minutes until softened. You don’t want them to brown.
- Next, stir in the minced thyme and sage, cooking them for another minute until fragrant. Your kitchen will smell heavenly right about now.
Step 3: Spice It Up
- Now add the ground cumin and coriander, and if you’re using it, the smoked paprika. Cook for about 30 seconds. This will bring out their flavors.
Step 4: Create the Creamy Sauce
- Add the roasted garlic cloves to the skillet, smashing them gently with a wooden spoon. They should break apart easily, blending into your sauté. Next, add the drained white beans and 2 ½ cups of stock. Bring this mixture to a gentle simmer.
- Allow it to bubble away for about 5 minutes. Use your wooden spoon to mash the beans slightly—this will help thicken the sauce.
Step 5: Incorporate Pasta
- Now, introduce the cooked farfalle to the skillet. Toss everything together, ensuring the pasta is well coated in the creamy sauce. If the sauce seems too thick, gradually stir in the reserved pasta water until you achieve your desired consistency.
- Taste and season with salt and freshly cracked black pepper.
Step 6: Garnish and Serve
- Plate your pasta up and sprinkle with freshly chopped parsley. If you’re in the mood for an extra flavor boost, add a sprinkle of Parmesan or Pecorino Romano.
- This dish is perfect served immediately, but I find it even better the next day as the flavors meld together beautifully.
Notes
- Farfalle Pasta: Its unique shape captures the sauce well, making every bite flavorful.
- Olive Oil: Choose a good quality oil to maximize flavor. A robust extra virgin will give depth to your dish.
- Shallot vs. Onion: Both are great, but shallots have milder, sweeter notes that complement rather than overpower the dish.
- Fresh Herbs: They add brightness and aroma. Don’t skip them; they’re essential.
- Ground Spices: Cumin and coriander should not be substituted with whole spices. Ground forms are necessary for an even taste throughout the dish.
- Roasted Garlic: If you’re roasting garlic yourself, pop it in the oven with a drizzle of olive oil wrapped in foil for 20–30 minutes at 400°F until soft and golden.
Nutrition
FAQs
1. Can I make this dish ahead of time?
Absolutely! You can prepare the sauce and pasta separately and combine them just before serving. This dish also stores well in the fridge for up to 3 days.
2. What can I substitute for white beans?
If you don’t have white beans on hand, navy or cannellini beans work perfectly. They have a similar texture and flavor profile.
3. How can I make this vegan?
This recipe is already vegan if you skip the cheese garnish. Use vegetable stock for a completely plant-based version.
4. Can I freeze this dish?
Yes, this pasta freezes well. Just make sure to cool it completely before transferring it to an airtight container. When reheating, you may need to add a little stock to help loosen the sauce.
5. Is there a way to add more flavor?
Definitely! Experiment with different herbs or try adding a splash of white wine to the sauce for acidity and depth.
6. What’s the best way to store leftovers?
Store leftovers in an airtight container in the fridge. It’s best consumed within 3 days for the best flavor and texture.
Conclusion
Farfalle with creamy white bean and roasted garlic sauce is more than just a dish; it’s an experience that fills your kitchen with warmth and joy. Each bite offers a balance of creamy texture and spicy notes. It’s comforting while being incredibly nutritious.
And let’s be honest, who doesn’t love a meal that takes mere minutes to prep yet feels so indulgent? Plus, with opportunities for customization and tweaks, you can make it uniquely your own every time.
So, fire up that stove and treat yourself. I guarantee this dish will delight you and anyone lucky enough to share your table. Let’s enjoy delicious meals together while keeping health in mind—because that’s what it’s all about.