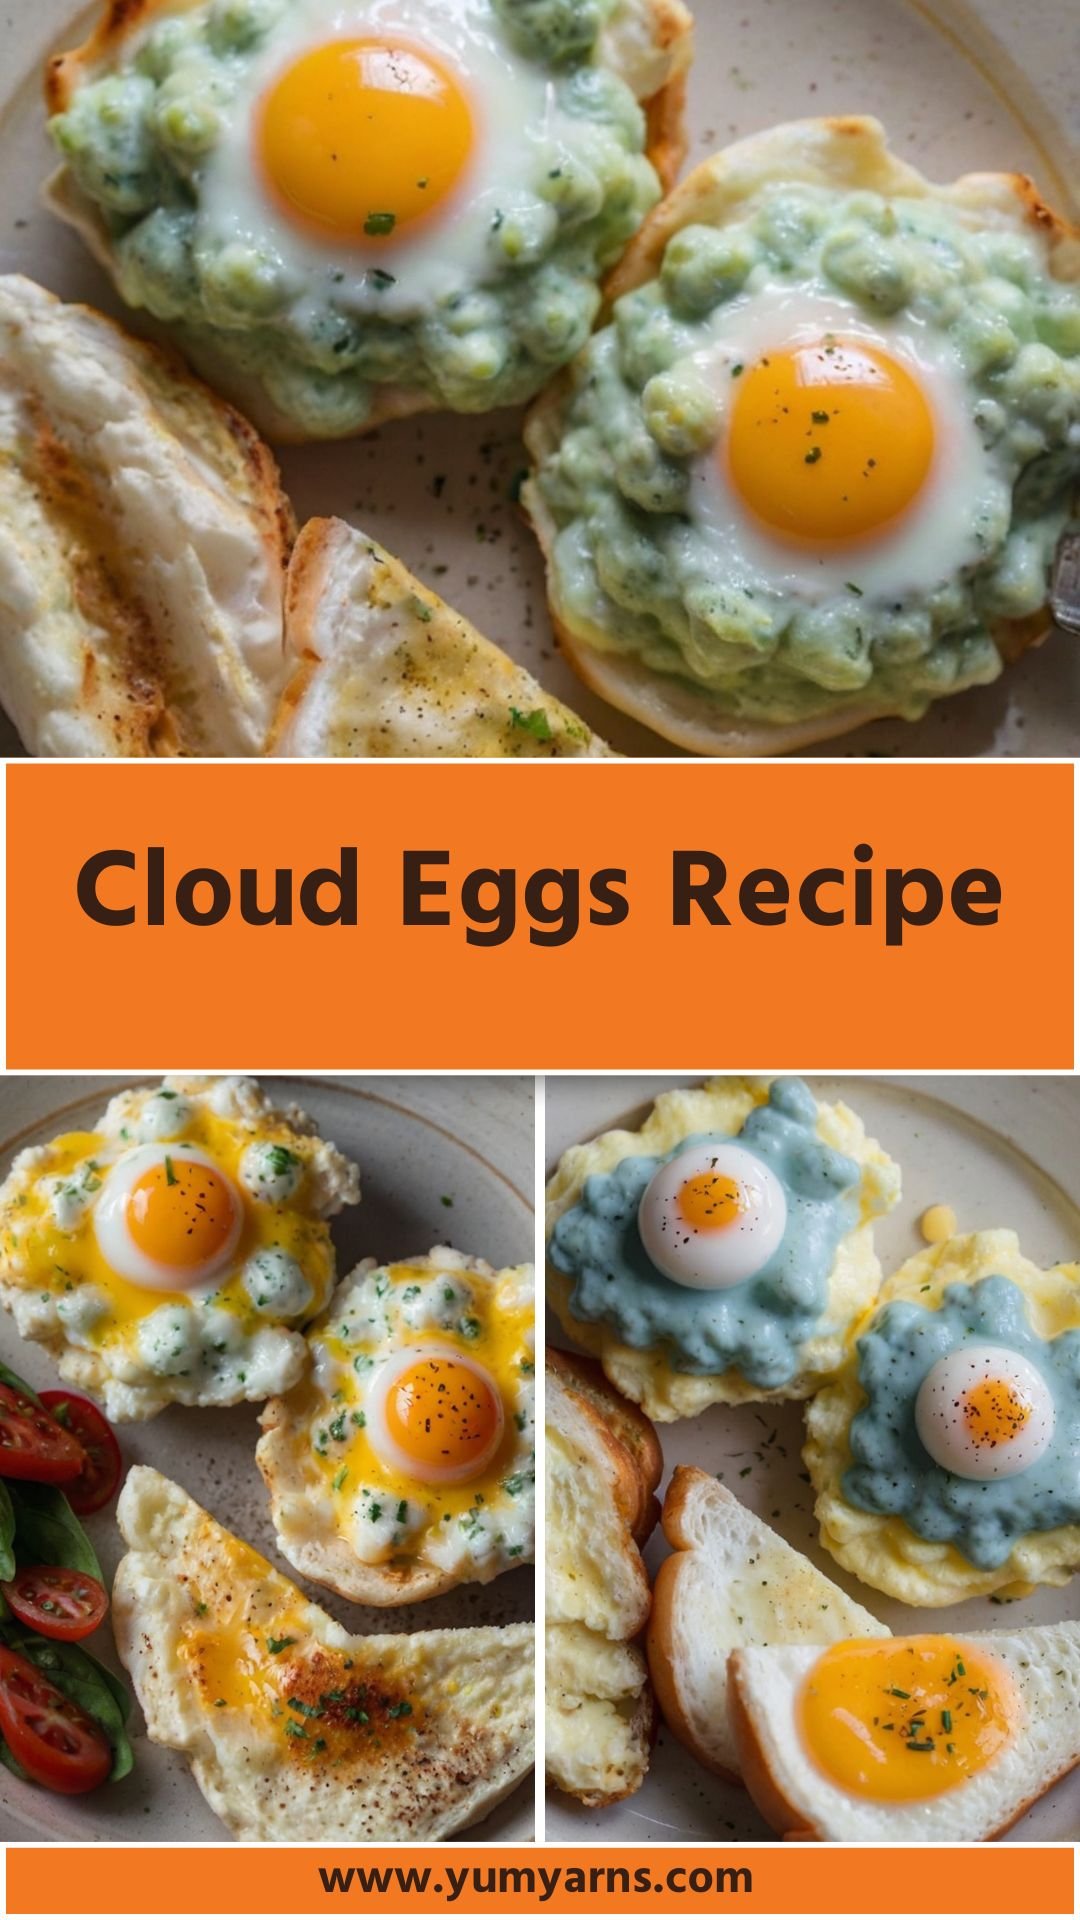
Korean Cheesy Corn Recipe – Yum Yarns

Best Korean Cheesy Corn Recipe

Korean cheesy corn is both unique and versatile. When considering what to pair this delightful dish with, think about textures and flavors that complement its cheesy richness. Here are some great options: Grilled Meats, Spicy Dishes, Fresh Salads, or Rice Dishes.

Best Korean Cheesy Corn Recipe

One hot summer evening, I found myself wandering through my favorite local Korean supermarket. I was entranced by the myriad of snacks and sauces. Then, out of nowhere, a dish caught my eye: Korean cheesy corn. Intrigued, I decided to delve into this delicious-looking concoction. 

A mix of sweet corn, gooey cheese, and a drizzled sauce so tasty that it beckoned me to try making it at home.

Korean cheesy corn is a fantastic dish, often served as a side or a snack. Whether you’re hosting a party or just looking for comfort food, this dish is sure to please. Let’s explore what it is, why it works so well, and how you can whip it up in your own kitchen.

You will also like the following Side Dish recipes!

What is Korean Cheesy Corn?

Korean cheesy corn is a delightful fusion of sweet corn and creamy cheese, often prepared simply but with great flavor. It’s not only popular in Korean households but also a trending item in Korean bars and restaurants. 

The essence lies in the combination of fresh corn, melted cheese, and a few secret ingredients that bring it all together. It can be enjoyed warm or at room temperature, making it perfect for any occasion.

Why This Recipe Works

Here’s the lowdown on why Korean cheesy corn is a hit among food lovers:

1. Crave-Worthy Flavor Combination: The natural sweetness of corn pairs perfectly with the rich, gooey cheese. This contrast creates a dish that is impossible to resist.

2. Simplicity: It requires very few ingredients, making it easy for anyone, even novice home cooks, to prepare. You likely already have many of the necessary items in your pantry.

3. Versatility: Korean cheesy corn can be enjoyed as a side dish or a standalone snack. It fits seamlessly into a variety of meals or gatherings, from picnics to family dinners.

4. Quick Prep Time: With just a handful of steps, you can have this delicious dish on your table in under 30 minutes. Great for a midweek bite!

Ingredients You’ll Need To Make Korean Cheesy Corn

Crafting Korean cheesy corn at home is straightforward. Here’s what you’ll need:

  • 2 ears of fresh sweet corn, kernels removed and cobs discarded
  • 4 ounces shredded mozzarella cheese
  • ½ cup mayonnaise
  • 1½ teaspoons granulated sugar
  • 2 green onions, thinly sliced
  • Salt and freshly ground black pepper, to taste
  • ½ teaspoon garlic powder (optional, for extra savory flavor)
  • 1 tablespoon lime juice (optional, for a citrusy zing)
Korean Cheesy Corn Recipe

How To Make Korean Cheesy Corn?

Let’s get to the fun part—the cooking! Here’s how to prepare this dish step by step:

Step 1: Prepare the Corn

Start by removing the kernels from the cobs of fresh corn. You can do this with a sharp knife. Cut downwards along the cob until all the kernels have been removed. This will give you about 2 cups of corn. Pat yourself on the back; you’re off to a great start!

Step 2: Mix the Base

In a medium bowl, combine the corn kernels, mayonnaise, granulated sugar, and garlic powder (if using). Give this a good stir until everything is well combined. This is where the magic starts—don’t skimp on mixing!

Step 3: Add the Cheese

Next, fold in the shredded mozzarella cheese and sliced green onions. Make sure the cheese is evenly distributed. At this point, you can also add a pinch of salt and freshly ground black pepper to enhance the flavors.

Step 4: Bake It

Transfer the mixture to a baking dish. Preheat your oven to 400°F (200°C) and bake for about 15-20 minutes, or until the top is bubbly and golden brown. Keep an eye on it; you want that perfect cheesiness!

Step 5: Serve and Enjoy

Once out of the oven, let it cool for a couple of minutes. You can drizzle with lime juice for a zesty touch if desired. Serve it warm, and watch it disappear!

Tips for Perfect Korean Cheesy Corn

Here are some handy tips to enhance your experience:

  • Grate Fresh Cheese: Freshly shredded cheese melts better than pre-packed cheese. Consider grating your mozzarella for a gooey texture.
  • Tweak the Sweetness: Adjust sugar to your taste. If you like it sweeter, add a little more; if not, reduce it.
  • Fresh Corn is Best: For the best flavor, use fresh corn when it’s in season. But frozen corn works well too if you’re in a pinch.
  • Add Spice: If you like a kick, consider mixing in some diced jalapeños or red pepper flakes.
  • Garnish Cleverly: Once baked, a sprinkling of chopped cilantro or a few extra green onions can elevate the appearance and flavor.
Easy Korean Cheesy Corn Recipe

How to Store The Leftovers?

If you’re lucky enough to have leftovers (which I rarely do!), here’s how to store them:

  • Refrigerate: Place in an airtight container. It will last about 3-4 days in the fridge.
  • Reheat: To reheat, warm in the oven at 350°F until heated through. You can also microwave it, but it might not retain its original texture.

Recommended Side Dishes for Korean Cheesy Corn

While Korean cheesy corn is delightful on its own, pairing it with the right sides can elevate the meal. Here are some suggestions:

1. Spicy Korean Fried Chicken: The crispy, spicy chicken complements the creamy corn perfectly. The textural contrast is delightful.

2. Kimchi: Its tangy and spicy profile adds an exciting punch to the sweet corn, making for a well-rounded meal.

3. Grilled Asparagus: Lightly salted and peppered grilled asparagus liven up the plate and provide a nutritious crunch.

4. Sesame Rice: A bowl of fluffy rice sprinkled with sesame seeds is a comforting accompaniment that balances out the flavors.

Substitute Options for Ingredients

If you’re missing some items, don’t worry! Here are some alternatives:

1. Mayonnaise: You can swap this with Greek yogurt for a healthier twist. It keeps the creaminess intact while adding protein.

2. Mozzarella Cheese: If you don’t have mozzarella, try using cheddar or a Mexican blend; they melt well and bring unique flavors.

3. Fresh Corn: Canned or frozen corn works just as well. If using canned corn, drain it properly to avoid excess moisture.

4. Green Onions: Regular onions can substitute if you don’t have green onions. Just remember they have a stronger flavor, so use less.

Easy Korean Cheesy Corn Recipe

Korean Cheesy Corn Recipe

Tina Cooper
One hot summer evening, I found myself wandering through my favorite local Korean supermarket. I was entranced by the myriad of snacks and sauces.
Prep Time 5 minutes
Cook Time 12 minutes
Total Time 17 minutes
Course Side Dish
Cuisine Korean
Servings 4 Servings
Calories 220 kcal

Equipment

  • Oven

Ingredients
  

  • 2 ears of fresh sweet corn kernels removed and cobs discarded
  • 4 ounces shredded mozzarella cheese
  • ½ cup mayonnaise
  • teaspoons granulated sugar
  • 2 green onions thinly sliced
  • Salt and freshly ground black pepper to taste
  • ½ teaspoon garlic powder optional, for extra savory flavor
  • 1 tablespoon lime juice optional, for a citrusy zing

Instructions
 

  • Let’s get to the fun part—the cooking! Here’s how to prepare this dish step by step:

Step 1: Prepare the Corn

  • Start by removing the kernels from the cobs of fresh corn. You can do this with a sharp knife. Cut downwards along the cob until all the kernels have been removed. This will give you about 2 cups of corn. Pat yourself on the back; you’re off to a great start!

Step 2: Mix the Base

  • In a medium bowl, combine the corn kernels, mayonnaise, granulated sugar, and garlic powder (if using). Give this a good stir until everything is well combined. This is where the magic starts—don’t skimp on mixing!

Step 3: Add the Cheese

  • Next, fold in the shredded mozzarella cheese and sliced green onions. Make sure the cheese is evenly distributed. At this point, you can also add a pinch of salt and freshly ground black pepper to enhance the flavors.

Step 4: Bake It

  • Transfer the mixture to a baking dish. Preheat your oven to 400°F (200°C) and bake for about 15-20 minutes, or until the top is bubbly and golden brown. Keep an eye on it; you want that perfect cheesiness!

Step 5: Serve and Enjoy

  • Once out of the oven, let it cool for a couple of minutes. You can drizzle with lime juice for a zesty touch if desired. Serve it warm, and watch it disappear!

Notes

Here are some handy tips to enhance your experience:
  • Grate Fresh Cheese: Freshly shredded cheese melts better than pre-packed cheese. Consider grating your mozzarella for a gooey texture.
  • Tweak the Sweetness: Adjust sugar to your taste. If you like it sweeter, add a little more; if not, reduce it.
  • Fresh Corn is Best: For the best flavor, use fresh corn when it’s in season. But frozen corn works well too if you’re in a pinch.
  • Add Spice: If you like a kick, consider mixing in some diced jalapeños or red pepper flakes.
  • Garnish Cleverly: Once baked, a sprinkling of chopped cilantro or a few extra green onions can elevate the appearance and flavor.

Nutrition

Calories: 220kcalCarbohydrates: 22gProtein: 5gFat: 14gFiber: 1gSugar: 2g
Keyword Korean Cheesy Corn Recipe
Tried this recipe?Let us know how it was!

Frequently Asked Questions

1. Can I make Korean cheesy corn ahead of time?

Yes! Prepare it in advance, but bake it just before serving to enjoy it warm and gooey.

2. Is Korean cheesy corn gluten-free?

By using gluten-free mayonnaise and checking your cheese label, you can absolutely make this dish gluten-free.

3. Can I add protein to this dish?

Certainly! You can incorporate cooked chicken, shrimp, or even tofu for a protein boost.

4. Is it possible to use non-dairy cheese?

Yes! There are many plant-based cheese options available that can replicate this dish’s gooey texture.

5. Can I adjust the spice level?

Definitely! Don’t add any hot spices for a milder dish, or throw in some chili flakes or jalapeños for added heat.

Conclusion

In the end, Korean cheesy corn is not just a dish; it’s an experience filled with warmth, flavor, and nostalgia. Every bite offers an explosion of creamy, cheesy goodness, reminding you of gatherings with family and friends. Pair it with your favorite sides, or enjoy it alone—the choice is yours.

Next time you’re in need of a satisfying snack, or a showstopper side dish, look no further than this delightful creation. I can assure you, once you make it, it will become a staple in your home, one delicious spoonful at a time! So grab those ingredients and get cooking—it’s time to indulge in this cheesy corn wonder!

You’ll also like these latest recipes!

Easy Chilaquiles Recipe – Yum Yarns

Easy Chilaquiles Recipe

I remember the first time I tried chilaquiles. It was at a friendly little cafe in Mexico City. The air was fragrant with spices, and I was eager to try a traditional breakfast. The vibrant colors and rich flavors punched through every bite, awakening my palate in ways I had never experienced before. 

Fast forward to today, and I’ve simplified that delicious dish into an easy, home-cooked version that will become a breakfast staple in your household. In this post, I’ll share my take on easy chilaquiles and guide you step by step to recreate this taste of Mexico at home.

Easy Chilaquiles Recipe

What are Easy Chilaquiles?

Chilaquiles is a classic Mexican dish typically served for breakfast or brunch. It features tortilla chips lightly doused in tomato sauce or salsa, topped with tasty add-ons like eggs, cheese, and fresh herbs. Think of it as the ultimate comfort food, marrying crispy textures with luscious toppings. 

Now, the beauty of this dish is its flexibility; you can customize the toppings to your liking. In my version, I’ll walk you through using ingredients that pack a punch without consuming a lot of time in the kitchen.

You will also like the following Dinner recipes!

Why You’ll Love This Easy Chilaquiles

There are several reasons why easy chilaquiles will soon become your favorite dish.

First, it’s a one-pan wonder. I love recipes where I can limit the number of dishes I need to wash afterward. Secondly, this dish can be tackled in under 30 minutes. For those busy mornings, that’s a lifesaver! 

And lastly, it caters to various dietary preferences. Want it vegetarian? You got it. Looking for something gluten-free? No problem! This dish truly embraces versatility.

The Ingredients

Here’s a quick glance at what you’ll need:

For Fried Eggs

  • 2 tablespoons of extra virgin olive oil: For a rich flavor and a base for frying.
  • 4 large eggs: These will crown your chilaquiles, giving them that satisfying touch.
  • Salt and freshly ground black pepper, to taste: Simple seasonings that enhance the flavor.

For Chilaquiles

  • 8 ounces of tortilla chips, preferably baked: Crunch is the name of the game.

For the Red Sauce

  • 3 tablespoons of neutral oil: This will be your cooking fat for blending flavors.
  • ½ sweet onion, finely diced: Adds sweetness and depth to your sauce.
  • 2 cloves of garlic, minced: Nothing beats the aroma of fresh garlic sizzling away.
  • 2 cups of crushed tomatoes: The heart of the sauce.
  • 6 chipotle peppers in adobo sauce: They give the chilaquiles that smoky heat.
  • ⅔ cup of unsalted chicken broth (or vegetable broth for a lighter version): To create a balanced sauce.

For Garnishes

  • ½ cup of crumbled queso fresco: For a creamy, tangy finish.
  • 2 radishes, thinly sliced: A fresh, crunchy contrast.
  • ½ bunch of fresh cilantro leaves, roughly chopped: Adds freshness.
  • Hot sauce (optional, for extra spice): Because who doesn’t enjoy a little kick?
  • 1 tablespoon of lime juice (optional, for a fresh tang): Enhances all the flavors beautifully.
Chilaquiles Recipe

Step by Step Instructions

Now that you have your ingredients gathered, let’s dive into the cooking process.

Step 1: Prepare the Sauce

Start by heating the neutral oil in a large skillet over medium heat. Once it’s shimmering, toss in the diced onion. Sauté for about 3-4 minutes, or until soft and translucent. Then, add the minced garlic and stir for 1 more minute. The aroma will fill your kitchen, promising deliciousness.

Next, pour in the crushed tomatoes, along with the chipotle peppers. These fiery little buds will warm things up! Stir everything together and let it simmer for about 10 minutes. If it starts to get too thick, don’t hesitate to add a splash of chicken broth.

Step 2: Mix in the Tortilla Chips

Once the sauce has thickened and infused with those warm, inviting flavors, it’s time to add the tortilla chips. Gently fold them into the sauce, ensuring every chip gets coated. Let this mixture absorb the flavors for about 3-4 minutes. You want them to soften slightly without turning to mush. I usually taste at this stage—because who can resist a little quality control?

Step 3: Fry the Eggs

While the chips are getting cozy in the sauce, it’s time to fry your eggs. In a separate pan, heat the extra virgin olive oil over medium heat. Crack the eggs in gently, and season them with salt and pepper. Cook until whites are set and the yolks are still runny, about 2-3 minutes. If you prefer your yolks cooked through, give them an extra minute.

Step 4: Assemble the Chilaquiles

Now comes the fun part! Take a generous scoop of the chilaquiles mixture and place it on a plate. Top it with the freshly fried eggs. Add crumbled queso fresco, radishes, and cilantro, ensuring a vibrant presentation. If you like a bit of heat, now’s the time to drizzle some hot sauce over the top. To cap things off, squeeze a bit of lime juice for a zesty finish.

Step 5: Serve and Enjoy!

Grab a fork and dig in! The balance of flavors and textures—crunchy chips, rich sauce, creamy cheese, and perfectly fried eggs—is simply irresistible.

Tips & Tricks

Here are a few secrets I’ve gathered in my chilaquiles-making journey:

  • Use baked tortilla chips: They are healthier and just as tasty as fried. Plus, they won’t get soggy as quickly.
  • Adjust spice levels: Not a fan of heat? Reduce the number of chipotle peppers or skip the hot sauce.
  • Get creative with garnishes: Try avocado slices or a dollop of sour cream.
  • Meal prep friendly: Make the sauce in advance and store it in the fridge. Just combine it with chips and eggs when ready to serve.
  • Experiment with leftovers: Chilaquiles are just as good with leftover meats or beans tossed in!
Copycat Chilaquiles Recipe

Can I Store Easy Chilaquiles?

Indeed, you can store your chilaquiles! While it’s best enjoyed fresh, leftover chilaquiles can be stored in an airtight container in the refrigerator for up to three days. 

Reheat them on the stovetop for the best texture. Just add a splash of water or broth to keep things from drying out!

What Can I Serve with Easy Chilaquiles?

Chilaquiles shine as a standalone meal, but you can always enhance your breakfast spread with these options:

  • Fresh Fruit: A side of tropical fruit salad adds brightness to your meal.
  • Refried Beans: A scoop of refried beans rounds out the meal, packed with protein.
  • Sliced Avocado: Creamy avocado pairs perfectly, bringing a rich texture.
  • Salad: A light green salad with a citrus vinaigrette can be refreshing alongside.
  • Coffee or Fresh Juice: Complete your breakfast with a hot beverage or a refreshing drink.

Variations

Let’s get creative! Here are some variations you can try to make chilaquiles even more fun:

  • Green Chilaquiles: Swap the red sauce for a green tomatillo salsa. This adds a different flavor profile that is equally delightful.
  • Mushroom and Spinach Chilaquiles: Sauté sliced mushrooms and fresh spinach before adding them to the sauce for an earthy twist.
  • Breakfast Burrito Chilaquiles: Wrap the chilaquiles mixture in a tortilla with scrambled eggs to make a savory burrito.
  • Carnitas Chilaquiles: Toss in some leftover carnitas for extra richness. The flavors meld beautifully with the sauce.
  • Vegan Chilaquiles: Use tofu and nutritional yeast instead of eggs and cheese for a hearty vegan delight.
Copycat Chilaquiles Recipe

Easy Chilaquiles Recipe

Tina Cooper
I remember the first time I tried chilaquiles. It was at a friendly little cafe in Mexico City. The air was fragrant with spices, and I was eager to try a traditional breakfast.
Prep Time 10 minutes
Cook Time 20 minutes
Total Time 30 minutes
Course Main Course
Cuisine Mexican
Servings 4 Servings
Calories 400 kcal

Equipment

  • large skillet

Ingredients
  

Fried Eggs:

  • 2 tablespoons extra virgin olive oil
  • 4 large eggs
  • Salt and freshly ground black pepper to taste

Chilaquiles:

  • 8 ounces tortilla chips preferably baked

Red Sauce:

  • 3 tablespoons neutral oil
  • ½ sweet onion finely diced
  • 2 cloves garlic minced
  • 2 cups crushed tomatoes
  • 6 chipotle peppers in adobo sauce
  • cup unsalted chicken broth or vegetable broth for a lighter version

Garnishes:

  • ½ cup crumbled queso fresco
  • 2 radishes thinly sliced
  • ½ bunch fresh cilantro leaves roughly chopped
  • Hot sauce optional, for extra spice
  • 1 tablespoon lime juice optional, for a fresh tang

Instructions
 

  • Now that you have your ingredients gathered, let’s dive into the cooking process.

Step 1: Prepare the Sauce

  • Start by heating the neutral oil in a large skillet over medium heat. Once it’s shimmering, toss in the diced onion. Sauté for about 3-4 minutes, or until soft and translucent. Then, add the minced garlic and stir for 1 more minute. The aroma will fill your kitchen, promising deliciousness.
  • Next, pour in the crushed tomatoes, along with the chipotle peppers. These fiery little buds will warm things up! Stir everything together and let it simmer for about 10 minutes. If it starts to get too thick, don’t hesitate to add a splash of chicken broth.

Step 2: Mix in the Tortilla Chips

  • Once the sauce has thickened and infused with those warm, inviting flavors, it’s time to add the tortilla chips. Gently fold them into the sauce, ensuring every chip gets coated. Let this mixture absorb the flavors for about 3-4 minutes. You want them to soften slightly without turning to mush. I usually taste at this stage—because who can resist a little quality control?

Step 3: Fry the Eggs

  • While the chips are getting cozy in the sauce, it’s time to fry your eggs. In a separate pan, heat the extra virgin olive oil over medium heat. Crack the eggs in gently, and season them with salt and pepper. Cook until whites are set and the yolks are still runny, about 2-3 minutes. If you prefer your yolks cooked through, give them an extra minute.

Step 4: Assemble the Chilaquiles

  • Now comes the fun part! Take a generous scoop of the chilaquiles mixture and place it on a plate. Top it with the freshly fried eggs. Add crumbled queso fresco, radishes, and cilantro, ensuring a vibrant presentation. If you like a bit of heat, now’s the time to drizzle some hot sauce over the top. To cap things off, squeeze a bit of lime juice for a zesty finish.

Step 5: Serve and Enjoy!

  • Grab a fork and dig in! The balance of flavors and textures—crunchy chips, rich sauce, creamy cheese, and perfectly fried eggs—is simply irresistible.

Notes

Here are a few secrets I’ve gathered in my chilaquiles-making journey:
  • Use baked tortilla chips: They are healthier and just as tasty as fried. Plus, they won’t get soggy as quickly.
  • Adjust spice levels: Not a fan of heat? Reduce the number of chipotle peppers or skip the hot sauce.
  • Get creative with garnishes: Try avocado slices or a dollop of sour cream.
  • Meal prep friendly: Make the sauce in advance and store it in the fridge. Just combine it with chips and eggs when ready to serve.
  • Experiment with leftovers: Chilaquiles are just as good with leftover meats or beans tossed in!

Nutrition

Calories: 400kcalCarbohydrates: 34gProtein: 16gFat: 24gCholesterol: 186mgFiber: 6gSugar: 5g
Keyword Easy Chilaquiles Recipe
Tried this recipe?Let us know how it was!

Frequently Asked Questions

1. Can I use store-bought salsa instead of making the sauce?

Absolutely! Sometimes we need shortcuts. Just choose a salsa you love. However, I recommend cooking it down a bit to enhance the flavors.

2. Can chilaquiles be made ahead of time?

Yes, you can. I suggest preparing the sauce and storing it separately. When ready to serve, combine with chips and warm before adding your toppings.

3. Is there a way to make chilaquiles gluten-free?

Definitely! Just swap out standard tortilla chips for gluten-free ones. Corn tortillas can also be cut and baked at home for a fresh touch.

4. Can I use fresh tomatoes instead of crushed tomatoes?

Sure, if you prefer fresh. Just peel, chop, and cook them down until they soften and create a sauce-like consistency.

5. How do I know if my eggs are cooked perfectly?

The whites should be fully set and opaque, and the yolk should still jiggle slightly when you tap it. Cook longer if desired.

Conclusion

There you have it! Easy chilaquiles are not just a dish; they’re an experience to savor. With layers of flavor, thoughtful garnishes, and endless variations, this dish has an exciting future in your kitchen. 

Each bite invites a new interpretation—whether you’re sharing with family, entertaining friends, or simply treating yourself. 

I hope you enjoy whipping up this easy recipe as much as I do. So grab your ingredients, roll up your sleeves, and have some culinary fun in the kitchen. Trust me; your taste buds will thank you!

You’ll also like these latest recipes!

Quick And Easy Broccoli Cheddar Soup Recipe – Yum Yarns

Best Quick And Easy Broccoli Cheddar Soup Recipe

Broccoli cheddar soup is incredibly versatile. If you’re like me and want to elevate the experience, consider pairing it with crispy breadsticks or a fresh garden salad. But there’s more. A slice of hearty sourdough and a dollop of tangy yogurt on the side work wonders too. Feeling adventurous? 

Try it with a drizzle of truffle oil for an upscale twist. The creamy soup complements these sides beautifully, enhancing not just flavor but also texture.

Best Quick And Easy Broccoli Cheddar Soup Recipe

When I think of comfort food, broccoli cheddar soup instantly comes to mind. It’s rich, creamy, and oh-so-satisfying. This recipe offers a quick and easy version that doesn’t skimp on flavor. It reflects everything I love about home-cooked meals: warmth, simplicity, and a touch of nostalgia. 

Toss in that it’s made from staple ingredients most of us already have, and you’ve got a win-win situation. On chilly nights or busy weekdays, this soup is my go-to. Are you ready to whip up a bowl?

You will also like the following Dinner recipes!

What is Quick and Easy Broccoli Cheddar Soup?

You might wonder what sets this recipe apart from countless others out there. Quick and easy broccoli cheddar soup is all about balancing flavor and simplicity. Imagine fresh broccoli and sharp cheddar melding together in a rich, creamy base. 

It’s about taking a classic comfort dish and making it accessible for everyone, regardless of culinary prowess. It’s a cozy hug of a meal, especially when time is limited.

Why This Recipe Works

1. Simple Ingredients
You won’t need to trek to specialty stores. Most, if not all, ingredients can be found in your kitchen. A basic trip to the grocery store can yield what you need.

2. Speed and Convenience
With prep and cooking time totaling around 30 minutes, this is one of those “I have 30 minutes before dinner” solutions that actually hits the mark. The efficient steps streamline the process so that you can get to enjoying your meal faster than you ever thought.

3. Cheesy Goodness
Let’s face it: cheese makes everything better. The sharp cheddar lends a distinct flavor that elevates the broccoli, transforming the simple into something luxurious. It’s richness strikes a perfect balance, drawing flavor from all the ingredients in the soup.

4. Wholesome Nutrition
With broccoli as the star ingredient, you’re not just filling your belly. You’re also packing in nutrients! The soup provides vitamins C and K, fiber, and some protein, all without feeling heavy.

Ingredients You’ll Need to Make This Dish

  • 2 cups chicken broth
  • 2 cups whole milk
  • 5 tablespoons unsalted butter
  • ½ medium onion, finely chopped
  • ⅓ cup all-purpose flour
  • 1 celery stalk, finely diced
  • 2 ½ cups broccoli florets, chopped into bite-sized pieces
  • 2 cups shredded sharp cheddar cheese
  • Salt and freshly ground black pepper, to taste

For Garnish:

  • 1 cup shredded sharp cheddar cheese (optional, for extra cheesy goodness)
  • ½ teaspoon garlic powder (adds depth and savory warmth)
Quick And Easy Broccoli Cheddar Soup Recipe

How to Make This Quick and Easy Broccoli Cheddar Soup

Step 1: Sauté the Base

Start by melting the butter in a large pot over medium heat. Toss in the chopped onions and celery. Allow them to cook until softened, which should take about 3-4 minutes. Stir occasionally. Not a bad moment to sniff that buttery aroma, is it?

Step 2: Create the Roux

Sprinkle the flour into the pot. Whisk it quickly to combine with the buttery veggies, cooking for an additional minute. This creates a roux, which thickens our soup and gives it a nice body.

Step 3: Introduce the Liquids

Gradually add the chicken broth, whisking continuously. After that, pour in the whole milk. This will create the creamy base of our soup. Bring everything to a gentle simmer while stirring. You want to see it gently bubbling, not boiling furiously.

Step 4: Add the Broccoli

Once your mixture has thickened slightly, add the chopped broccoli florets. This part’s key—let everything cook for about 10 minutes, or until the broccoli is tender but still vibrant in color. You don’t want mushy broccoli bathing in soup.

Step 5: Stir in the Cheese

Lower the heat and stir in the shredded sharp cheddar. Mix until completely melted and blended into the soup. This is the moment the whole kitchen fragrance skyrockets! Season with salt, pepper, and garlic powder to taste.

Step 6: Serve!

Ladle your delicious soup into bowls. If you’re feeling indulgent, top with more shredded cheddar. Serve with warm bread or a fresh salad. Dive in, savor every bite, and enjoy the fruits of your labor!

Tips & Tricks

  • Prep Ahead: Chop your veggies and measure your ingredients in advance. It saves headaches when it’s cooking time.
  • Adjust the Cheese: If you prefer a creamier soup, feel free to increase the amount of cheese. It won’t hurt!
  • Use Fresh Broccoli: Frozen is fine, but fresh broccoli gives a better texture and flavor. Try to find florets that are bright green.
  • Blend It: For a smooth texture, blend the soup after cooking for a creamy consistency. Just take care to allow the soup to cool slightly before blending.
  • Garnish Creatively: Consider adding bacon bits, croutons, or even toasted pumpkin seeds for texture on top of your bowl.
Copycat Quick And Easy Broccoli Cheddar Soup Recipe

How Do You Store the Leftovers?

So, you’re left with some soup? No problem! Cool the soup to room temperature before transferring it into airtight containers. Store in the fridge for up to four days. If you want to keep it longer, freeze it! 

Just let it cool, portion it out, and store in freezer-safe bags or containers for up to three months. Be sure to label the containers, so you aren’t playing detective later on.

What Sides Would Complement Quick and Easy Broccoli Cheddar Soup?

1. Classic Grilled Cheese
The dynamic duo of broccoli cheddar soup and a classic grilled cheese sandwich is truly a match made in heaven. Melted cheese oozing from between golden, buttery bread pairs perfectly with the creamy soup.

2. Tangy Garden Salad
A fresh salad with crunchy greens and a zesty dressing adds contrast to the rich soup. Consider combining romaine lettuce, cucumbers, cherry tomatoes, and a lemon vinaigrette.

3. Crunchy Breadsticks
Homemade or store-bought garlic breadsticks offer a delightful crunch. They’re perfect for dipping, adding texture to each delectable bite of your soup.

What Alternatives Can You Use for the Ingredients if They Are Not Present in Your Kitchen?

1. Broth Substitution
In lieu of chicken broth, vegetable broth works wonders. You’ll still get depth of flavor without compromising on taste if you are keeping it vegetarian.

2. Milk Options
For a dairy-free version, use almond milk or oat milk. They provide similar creaminess and allow you to cater to lactose-intolerant friends or family.

3. Cheese Variety
If sharp cheddar isn’t handy, Gruyère or a mild white cheddar can also deliver a similar flavor profile. Experimenting with different cheeses always yields delightful surprises.

4. Broccoli Alternatives
Don’t have broccoli? Try using cauliflower or even spinach. Both will add a unique twist to your soup while retaining its soul.

Copycat Quick And Easy Broccoli Cheddar Soup Recipe

Quick And Easy Broccoli Cheddar Soup Recipe

Tina Cooper
When I think of comfort food, broccoli cheddar soup instantly comes to mind. It’s rich, creamy, and oh-so-satisfying. This recipe offers a quick and easy version that doesn’t skimp on flavor.
Prep Time 5 minutes
Cook Time 25 minutes
Total Time 30 minutes
Course Main Course
Cuisine American
Servings 6 Servings
Calories 330 kcal

Equipment

  • Large pot

Ingredients
  

  • 2 cups chicken broth
  • 2 cups whole milk
  • 5 tablespoons unsalted butter
  • ½ medium onion finely chopped
  • cup all-purpose flour
  • 1 celery stalk finely diced
  • 2 ½ cups broccoli florets chopped into bite-sized pieces
  • 2 cups shredded sharp cheddar cheese

For Garnish:

  • 1 cup shredded sharp cheddar cheese optional, for extra cheesy goodness
  • ½ teaspoon garlic powder adds depth and savory warmth

Instructions
 

Step 1: Sauté the Base

  • Start by melting the butter in a large pot over medium heat. Toss in the chopped onions and celery. Allow them to cook until softened, which should take about 3-4 minutes. Stir occasionally. Not a bad moment to sniff that buttery aroma, is it?

Step 2: Create the Roux

  • Sprinkle the flour into the pot. Whisk it quickly to combine with the buttery veggies, cooking for an additional minute. This creates a roux, which thickens our soup and gives it a nice body.

Step 3: Introduce the Liquids

  • Gradually add the chicken broth, whisking continuously. After that, pour in the whole milk. This will create the creamy base of our soup. Bring everything to a gentle simmer while stirring. You want to see it gently bubbling, not boiling furiously.

Step 4: Add the Broccoli

  • Once your mixture has thickened slightly, add the chopped broccoli florets. This part’s key—let everything cook for about 10 minutes, or until the broccoli is tender but still vibrant in color. You don’t want mushy broccoli bathing in soup.

Step 5: Stir in the Cheese

  • Lower the heat and stir in the shredded sharp cheddar. Mix until completely melted and blended into the soup. This is the moment the whole kitchen fragrance skyrockets! Season with salt, pepper, and garlic powder to taste.

Step 6: Serve!

  • Ladle your delicious soup into bowls. If you’re feeling indulgent, top with more shredded cheddar. Serve with warm bread or a fresh salad. Dive in, savor every bite, and enjoy the fruits of your labor!

Notes

  • Prep Ahead: Chop your veggies and measure your ingredients in advance. It saves headaches when it’s cooking time.
  • Adjust the Cheese: If you prefer a creamier soup, feel free to increase the amount of cheese. It won’t hurt!
  • Use Fresh Broccoli: Frozen is fine, but fresh broccoli gives a better texture and flavor. Try to find florets that are bright green.
  • Blend It: For a smooth texture, blend the soup after cooking for a creamy consistency. Just take care to allow the soup to cool slightly before blending.
  • Garnish Creatively: Consider adding bacon bits, croutons, or even toasted pumpkin seeds for texture on top of your bowl.

Nutrition

Calories: 330kcalCarbohydrates: 28gProtein: 10gFat: 20gFiber: 3gSugar: 4g
Keyword Quick And Easy Broccoli Cheddar Soup Recipe
Tried this recipe?Let us know how it was!

Frequently Asked Questions

1. Can I make this soup vegan?

Absolutely! Simply swap out the chicken broth for vegetable broth, use plant-based butter, and opt for nutritional yeast or a vegan cheese to keep it cheesy.

2. How can I make it spicier?

If you like heat, add a pinch of red pepper flakes or diced jalapeños after adding the broccoli. Spice it up and let the flavor shine through!

3. Do I have to use fresh broccoli?

While fresh makes a difference in texture, frozen broccoli works too. Just ensure it’s pre-blanched to save some cooking time.

4. Can I use a slow cooker?

Yes! Sauté the vegetables in a pan first, then transfer everything to the slow cooker. Cook on low for about 4 hours. Add cheese at the end.

5. Why is my soup too thick?

If it thickens more than you’d like, try adding more broth or milk until you reach your desired consistency.

6. Can I freeze this soup after adding cheese?

Technically, yes, but the cheese may separate when reheating. If you plan to freeze it, consider adding the cheese fresh when you reheat the soup.

Conclusion

Quick and easy broccoli cheddar soup is more than just a recipe; it’s a fundamental dish that deserves a spot in your kitchen repertoire. This soup marries convenience with flavor, providing a healthful meal in a fraction of the time. 

So gather your ingredients and indulge in the comfort of a warm bowl today. You’ll find that it not only satisfies your hunger but also warms your soul on cool days. Give it a try, and don’t forget to experiment with sides and toppings. Happy cooking!

You’ll also like these latest recipes!

Jollibee Fiesta Noodles Recipe – Yum Yarns

Best Jollibee Fiesta Noodles Recipe

Growing up in a multicultural neighborhood, I’ve had my fair share of delicious dishes from various kitchens, but nothing quite tickles my taste buds like Jollibee Fiesta Noodles. This dish isn’t just a meal; it’s a celebration of flavor. 

Today, let me take you through a colorful culinary journey, diving deep into what makes Jollibee Fiesta Noodles irresistible.

Best Jollibee Fiesta Noodles Recipe

What are Jollibee Fiesta Noodles?

At first glance, Jollibee Fiesta Noodles may appear as just another noodle dish. However, the magic lies in its vibrant mix of flavors and textures. Originating from the beloved Jollibee restaurant chain in the Philippines, this dish combines rice noodles, savory pork, a medley of vegetables, and a punchy sauce. 

This isn’t just food; it’s a nostalgic nod to family gatherings and festive celebrations. Each bite tells a story, capturing the essence of Filipino culture.

But what truly sets Jollibee Fiesta Noodles apart? Let’s dig a little deeper.

You will also like the following Dinner recipes!

Why You’ll Love Jollibee Fiesta Noodles

The beauty of Jollibee Fiesta Noodles is evident from the first taste. You’ll adore the delightful combination of silky noodles and rich, savory flavors. It’s not just the taste; it’s about how the dish brings people together.

Imagine sharing a hearty bowl with friends or family, laughter filling the air.

A dish may have delicious ingredients, but the love and care that go into making it transform it into something extraordinary. I remember the first time I enjoyed this dish at a Jollibee outlet in my city. 

The aroma wafting from the kitchen, the vibrant colors on the plate, and the first bite—it felt like a warm hug on a Sunday afternoon.

The Ingredients

For Topping:

  • ½ lb. shrimp, peeled and cooked
  • ½ cup smoked fish flakes
  • ½ cup crispy fried pork skin, crushed
  • 3 hard-boiled eggs, quartered
  • ¼ cup sliced green onions
  • 2 lemons, quartered

Main Ingredients:

  • 1 pack rice noodles (16oz)
  • Water, as needed

Sauce Mix:

  • 2 Tbsp. cooking oil
  • 1 Tbsp. Lee Kum Kee Minced Garlic
  • 1 onion, finely chopped
  • ¾ lb. ground pork
  • 4 cups beef broth
  • 1 Tbsp. annatto powder, dissolved in ¼ cup beef broth (or water)
  • 1 shrimp bouillon cube
  • 4 Tbsp. flour, dissolved in ¼ cup beef broth (or water)
  • 2 Tbsp. fish sauce
  • 1 Tbsp. Panda Brand Cooking Soy Sauce
  • ½ tsp. Coarse Ground Black Pepper
  • 1 tsp. paprika for a smoky depth
  • 1 Tbsp. oyster sauce for added umami
Jollibee Fiesta Noodles Recipe

Step-by-Step Instructions

Step 1: Prepare the Noodles

Start by cooking your rice noodles. Bring a pot of water to a boil, then add the noodles. Cook them until they’re just tender, about 3-5 minutes. 

Drain and rinse under cold water. This helps to prevent them from getting mushy and sticky. Set them aside, and let’s move on to the lovely sauce.

Step 2: Make the Sauce Mix

In a large skillet, heat 2 tablespoons of cooking oil over medium heat. Once hot, sauté the minced garlic and chopped onion until they’re translucent. This should take about 2-3 minutes.

Now, it’s time to add the ground pork. Cook it until it’s browned and cooked through, about 5-7 minutes. The aroma should be incredible by now!

Step 3: Add the Broth and Seasonings

Pour in the beef broth, including the dissolved annatto powder. This not only adds flavor but also gives your dish that beautiful color. Then, add the shrimp bouillon cube, flour mixture, fish sauce, soy sauce, pepper, paprika, and oyster sauce. Stir well to combine.

Bring the mixture to a gentle simmer. Allow it to cook for about 10 minutes until it thickens and all the flavors meld together. You should be doing a little happy dance at this point; it smells heavenly!

Step 4: Combine Noodles and Sauce

Now, toss in those cooked rice noodles. Gently mix everything, so the noodles soak up that glorious sauce. Let it cook for another 5 minutes on low heat.

Step 5: Prepare the Topping

While the noodles are soaking up the flavors, let’s prep the toppings. Slice the hard-boiled eggs, chop the green onions, and if you haven’t done so yet, get the shrimp and fried pork skin ready.

Step 6: Serve the Noodles

Serve the noodles hot, topped generously with smoked fish flakes, shrimp, egg, crispy pork skin, and green onions. Squeeze a little lemon over the top for an extra burst of flavor.

Tips & Tricks

  • Choose Fresh Ingredients: Fresh shrimp and vegetables elevate your dish.
  • Adjust the Spice: Feel free to add chili flakes if you like it spicy.
  • Cook Pasta Al Dente: This prevents the noodles from becoming mushy.
  • Store Leftovers: Keep leftover noodles in an airtight container; they’ll last a few days.
  • Garnish Creatively: Experiment with different toppings, like chopped cilantro or lime wedges.
Easy Jollibee Fiesta Noodles Recipe

Can I Store Jollibee Fiesta Noodles?

Absolutely! If you happen to have leftovers, store them in an airtight container in the refrigerator. They’ll stay fresh for about 3-4 days. Just remember, adding fresh veggies before serving will give your meal a delightful crunch again.

What Can I Serve with Jollibee Fiesta Noodles?

Jollibee Fiesta Noodles can be enjoyed on their own, but consider these amazing pairings:

  • Grilled Chicken: Spice it up with some grilled marinated chicken.
  • Vegetable Spring Rolls: Add crispy spring rolls for that crunchy contrast.
  • Fruit Salad: A refreshing fruit salad balances the savory noodles perfectly.
  • Pancit: Serve with traditional Pancit noodles for a delightful noodle feast.
  • Sour Soup: A sour soup can be a wonderful starter before your noodle dish.

Variations

  • Seafood Fiesta: Replace the pork with a mix of seafood like calamari, crab, and mussels.
  • Vegetarian Delight: Use tofu instead of ground pork, and load up on veggies like bell peppers, carrots, and bok choy.
  • Spicy Throwdown: Add chili garlic sauce or fresh chili peppers.
  • Cheesy Goodness: Add shredded cheese on top before serving.
  • Fried Rice Noodles: Stir-fry the cooked noodles with the sauce for a smoky finish.
Easy Jollibee Fiesta Noodles Recipe

Jollibee Fiesta Noodles Recipe

Tina Cooper
Growing up in a multicultural neighborhood, I’ve had my fair share of delicious dishes from various kitchens, but nothing quite tickles my taste buds like Jollibee Fiesta Noodles. This dish isn’t just a meal; it’s a celebration of flavor. 
Prep Time 30 minutes
Cook Time 30 minutes
Total Time 1 hour
Course Main Course
Cuisine Filipino
Servings 4 Servings
Calories 524 kcal

Equipment

  • Pot

Ingredients
  

For Topping:

  • ½ lb. shrimp peeled and cooked
  • ½ cup smoked fish flakes
  • ½ cup crispy fried pork skin crushed
  • 3 hard-boiled eggs quartered
  • ¼ cup sliced green onions
  • 2 lemons quartered

Main Ingredients:

  • 1 pack rice noodles 16oz
  • Water as needed

Sauce Mix:

  • 2 Tbsp. cooking oil
  • 1 Tbsp. Lee Kum Kee Minced Garlic
  • 1 onion finely chopped
  • ¾ lb. ground pork
  • 4 cups beef broth
  • 1 Tbsp. annatto powder dissolved in ¼ cup beef broth (or water)
  • 1 shrimp bouillon cube
  • 4 Tbsp. flour dissolved in ¼ cup beef broth (or water)
  • 2 Tbsp. fish sauce
  • 1 Tbsp. Panda Brand Cooking Soy Sauce
  • ½ tsp. Coarse Ground Black Pepper
  • 1 tsp. paprika for a smoky depth
  • 1 Tbsp. oyster sauce for added umami

Instructions
 

Step 1: Prepare the Noodles

  • Start by cooking your rice noodles. Bring a pot of water to a boil, then add the noodles. Cook them until they’re just tender, about 3-5 minutes.
  • Drain and rinse under cold water. This helps to prevent them from getting mushy and sticky. Set them aside, and let’s move on to the lovely sauce.

Step 2: Make the Sauce Mix

  • In a large skillet, heat 2 tablespoons of cooking oil over medium heat. Once hot, sauté the minced garlic and chopped onion until they’re translucent. This should take about 2-3 minutes.
  • Now, it’s time to add the ground pork. Cook it until it’s browned and cooked through, about 5-7 minutes. The aroma should be incredible by now!

Step 3: Add the Broth and Seasonings

  • Pour in the beef broth, including the dissolved annatto powder. This not only adds flavor but also gives your dish that beautiful color. Then, add the shrimp bouillon cube, flour mixture, fish sauce, soy sauce, pepper, paprika, and oyster sauce. Stir well to combine.
  • Bring the mixture to a gentle simmer. Allow it to cook for about 10 minutes until it thickens and all the flavors meld together. You should be doing a little happy dance at this point; it smells heavenly!

Step 4: Combine Noodles and Sauce

  • Now, toss in those cooked rice noodles. Gently mix everything, so the noodles soak up that glorious sauce. Let it cook for another 5 minutes on low heat.

Step 5: Prepare the Topping

  • While the noodles are soaking up the flavors, let’s prep the toppings. Slice the hard-boiled eggs, chop the green onions, and if you haven’t done so yet, get the shrimp and fried pork skin ready.

Step 6: Serve the Noodles

  • Serve the noodles hot, topped generously with smoked fish flakes, shrimp, egg, crispy pork skin, and green onions. Squeeze a little lemon over the top for an extra burst of flavor.

Notes

  • Choose Fresh Ingredients: Fresh shrimp and vegetables elevate your dish.
  • Adjust the Spice: Feel free to add chili flakes if you like it spicy.
  • Cook Pasta Al Dente: This prevents the noodles from becoming mushy.
  • Store Leftovers: Keep leftover noodles in an airtight container; they’ll last a few days.
  • Garnish Creatively: Experiment with different toppings, like chopped cilantro or lime wedges.

Nutrition

Serving: 335gCalories: 524kcalCarbohydrates: 57gProtein: 32gFat: 18.9gCholesterol: 622mgSodium: 1597mgFiber: 6gSugar: 8g
Keyword Jollibee Fiesta Noodles Recipe
Tried this recipe?Let us know how it was!

Frequently Asked Questions

1. Can I use other types of noodles?

Yes! You can use egg noodles, udon, or even whole wheat pasta if you prefer. Just adjust the cooking time as needed.

2. Is Jollibee Fiesta Noodles gluten-free?

Traditionally, it isn’t gluten-free due to soy sauce and noodles. However, you can easily keep it gluten-free by opting for gluten-free soy sauce and rice noodles.

3. How do I make it less salty?

Reduce the amount of soy sauce and fish sauce. You can also dilute with more broth or add extra vegetables.

4. Can I make it vegan?

Absolutely! Substitute pork with tempeh, and use vegetable broth and vegan sauces to maintain the flavors.

5. How can I make this dish spicy?

For a spicy kick, add diced jalapeños, chili garlic sauce, or sriracha when cooking the sauce.

Conclusion

Jollibee Fiesta Noodles are more than just a simple dish; they are an experience. Each ingredient plays a role in delivering a delightful burst of flavor. Whether you’re cooking for family, friends, or enjoying a quiet night in, this meal never disappoints. 

It’s your ticket to an exciting taste adventure right in your own kitchen. So, roll up your sleeves and dive into this deliciously vibrant dish! I promise, once you’ve made Jollibee Fiesta Noodles, you’ll want to keep this recipe on repeat. 

Happy cooking!

You’ll also like these latest recipes!

Jollibee Coke Float Recipe – Yum Yarns

Best Jollibee Coke Float Recipe

Have you ever experienced that perfect moment when the heat of the day fades away as you indulge in something cool and delicious? 

Pairing this uplifting vibe with a classic Coca-Cola float delivers pure joy. Imagine a hot summer day, sitting on the porch, and sipping on something that takes you right back to your childhood. 

That’s the magic of the Jollibee Coke float, a delightful sweet treat combining fizzy simplicity with creamy goodness. Let’s embark on this culinary journey to create this refreshing concoction, shall we?

Best Jollibee Coke Float Recipe

The Perfect Pairings

Before diving into the recipe, let’s consider what pairs well with this delicious treat. You might enjoy it alongside crispy chicken, classic fries, or even some spicy chicken sandwiches. These savory options complement the sweetness of the float perfectly. 

Imagine biting into a crisp piece of fried chicken and cleansing your palate with the cool, sweet rush of the float — it’s a match made in culinary heaven!

You will also like the following Drink recipes!

Why This Recipe is Great for You

Now, let’s talk about the delightful aspects of making a Jollibee Coke float at home. First, it’s incredibly easy to whip up, making it perfect for those hot summer afternoons. It’s characterized by just a handful of ingredients that pack a punch of flavor. 

Plus, this recipe caters to your sweet tooth without the need for a complicated process or expensive items. The familiarity of Coke combined with smooth ice cream will undoubtedly create a sense of nostalgia.

My Journey with the Ingredients

I remember the first time I made a Coke float; I was a kid, experimenting with flavors, and feeling like a master chef! 

Fast forward to today, and I still find joy in this simple recipe. The ingredients are straightforward: classic Coca-Cola, a generous scoop of creamy vanilla ice cream, a splash of vanilla extract, and some chocolate syrup. 

Each of these plays a significant role. The Coca-Cola provides the fizz, while the vanilla ice cream adds a creamy, dreamy texture. 

The dash of vanilla extract brings depth to the flavor, and let’s not forget the chocolate syrup. Who doesn’t love that sweet addition? A cherry on top seals the deal!

Ingredients for Jollibee Coke Float

  • 1 tablespoon of chocolate syrup
  • 4 ounces of classic Coca-Cola soda
  • 1/4 teaspoon of vanilla extract
  • 2 scoops of creamy vanilla ice cream
  • A maraschino cherry for garnish
  • A dollop of fresh whipped cream
Jollibee Coke Float Recipe

How to Make a Jollibee Coke Float

Step 1: Gather Your Ingredients

Before you start, gather all your ingredients. Having everything in one place always makes cooking feel manageable and fun.

Step 2: Start with the Ice Cream

In a tall glass, place two generous scoops of creamy vanilla ice cream. Tuna melt anyone? Just kidding! But really, the ice cream acts as the base of our float and sets the stage for the fizzy magic that’s about to unfold.

Step 3: Add the Chocolate Syrup

Drizzle one tablespoon of chocolate syrup over the ice cream. This is where things get exciting. The chocolate syrup runs down the sides, creating a beautiful marbled effect.

Step 4: Pour the Coca-Cola

Next, slowly pour 4 ounces of classic Coca-Cola soda over the ice cream. Watching the bubbles fizz and pop as the soda interacts with the ice cream is pure joy. Be careful to avoid overflow — it can get messy!

Step 5: Add the Vanilla Extract

Now, sprinkle in 1/4 teaspoon of vanilla extract. This unassuming ingredient enhances the drink with a warm, comforting flavor that makes each sip irresistible.

Step 6: Top It Off

Finally, crown your float with a dollop of fresh whipped cream. Don’t skimp — go for it! The creaminess adds a lovely texture and visual appeal to the drink.

Step 7: Garnish

Complete your masterpiece with a maraschino cherry on top. Make sure everyone knows you mean business with your float.

Step 8: Serve and Enjoy

Grab a straw or a long spoon, and serve it right away. Take a moment to enjoy the view before digging in. It’s a treat for the eyes before it’s a treat for the taste buds!

Recipe Notes

  • Coca-Cola: This is the star of the show. Its carbonation adds a refreshing quality that balances the creaminess of the ice cream.
  • Vanilla Ice Cream: Choose a high-quality ice cream to truly taste the difference. Going for real vanilla rather than an artificial option elevates the entire experience.
  • Chocolate Syrup: The chocolate gives a hint of richness that enhances all other flavors. You can use regular or dark chocolate syrup based on your preference.
  • Vanilla Extract: This ingredient is optional, but it provides an additional layer of flavor that rounds out the sweetness.
  • Maraschino Cherry: This little guy doesn’t just look pretty; it adds a pop of tartness which contrasts nicely with the sweetness.
  • Fresh Whipped Cream: Making your own whipped cream takes just a few minutes and makes a significant difference in flavor and texture.
Easy Jollibee Coke Float Recipe

Recipe Variations

No two floats have to be the same! Here are some ideas to mix things up:

  • Root Beer Float: Swap out Coca-Cola for root beer. This change gives the float a classic diner vibe.
  • Flavored Soda: Experiment with cherry cola or even orange soda for a fun twist.
  • Ice Cream Varieties: Try different ice cream flavors! Chocolate, mint chocolate chip, or even coffee ice cream make great alternatives.
  • Add Fruits: Toss in some bananas or strawberries for a fruity surprise that elevates your float to a new level.
Easy Jollibee Coke Float Recipe

Jollibee Coke Float Recipe

Tina Cooper
Pairing this uplifting vibe with a classic Coca-Cola float delivers pure joy. Imagine a hot summer day, sitting on the porch, and sipping on something that takes you right back to your childhood. 
Prep Time 5 minutes
Cook Time 0 minutes
Total Time 5 minutes
Course Beverages
Cuisine Southern
Servings 1 Servings
Calories 309 kcal

Equipment

  • tall glass

Ingredients
  

  • 1 tablespoon of chocolate syrup
  • 4 ounces of classic Coca-Cola soda
  • 1/4 teaspoon of vanilla extract
  • 2 scoops of creamy vanilla ice cream
  • A maraschino cherry for garnish
  • A dollop of fresh whipped cream

Instructions
 

Step 1: Gather Your Ingredients

  • Before you start, gather all your ingredients. Having everything in one place always makes cooking feel manageable and fun.

Step 2: Start with the Ice Cream

  • In a tall glass, place two generous scoops of creamy vanilla ice cream. Tuna melt anyone? Just kidding! But really, the ice cream acts as the base of our float and sets the stage for the fizzy magic that’s about to unfold.

Step 3: Add the Chocolate Syrup

  • Drizzle one tablespoon of chocolate syrup over the ice cream. This is where things get exciting. The chocolate syrup runs down the sides, creating a beautiful marbled effect.

Step 4: Pour the Coca-Cola

  • Next, slowly pour 4 ounces of classic Coca-Cola soda over the ice cream. Watching the bubbles fizz and pop as the soda interacts with the ice cream is pure joy. Be careful to avoid overflow — it can get messy!

Step 5: Add the Vanilla Extract

  • Now, sprinkle in 1/4 teaspoon of vanilla extract. This unassuming ingredient enhances the drink with a warm, comforting flavor that makes each sip irresistible.

Step 6: Top It Off

  • Finally, crown your float with a dollop of fresh whipped cream. Don’t skimp — go for it! The creaminess adds a lovely texture and visual appeal to the drink.

Step 7: Garnish

  • Complete your masterpiece with a maraschino cherry on top. Make sure everyone knows you mean business with your float.

Step 8: Serve and Enjoy

  • Grab a straw or a long spoon, and serve it right away. Take a moment to enjoy the view before digging in. It’s a treat for the eyes before it’s a treat for the taste buds!

Notes

  • Coca-Cola: This is the star of the show. Its carbonation adds a refreshing quality that balances the creaminess of the ice cream.
  • Vanilla Ice Cream: Choose a high-quality ice cream to truly taste the difference. Going for real vanilla rather than an artificial option elevates the entire experience.
  • Chocolate Syrup: The chocolate gives a hint of richness that enhances all other flavors. You can use regular or dark chocolate syrup based on your preference.
  • Vanilla Extract: This ingredient is optional, but it provides an additional layer of flavor that rounds out the sweetness.
  • Maraschino Cherry: This little guy doesn’t just look pretty; it adds a pop of tartness which contrasts nicely with the sweetness.
  • Fresh Whipped Cream: Making your own whipped cream takes just a few minutes and makes a significant difference in flavor and texture.

Nutrition

Serving: 257gCalories: 309kcalCarbohydrates: 67gProtein: 4gFat: 4gCholesterol: 21mgSodium: 284mgFiber: 1gSugar: 46g
Keyword Jollibee Coke Float Recipe
Tried this recipe?Let us know how it was!

Frequently Asked Questions

Can I use diet Coca-Cola for this recipe?

Certainly! Using diet Coca-Cola will change the flavor slightly, but the core idea remains intact. It may not be as sweet, but you’ll still enjoy the fun fizz and creamy texture.

How can I make this float dairy-free?

To create a dairy-free version, you’ll want to find a dairy-free ice cream made from almond, coconut, or cashew milk. Use a dairy-free whipped topping if you’d like to keep it creamy.

What should I do if it overflows when adding Coke?

Overflowing can happen! The best way to prevent this is to pour the Coca-Cola slowly. If it does overflow, just grab a spoon and enjoy the little bit of extra sweetness.

How long can I keep leftovers?

Although it’s best enjoyed right away, if you have leftovers, cover the float and place it in the freezer for an hour. However, it may lose some of its fizzy charm.

Can I make this float ahead of time?

This is not a recipe that holds up well over time. The ice cream can melt, and the fizz from the soda diminishes. However, you can prepare all elements separately and assemble them when you’re ready to serve.

Can I use sparkling water instead of soda?

While it won’t have the same flavor profile, you can definitely use sparkling water! Add some sweetness with flavored syrups for a refreshing twist.

Conclusion

The Jollibee Coke float is more than just a dessert; it’s an experience wrapped in nostalgia and comfort. Each sip brings a smile, and the simple pleasure of combining soda with ice cream creates a sense of joy — a moment to pause and indulge. 

I hope you dive in, create your own, and share this delightful treat with your friends and family. Whether you enjoy it on a hot day or as a sweet conclusion to a meal, every single time it’s a reward worth celebrating. Happy floating!

You’ll also like these latest recipes!

Jollibee Peach Mango Pie Recipe – Yum Yarns

Best Jollibee Peach Mango Pie Recipe

Jollibee Peach Mango Pie is a sweet, irresistible treat that pairs wonderfully with a variety of accompaniments to enhance its flavors. For a classic combo, enjoy the pie with a scoop of creamy vanilla ice cream. 

The contrast between the warm pie and cold ice cream creates a delightful melt-in-your-mouth experience. If you’re in the mood for something fresh, a vibrant tropical fruit salad made with pineapple, kiwi, and strawberries adds tangy brightness that perfectly complements the richness of the pie. 

For a cozy touch, pair your dessert with a comforting cup of coffee or tea; a robust cappuccino or a calming chamomile tea will balance the sweetness of the pie. And if you want to take it up a notch, a dollop of freshly whipped cream on top adds an extra layer of indulgence.

These pairings make for a truly satisfying dessert experience.

Best Jollibee Peach Mango Pie Recipe

I remember the first time I took a bite of a Jollibee Peach Mango Pie. The crispy crust gave way to a warm, gooey filling that burst with sunny flavors. It was like a slice of happiness wrapped in flaky goodness. 

If you’ve been lucky enough to experience this treat, you know exactly what I mean. If not, allow me to take you on a delicious journey into the heart of this beloved dessert.

The Jollibee Peach Mango Pie is more than just a dessert. It’s a cultural icon that captures the essence of Filipino flavors with a hint of nostalgia. I’ve tried making this pie at home multiple times and am excited to share a recipe that gets it just right. 

With a few simple ingredients, a step-by-step guide, and personal insights along the way, you too can create this masterpiece in your kitchen.

You will also like the following Dessert recipes!

What is Jollibee Peach Mango Pie?

Jollibee Peach Mango Pie is a deep-fried pastry filled with a delightful mixture of sweet peaches and ripe mangoes. This iconic dessert is famous for its unique combination of flavors and textures – a crisp exterior giving way to a luscious, gooey center. 

On a busy day, grabbing one of these pies at Jollibee feels like a warm hug. But the best part? You can recreate this beloved treat in your own kitchen.

Why This Recipe Works

1. Authentic Flavor: The use of ripe peaches and mangoes ensures that the pie is bursting with tropical flavor. Fresh ingredients make all the difference.

2. Easy Preparation: This recipe uses pre-made pie crusts which saves a tremendous amount of time. Even busy folks can whip this up in no time.

3. Versatility: You can adjust the sweetness or spices based on your preferences. Don’t like vanilla? Substitute it with almond extract.

4. Satisfying Texture: The combination of a flaky crust with a gooey filling hits all the right spots. Each bite is a delightful contrast that keeps you going back for more.

Ingredients You’ll Need to Make This Jollibee Peach Mango Pie

Before we dive into the steps, here’s a quick view of the ingredients you’ll need:

  • 2 pre-made 9-inch pie crusts (store-bought or homemade)
  • 1 large egg, lightly beaten
  • 1 tablespoon of heavy cream
  • A sprinkle of raw sugar, for topping
  • ¾ cup diced mangoes (fresh or frozen)
  • ¾ cup diced peaches (fresh or frozen)
  • ½ cup white sugar
  • 2 tablespoons of cornstarch
  • ¼ teaspoon ground cinnamon
  • 1 tablespoon freshly squeezed lemon juice
  • A pinch of sea salt
  • ½ teaspoon pure vanilla extract
  • All-purpose flour, for dusting the counter
  • ¼ teaspoon ground ginger
  • 1 tablespoon maple syrup
Jollibee Peach Mango Pie Recipe

How to Make These?

Follow these steps to create your very own Jollibee Peach Mango Pie.

Step 1: Prepare the Filling

In a mixing bowl, combine the diced mangoes and peaches. Add the white sugar, cornstarch, ground cinnamon, lemon juice, sea salt, vanilla extract, ground ginger, and maple syrup. Gently fold everything together until evenly mixed. Let this sit while you prepare your crust.

Step 2: Roll Out the Crust

Dust your countertop with flour. Take one of the 9-inch pie crusts and gently roll it out to smooth any creases. You want it to be pliable enough to form into a pie shape without breaking.

Step 3: Fill the Pie Crust

Carefully place the rolled-out pie crust into a pie dish. Use your fingers to mold the crust into the shape of the dish. Now, take your fruit filling and pour it into the crust, spreading it evenly.

Step 4: Seal the Pie

Roll out the second pie crust in a similar manner. Cover the pie with this second crust. Pinch the edges of both crusts together to seal in the delicious filling. You can make decorative cuts on top to let steam escape.

Step 5: Brush and Sprinkle

Mix the beaten egg and heavy cream together. Gently brush the top of the pie with this mixture for a golden finish. Sprinkle some raw sugar on top for added crunch and sweetness.

Step 6: Bake

Preheat your oven to 375°F (190°C). Bake for about 25 to 30 minutes or until the crust is golden brown. Allowing the baking aroma to fill your kitchen is a definite plus.

Step 7: Cool and Serve

Once baked, let the pie cool for a few minutes before slicing. This will help the filling set a bit.

Tips for Success

  • Choose Ripe Fruit: For the best flavor, select ripe, sweet peaches and mangoes. Overripe fruit can make the pie too mushy.
  • Watch the Baking Time: Every oven is different. Keep an eye on your pie to avoid over-baking.
  • Cool Before Serving: Let the pie cool slightly; this helps the filling firm up.
  • Experiment with Spices: Cinnamon and ginger are classic, but feel free to experiment with nutmeg or other spices.
  • Dusting Flour: Don’t skimp on the flour when rolling out crusts. It prevents sticking and tearing.
Easy Jollibee Peach Mango Pie Recipe

How to Store the Leftovers?

If you happen to have leftover pie (which seems unlikely, but just in case!), store it in an airtight container in the refrigerator. It should last for about 3-4 days. You can reheat slices in the oven for a warm treat or enjoy it cold.

What are Some Recommended Side Dishes for Jollibee Peach Mango Pie?

Pairing your pie with sides can elevate your meal experience. Here are a few ideas:

1. Steamed Asparagus: Its crispness contrasts the softness of the pie, making for a refreshing addition.

2. Side Salad: A light salad with mixed greens, nuts, and a tangy vinaigrette can add a nice balance to the sweetness of your dessert.

3. Roasted Sweet Potatoes: These can be a savory side that complements the sweetness of the pie well.

4. Grilled Shrimp Skewers: Add some grilled proteins to your fare. The smokiness contrasts the sweet flavors perfectly.

Substitute Options for the Ingredients

Not all ingredients may be available, but don’t worry. Here are some substitutes:

  • Pre-made Pie Crusts: Use homemade dough or phyllo pastry instead for a different texture.
  • Heavy Cream: Half-and-half or coconut cream are alternatives that yield a similar result.
  • Granulated Sugar: Brown sugar or coconut sugar will add a deeper flavor.
  • Cornstarch: Arrowroot powder or all-purpose flour can work as thickening alternatives in your filling.
Easy Jollibee Peach Mango Pie Recipe

Jollibee Peach Mango Pie Recipe

Tina Cooper
Jollibee Peach Mango Pie is a sweet, irresistible treat that pairs wonderfully with a variety of accompaniments to enhance its flavors. For a classic combo, enjoy the pie with a scoop of creamy vanilla ice cream. 
Prep Time 15 minutes
Cook Time 25 minutes
Total Time 40 minutes
Course Dessert
Cuisine Filipino
Servings 8 Servings
Calories 278 kcal

Equipment

  • Mixing bowl

Ingredients
  

  • 2 pre-made 9-inch pie crusts store-bought or homemade
  • 1 large egg lightly beaten
  • 1 tablespoon of heavy cream
  • A sprinkle of raw sugar for topping
  • ¾ cup diced mangoes fresh or frozen
  • ¾ cup diced peaches fresh or frozen
  • ½ cup white sugar
  • 2 tablespoons of cornstarch
  • ¼ teaspoon ground cinnamon
  • 1 tablespoon freshly squeezed lemon juice
  • A pinch of sea salt
  • ½ teaspoon pure vanilla extract
  • All-purpose flour for dusting the counter
  • ¼ teaspoon ground ginger
  • 1 tablespoon maple syrup

Instructions
 

  • Follow these steps to create your very own Jollibee Peach Mango Pie.

Step 1: Prepare the Filling

  • In a mixing bowl, combine the diced mangoes and peaches. Add the white sugar, cornstarch, ground cinnamon, lemon juice, sea salt, vanilla extract, ground ginger, and maple syrup. Gently fold everything together until evenly mixed. Let this sit while you prepare your crust.

Step 2: Roll Out the Crust

  • Dust your countertop with flour. Take one of the 9-inch pie crusts and gently roll it out to smooth any creases. You want it to be pliable enough to form into a pie shape without breaking.

Step 3: Fill the Pie Crust

  • Carefully place the rolled-out pie crust into a pie dish. Use your fingers to mold the crust into the shape of the dish. Now, take your fruit filling and pour it into the crust, spreading it evenly.

Step 4: Seal the Pie

  • Roll out the second pie crust in a similar manner. Cover the pie with this second crust. Pinch the edges of both crusts together to seal in the delicious filling. You can make decorative cuts on top to let steam escape.

Step 5: Brush and Sprinkle

  • Mix the beaten egg and heavy cream together. Gently brush the top of the pie with this mixture for a golden finish. Sprinkle some raw sugar on top for added crunch and sweetness.

Step 6: Bake

  • Preheat your oven to 375°F (190°C). Bake for about 25 to 30 minutes or until the crust is golden brown. Allowing the baking aroma to fill your kitchen is a definite plus.

Step 7: Cool and Serve

  • Once baked, let the pie cool for a few minutes before slicing. This will help the filling set a bit.

Notes

  • Choose Ripe Fruit: For the best flavor, select ripe, sweet peaches and mangoes. Overripe fruit can make the pie too mushy.
  • Watch the Baking Time: Every oven is different. Keep an eye on your pie to avoid over-baking.
  • Cool Before Serving: Let the pie cool slightly; this helps the filling firm up.
  • Experiment with Spices: Cinnamon and ginger are classic, but feel free to experiment with nutmeg or other spices.
  • Dusting Flour: Don’t skimp on the flour when rolling out crusts. It prevents sticking and tearing.

Nutrition

Serving: 56gCalories: 278kcalCarbohydrates: 29gProtein: 3gFat: 16.8gCholesterol: 3mgSodium: 200mgFiber: 1g
Keyword Jollibee Peach Mango Pie Recipe
Tried this recipe?Let us know how it was!

Frequently Asked Questions

1. Can I freeze Jollibee Peach Mango Pie?

Yes! You may freeze it before baking or after. Wrap it tightly in plastic wrap and foil to prevent freezer burn. It should last for about three months.

2. Can I use canned peaches and mangoes?

Absolutely! Canned fruits can offer convenience. Just make sure to drain them well to avoid excess moisture.

3. Is it necessary to deep-fry the pie?

While traditional recipes fry the pie, baking yields a lighter option. Just keep an eye on the oven for that golden crisp.

4. Can I make mini pies?

Definitely! Use muffin tins for mini versions. Adjust baking time because they will cook faster.

5. What type of mango is best?

Alfonso mangoes are sweet and flavorful, making them ideal for this recipe. Pick whatever is ripe!

Conclusion

Creating your very own Jollibee Peach Mango Pie is a rewarding experience that’s easy, fun, and delicious. Whether you enjoy it fresh from the oven or save it for a snack, each bite will take you on a flavor adventure. 

The perfect combination of sweet fruit and flaky crust is one bite away. Now that you’ve got the recipe, it’s time to gather your ingredients and get baking. Happy pie-making!

You’ll also like these latest recipes!

Jollibee Pasta Recipe – Yum Yarns

Best Jollibee Pasta Recipe

Before diving into the wonders of Jollibee pasta, let’s explore the perfect pairings that can enhance this delicious dish. Jollibee pasta, with its flavorful tomato base and hearty toppings, is versatile enough to complement a variety of sides. 

A crunchy slice of garlic bread makes an excellent accompaniment, with its buttery, crispy texture and rich garlic flavor perfectly balancing the dish’s lightness. For a refreshing contrast, a fresh Caesar salad adds a crisp green element, with the crunch of romaine and the tangy dressing offering a bright and vibrant side. 

And, of course, no meal is complete without Jollibee’s famous fried chicken. The crispy, savory goodness of the chicken pairs wonderfully with the pasta, creating a delightful mix of textures and flavors. Now, let’s jump into all that is Jollibee pasta!

Best Jollibee Pasta Recipe

As a food enthusiast and registered dietitian, I’m always on the lookout for dishes that pack a punch in flavor and nutrition. When I first encountered Jollibee pasta, I was intrigued. The dish, a fusion of Italian and Filipino flavors, surprised me with its vibrant taste and texture.

With a combination of pasta, meat, and a rich sauce, this dish represents more than just a meal; it tells a story of cultural intersection. If you’ve never tried Jollibee pasta before, you’re in for a treat.

You will also like the following Dinner recipes!

What is Jollibee Pasta?

Jollibee pasta is a unique creation found in the popular Filipino fast-food chain, Jollibee. This dish often features spaghetti or a similar noodle topped with a sweet, tangy sauce made primarily from tomatoes and banana ketchup. 

The addition of protein, usually ground meat or sausage, enhances its heartiness.

In the Philippines, food isn’t just fuel; it’s an experience shaped by history and tradition. Jollibee pasta stands as a testament to this, blending Western culinary influence with Filipino taste profiles.

What is the Flavor Profile of This Dish?

The beauty of Jollibee pasta lies in its complex flavor profile. Let’s break it down:

  • Sweetness: One of the defining ingredients is banana ketchup. It contributes a level of sweetness that many people adore. It’s unexpected yet familiar.
  • Tanginess: The tomato puree adds a sharp, tangy counterbalance that elevates the overall taste.
  • Savory: Ground meat, whether beef or sausage, lends depth to the dish. The savory element complements the sweetness and tanginess beautifully.
  • Aromatic: Garlic and onion add aromatic notes that round out the dish. Each bite is filled with flavor, offering a taste of home for many Filipinos.

Why You’ll Love This?

You’ll love Jollibee pasta for several reasons. First, it’s comfort food at its finest. It’s hearty, filling, and reminiscent of childhood meals. The sweetness combined with the rich tomato flavor feels like a hug for your taste buds.

Second, it’s versatile. You can tweak the ingredients based on your dietary needs. Want it vegetarian? Swap the meat for mushrooms or chickpeas. Gluten-free? Use your favorite gluten-free pasta.

Lastly, Jollibee pasta is easy to prepare. With simple ingredients and straightforward steps, you’ll be enjoying a warm bowl of deliciousness in no time.

Ingredients

Now let’s gather everything you need to recreate this dish in your kitchen. Here’s what you’ll require:

  • 1 pound spaghetti pasta
  • 1 tablespoon extra virgin olive oil
  • 1 can (15 ounces) tomato puree
  • 4-5 sausages, sliced on the diagonal
  • 1 can (8 ounces) tomato paste
  • 1 teaspoon honey or maple syrup
  • 3 cloves garlic, finely minced
  • ½ teaspoon sea salt
  • 1 small yellow onion, finely chopped
  • ½ cup shredded sharp cheddar cheese
  • 1 pound ground chuck beef
  • 1 cup sweet banana ketchup
  • 1 cup beef stock
  • ¼ teaspoon freshly cracked black pepper
  • Optional: Fresh basil or cilantro for garnish
Jollibee Pasta Recipe

Step-by-Step Instructions

Let’s transform those ingredients into a comforting bowl of Jollibee pasta. Here’s how to do it:

Step 1: Cook the Pasta

Start by boiling a large pot of salted water. Add the spaghetti and cook according to the package instructions. Drain and set aside when done.

Step 2: Sauté the Aromatics

In a large skillet, heat the olive oil over medium heat. Add the finely chopped onions and minced garlic. Sauté until fragrant and translucent, about 3-4 minutes. The aroma? It’ll make you want to dive in early!

Step 3: Brown the Meat

Add the ground beef to the skillet. Break it up with a spatula and cook until browned. Drain excess fat if needed. This step will give your dish that savory essence.

Step 4: Add Sausage

Once the beef is browned, add the sliced sausages. Let them brown for another 3-4 minutes, stirring occasionally. They add a delightful bite and flavor.

Step 5: Mix in the Sauces

Stir in the tomato puree and tomato paste. Follow with banana ketchup. Make sure to mix thoroughly, allowing all flavors to meld together.

Step 6: Season It Up

Pour in the beef stock and mix it well. Season with sea salt, black pepper, and the teaspoon of honey or maple syrup. Bring this mixture to a gentle simmer and let it bubble away for about 10 minutes.

Step 7: Combine Pasta and Sauce

Once your sauce has thickened slightly, add the cooked spaghetti to the skillet. Toss to coat the noodles well. The goal is to let every strand soak in that delicious sauce.

Step 8: Serve and Garnish

Serve the Jollibee pasta in bowls, topped with shredded cheddar cheese. For an extra touch, sprinkle with fresh basil or cilantro. It’s all about the finishing touches!

Tips & Tricks

Here are some handy tips to ensure your pasta turns out perfect:

  • Salt the Pasta Water: Always season your boiling water. It improves flavor from the very beginning.
  • Don’t Overcook the Noodles: Aim for al dente! The pasta should still have a slight bite.
  • Make It Ahead: This pasta tastes even better the next day. It’s a great make-ahead option for gatherings.
  • Experiment with Proteins: Use chicken or even plant-based proteins if you prefer. The flavors will adapt wonderfully.
  • Add Veggies: Toss in some bell peppers or zucchini for added nutrition and color.
Easy Jollibee Pasta Recipe

How Can You Store This Jollibee Pasta?

If you have leftovers, storing them is a breeze. Allow the pasta to cool completely before transferring it to an airtight container. It can be kept in the fridge for up to 3 days. 

When reheating, add a splash of water to prevent it from drying out. Heat thoroughly in a microwave or on the stove until hot.

Alternative Ingredient Choices

Sometimes, you might not have everything on hand. Here are some alternative ingredients that can work wonders:

  • Spaghetti Substitutes: Fusilli or penne can be used instead of spaghetti. They capture the sauce beautifully.
  • Banana Ketchup Alternative: If you can’t find banana ketchup, consider using regular ketchup with a dash of sugar to replicate the sweetness.
  • Cheese Options: Don’t have cheddar? Mozzarella or parmesan can easily replace it to achieve a delightful flavor.
Easy Jollibee Pasta Recipe

Jollibee Pasta Recipe

Tina Cooper
As a food enthusiast and registered dietitian, I’m always on the lookout for dishes that pack a punch in flavor and nutrition. When I first encountered Jollibee pasta, I was intrigued.
Prep Time 10 minutes
Cook Time 40 minutes
Total Time 50 minutes
Course Main Course
Cuisine Filipino
Servings 8 Servings
Calories 521 kcal

Equipment

  • Skillet

Ingredients
  

  • 1 pound spaghetti pasta
  • 1 tablespoon extra virgin olive oil
  • 1 can 15 ounces tomato puree
  • 4-5 sausages sliced on the diagonal
  • 1 can 8 ounces tomato paste
  • 1 teaspoon honey or maple syrup
  • 3 cloves garlic finely minced
  • ½ teaspoon sea salt
  • 1 small yellow onion finely chopped
  • ½ cup shredded sharp cheddar cheese
  • 1 pound ground chuck beef
  • 1 cup sweet banana ketchup
  • 1 cup beef stock
  • ¼ teaspoon freshly cracked black pepper
  • Optional: Fresh basil or cilantro for garnish

Instructions
 

  • Let’s transform those ingredients into a comforting bowl of Jollibee pasta. Here’s how to do it:

Step 1: Cook the Pasta

  • Start by boiling a large pot of salted water. Add the spaghetti and cook according to the package instructions. Drain and set aside when done.

Step 2: Sauté the Aromatics

  • In a large skillet, heat the olive oil over medium heat. Add the finely chopped onions and minced garlic. Sauté until fragrant and translucent, about 3-4 minutes. The aroma? It’ll make you want to dive in early!

Step 3: Brown the Meat

  • Add the ground beef to the skillet. Break it up with a spatula and cook until browned. Drain excess fat if needed. This step will give your dish that savory essence.

Step 4: Add Sausage

  • Once the beef is browned, add the sliced sausages. Let them brown for another 3-4 minutes, stirring occasionally. They add a delightful bite and flavor.

Step 5: Mix in the Sauces

  • Stir in the tomato puree and tomato paste. Follow with banana ketchup. Make sure to mix thoroughly, allowing all flavors to meld together.

Step 6: Season It Up

  • Pour in the beef stock and mix it well. Season with sea salt, black pepper, and the teaspoon of honey or maple syrup. Bring this mixture to a gentle simmer and let it bubble away for about 10 minutes.

Step 7: Combine Pasta and Sauce

  • Once your sauce has thickened slightly, add the cooked spaghetti to the skillet. Toss to coat the noodles well. The goal is to let every strand soak in that delicious sauce.

Step 8: Serve and Garnish

  • Serve the Jollibee pasta in bowls, topped with shredded cheddar cheese. For an extra touch, sprinkle with fresh basil or cilantro. It’s all about the finishing touches!

Notes

Here are some handy tips to ensure your pasta turns out perfect:
  • Salt the Pasta Water: Always season your boiling water. It improves flavor from the very beginning.
  • Don’t Overcook the Noodles: Aim for al dente! The pasta should still have a slight bite.
  • Make It Ahead: This pasta tastes even better the next day. It’s a great make-ahead option for gatherings.
  • Experiment with Proteins: Use chicken or even plant-based proteins if you prefer. The flavors will adapt wonderfully.
  • Add Veggies: Toss in some bell peppers or zucchini for added nutrition and color.

Nutrition

Serving: 446gCalories: 521kcalCarbohydrates: 43gProtein: 55gFat: 17.2gCholesterol: 165mgSodium: 536mgFiber: 7gSugar: 15g
Keyword Jollibee Pasta Recipe
Tried this recipe?Let us know how it was!

Frequently Asked Questions

1. Can I make Jollibee pasta vegetarian?

Absolutely! Simply swap the meats for vegetables like mushrooms and add beans for protein. The flavors remain fantastic!

2. Is banana ketchup necessary?

While it adds a unique sweetness, you can substitute it with regular ketchup and a bit of sugar. It won’t replicate the exact taste, but it comes close.

3. Can I freeze Jollibee pasta?

Yes, it freezes well! Just be sure to store it in airtight containers and consume it within 2 months for optimal taste.

4. What side dishes go best with Jollibee pasta?

Aside from garlic bread and salads, crispy spring rolls or a vegetable stir-fry would be delightful as a side.

5. How spicy is Jollibee pasta?

This dish is not typically spicy. However, if you enjoy heat, feel free to add chili flakes or diced jalapeños to the mix.

Conclusion

Making Jollibee pasta is not just about preparing a dish; it’s about embracing a fusion of cultures and flavors that have a special place in many hearts. The next time you gather with friends or family, consider this nostalgic recipe, and bask in the delightful flavors it brings to the table. 

You might just find Jollibee pasta becoming a staple in your kitchen. Dive in, share stories, and enjoy every cheesy, savory bite. There’s nothing quite like food that brings people together!

You’ll also like these latest recipes!

Jollibee Mashed Potato Recipe – Yum Yarns

Best Jollibee Mashed Potato Recipe

When you think about Jollibee mashed potatoes, several delicious pairings come to mind. Think about crispy fried chicken, rich gravy, or a hearty burger. These mashed potatoes elevate any meal.

Best Jollibee Mashed Potato Recipe

Imagine savoring creamy mashed potatoes alongside a perfectly crispy Chickenjoy. It’s a match made in foodie heaven. But let’s not just stop there. Add some corn on the side, and you’ve got a plate that looks pretty appealing, too.

You will also like the following Side Dish recipes!

Why This Recipe is Great for You

Now, onto the star of the show: Jollibee mashed potatoes. Why is this recipe such a treasure? For starters, it’s an embodiment of comfort food. The smooth, creamy texture of the mashed potatoes hugs your taste buds like a warm blanket.

It’s not just about flavor; it’s about creating memories. Perhaps you enjoyed this dish at Jollibee after a long day, or celebrating a special occasion with family. Whatever the case, making it at home helps you create that experience in your own kitchen.

As a registered dietitian and food enthusiast, I make it a point to choose ingredients that not only taste great but also contribute to overall well-being. 

Each component in my recipe is carefully selected for that perfect balance of flavor and nutrition.

My Experience with the Ingredients

Before diving into the recipe, let me share my journey with the ingredients. First, the russet potatoes. These chunky guys are known for their creamy texture when mashed. 

I peel them with excitement, knowing the fluffy goodness they will become. Then comes the whole milk—a splash of richness that makes all the difference in texture.

Next up is the unsalted butter. A few tablespoons of melted bliss—who can resist? Garlic powder adds a depth of flavor that’s subtle yet irresistible. 

Finally, a sprinkle of sea salt and fresh chives ties everything together. Trust me; these simple elements create something extraordinary. Now, are you ready to join me in the kitchen?

Ingredients List

  • 1 tablespoon chopped fresh chives
  • 3 to 4 cups of water
  • 2 teaspoons sea salt
  • 3/4 cup whole milk
  • 2 lbs. russet potatoes, peeled and diced into chunks
  • 1/2 teaspoon garlic powder
  • 3 tablespoons melted unsalted butter
Jollibee Mashed Potato Recipe

How to Make Jollibee Mashed Potatoes

Transforming your ingredients into a comforting bowl of mashed potatoes is a straightforward process. Let’s break it down step-by-step.

Step 1: Prepare the Potatoes

Start by washing and peeling your russet potatoes. Next, dice them into even chunks. This ensures they cook uniformly. You want to make sure they’re about an inch thick.

Step 2: Boil the Potatoes

In a large pot, place your diced potatoes and cover them with 3 to 4 cups of water. Add 2 teaspoons of sea salt to the water. 

Bring everything to a boil over medium-high heat. This step usually takes around 10-15 minutes. You want the potatoes to become fork-tender, so keep an eye on them.

Step 3: Drain and Dry

Once your potatoes are perfectly tender, carefully drain them into a colander. This helps remove excess moisture. Allow them to sit for a few minutes in the colander. This drying process is key to achieving that buttery texture.

Step 4: Mash the Potatoes

Return the drained potatoes to the pot. Here’s where the fun begins! Grab your potato masher (or fork if you’re feeling adventurous) and start mashing.

Step 5: Add Butter and Milk

Now it’s time to introduce some richness. Pour in the melted unsalted butter and the whole milk. Add 1/2 teaspoon of garlic powder for that gourmet touch. Stir everything until smooth and creamy.

Step 6: Season to Taste

Taste your mashed potatoes and add more sea salt if necessary. This step is often overlooked, but trust me; tasting is essential. You want it to be just right.

Step 7: Garnish and Serve

Finally, add the chopped fresh chives on top. They add a delightful flavor and a pop of color that makes your dish look inviting. Serve it warm alongside your choice of proteins or veggies.

Recipe Notes

Here’s a breakdown of the ingredients you’ll be using:

  • Russet Potatoes: These potatoes have a starchy texture, making them ideal for creamy mashed potatoes.
  • Sea Salt: Adds flavor to the potatoes. It’s essential, so don’t skimp on it!
  • Whole Milk: Enhances creaminess. Feel free to use lower-fat options if preferred.
  • Unsalted Butter: Gives richness; use unsalted to control the saltiness of the dish.
  • Garlic Powder: Offers a hint of flavor without overwhelming the dish.
  • Fresh Chives: Add a fresh taste and bright color, elevating the dish visually and in flavor.
Easy Jollibee Mashed Potato Recipe

Recipe Variations

Looking to switch things up? Here are some ways to customize your Jollibee mashed potatoes:

  • Cheesy Mashed Potatoes: Stir in shredded cheese like cheddar or mozzarella for a decadent twist.
  • Loaded Mashed Potatoes: Add crispy bacon bits, sour cream, and cheese for a loaded variant.
  • Herbed Mashed Potatoes: Mix in different herbs such as rosemary or thyme for a unique flavor profile.
  • Garlic Mashed Potatoes: Replace garlic powder with roasted garlic for a deeper, sweeter garlic flavor.
  • Vegan Option: Use non-dairy milk and vegan butter to make these mashed potatoes plant-based.
Easy Jollibee Mashed Potato Recipe

Jollibee Mashed Potato Recipe

Tina Cooper
Make Jollibee mashed potatoes at home with this creamy recipe! Fluffy, rich, and perfect for pairing with fried chicken or your favorite dish.
Prep Time 10 minutes
Cook Time 12 minutes
Total Time 22 minutes
Course Side Dish
Cuisine Filipino
Servings 4 Servings
Calories 205 kcal

Equipment

  • Large pot

Ingredients
  

  • 1 tablespoon chopped fresh chives
  • 3 to 4 cups of water
  • 2 teaspoons sea salt
  • 3/4 cup whole milk
  • 2 lbs. russet potatoes peeled and diced into chunks
  • 1/2 teaspoon garlic powder
  • 3 tablespoons melted unsalted butter

Instructions
 

  • Transforming your ingredients into a comforting bowl of mashed potatoes is a straightforward process. Let’s break it down step-by-step.

Step 1: Prepare the Potatoes

  • Start by washing and peeling your russet potatoes. Next, dice them into even chunks. This ensures they cook uniformly. You want to make sure they’re about an inch thick.

Step 2: Boil the Potatoes

  • In a large pot, place your diced potatoes and cover them with 3 to 4 cups of water. Add 2 teaspoons of sea salt to the water.
  • Bring everything to a boil over medium-high heat. This step usually takes around 10-15 minutes. You want the potatoes to become fork-tender, so keep an eye on them.

Step 3: Drain and Dry

  • Once your potatoes are perfectly tender, carefully drain them into a colander. This helps remove excess moisture. Allow them to sit for a few minutes in the colander. This drying process is key to achieving that buttery texture.

Step 4: Mash the Potatoes

  • Return the drained potatoes to the pot. Here’s where the fun begins! Grab your potato masher (or fork if you’re feeling adventurous) and start mashing.

Step 5: Add Butter and Milk

  • Now it’s time to introduce some richness. Pour in the melted unsalted butter and the whole milk. Add 1/2 teaspoon of garlic powder for that gourmet touch. Stir everything until smooth and creamy.

Step 6: Season to Taste

  • Taste your mashed potatoes and add more sea salt if necessary. This step is often overlooked, but trust me; tasting is essential. You want it to be just right.

Step 7: Garnish and Serve

  • Finally, add the chopped fresh chives on top. They add a delightful flavor and a pop of color that makes your dish look inviting. Serve it warm alongside your choice of proteins or veggies.

Notes

Here’s a breakdown of the ingredients you’ll be using:
  • Russet Potatoes: These potatoes have a starchy texture, making them ideal for creamy mashed potatoes.
  • Sea Salt: Adds flavor to the potatoes. It’s essential, so don’t skimp on it!
  • Whole Milk: Enhances creaminess. Feel free to use lower-fat options if preferred.
  • Unsalted Butter: Gives richness; use unsalted to control the saltiness of the dish.
  • Garlic Powder: Offers a hint of flavor without overwhelming the dish.
  • Fresh Chives: Add a fresh taste and bright color, elevating the dish visually and in flavor.

Nutrition

Serving: 351gCalories: 205kcalCarbohydrates: 24gProtein: 4gFat: 10.3gCholesterol: 27mgSodium: 1268mgFiber: 2gSugar: 4g
Keyword Jollibee Mashed Potato Recipe
Tried this recipe?Let us know how it was!

Frequently Asked Questions

Can I use different types of potatoes?

Absolutely! While russet potatoes yield the creamiest results, Yukon Gold or red potatoes work well too. They have a buttery flavor and smooth texture.

How do I store leftovers?

Store cooled mashed potatoes in an airtight container in the refrigerator. They’ll last about 3-5 days. Reheat with a splash of milk to restore creaminess.

Can I freeze mashed potatoes?

Yes, you can freeze them. Scoop portions into freezer-safe containers, leaving space for expansion. They can be frozen for up to 2 months.

How do I fix gluey mashed potatoes?

If yours turn out gluey, it’s usually because they’ve been over-mashed. To salvage, add a bit more milk or butter and fold gently with a spatula.

What if I don’t have whole milk?

You can use any milk you have on hand—skim, almond, or oat milk can work, though they will alter the creaminess.

Can these be made ahead of time?

Yes! You can make them a day ahead. Just reheat gently on the stovetop, adding a bit of milk to bring back that creamy texture.

Conclusion

Creating Jollibee mashed potatoes at home isn’t just about the ingredients; it’s about the experience. Each step allows you to connect with the food and relive those memories associated with Jollibee. 

The beauty of this dish lies in its versatility—pair it with fried chicken, drizzle it with gravy, or savor it solo. It’s comfort food at its finest. 

I hope this motivated you to try your hand at making this dish. Whether for a special occasion or just a weeknight dinner, your taste buds will thank you! Enjoy your culinary adventure.

You’ll also like these latest recipes!

Jollibee Lumpia Recipe – Yum Yarns

Best Jollibee Lumpia Recipe

Before diving into the delightful world of Jollibee lumpia, let’s chat about perfect partners! These crispy treasures shine when served alongside a few tasty comrades. Consider pairing them with sweet and sour sauce for a zesty kick. 

The tang complements the savory filling beautifully. Garlic vinegar dip adds a punch of flavor for those who enjoy a tart bite. Want a cool contrast? 

Spicy vinegar can give you that thrill of heat against the crunchy texture. These pairings transform a delightful snack into a memorable feast.

Best Jollibee Lumpia Recipe

The first time I tasted Jollibee lumpia, I was mesmerized. This wasn’t just any snack; it was a comforting little package that, when bitten into, released a medley of flavors. 

Growing up, I often watched my grandparents make lumpia from scratch, and while it was an intricate process, the joy on their faces while sharing it was worth every moment.

Fast-forward to today, and I find myself recreating that love in my kitchen. 

Whether it’s a cozy family meal or a festive gathering, Jollibee lumpia is always a hit. The crispy wrapper, complemented by a savory filling, brings nostalgia and joy to the table. Ready to make your own? Let’s explore what Jollibee lumpia is all about!

You will also like the following Appetizer recipes!

What is Jollibee Lumpia?

Jollibee lumpia is a popular Filipino snack that features a crispy wrapper stuffed with seasoned meats and vegetables. 

These delightful rolls are often served as appetizers or side dishes. You can find them in various forms, but the Jollibee twist includes an irresistible flavor profile.

These rolls are loved for their satisfying crunch on the outside and savory goodness inside. The entire experience is a delightful journey of textures and tastes. Whether you’re at a Jollibee restaurant or making them at home, lumpia brings people together.

Why This Recipe Works?

You might be wondering why this recipe has become a staple in many households. Here are four solid reasons that make Jollibee lumpia a winner every time.

1. Crispy Perfection Every Time
Achieving that golden, crispy exterior is key. With the right frying technique and proper temperature, you’ll have perfectly crispy lumpia that you won’t be able to resist.

2. Flavorful Filling
The mixture of ground pork, fresh vegetables, and seasoning creates a filling that’s bursting with flavor. Each bite offers a savory taste, bringing comfort food to new heights.

3. Easy to Prepare
While lumpia might seem daunting at first, the step-by-step process is simple. The ingredients are easy to find and require minimal prep, making it accessible even for beginners.

4. Versatile and Customizable
One of the fantastic aspects of lumpia is its versatility. You can play with the filling ingredients to suit your preferences. Want to add shrimp or switch to a vegetarian filling? The possibilities are endless!

Ingredients You’ll Need to Make This Dish

To embark on your Jollibee lumpia journey, here’s what you’ll need:

  • 1 1/2 lbs ground pork
  • 2 large eggs
  • 2 medium onions, finely minced
  • 2 carrots, finely diced
  • 1/2 cup fresh parsley, finely chopped
  • 1 1/2 teaspoons garlic powder
  • 1 tablespoon toasted sesame oil
  • 1 tablespoon soy sauce
  • 1 1/2 teaspoons sea salt
  • 1/2 teaspoon freshly ground black pepper
  • 1/4 teaspoon ground white pepper

Lumpia Wrappers & Oil:

  • 50 pieces of lumpia wrappers
  • 3 cups vegetable oil for frying
Jollibee Lumpia Recipe

How to Make Jollibee Lumpia?

Let’s get into the nitty-gritty of preparing this delightful dish.

Step 1: Prepare the Filling

Start by gathering all your filling ingredients. In a large bowl, combine the ground pork, minced onions, diced carrots, and chopped parsley. 

Next, add in the eggs, garlic powder, sesame oil, soy sauce, sea salt, black pepper, and white pepper. Mix everything well until it’s uniformly combined. Don’t be afraid to get your hands in there!

Step 2: Assemble the Lumpia

Take a lumpia wrapper and lay it on a clean surface. Spoon about two tablespoons of the filling into the center. 

Make sure not to overfill; it needs room to roll. Fold the sides toward the center and roll tightly, sealing the last edge with a bit of water. Repeat this until all wrappers and filling are used up.

Step 3: Heat the Oil

In a large pan or deep fryer, heat the vegetable oil over medium heat. You want enough oil for deep frying, usually about two inches deep. To test if the oil is ready, throw in a small piece of wrapper; if it bubbles and rises, you’re good to go.

Step 4: Fry the Lumpia

Carefully place a few lumpia in the hot oil, avoiding overcrowding. Fry for about 3-4 minutes per side or until golden brown and crispy. Use tongs to turn them gently to ensure even cooking. Remove from heat and place on paper towels to drain excess oil.

Step 5: Serve and Enjoy!

Serve the lumpia hot and crispy, accompanied by dipping sauces of your choice. Watching everyone enjoy the fruits of your labor is rewarding. Savor the moment!

Tips & Tricks

To enhance your lumpia-making experience, keep these handy tips in mind:

  • Don’t Skip the Drain: Allow the fried lumpia to sit on paper towels to absorb excess oil. This keeps them crunchy and not greasy.
  • Make Ahead: You can prepare the filling a day in advance and keep it refrigerated. Just wrap and fry when you’re ready!
  • Experiment with Fillings: Toss in some shredded cabbage or bean sprouts for a different texture.
  • Maintain Oil Temperature: Keep an eye on the oil temperature by adjusting the heat as needed. If it gets too hot, the lumpia may burn.
  • Use Fresh Wrappers: Fresh lumpia wrappers yield the best results. If they feel dry, spritz them lightly with water.
Easy Jollibee Lumpia Recipe

How Do You Store The Leftovers?

If you find yourself with leftovers (which is rare because they go quickly!), allow the lumpia to cool completely before storing. Place them in an airtight container and refrigerate for up to 3 days. 

To reheat, pop them in the oven at 375°F until warmed through for that crispy texture. Avoid using a microwave, as it can make them soggy.

What Sides Would Complement Jollibee Lumpia?

Here are three sides that amplify your lumpia experience:

1. Pancit (Noodles)
A classic Filipino dish, Pancit is vibrant and flavorful. With stir-fried noodles, vegetables, and meats, it pairs beautifully with crispy lumpia, making a complete meal.

2. Filipino Fried Rice
Egg fried rice with a dash of soy sauce offers a savory base. It balances the crispiness of lumpia while adding comforting familiarity.

3. Fresh Fruit Salad
A refreshing fruit salad can cleanse the palate. Combine tropical fruits like mangoes, pineapples, and bananas for a bright contrast to savory lumpia.

What Alternatives Can You Use for the Ingredients?

Running low on ingredients? Here are some alternatives:

1. Ground Turkey or Chicken
If you prefer a leaner option, ground turkey or chicken can replace the pork. It offers the same texture with less fat.

2. Tofu
For a vegetarian alternative, finely crumbled tofu can be used. Add soy sauce and spices for a boost of flavor.

3. Green Onions
Instead of onions, chopped green onions can add a fresh kick to your filling.

4. Any Wrappers
Don’t have lumpia wrappers? Spring roll or egg roll wrappers work well. Just ensure they’re sealed properly.

Jollibee Lumpia Recipe

Tina Cooper
Before diving into the delightful world of Jollibee lumpia, let’s chat about perfect partners! These crispy treasures shine when served alongside a few tasty comrades. Consider pairing them with sweet and sour sauce for a zesty kick. 
Prep Time 15 minutes
Cook Time 10 minutes
Total Time 25 minutes
Course Appetizer
Cuisine Filipino
Servings 12 Servings
Calories 1342 kcal

Equipment

  • large pan or deep fryer

Ingredients
  

Filling Ingredients:

  • 1 1/2 lbs ground pork
  • 2 large eggs
  • 2 medium onions finely minced
  • 2 carrots finely diced
  • 1/2 cup fresh parsley finely chopped
  • 1 1/2 teaspoons garlic powder
  • 1 tablespoon toasted sesame oil
  • 1 tablespoon soy sauce
  • 1 1/2 teaspoons sea salt
  • 1/2 teaspoon freshly ground black pepper
  • 1/4 teaspoon ground white pepper

Lumpia Wrappers & Oil:

  • 50 pieces of lumpia wrappers
  • 3 cups vegetable oil for frying

Instructions
 

  • Let’s get into the nitty-gritty of preparing this delightful dish.

Step 1: Prepare the Filling

  • Start by gathering all your filling ingredients. In a large bowl, combine the ground pork, minced onions, diced carrots, and chopped parsley.
  • Next, add in the eggs, garlic powder, sesame oil, soy sauce, sea salt, black pepper, and white pepper. Mix everything well until it’s uniformly combined. Don’t be afraid to get your hands in there!

Step 2: Assemble the Lumpia

  • Take a lumpia wrapper and lay it on a clean surface. Spoon about two tablespoons of the filling into the center.
  • Make sure not to overfill; it needs room to roll. Fold the sides toward the center and roll tightly, sealing the last edge with a bit of water. Repeat this until all wrappers and filling are used up.

Step 3: Heat the Oil

  • In a large pan or deep fryer, heat the vegetable oil over medium heat. You want enough oil for deep frying, usually about two inches deep. To test if the oil is ready, throw in a small piece of wrapper; if it bubbles and rises, you’re good to go.

Step 4: Fry the Lumpia

  • Carefully place a few lumpia in the hot oil, avoiding overcrowding. Fry for about 3-4 minutes per side or until golden brown and crispy. Use tongs to turn them gently to ensure even cooking. Remove from heat and place on paper towels to drain excess oil.

Step 5: Serve and Enjoy!

  • Serve the lumpia hot and crispy, accompanied by dipping sauces of your choice. Watching everyone enjoy the fruits of your labor is rewarding. Savor the moment!

Notes

To enhance your lumpia-making experience, keep these handy tips in mind:
  • Don’t Skip the Drain: Allow the fried lumpia to sit on paper towels to absorb excess oil. This keeps them crunchy and not greasy.
  • Make Ahead: You can prepare the filling a day in advance and keep it refrigerated. Just wrap and fry when you’re ready!
  • Experiment with Fillings: Toss in some shredded cabbage or bean sprouts for a different texture.
  • Maintain Oil Temperature: Keep an eye on the oil temperature by adjusting the heat as needed. If it gets too hot, the lumpia may burn.
  • Use Fresh Wrappers: Fresh lumpia wrappers yield the best results. If they feel dry, spritz them lightly with water.

Nutrition

Serving: 377gCalories: 1342kcalCarbohydrates: 117gProtein: 18gFat: 90.5gCholesterol: 156mgSodium: 863mgFiber: 1gSugar: 79g
Keyword Jollibee Lumpia Recipe
Tried this recipe?Let us know how it was!

Frequently Asked Questions

1. Can I bake lumpia instead of frying them?

Yes, you can bake lumpia! Preheat the oven to 400°F, brush them with oil, and bake for about 20 minutes or until golden brown, flipping them halfway through.

2. Are lumpia gluten-free?

Typically, lumpia wrappers aren’t gluten-free. However, you can find gluten-free wrappers at specialty stores or online.

3. Can lumpia be frozen for later use?

Absolutely! You can freeze uncooked lumpia. Just ensure they’re sealed well in plastic wrap and then in a freezer bag. Fry them straight from the freezer, adding a few extra minutes to the cooking time.

4. How do I make lumpia less greasy?

To reduce greasiness, ensure the oil is at the right temperature before frying. Also, make sure to drain the fried lumpia on paper towels.

5. Can I use leftover ingredients for this recipe?

Sure! If you have leftover ground meat or veggies, feel free to throw them in as long as they complement the flavors.

6. How many lumpia can I make from this recipe?

This recipe yields about 50 pieces of lumpia, making it perfect for gatherings or freezing for later.

Conclusion

Making Jollibee lumpia at home is not just about cooking; it’s about reliving memories and sharing joy. With its perfect crunch and savory filling, it’s more than a dish—it’s an experience. 

Whether enjoyed at a festive gathering or a peaceful evening at home, lumpia holds a special place in the hearts of many.

I hope this guide inspires you to create your own lumpia masterpiece. Dive into the process, experiment with flavors, and enjoy the delightful experience of sharing this Filipino favorite. 

Trust me, the smiles around the table will be worth it!

You’ll also like these latest recipes!

Jollibee Hotdog Recipe – Yum Yarns

Best Jollibee Hotdog Recipe

If you’re planning to enjoy a Jollibee hotdog, consider what else might complement your meal. A side of crispy, golden fries is always a winner. The salty crunch of fries pairs beautifully with the savory flavors of the hotdog. 

Alternatively, a refreshing green salad can offer a nice contrast, cleansing your palate with each hearty bite. If you’re in the mood for something sweet, a slice of mango or a fruit cup could balance the savory profile wonderfully. Beverages like a cold soda or iced tea can also round out the experience. 

Now that you have some ideas to pair, let’s dive into the delicious world of the Jollibee hotdog.

Best Jollibee Hotdog Recipe

As a food blogger and dietitian, I have spent years exploring different cuisines, and one particular childhood favorite always brings me joy—the Jollibee hotdog. Growing up, the thrill of biting into a hotdog layered with creamy mayonnaise, cheese, and a sprinkle of sweetness was unmatched. 

Every encounter with this dish reminded me of celebrating special occasions with family and friends. Whether it’s a casual snack or a festive treat, the Jollibee hotdog is a delightful staple that has captured hearts worldwide.

My journey into the culinary landscape of this beloved dish revealed fascinating insights about its unique flavor and preparation. So, let’s go deeper into what makes the Jollibee hotdog so special.

You will also like the following Taste recipes!

What is the Jollibee Hotdog?

The Jollibee hotdog is a feast for your senses. Unlike your ordinary hotdog, it boasts a combination of flavors layered with rich mayonnaise, cheese, and some interesting seasonings. 

Found at the iconic Jollibee fast-food chain, this dish has gained a solid following. The blend of umami from the meat, the creaminess of the mayonnaise, and a pop of sweetness truly sets this hotdog apart.

This treat is often accompanied by a playful presentation—think bright yellow mustard, a dash of colorful food dye, and a sprinkling of toppings that make it visually appealing as well. If you’re in the mood for joy, this hotdog is sure to deliver.

What is the Flavor Profile of This Dish?

Imagine biting into a Jollibee hotdog. At first, the taste of the juicy beef hotdog fills your mouth. It’s savory, almost smoky. Then, the creamy mayonnaise surprises you, adding a smooth texture that dances with the omega-rich fat from the meat. 

The shredded cheese melts into the mix, offering a stretchy, cheesy sensation with each bite. That dash of sugar and seasoning brings a subtle sweetness to the table, elevating the experience. 

It’s a delightful medley of salty, savory, and slightly sweet—all wrapped in a comforting hotdog bun.

What Makes This Recipe Different from Other Jollibee Hotdogs?

What separates the Jollibee hotdog from other variations is how it combines familiar flavors with an unexpected twist. The significant use of mayonnaise, combined with a sprinkle of sugar, is quite unusual. 

Additionally, using processed cheese brings a nostalgic kick, reminiscent of the grab-and-go style of fast-food meals. You won’t find this combination just anywhere. Furthermore, the vibrant presentation—often topped with bright yellow mustard and colorful toppings—makes it a party in your mouth.

Ingredients You’ll Need

To recreate a true Jollibee hotdog experience in your kitchen, you will need:

  • 1 cup mayonnaise
  • 1 tablespoon grated Parmesan cheese
  • 4 premium all-beef hotdogs
  • 4 soft hotdog rolls
  • 1 squeeze of classic yellow mustard
  • 1/2 tablespoon granulated white sugar
  • A couple of drops of yellow food coloring
  • 1/2 cup shredded mozzarella or processed cheese
  • 1 tablespoon of finely chopped pickles
  • 1/2 teaspoon smoked paprika
Jollibee Hotdog Recipe

Step by Step Directions

Step 1: Prepare the Hotdogs

Start by cooking your hotdogs. You can boil, grill, or fry them based on your preference. The goal is to have them hot and smoky, so cooking over high heat will work wonders. If grilling, keep an eye on them to avoid burning.

Step 2: Prepare the Toppings

While your hotdogs are cooking, it’s time to whip up the toppings. In a mixing bowl, combine the mayonnaise, grated Parmesan cheese, granulated sugar, yellow food coloring, and smoked paprika. 

Stir until everything is well blended. It should resemble a creamy yellow sauce. If you want more zing, add some chopped pickles for that extra crunch.

Step 3: Toast the Buns

For an extra treat, lightly toast your hotdog buns. You can toast them in a skillet or pop them in the oven for just a minute—it’ll enhance the texture.

Step 4: Assemble the Hotdogs

Once everything is ready, take a toasted bun and place a hotdog inside. Generously drizzle your prepared creamy mixture over the top. Now, sprinkle on the shredded cheese and finish with a squeeze of mustard. Look at your masterpiece!

Step 5: Serve Immediately

Serve the hotdogs right away. They are best enjoyed fresh. You can present them with a side of fries or a light salad.

Tips For Making Jollibee Hotdog

  • Choose Quality Hotdogs: Always opt for premium all-beef hotdogs. The quality of the hotdog will make or break your dish.
  • Homemade Mayonnaise: If you have time, consider making your own mayonnaise for a fresh taste.
  • Experiment with Cheese: While mozzarella works great, you can try other cheeses for flavor, such as cheddar or pepper jack for some heat.
  • Don’t Skip the Food Coloring: A couple of drops can elevate your dish’s visual appeal, making it look inviting.
  • Garnish for Color: Consider adding diced tomatoes or pickled jalapeños for not just flavor, but color too.
Easy Jollibee Hotdog Recipe

How Can I Store This Jollibee Hotdog?

If you have leftovers (which is rare, but it happens), store them in an airtight container in the fridge. Consume them within 1-2 days for the best flavor and texture. You can also separate the components, storing hotdogs and toppings separately to avoid sogginess.

Ingredient Substitutes

If you find yourself short on the listed ingredients, here are some substitutions:

  • Mayonnaise: Use Greek yogurt for a healthier option that still provides creaminess.
  • All-beef hotdogs: Turkey or chicken hotdogs can replace beef for a lighter meal.
  • Shredded Cheese: Use crumbled feta cheese for a tangy flavor boost.
  • Yellow Food Coloring: If you don’t have it, a small amount of turmeric can impart a similar color.
Easy Jollibee Hotdog Recipe

Jollibee Hotdog Recipe

Tina Cooper
As a food blogger and dietitian, I have spent years exploring different cuisines, and one particular childhood favorite always brings me joy—the Jollibee hotdog. 
Prep Time 5 minutes
Cook Time 5 minutes
Total Time 10 minutes
Course Main dish
Cuisine Filipino
Servings 1 Servings
Calories 149 kcal

Equipment

  • Mixing bowl

Ingredients
  

  • 1 cup mayonnaise
  • 1 tablespoon grated Parmesan cheese
  • We use your personal data for interest-based advertising as outlined in our Privacy Notice.
  • 4 premium all-beef hotdogs
  • 4 soft hotdog rolls
  • 1 squeeze of classic yellow mustard
  • 1/2 tablespoon granulated white sugar
  • A couple of drops of yellow food coloring
  • 1/2 cup shredded mozzarella or processed cheese
  • 1 tablespoon of finely chopped pickles
  • 1/2 teaspoon smoked paprika

Instructions
 

Step 1: Prepare the Hotdogs

  • Start by cooking your hotdogs. You can boil, grill, or fry them based on your preference. The goal is to have them hot and smoky, so cooking over high heat will work wonders. If grilling, keep an eye on them to avoid burning.

Step 2: Prepare the Toppings

  • While your hotdogs are cooking, it’s time to whip up the toppings. In a mixing bowl, combine the mayonnaise, grated Parmesan cheese, granulated sugar, yellow food coloring, and smoked paprika.
  • Stir until everything is well blended. It should resemble a creamy yellow sauce. If you want more zing, add some chopped pickles for that extra crunch.

Step 3: Toast the Buns

  • For an extra treat, lightly toast your hotdog buns. You can toast them in a skillet or pop them in the oven for just a minute—it’ll enhance the texture.

Step 4: Assemble the Hotdogs

  • Once everything is ready, take a toasted bun and place a hotdog inside. Generously drizzle your prepared creamy mixture over the top. Now, sprinkle on the shredded cheese and finish with a squeeze of mustard. Look at your masterpiece!

Step 5: Serve Immediately

  • Serve the hotdogs right away. They are best enjoyed fresh. You can present them with a side of fries or a light salad.

Notes

  • Choose Quality Hotdogs: Always opt for premium all-beef hotdogs. The quality of the hotdog will make or break your dish.
  • Homemade Mayonnaise: If you have time, consider making your own mayonnaise for a fresh taste.
  • Experiment with Cheese: While mozzarella works great, you can try other cheeses for flavor, such as cheddar or pepper jack for some heat.
  • Don’t Skip the Food Coloring: A couple of drops can elevate your dish’s visual appeal, making it look inviting.
  • Garnish for Color: Consider adding diced tomatoes or pickled jalapeños for not just flavor, but color too.

Nutrition

Serving: 89gCalories: 149kcalCarbohydrates: 8gProtein: 8gFat: 10gCholesterol: 16mgSodium: 247mgFiber: 1gSugar: 6g
Keyword Jollibee Hotdog Recipe
Tried this recipe?Let us know how it was!

Frequently Asked Questions

1. Can I make Jollibee hotdogs ahead of time?

Yes! You can prepare the toppings ahead and store them in the refrigerator. Cook the hotdogs and assemble them right before serving for the freshest taste.

2. Are Jollibee hotdogs gluten-free?

If you use gluten-free hotdog buns, absolutely! It’s easily customizable for those with gluten sensitivities.

3. Can I grill the hotdogs?

Definitely! Grilling enhances the flavor and adds a smoky touch that makes the hotdog even better.

4. What if I can’t find processed cheese?

You can use any cheese type you prefer. Just remember it should melt well to get that cheesy goodness.

5. How can I spice up the recipe?

Consider adding jalapeños or sriracha to the creamy mix for an extra kick.

Conclusion

The Jollibee hotdog offers a wonderful mix of flavors that speaks to both heart and palate. The nostalgia and warmth it brings make it a beloved dish for many. With this recipe in hand, you can recreate this culinary delight at home, impressing family and friends. 

So next time you crave something hearty and fun, look no further than your kitchen. Enjoy the delightful whimsy of a Jollibee hotdog—you won’t be disappointed!

You’ll also like these latest recipes!