Before we dive into the heart of the matter—beef bulgogi—let’s explore some delightful pairings that will take your meal from great to phenomenal. The right sides can elevate this already amazing dish, making it an unforgettable experience.
Start with steamed rice. Simple white or sticky rice is a classic pairing. The rice soaks up the bulgogi sauce perfectly, allowing you to savor every drop of the flavorful marinade.
Pickled vegetables are another fantastic accompaniment. Quick pickled cucumbers or radishes add a refreshing crunch and balance the savory and sweet flavors of the bulgogi, providing a lovely contrast to the richness of the beef.
Korean side dishes, or banchan, are essential. Kimchi is a must—it’s tangy and fermented, cutting through the richness of the beef. You can also serve bean sprouts or braised potatoes, which are classic banchan choices that complement bulgogi beautifully.
Lettuce wraps are a fun and interactive way to enjoy bulgogi. Use crisp leaves to wrap the bulgogi, and add a little rice, a slice of garlic, and maybe some chili sauce. It’s a fresh and light way to enjoy the dish, while making each bite customizable.
Finally, consider adding a sunny-side-up egg on top of your bulgogi rice bowl. The egg adds richness and a burst of flavor that enhances the meal, making each bite even more satisfying.
Now, let’s journey into the wonderful world of beef bulgogi and enjoy all these delicious pairings!

Korean beef bulgogi has a special place in my heart (and my stomach). The first time I tried it was at a little Korean barbecue joint in the city. I remember savoring the sweet, smoky beef, which literally melted in my mouth.
Ever since then, bulgogi has become my go-to dish when I want something that feels festive yet comforting.
Have you ever had food that brings people together?
That’s the magic of bulgogi. It’s perfect for gatherings—easy to share, full of flavor, and a total crowd-pleaser.
Plus, making it at home isn’t as daunting as it might seem! With the right ingredients and a few simple steps, you can create your own delicious bulgogi feast.
So, let’s unravel the mystery of this dish together, shall we?
You will also like the following Lunch and Dinner recipes!
What is Beef Bulgogi?
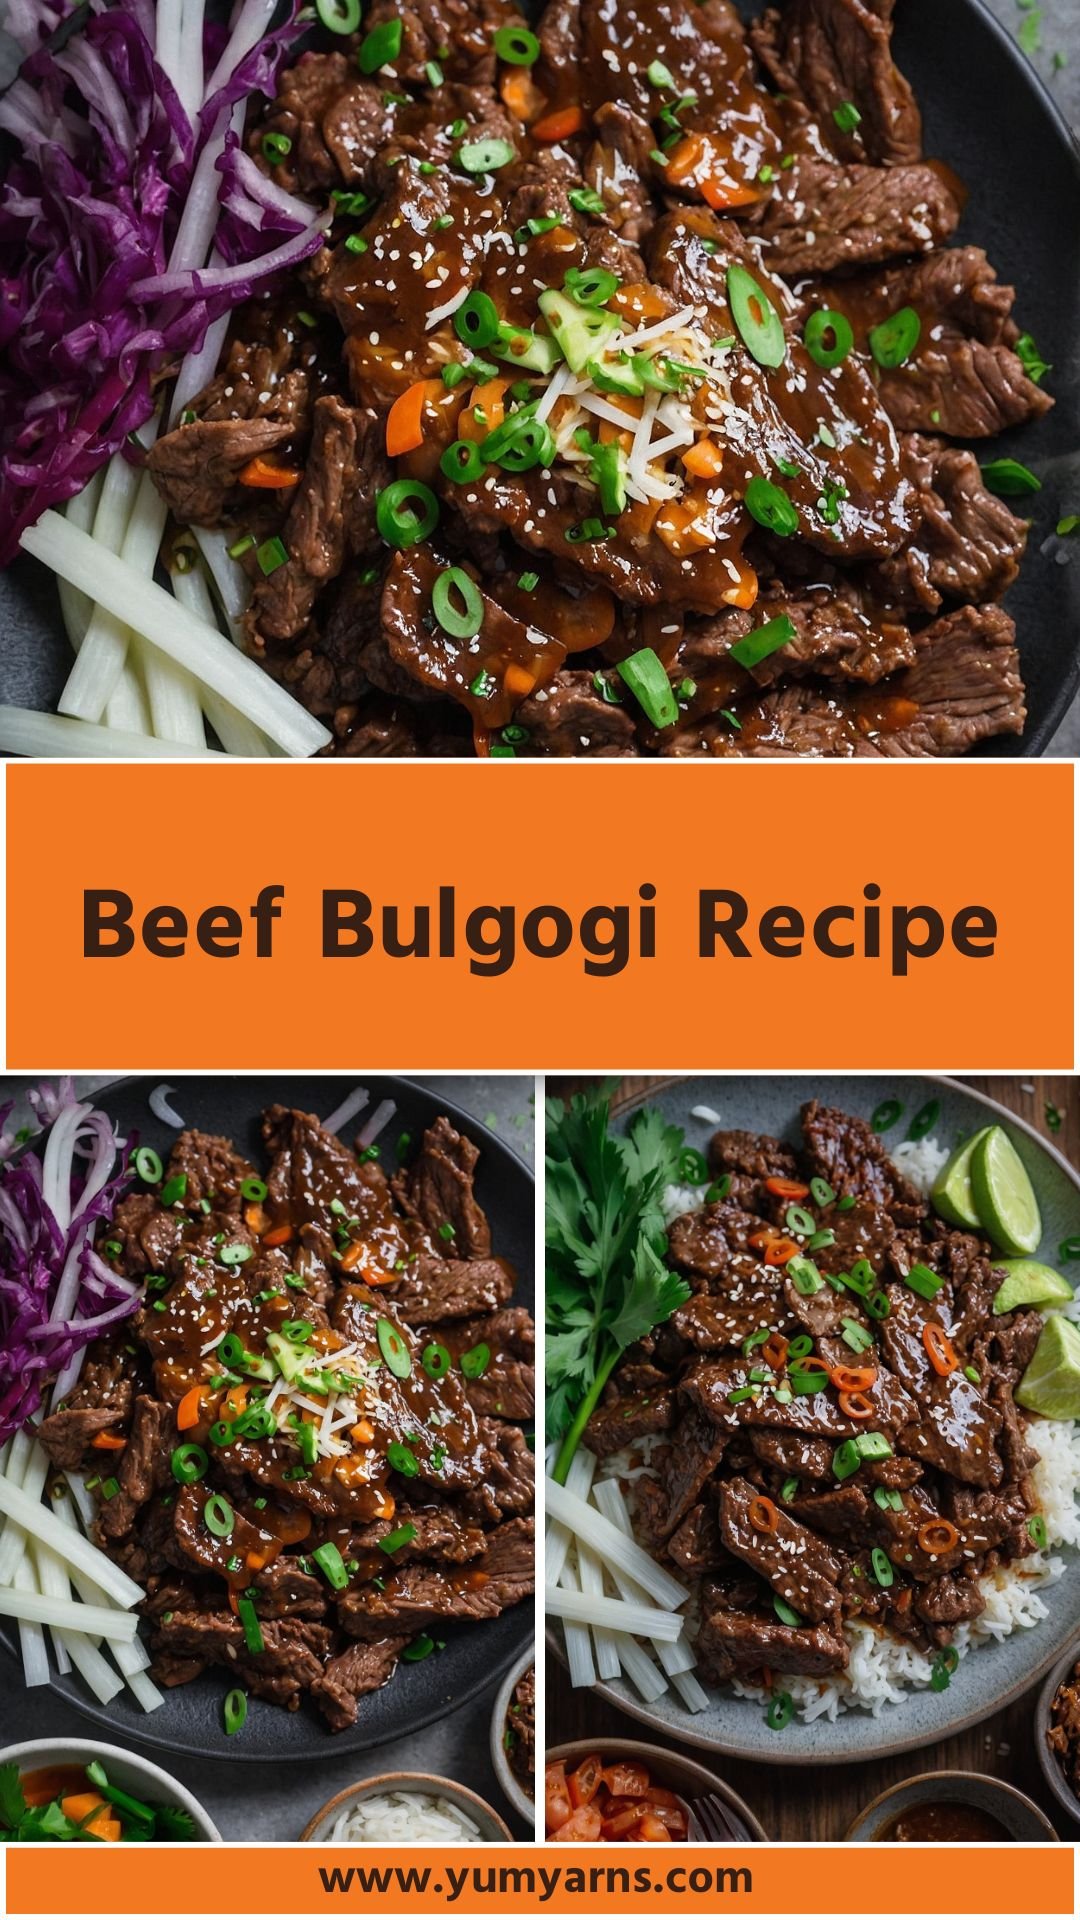
Beef bulgogi, literally meaning “fire meat,” is a traditional Korean dish usually made from marinated beef that is grilled or stir-fried. Typically using ribeye or sirloin, bold flavors from soy sauce, garlic, and sugar create a culinary treat that’s as complex as it is straightforward.
You’ll find various versions depending on the region in Korea, but they share a pivotal component: marination.
The marinade is where the magic happens. It’s a symphony of sweet and savory, with a hint of spice. That’s core to bulgogi’s success. It beckons you to serve it at get-togethers, family dinners, or simply a night in where good food reigns.
Why You’ll Love This Beef Bulgogi
Now let’s dive deeper into why beef bulgogi has captured so many food lovers’ hearts.
The Flavor Explosion
Imagine this: sweet, savory, and a touch spicy all wrapped around tender beef. The combination of gochujang and grated pear creates an unforgettable flavor that hits all the right notes. Gochujang’s umami punch combined with the natural sweetness of the pear? Chef’s kiss!
Versatility
You can customize your bulgogi any way you like. Vegetarian? Swap out the beef for mushrooms or tofu. Prefer chicken? Go for it! This dish is adaptable, meaning everyone can enjoy it regardless of their diet.
Easy to Make
Don’t let the thought of marination intimidate you. The process requires minimal effort, and the rewards are plentiful. Just a couple of hours of marinating and then a quick cook, and you’re ready to serve.
Perfect for Sharing
Food tastes better when shared. A tray of bulgogi sizzling on the table draws everyone in. Tossing cooked bulgogi into lettuce leaves for wraps adds a fun, interactive element to your meal.
Health Benefits
When prepared correctly, bulgogi can pack a nutritious punch. High in protein, you can add plenty of veggies to your plate. The marinade contains healthy elements like garlic, which is known for its myriad health benefits.
The Ingredients You Will Need to Make Beef Bulgogi
Let’s gather what we need for that delicious bulgogi! Here’s what you’ll need:
- 1 ½ pounds boneless ribeye steak
- 2 tablespoons canola oil, divided
- 2 tablespoons dark brown sugar
- 1 tablespoon freshly grated ginger
- 3 cloves garlic, finely minced
- 1 tablespoon gochujang (Korean red chili paste)
- ½ small pear, peeled and finely grated
- ¼ cup low-sodium soy sauce
- 1 tablespoon rice vinegar
- 2 green onions, thinly sliced
- 1 teaspoon toasted sesame seeds
- 1 teaspoon chili flakes
- 2 tablespoons toasted sesame oil

Directions
Ready to make some beef bulgogi? Let’s break it down step by step.
Step 1: Marinate the Beef
Start by thinly slicing the ribeye steak against the grain. Thin slices ensure you get that tender texture everyone loves.
In a bowl, mix the soy sauce, dark brown sugar, grated ginger, minced garlic, rice vinegar, gochujang, and grated pear. This is the marinade that will infuse your beef with flavor.
Add the beef slices to the marinade, making sure they are fully coated. Cover the bowl and let it sit in the refrigerator for at least 30 minutes. If you have time, a few hours or overnight will enhance the flavors significantly.
Step 2: Heat the Pan
Once the marination is complete, heat a pan over medium-high heat. Add 1 tablespoon of canola oil and let it warm up. If you have a grill, that works wonders as well!
Step 3: Cook the Beef
Add the marinated beef to the hot pan. Spread it out in a single layer to ensure even cooking. Let it cook for about 4-5 minutes on each side.
Stir occasionally to caramelize all sides. You want a bit of charring to add flavor depth. The high heat works wonders here, giving the bulgogi that beautiful signature glaze.
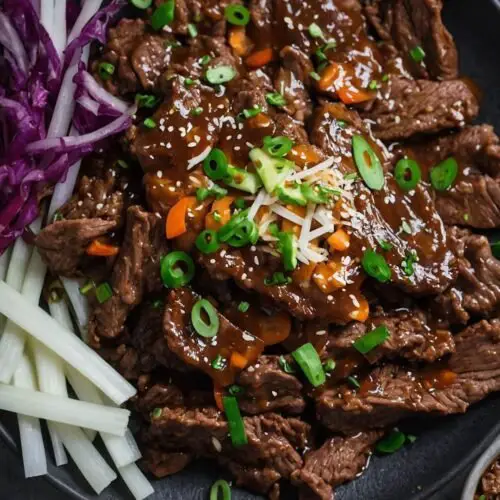
Step 4: Add the Finishing Touches
Once your beef is cooked, transfer it to a serving platter. Drizzle with toasted sesame oil and sprinkle the green onions and sesame seeds over the top. Serve it up hot!
Notes
Every great recipe comes with handy tips. Here are a few to make your beef bulgogi unforgettable:
- Use Quality Beef: The better the beef, the better the outcome. Ribeye is my favorite for its marbling.
- Slice Against the Grain: This ensures tenderness. If you’re unsure, pay attention to how the fibers run in the meat.
- Don’t Skip the Pear: Seriously! It’s not just an ingredient; it’s a game changer.
- Control the Spice: Adjust the amount of gochujang to suit your taste. Spice lovers, go wild!
- Cook in Batches: If you have a lot of beef, cook it in batches to avoid overcrowding the pan. This prevents steaming and ensures good searing.
Storage Tips
This is the best part; bulgogi stores well. Here’s what you need to know:
- Refrigeration: Store leftovers in an airtight container in the fridge. They’ll last up to 3 days.
- Freezing: Want to enjoy bulgogi later? Freeze it! Place it in a safe container while it’s still fresh. It can last for up to 3 months in the freezer.
- Reheating: Reheat gently on the stove with a splash of water or broth to prevent it from drying out.
Nutrition Information
Beef bulgogi recipe nutrition facts

Serving Suggestions
Now that you have your delicious beef bulgogi, how do you make the meal a feast?
- Serve with Steamed Rice: This is a classic. It balances the flavors perfectly and absorbs the excess sauce.
- Wrap in Lettuce: Use crisp leaves. Add rice, a slice of garlic, and a bit of spicy sauce for a fun twist.
- Add a Side of Kimchi: This fermented dish adds a tangy crunch that complements the sweetness of bulgogi.
- Top with a Fried Egg: A runny egg on top? Yes, please! Each bite becomes creamy and rich.
- Accompany with Noodle Salad: A cold noodle salad with fresh veggies adds a refreshing contrast.

What Other Substitutes Can I Use in Beef Bulgogi?
Not everyone craves beef, and that’s totally okay. Here are a few delicious alternatives:
- Pork Bulgogi: Sweet and savory goodness also works well with pork. Use pork tenderloin, and it cooks similarly.
- Chicken Bulgogi: Thinly sliced chicken breast is a lighter option. Marinate the same way for delightful results.
- Duck Bulgogi: If you’re feeling adventurous, try duck for a rich twist. You can adapt the marinade to suit the duck’s unique flavor.
- Tofu Bulgogi: A fantastic vegetarian option! Use firm, pressed tofu and marinate it in the same mixture.
- Mushroom Bulgogi: Shiitake or portobello mushrooms can deliver an earthy flavor. Perfect for vegetarians!
Beef Bulgogi Recipe
Equipment
- Bowl
Ingredients
- 1 ½ pounds boneless ribeye steak
- 2 tablespoons canola oil divided
- 2 tablespoons dark brown sugar
- 1 tablespoon freshly grated ginger
- 3 cloves garlic finely minced
- 1 tablespoon gochujang Korean red chili paste
- ½ small pear peeled and finely grated
- ¼ cup low-sodium soy sauce
- 1 tablespoon rice vinegar
- 2 green onions thinly sliced
- 1 teaspoon toasted sesame seeds
- 1 teaspoon chili flakes
- 2 tablespoons toasted sesame oil
Instructions
Step 1: Marinate the Beef
- Start by thinly slicing the ribeye steak against the grain. Thin slices ensure you get that tender texture everyone loves.
- In a bowl, mix the soy sauce, dark brown sugar, grated ginger, minced garlic, rice vinegar, gochujang, and grated pear. This is the marinade that will infuse your beef with flavor.
- Add the beef slices to the marinade, making sure they are fully coated. Cover the bowl and let it sit in the refrigerator for at least 30 minutes. If you have time, a few hours or overnight will enhance the flavors significantly.
Step 2: Heat the Pan
- Once the marination is complete, heat a pan over medium-high heat. Add 1 tablespoon of canola oil and let it warm up. If you have a grill, that works wonders as well!
Step 3: Cook the Beef
- Add the marinated beef to the hot pan. Spread it out in a single layer to ensure even cooking. Let it cook for about 4-5 minutes on each side.
- Stir occasionally to caramelize all sides. You want a bit of charring to add flavor depth. The high heat works wonders here, giving the bulgogi that beautiful signature glaze.
Step 4: Add the Finishing Touches
- Once your beef is cooked, transfer it to a serving platter. Drizzle with toasted sesame oil and sprinkle the green onions and sesame seeds over the top. Serve it up hot!
Notes
- Use Quality Beef: The better the beef, the better the outcome. Ribeye is my favorite for its marbling.
- Slice Against the Grain: This ensures tenderness. If you’re unsure, pay attention to how the fibers run in the meat.
- Don’t Skip the Pear: Seriously! It’s not just an ingredient; it’s a game changer.
- Control the Spice: Adjust the amount of gochujang to suit your taste. Spice lovers, go wild!
- Cook in Batches: If you have a lot of beef, cook it in batches to avoid overcrowding the pan. This prevents steaming and ensures good searing.
Nutrition
Frequently Asked Questions
1. Can I make bulgogi without gochujang?
Absolutely! If gochujang isn’t available, you can use red pepper flakes or Sriracha for some heat, but it won’t provide the same depth of flavor.
2. What’s the best way to tenderize the beef?
Marinating is key. The enzymes in the pear help soften the meat. Additionally, slicing against the grain is crucial.
3. Can I use frozen beef for bulgogi?
Yes, but make sure to thaw it completely before marinating and cooking to ensure even tenderness.
4. Is bulgogi served hot or cold?
It’s best served hot! But, leftovers can be delightful cold in a salad or as a filling in wraps
5. How do I make bulgogi gluten-free?
Use gluten-free soy sauce to replace regular soy sauce. This small swap keeps the flavor intact!
6. What’s a typical drink pairing for bulgogi?
For a traditional pairing, try soju or makgeolli—Korean rice wine. If you prefer non-alcoholic, a refreshing cucumber lemonade works wonders!
Conclusion
Beef bulgogi is a culinary treasure. Its exquisite flavors, adaptability, and dish-sharing camaraderie make it a true winner. Whether you’re treating yourself, having friends over, or planning a barbecue, beef bulgogi is sure to impress.
So fire up that grill or sizzling pan and get cooking! Share your creations and relish the delighted faces around the table. This dish doesn’t just fill bellies; it feeds souls.
Happy cooking!