Chicken And Shrimp Shumai Recipe – Yum Yarns

Best Chicken And Shrimp Shumai Recipe

When you dive into the delightful world of chicken and shrimp shumai, it’s essential to think about pairing options that elevate your meal. Consider a side of soy sauce or a tangy dipping sauce, like a mixture of vinegar, sugar, and chili oil. 

You might also enjoy a vibrant cucumber salad with sesame dressing for some crunch and freshness. Additionally, serving fragrant jasmine rice can balance the dish beautifully, soaking up any juices that dribble from the shumai.

Best Chicken And Shrimp Shumai Recipe

I still remember the first time I tasted chicken and shrimp shumai. It was at a bustling dim sum restaurant in San Francisco, and I was captivated by the delicate, pleated dumplings filled with a savory blend of chicken and shrimp. 

The light steam wafting through the air mixed with flavors of ginger and garlic transported me to culinary heaven. 

Today, I’m excited to share my own twist on this classic dish. Just like that first bite, I aim to evoke the same delight in your kitchen.

Shumai, a traditional Chinese dumpling, is often filled with seasoned meat and served as a part of dim sum. This recipe combines succulent chicken and shrimp, offering a flavor-packed punch in each bite. 

Let’s explore not only how to create this dish but also why it’s such a wonderful addition to your cooking repertoire.

Why This Recipe Works

1. Fresh Ingredients Matter

Using high-quality, fresh ingredients can make a noticeable difference. For this recipe, I recommend using chicken thigh mince for its juicy texture. Pair this with fresh shrimp to enhance flavors. The three types of vegetables, including shiitake mushrooms and spring onions, bring a delightful crunch and umami taste.

2. Easy Assembly and Cooking

Shumai is surprisingly simple to create. The process involves mixing the filling, wrapping it, and steaming it. Unlike other dumplings that may require a complicated folding technique, shumai has an open-top design. This makes it approachable, even for novice cooks.

3. Versatile Flavors

This recipe allows for variations. You can adjust the seasoning according to your palate. Prefer a bit of spice? Add more chili oil. Want to highlight the ginger? Throw in an extra dash. Your creativity can shine through, and you won’t get bored with the same flavors each time.

4. Meal Prep Friendly

Shumai can be prepared in advance, making it perfect for parties or meal prep. Once you’ve assembled your dumplings, you can freeze them for later use. Simply steam them from frozen, and you’ve got a delicious meal in minutes.

You will also like the following Appetizer recipes!

How Does It Taste?

Imagine savoring a tender dumpling that bursts with flavor as you take your first bite. The combination of chicken and shrimp creates a delightful harmony of textures, while the seasonings—like sesame oil and Shao Xing wine—add depth. 

The slight sweetness from the sugar counterpoints the savory notes, making every bite a joyful experience. Topped with a fresh sprinkle of carrot and spring onion, each shumai also appears vibrant and inviting.

What Sets This Recipe Apart from Other Chicken and Shrimp Shumai Variations?

This version stands out thanks to the unique balance of flavors and textures. Many recipes may rely heavily on one protein, but here you get the best of both worlds. The chicken provides richness, while the shrimp offers a coastal freshness. 

Moreover, the use of shiitake mushrooms adds an earthy component missing in other variations. This recipe also emphasizes the importance of seasoning, making sure every ingredient plays its part for an unforgettable taste.

The Ingredients

To whip up these delicious chicken and shrimp shumai, you’ll need:

For the Siu Mai Sauce:

  • 1 tablespoon light soy sauce
  • 1 tablespoon Chinkiang vinegar (or rice vinegar, if unavailable)
  • 1 teaspoon sugar
  • 1 teaspoon chili oil (optional, for a hint of spice)
  • ½ teaspoon grated ginger (optional, for extra depth)

For the Filling:

  • 200 grams chicken mince (about 7 oz) — chicken thigh mince is a great choice
  • 200 grams prawns (about 7 oz) — peeled, deveined, and minced
  • 3–4 dried shiitake mushrooms (pre-soaked in warm water for 15–20 minutes, then finely diced)
  • 3–4 spring onions (finely chopped)
  • ¼ carrot (finely diced for garnish, see note for details)

For Seasonings:

  • 1 tablespoon light soy sauce
  • 1 tablespoon Shao Xing wine (or Japanese mirin for a milder sweetness)
  • 1 teaspoon sesame oil
  • 1 teaspoon salt
  • 2 teaspoons sugar (optional, for a slight sweetness)
  • 1 teaspoon minced garlic
  • 1 tablespoon corn starch
  • ¼ teaspoon white pepper

For the Wrappers:

  • 20–25 wonton or siu mai wrappers (defrosted in the fridge beforehand)
Chicken And Shrimp Shumai Recipe

Instructions

Step 1: Prepare the Filling

In a bowl, combine the chicken mince and minced prawns. These two proteins merge beautifully when mixed, creating a wonderfully juicy filling. Add in the finely diced shiitake mushrooms, chopped spring onions, and the carrot. They contribute both flavor and texture.

Step 2: Season the Mixture

Now, we move on to adding flavors. Pour in the light soy sauce, Shao Xing wine, and sesame oil. Mix well. Don’t forget the salt, sugar, minced garlic, corn starch, and white pepper. The corn starch helps bind the mixture, ensuring it holds its shape when steamed. Give everything a good stir until thoroughly combined.

Step 3: Form the Shumai

Grab a dumpling wrapper and place about a tablespoon of the filling in the center. Gently gather the edges of the wrapper and pinch them together, leaving the top open. Think of it like a little purse. Repeat this process until you’ve used up all your filling.

Step 4: Prepare the Steamer

Prepare your steamer with water, making sure it’s at a rolling boil. If you’re using a bamboo steamer, line it with parchment paper to prevent sticking.

Step 5: Steam the Shumai

Carefully place the shumai in the steamer, making sure they don’t touch. Steam for about 10–12 minutes, or until the filling is cooked through and the dumplings are translucent.

Step 6: Serve with Dipping Sauce

Once steamed, serve your chicken and shrimp shumai hot with the prepared sauce for dipping. Enjoy each bite, feeling proud of your culinary creation!

Notes

  • Avoid Overfilling: Be careful not to overstuff your shumai. This can lead to them falling apart during cooking.
  • Customize Your Protein: Feel free to swap proteins based on what you have. Ground pork or tofu can work well, too.
  • Use Fresh Veggies: Fresh, high-quality vegetables improve the filling’s flavor and texture significantly.
  • Experiment with Dipping Sauces: While the siu mai sauce is great, try a peanut sauce or sweet and sour sauce for variety!
  • Steaming Equipment: If you don’t have a steamer, a metal colander or a microwave-safe bowl with a lid might work in a pinch.
Easy Chicken And Shrimp Shumai Recipe

How Do You Store Chicken and Shrimp Shumai?

Storing shumai is easy! If you have leftover dumplings, place them in an airtight container and store them in the refrigerator for up to 3 days. To reheat, simply steam them for a few minutes until heated through.

If you’ve made a large batch, consider freezing them. Arrange the uncooked shumai in a single layer on a baking tray, making sure they’re not touching. 

Freeze until solid, then transfer to a freezer bag. They’ll be good for up to 3 months. When you’re ready to enjoy them, steam them directly from frozen — just add an extra 2-3 minutes to the cooking time.

Sides for Chicken and Shrimp Shumai

Pairing sides with shumai can elevate your dining experience. Here are a few excellent suggestions:

1. Cucumber Salad

Toss together sliced cucumbers, rice vinegar, a sprinkle of sesame oil, and a pinch of salt. This refreshing salad brightens up the meal and balances the richness of the shumai.

2. Asian Slaw

Shred red cabbage, carrots, and green onions. Drizzle with a sesame ginger dressing, and you’ve got yourself a crunchy, flavorful accompaniment. It adds a nice contrast to the soft dumplings.

3. Jasmine Rice

A fragrant bowl of jasmine rice complements shumai beautifully. The rice soaks up any juices and flavors from the meal, making it a satisfying side dish.

What Alternatives Can You Use for the Ingredients If They Are Not Present in Your Kitchen?

Sometimes, you have to get creative! Here are a few alternatives you can consider:

1. Chicken Thigh to Ground Turkey

If you can’t find chicken thigh mince, ground turkey is an excellent substitute. It has a similar texture and flavor.

2. Shrimp to Imitation Crab

If shrimp isn’t available, consider using imitation crab. It will alter the texture a bit, but the taste remains delightful.

3. Dried Shiitake Mushrooms to Fresh Mushrooms

If you can’t locate dried shiitake mushrooms, fresh button or cremini mushrooms will do. Just make sure to sauté them a bit first to reduce moisture.

4. Wonton Wrappers to Rice Paper

If wonton wrappers are nowhere to be found, rice paper is another great option. Just remember to soften them with water before wrapping your filling.

Easy Chicken And Shrimp Shumai Recipe

Chicken And Shrimp Shumai Recipe

Tina Cooper
I still remember the first time I tasted chicken and shrimp shumai. It was at a bustling dim sum restaurant in San Francisco, and I was captivated by the delicate, pleated dumplings filled with a savory blend of chicken and shrimp. 
Prep Time 30 minutes
Cook Time 10 minutes
Total Time 40 minutes
Course Appetizer
Cuisine Chinese
Servings 25 Servings
Calories 250 kcal

Equipment

  • Steamer

Ingredients
  

Siu Mai Sauce:

  • 1 tablespoon light soy sauce
  • 1 tablespoon Chinkiang vinegar or rice vinegar, if unavailable
  • 1 teaspoon sugar
  • 1 teaspoon chili oil optional, for a hint of spice
  • ½ teaspoon grated ginger optional, for extra depth

Filling:

  • 200 grams chicken mince about 7 oz (chicken thigh mince or pork mince)
  • 200 grams prawns about 7 oz (peeled, deveined, and minced)
  • 3 –4 dried shiitake mushrooms pre-soaked in warm water for 15–20 minutes, then finely diced
  • 3 –4 spring onions finely chopped
  • ¼ carrot finely diced for garnish, see note for details

Seasonings:

  • 1 tablespoon light soy sauce
  • 1 tablespoon Shao Xing wine or Japanese mirin, for a milder sweetness
  • 1 teaspoon sesame oil
  • 1 teaspoon salt
  • 2 teaspoons sugar optional, for a slight sweetness
  • 1 teaspoon minced garlic
  • 1 tablespoon corn starch
  • ¼ teaspoon white pepper

Wrappers:

  • 20 –25 wonton wrappers or siu mai pastry defrosted in the fridge, as per note

Instructions
 

Step 1: Prepare the Filling

  • In a bowl, combine the chicken mince and minced prawns. These two proteins merge beautifully when mixed, creating a wonderfully juicy filling. Add in the finely diced shiitake mushrooms, chopped spring onions, and the carrot. They contribute both flavor and texture.

Step 2: Season the Mixture

  • Now, we move on to adding flavors. Pour in the light soy sauce, Shao Xing wine, and sesame oil. Mix well. Don’t forget the salt, sugar, minced garlic, corn starch, and white pepper. The corn starch helps bind the mixture, ensuring it holds its shape when steamed. Give everything a good stir until thoroughly combined.

Step 3: Form the Shumai

  • Grab a dumpling wrapper and place about a tablespoon of the filling in the center. Gently gather the edges of the wrapper and pinch them together, leaving the top open. Think of it like a little purse. Repeat this process until you’ve used up all your filling.

Step 4: Prepare the Steamer

  • Prepare your steamer with water, making sure it’s at a rolling boil. If you’re using a bamboo steamer, line it with parchment paper to prevent sticking.

Step 5: Steam the Shumai

  • Carefully place the shumai in the steamer, making sure they don’t touch. Steam for about 10–12 minutes, or until the filling is cooked through and the dumplings are translucent.

Step 6: Serve with Dipping Sauce

  • Once steamed, serve your chicken and shrimp shumai hot with the prepared sauce for dipping. Enjoy each bite, feeling proud of your culinary creation!

Notes

  • Avoid Overfilling: Be careful not to overstuff your shumai. This can lead to them falling apart during cooking.
  • Customize Your Protein: Feel free to swap proteins based on what you have. Ground pork or tofu can work well, too.
  • Use Fresh Veggies: Fresh, high-quality vegetables improve the filling’s flavor and texture significantly.
  • Experiment with Dipping Sauces: While the siu mai sauce is great, try a peanut sauce or sweet and sour sauce for variety!
  • Steaming Equipment: If you don’t have a steamer, a metal colander or a microwave-safe bowl with a lid might work in a pinch.

Nutrition

Calories: 250kcalCarbohydrates: 30gProtein: 20gFat: 7gFiber: 2g
Keyword Chicken And Shrimp Shumai Recipe
Tried this recipe?Let us know how it was!

Frequently Asked Questions

1. Can I make shumai vegan?

Absolutely! You can substitute the chicken and shrimp with a blend of firm tofu and shredded vegetables. Season well to achieve a rich flavor similar to the original.

2. What can I use for dipping sauce besides the suggested one?

You can try a sauce made from soy sauce, peanut butter, and a touch of lime juice for a nutty twist. This brings a whole new flavor profile to your shumai.

3. How can I make shumai spicier?

If you crave heat, consider incorporating minced fresh chili peppers or a dash of Sriracha into the filling. You can also adjust the amount of chili oil in the dipping sauce.

4. Can I pan-fry shumai instead of steaming them?

Yes! After forming your shumai, heat a teaspoon of oil in a nonstick pan over medium heat. Brown the bottoms of the shumai slightly, then add a bit of water and cover to steam. This creates a delightful crispy bottom with tender centers.

Conclusion

Making chicken and shrimp shumai at home is not only achievable but also an enjoyable culinary adventure. The combination of fresh ingredients, versatile flavors, and encouraging assembly steps makes this dish perfect for cooks of all skill levels. 

Whether you’re serving it at a gathering or simply enjoying a quiet evening in, these dumplings bring joy and a taste of Asian cuisine right to your table.

This recipe is your gateway to sharing delicious meals with family and friends. So, roll up your sleeves, gather your ingredients, and start creating some shumai magic today!

You’ll also like these latest recipes!

Korean Cheesy Corn Recipe – Yum Yarns

Best Korean Cheesy Corn Recipe

Korean cheesy corn is both unique and versatile. When considering what to pair this delightful dish with, think about textures and flavors that complement its cheesy richness. Here are some great options: Grilled Meats, Spicy Dishes, Fresh Salads, or Rice Dishes.

Best Korean Cheesy Corn Recipe

One hot summer evening, I found myself wandering through my favorite local Korean supermarket. I was entranced by the myriad of snacks and sauces. Then, out of nowhere, a dish caught my eye: Korean cheesy corn. Intrigued, I decided to delve into this delicious-looking concoction. 

A mix of sweet corn, gooey cheese, and a drizzled sauce so tasty that it beckoned me to try making it at home.

Korean cheesy corn is a fantastic dish, often served as a side or a snack. Whether you’re hosting a party or just looking for comfort food, this dish is sure to please. Let’s explore what it is, why it works so well, and how you can whip it up in your own kitchen.

You will also like the following Side Dish recipes!

What is Korean Cheesy Corn?

Korean cheesy corn is a delightful fusion of sweet corn and creamy cheese, often prepared simply but with great flavor. It’s not only popular in Korean households but also a trending item in Korean bars and restaurants. 

The essence lies in the combination of fresh corn, melted cheese, and a few secret ingredients that bring it all together. It can be enjoyed warm or at room temperature, making it perfect for any occasion.

Why This Recipe Works

Here’s the lowdown on why Korean cheesy corn is a hit among food lovers:

1. Crave-Worthy Flavor Combination: The natural sweetness of corn pairs perfectly with the rich, gooey cheese. This contrast creates a dish that is impossible to resist.

2. Simplicity: It requires very few ingredients, making it easy for anyone, even novice home cooks, to prepare. You likely already have many of the necessary items in your pantry.

3. Versatility: Korean cheesy corn can be enjoyed as a side dish or a standalone snack. It fits seamlessly into a variety of meals or gatherings, from picnics to family dinners.

4. Quick Prep Time: With just a handful of steps, you can have this delicious dish on your table in under 30 minutes. Great for a midweek bite!

Ingredients You’ll Need To Make Korean Cheesy Corn

Crafting Korean cheesy corn at home is straightforward. Here’s what you’ll need:

  • 2 ears of fresh sweet corn, kernels removed and cobs discarded
  • 4 ounces shredded mozzarella cheese
  • ½ cup mayonnaise
  • 1½ teaspoons granulated sugar
  • 2 green onions, thinly sliced
  • Salt and freshly ground black pepper, to taste
  • ½ teaspoon garlic powder (optional, for extra savory flavor)
  • 1 tablespoon lime juice (optional, for a citrusy zing)
Korean Cheesy Corn Recipe

How To Make Korean Cheesy Corn?

Let’s get to the fun part—the cooking! Here’s how to prepare this dish step by step:

Step 1: Prepare the Corn

Start by removing the kernels from the cobs of fresh corn. You can do this with a sharp knife. Cut downwards along the cob until all the kernels have been removed. This will give you about 2 cups of corn. Pat yourself on the back; you’re off to a great start!

Step 2: Mix the Base

In a medium bowl, combine the corn kernels, mayonnaise, granulated sugar, and garlic powder (if using). Give this a good stir until everything is well combined. This is where the magic starts—don’t skimp on mixing!

Step 3: Add the Cheese

Next, fold in the shredded mozzarella cheese and sliced green onions. Make sure the cheese is evenly distributed. At this point, you can also add a pinch of salt and freshly ground black pepper to enhance the flavors.

Step 4: Bake It

Transfer the mixture to a baking dish. Preheat your oven to 400°F (200°C) and bake for about 15-20 minutes, or until the top is bubbly and golden brown. Keep an eye on it; you want that perfect cheesiness!

Step 5: Serve and Enjoy

Once out of the oven, let it cool for a couple of minutes. You can drizzle with lime juice for a zesty touch if desired. Serve it warm, and watch it disappear!

Tips for Perfect Korean Cheesy Corn

Here are some handy tips to enhance your experience:

  • Grate Fresh Cheese: Freshly shredded cheese melts better than pre-packed cheese. Consider grating your mozzarella for a gooey texture.
  • Tweak the Sweetness: Adjust sugar to your taste. If you like it sweeter, add a little more; if not, reduce it.
  • Fresh Corn is Best: For the best flavor, use fresh corn when it’s in season. But frozen corn works well too if you’re in a pinch.
  • Add Spice: If you like a kick, consider mixing in some diced jalapeños or red pepper flakes.
  • Garnish Cleverly: Once baked, a sprinkling of chopped cilantro or a few extra green onions can elevate the appearance and flavor.
Easy Korean Cheesy Corn Recipe

How to Store The Leftovers?

If you’re lucky enough to have leftovers (which I rarely do!), here’s how to store them:

  • Refrigerate: Place in an airtight container. It will last about 3-4 days in the fridge.
  • Reheat: To reheat, warm in the oven at 350°F until heated through. You can also microwave it, but it might not retain its original texture.

Recommended Side Dishes for Korean Cheesy Corn

While Korean cheesy corn is delightful on its own, pairing it with the right sides can elevate the meal. Here are some suggestions:

1. Spicy Korean Fried Chicken: The crispy, spicy chicken complements the creamy corn perfectly. The textural contrast is delightful.

2. Kimchi: Its tangy and spicy profile adds an exciting punch to the sweet corn, making for a well-rounded meal.

3. Grilled Asparagus: Lightly salted and peppered grilled asparagus liven up the plate and provide a nutritious crunch.

4. Sesame Rice: A bowl of fluffy rice sprinkled with sesame seeds is a comforting accompaniment that balances out the flavors.

Substitute Options for Ingredients

If you’re missing some items, don’t worry! Here are some alternatives:

1. Mayonnaise: You can swap this with Greek yogurt for a healthier twist. It keeps the creaminess intact while adding protein.

2. Mozzarella Cheese: If you don’t have mozzarella, try using cheddar or a Mexican blend; they melt well and bring unique flavors.

3. Fresh Corn: Canned or frozen corn works just as well. If using canned corn, drain it properly to avoid excess moisture.

4. Green Onions: Regular onions can substitute if you don’t have green onions. Just remember they have a stronger flavor, so use less.

Easy Korean Cheesy Corn Recipe

Korean Cheesy Corn Recipe

Tina Cooper
One hot summer evening, I found myself wandering through my favorite local Korean supermarket. I was entranced by the myriad of snacks and sauces.
Prep Time 5 minutes
Cook Time 12 minutes
Total Time 17 minutes
Course Side Dish
Cuisine Korean
Servings 4 Servings
Calories 220 kcal

Equipment

  • Oven

Ingredients
  

  • 2 ears of fresh sweet corn kernels removed and cobs discarded
  • 4 ounces shredded mozzarella cheese
  • ½ cup mayonnaise
  • teaspoons granulated sugar
  • 2 green onions thinly sliced
  • Salt and freshly ground black pepper to taste
  • ½ teaspoon garlic powder optional, for extra savory flavor
  • 1 tablespoon lime juice optional, for a citrusy zing

Instructions
 

  • Let’s get to the fun part—the cooking! Here’s how to prepare this dish step by step:

Step 1: Prepare the Corn

  • Start by removing the kernels from the cobs of fresh corn. You can do this with a sharp knife. Cut downwards along the cob until all the kernels have been removed. This will give you about 2 cups of corn. Pat yourself on the back; you’re off to a great start!

Step 2: Mix the Base

  • In a medium bowl, combine the corn kernels, mayonnaise, granulated sugar, and garlic powder (if using). Give this a good stir until everything is well combined. This is where the magic starts—don’t skimp on mixing!

Step 3: Add the Cheese

  • Next, fold in the shredded mozzarella cheese and sliced green onions. Make sure the cheese is evenly distributed. At this point, you can also add a pinch of salt and freshly ground black pepper to enhance the flavors.

Step 4: Bake It

  • Transfer the mixture to a baking dish. Preheat your oven to 400°F (200°C) and bake for about 15-20 minutes, or until the top is bubbly and golden brown. Keep an eye on it; you want that perfect cheesiness!

Step 5: Serve and Enjoy

  • Once out of the oven, let it cool for a couple of minutes. You can drizzle with lime juice for a zesty touch if desired. Serve it warm, and watch it disappear!

Notes

Here are some handy tips to enhance your experience:
  • Grate Fresh Cheese: Freshly shredded cheese melts better than pre-packed cheese. Consider grating your mozzarella for a gooey texture.
  • Tweak the Sweetness: Adjust sugar to your taste. If you like it sweeter, add a little more; if not, reduce it.
  • Fresh Corn is Best: For the best flavor, use fresh corn when it’s in season. But frozen corn works well too if you’re in a pinch.
  • Add Spice: If you like a kick, consider mixing in some diced jalapeños or red pepper flakes.
  • Garnish Cleverly: Once baked, a sprinkling of chopped cilantro or a few extra green onions can elevate the appearance and flavor.

Nutrition

Calories: 220kcalCarbohydrates: 22gProtein: 5gFat: 14gFiber: 1gSugar: 2g
Keyword Korean Cheesy Corn Recipe
Tried this recipe?Let us know how it was!

Frequently Asked Questions

1. Can I make Korean cheesy corn ahead of time?

Yes! Prepare it in advance, but bake it just before serving to enjoy it warm and gooey.

2. Is Korean cheesy corn gluten-free?

By using gluten-free mayonnaise and checking your cheese label, you can absolutely make this dish gluten-free.

3. Can I add protein to this dish?

Certainly! You can incorporate cooked chicken, shrimp, or even tofu for a protein boost.

4. Is it possible to use non-dairy cheese?

Yes! There are many plant-based cheese options available that can replicate this dish’s gooey texture.

5. Can I adjust the spice level?

Definitely! Don’t add any hot spices for a milder dish, or throw in some chili flakes or jalapeños for added heat.

Conclusion

In the end, Korean cheesy corn is not just a dish; it’s an experience filled with warmth, flavor, and nostalgia. Every bite offers an explosion of creamy, cheesy goodness, reminding you of gatherings with family and friends. Pair it with your favorite sides, or enjoy it alone—the choice is yours.

Next time you’re in need of a satisfying snack, or a showstopper side dish, look no further than this delightful creation. I can assure you, once you make it, it will become a staple in your home, one delicious spoonful at a time! So grab those ingredients and get cooking—it’s time to indulge in this cheesy corn wonder!

You’ll also like these latest recipes!

Jollibee Mashed Potato Recipe – Yum Yarns

Best Jollibee Mashed Potato Recipe

When you think about Jollibee mashed potatoes, several delicious pairings come to mind. Think about crispy fried chicken, rich gravy, or a hearty burger. These mashed potatoes elevate any meal.

Best Jollibee Mashed Potato Recipe

Imagine savoring creamy mashed potatoes alongside a perfectly crispy Chickenjoy. It’s a match made in foodie heaven. But let’s not just stop there. Add some corn on the side, and you’ve got a plate that looks pretty appealing, too.

You will also like the following Side Dish recipes!

Why This Recipe is Great for You

Now, onto the star of the show: Jollibee mashed potatoes. Why is this recipe such a treasure? For starters, it’s an embodiment of comfort food. The smooth, creamy texture of the mashed potatoes hugs your taste buds like a warm blanket.

It’s not just about flavor; it’s about creating memories. Perhaps you enjoyed this dish at Jollibee after a long day, or celebrating a special occasion with family. Whatever the case, making it at home helps you create that experience in your own kitchen.

As a registered dietitian and food enthusiast, I make it a point to choose ingredients that not only taste great but also contribute to overall well-being. 

Each component in my recipe is carefully selected for that perfect balance of flavor and nutrition.

My Experience with the Ingredients

Before diving into the recipe, let me share my journey with the ingredients. First, the russet potatoes. These chunky guys are known for their creamy texture when mashed. 

I peel them with excitement, knowing the fluffy goodness they will become. Then comes the whole milk—a splash of richness that makes all the difference in texture.

Next up is the unsalted butter. A few tablespoons of melted bliss—who can resist? Garlic powder adds a depth of flavor that’s subtle yet irresistible. 

Finally, a sprinkle of sea salt and fresh chives ties everything together. Trust me; these simple elements create something extraordinary. Now, are you ready to join me in the kitchen?

Ingredients List

  • 1 tablespoon chopped fresh chives
  • 3 to 4 cups of water
  • 2 teaspoons sea salt
  • 3/4 cup whole milk
  • 2 lbs. russet potatoes, peeled and diced into chunks
  • 1/2 teaspoon garlic powder
  • 3 tablespoons melted unsalted butter
Jollibee Mashed Potato Recipe

How to Make Jollibee Mashed Potatoes

Transforming your ingredients into a comforting bowl of mashed potatoes is a straightforward process. Let’s break it down step-by-step.

Step 1: Prepare the Potatoes

Start by washing and peeling your russet potatoes. Next, dice them into even chunks. This ensures they cook uniformly. You want to make sure they’re about an inch thick.

Step 2: Boil the Potatoes

In a large pot, place your diced potatoes and cover them with 3 to 4 cups of water. Add 2 teaspoons of sea salt to the water. 

Bring everything to a boil over medium-high heat. This step usually takes around 10-15 minutes. You want the potatoes to become fork-tender, so keep an eye on them.

Step 3: Drain and Dry

Once your potatoes are perfectly tender, carefully drain them into a colander. This helps remove excess moisture. Allow them to sit for a few minutes in the colander. This drying process is key to achieving that buttery texture.

Step 4: Mash the Potatoes

Return the drained potatoes to the pot. Here’s where the fun begins! Grab your potato masher (or fork if you’re feeling adventurous) and start mashing.

Step 5: Add Butter and Milk

Now it’s time to introduce some richness. Pour in the melted unsalted butter and the whole milk. Add 1/2 teaspoon of garlic powder for that gourmet touch. Stir everything until smooth and creamy.

Step 6: Season to Taste

Taste your mashed potatoes and add more sea salt if necessary. This step is often overlooked, but trust me; tasting is essential. You want it to be just right.

Step 7: Garnish and Serve

Finally, add the chopped fresh chives on top. They add a delightful flavor and a pop of color that makes your dish look inviting. Serve it warm alongside your choice of proteins or veggies.

Recipe Notes

Here’s a breakdown of the ingredients you’ll be using:

  • Russet Potatoes: These potatoes have a starchy texture, making them ideal for creamy mashed potatoes.
  • Sea Salt: Adds flavor to the potatoes. It’s essential, so don’t skimp on it!
  • Whole Milk: Enhances creaminess. Feel free to use lower-fat options if preferred.
  • Unsalted Butter: Gives richness; use unsalted to control the saltiness of the dish.
  • Garlic Powder: Offers a hint of flavor without overwhelming the dish.
  • Fresh Chives: Add a fresh taste and bright color, elevating the dish visually and in flavor.
Easy Jollibee Mashed Potato Recipe

Recipe Variations

Looking to switch things up? Here are some ways to customize your Jollibee mashed potatoes:

  • Cheesy Mashed Potatoes: Stir in shredded cheese like cheddar or mozzarella for a decadent twist.
  • Loaded Mashed Potatoes: Add crispy bacon bits, sour cream, and cheese for a loaded variant.
  • Herbed Mashed Potatoes: Mix in different herbs such as rosemary or thyme for a unique flavor profile.
  • Garlic Mashed Potatoes: Replace garlic powder with roasted garlic for a deeper, sweeter garlic flavor.
  • Vegan Option: Use non-dairy milk and vegan butter to make these mashed potatoes plant-based.
Easy Jollibee Mashed Potato Recipe

Jollibee Mashed Potato Recipe

Tina Cooper
Make Jollibee mashed potatoes at home with this creamy recipe! Fluffy, rich, and perfect for pairing with fried chicken or your favorite dish.
Prep Time 10 minutes
Cook Time 12 minutes
Total Time 22 minutes
Course Side Dish
Cuisine Filipino
Servings 4 Servings
Calories 205 kcal

Equipment

  • Large pot

Ingredients
  

  • 1 tablespoon chopped fresh chives
  • 3 to 4 cups of water
  • 2 teaspoons sea salt
  • 3/4 cup whole milk
  • 2 lbs. russet potatoes peeled and diced into chunks
  • 1/2 teaspoon garlic powder
  • 3 tablespoons melted unsalted butter

Instructions
 

  • Transforming your ingredients into a comforting bowl of mashed potatoes is a straightforward process. Let’s break it down step-by-step.

Step 1: Prepare the Potatoes

  • Start by washing and peeling your russet potatoes. Next, dice them into even chunks. This ensures they cook uniformly. You want to make sure they’re about an inch thick.

Step 2: Boil the Potatoes

  • In a large pot, place your diced potatoes and cover them with 3 to 4 cups of water. Add 2 teaspoons of sea salt to the water.
  • Bring everything to a boil over medium-high heat. This step usually takes around 10-15 minutes. You want the potatoes to become fork-tender, so keep an eye on them.

Step 3: Drain and Dry

  • Once your potatoes are perfectly tender, carefully drain them into a colander. This helps remove excess moisture. Allow them to sit for a few minutes in the colander. This drying process is key to achieving that buttery texture.

Step 4: Mash the Potatoes

  • Return the drained potatoes to the pot. Here’s where the fun begins! Grab your potato masher (or fork if you’re feeling adventurous) and start mashing.

Step 5: Add Butter and Milk

  • Now it’s time to introduce some richness. Pour in the melted unsalted butter and the whole milk. Add 1/2 teaspoon of garlic powder for that gourmet touch. Stir everything until smooth and creamy.

Step 6: Season to Taste

  • Taste your mashed potatoes and add more sea salt if necessary. This step is often overlooked, but trust me; tasting is essential. You want it to be just right.

Step 7: Garnish and Serve

  • Finally, add the chopped fresh chives on top. They add a delightful flavor and a pop of color that makes your dish look inviting. Serve it warm alongside your choice of proteins or veggies.

Notes

Here’s a breakdown of the ingredients you’ll be using:
  • Russet Potatoes: These potatoes have a starchy texture, making them ideal for creamy mashed potatoes.
  • Sea Salt: Adds flavor to the potatoes. It’s essential, so don’t skimp on it!
  • Whole Milk: Enhances creaminess. Feel free to use lower-fat options if preferred.
  • Unsalted Butter: Gives richness; use unsalted to control the saltiness of the dish.
  • Garlic Powder: Offers a hint of flavor without overwhelming the dish.
  • Fresh Chives: Add a fresh taste and bright color, elevating the dish visually and in flavor.

Nutrition

Serving: 351gCalories: 205kcalCarbohydrates: 24gProtein: 4gFat: 10.3gCholesterol: 27mgSodium: 1268mgFiber: 2gSugar: 4g
Keyword Jollibee Mashed Potato Recipe
Tried this recipe?Let us know how it was!

Frequently Asked Questions

Can I use different types of potatoes?

Absolutely! While russet potatoes yield the creamiest results, Yukon Gold or red potatoes work well too. They have a buttery flavor and smooth texture.

How do I store leftovers?

Store cooled mashed potatoes in an airtight container in the refrigerator. They’ll last about 3-5 days. Reheat with a splash of milk to restore creaminess.

Can I freeze mashed potatoes?

Yes, you can freeze them. Scoop portions into freezer-safe containers, leaving space for expansion. They can be frozen for up to 2 months.

How do I fix gluey mashed potatoes?

If yours turn out gluey, it’s usually because they’ve been over-mashed. To salvage, add a bit more milk or butter and fold gently with a spatula.

What if I don’t have whole milk?

You can use any milk you have on hand—skim, almond, or oat milk can work, though they will alter the creaminess.

Can these be made ahead of time?

Yes! You can make them a day ahead. Just reheat gently on the stovetop, adding a bit of milk to bring back that creamy texture.

Conclusion

Creating Jollibee mashed potatoes at home isn’t just about the ingredients; it’s about the experience. Each step allows you to connect with the food and relive those memories associated with Jollibee. 

The beauty of this dish lies in its versatility—pair it with fried chicken, drizzle it with gravy, or savor it solo. It’s comfort food at its finest. 

I hope this motivated you to try your hand at making this dish. Whether for a special occasion or just a weeknight dinner, your taste buds will thank you! Enjoy your culinary adventure.

You’ll also like these latest recipes!

Jollibee Lumpia Recipe – Yum Yarns

Best Jollibee Lumpia Recipe

Before diving into the delightful world of Jollibee lumpia, let’s chat about perfect partners! These crispy treasures shine when served alongside a few tasty comrades. Consider pairing them with sweet and sour sauce for a zesty kick. 

The tang complements the savory filling beautifully. Garlic vinegar dip adds a punch of flavor for those who enjoy a tart bite. Want a cool contrast? 

Spicy vinegar can give you that thrill of heat against the crunchy texture. These pairings transform a delightful snack into a memorable feast.

Best Jollibee Lumpia Recipe

The first time I tasted Jollibee lumpia, I was mesmerized. This wasn’t just any snack; it was a comforting little package that, when bitten into, released a medley of flavors. 

Growing up, I often watched my grandparents make lumpia from scratch, and while it was an intricate process, the joy on their faces while sharing it was worth every moment.

Fast-forward to today, and I find myself recreating that love in my kitchen. 

Whether it’s a cozy family meal or a festive gathering, Jollibee lumpia is always a hit. The crispy wrapper, complemented by a savory filling, brings nostalgia and joy to the table. Ready to make your own? Let’s explore what Jollibee lumpia is all about!

You will also like the following Appetizer recipes!

What is Jollibee Lumpia?

Jollibee lumpia is a popular Filipino snack that features a crispy wrapper stuffed with seasoned meats and vegetables. 

These delightful rolls are often served as appetizers or side dishes. You can find them in various forms, but the Jollibee twist includes an irresistible flavor profile.

These rolls are loved for their satisfying crunch on the outside and savory goodness inside. The entire experience is a delightful journey of textures and tastes. Whether you’re at a Jollibee restaurant or making them at home, lumpia brings people together.

Why This Recipe Works?

You might be wondering why this recipe has become a staple in many households. Here are four solid reasons that make Jollibee lumpia a winner every time.

1. Crispy Perfection Every Time
Achieving that golden, crispy exterior is key. With the right frying technique and proper temperature, you’ll have perfectly crispy lumpia that you won’t be able to resist.

2. Flavorful Filling
The mixture of ground pork, fresh vegetables, and seasoning creates a filling that’s bursting with flavor. Each bite offers a savory taste, bringing comfort food to new heights.

3. Easy to Prepare
While lumpia might seem daunting at first, the step-by-step process is simple. The ingredients are easy to find and require minimal prep, making it accessible even for beginners.

4. Versatile and Customizable
One of the fantastic aspects of lumpia is its versatility. You can play with the filling ingredients to suit your preferences. Want to add shrimp or switch to a vegetarian filling? The possibilities are endless!

Ingredients You’ll Need to Make This Dish

To embark on your Jollibee lumpia journey, here’s what you’ll need:

  • 1 1/2 lbs ground pork
  • 2 large eggs
  • 2 medium onions, finely minced
  • 2 carrots, finely diced
  • 1/2 cup fresh parsley, finely chopped
  • 1 1/2 teaspoons garlic powder
  • 1 tablespoon toasted sesame oil
  • 1 tablespoon soy sauce
  • 1 1/2 teaspoons sea salt
  • 1/2 teaspoon freshly ground black pepper
  • 1/4 teaspoon ground white pepper

Lumpia Wrappers & Oil:

  • 50 pieces of lumpia wrappers
  • 3 cups vegetable oil for frying
Jollibee Lumpia Recipe

How to Make Jollibee Lumpia?

Let’s get into the nitty-gritty of preparing this delightful dish.

Step 1: Prepare the Filling

Start by gathering all your filling ingredients. In a large bowl, combine the ground pork, minced onions, diced carrots, and chopped parsley. 

Next, add in the eggs, garlic powder, sesame oil, soy sauce, sea salt, black pepper, and white pepper. Mix everything well until it’s uniformly combined. Don’t be afraid to get your hands in there!

Step 2: Assemble the Lumpia

Take a lumpia wrapper and lay it on a clean surface. Spoon about two tablespoons of the filling into the center. 

Make sure not to overfill; it needs room to roll. Fold the sides toward the center and roll tightly, sealing the last edge with a bit of water. Repeat this until all wrappers and filling are used up.

Step 3: Heat the Oil

In a large pan or deep fryer, heat the vegetable oil over medium heat. You want enough oil for deep frying, usually about two inches deep. To test if the oil is ready, throw in a small piece of wrapper; if it bubbles and rises, you’re good to go.

Step 4: Fry the Lumpia

Carefully place a few lumpia in the hot oil, avoiding overcrowding. Fry for about 3-4 minutes per side or until golden brown and crispy. Use tongs to turn them gently to ensure even cooking. Remove from heat and place on paper towels to drain excess oil.

Step 5: Serve and Enjoy!

Serve the lumpia hot and crispy, accompanied by dipping sauces of your choice. Watching everyone enjoy the fruits of your labor is rewarding. Savor the moment!

Tips & Tricks

To enhance your lumpia-making experience, keep these handy tips in mind:

  • Don’t Skip the Drain: Allow the fried lumpia to sit on paper towels to absorb excess oil. This keeps them crunchy and not greasy.
  • Make Ahead: You can prepare the filling a day in advance and keep it refrigerated. Just wrap and fry when you’re ready!
  • Experiment with Fillings: Toss in some shredded cabbage or bean sprouts for a different texture.
  • Maintain Oil Temperature: Keep an eye on the oil temperature by adjusting the heat as needed. If it gets too hot, the lumpia may burn.
  • Use Fresh Wrappers: Fresh lumpia wrappers yield the best results. If they feel dry, spritz them lightly with water.
Easy Jollibee Lumpia Recipe

How Do You Store The Leftovers?

If you find yourself with leftovers (which is rare because they go quickly!), allow the lumpia to cool completely before storing. Place them in an airtight container and refrigerate for up to 3 days. 

To reheat, pop them in the oven at 375°F until warmed through for that crispy texture. Avoid using a microwave, as it can make them soggy.

What Sides Would Complement Jollibee Lumpia?

Here are three sides that amplify your lumpia experience:

1. Pancit (Noodles)
A classic Filipino dish, Pancit is vibrant and flavorful. With stir-fried noodles, vegetables, and meats, it pairs beautifully with crispy lumpia, making a complete meal.

2. Filipino Fried Rice
Egg fried rice with a dash of soy sauce offers a savory base. It balances the crispiness of lumpia while adding comforting familiarity.

3. Fresh Fruit Salad
A refreshing fruit salad can cleanse the palate. Combine tropical fruits like mangoes, pineapples, and bananas for a bright contrast to savory lumpia.

What Alternatives Can You Use for the Ingredients?

Running low on ingredients? Here are some alternatives:

1. Ground Turkey or Chicken
If you prefer a leaner option, ground turkey or chicken can replace the pork. It offers the same texture with less fat.

2. Tofu
For a vegetarian alternative, finely crumbled tofu can be used. Add soy sauce and spices for a boost of flavor.

3. Green Onions
Instead of onions, chopped green onions can add a fresh kick to your filling.

4. Any Wrappers
Don’t have lumpia wrappers? Spring roll or egg roll wrappers work well. Just ensure they’re sealed properly.

Jollibee Lumpia Recipe

Tina Cooper
Before diving into the delightful world of Jollibee lumpia, let’s chat about perfect partners! These crispy treasures shine when served alongside a few tasty comrades. Consider pairing them with sweet and sour sauce for a zesty kick. 
Prep Time 15 minutes
Cook Time 10 minutes
Total Time 25 minutes
Course Appetizer
Cuisine Filipino
Servings 12 Servings
Calories 1342 kcal

Equipment

  • large pan or deep fryer

Ingredients
  

Filling Ingredients:

  • 1 1/2 lbs ground pork
  • 2 large eggs
  • 2 medium onions finely minced
  • 2 carrots finely diced
  • 1/2 cup fresh parsley finely chopped
  • 1 1/2 teaspoons garlic powder
  • 1 tablespoon toasted sesame oil
  • 1 tablespoon soy sauce
  • 1 1/2 teaspoons sea salt
  • 1/2 teaspoon freshly ground black pepper
  • 1/4 teaspoon ground white pepper

Lumpia Wrappers & Oil:

  • 50 pieces of lumpia wrappers
  • 3 cups vegetable oil for frying

Instructions
 

  • Let’s get into the nitty-gritty of preparing this delightful dish.

Step 1: Prepare the Filling

  • Start by gathering all your filling ingredients. In a large bowl, combine the ground pork, minced onions, diced carrots, and chopped parsley.
  • Next, add in the eggs, garlic powder, sesame oil, soy sauce, sea salt, black pepper, and white pepper. Mix everything well until it’s uniformly combined. Don’t be afraid to get your hands in there!

Step 2: Assemble the Lumpia

  • Take a lumpia wrapper and lay it on a clean surface. Spoon about two tablespoons of the filling into the center.
  • Make sure not to overfill; it needs room to roll. Fold the sides toward the center and roll tightly, sealing the last edge with a bit of water. Repeat this until all wrappers and filling are used up.

Step 3: Heat the Oil

  • In a large pan or deep fryer, heat the vegetable oil over medium heat. You want enough oil for deep frying, usually about two inches deep. To test if the oil is ready, throw in a small piece of wrapper; if it bubbles and rises, you’re good to go.

Step 4: Fry the Lumpia

  • Carefully place a few lumpia in the hot oil, avoiding overcrowding. Fry for about 3-4 minutes per side or until golden brown and crispy. Use tongs to turn them gently to ensure even cooking. Remove from heat and place on paper towels to drain excess oil.

Step 5: Serve and Enjoy!

  • Serve the lumpia hot and crispy, accompanied by dipping sauces of your choice. Watching everyone enjoy the fruits of your labor is rewarding. Savor the moment!

Notes

To enhance your lumpia-making experience, keep these handy tips in mind:
  • Don’t Skip the Drain: Allow the fried lumpia to sit on paper towels to absorb excess oil. This keeps them crunchy and not greasy.
  • Make Ahead: You can prepare the filling a day in advance and keep it refrigerated. Just wrap and fry when you’re ready!
  • Experiment with Fillings: Toss in some shredded cabbage or bean sprouts for a different texture.
  • Maintain Oil Temperature: Keep an eye on the oil temperature by adjusting the heat as needed. If it gets too hot, the lumpia may burn.
  • Use Fresh Wrappers: Fresh lumpia wrappers yield the best results. If they feel dry, spritz them lightly with water.

Nutrition

Serving: 377gCalories: 1342kcalCarbohydrates: 117gProtein: 18gFat: 90.5gCholesterol: 156mgSodium: 863mgFiber: 1gSugar: 79g
Keyword Jollibee Lumpia Recipe
Tried this recipe?Let us know how it was!

Frequently Asked Questions

1. Can I bake lumpia instead of frying them?

Yes, you can bake lumpia! Preheat the oven to 400°F, brush them with oil, and bake for about 20 minutes or until golden brown, flipping them halfway through.

2. Are lumpia gluten-free?

Typically, lumpia wrappers aren’t gluten-free. However, you can find gluten-free wrappers at specialty stores or online.

3. Can lumpia be frozen for later use?

Absolutely! You can freeze uncooked lumpia. Just ensure they’re sealed well in plastic wrap and then in a freezer bag. Fry them straight from the freezer, adding a few extra minutes to the cooking time.

4. How do I make lumpia less greasy?

To reduce greasiness, ensure the oil is at the right temperature before frying. Also, make sure to drain the fried lumpia on paper towels.

5. Can I use leftover ingredients for this recipe?

Sure! If you have leftover ground meat or veggies, feel free to throw them in as long as they complement the flavors.

6. How many lumpia can I make from this recipe?

This recipe yields about 50 pieces of lumpia, making it perfect for gatherings or freezing for later.

Conclusion

Making Jollibee lumpia at home is not just about cooking; it’s about reliving memories and sharing joy. With its perfect crunch and savory filling, it’s more than a dish—it’s an experience. 

Whether enjoyed at a festive gathering or a peaceful evening at home, lumpia holds a special place in the hearts of many.

I hope this guide inspires you to create your own lumpia masterpiece. Dive into the process, experiment with flavors, and enjoy the delightful experience of sharing this Filipino favorite. 

Trust me, the smiles around the table will be worth it!

You’ll also like these latest recipes!

Jollibee French Fries Recipe – Yum Yarns

Best Jollibee French Fries Recipe

If you’re like me, a visit to Jollibee is incomplete without indulging in their famous French fries. Their crispy, golden fries provide the perfect companion, complementing the flavors of chickenjoy or the signature Jolly Spaghetti.

I can tell you from experience, Jollibee’s fries are not just any fast-food side dish; they boast a unique texture and flavor that wins hearts.

Best Jollibee French Fries Recipe

Celebrated for its unique menu and playful ambiance, Jollibee stands tall in the fast-food industry. The restaurant hails from the Philippines and has captured the hearts of food enthusiasts worldwide. But what keeps diners coming back, besides their exuberant mascot? 

The answer is simple: the food! Chief among these delicious offerings are the iconic French fries. Perfectly crispy and wonderfully addictive, they create a delightful crunch that leaves you craving more.

I cannot stress enough how much joy these fries can bring. Picture this: perfect golden fries paired with creamy gravy or maybe dipped in ketchup. 

Trust me, there’s nothing quite like it. Let’s dive deeper into what makes Jollibee French fries so special, shall we?

You will also like the following Side Dish recipes!

Why This Recipe Works?

Creating a version of Jollibee’s fries at home is not just about replicating a fast food product. It involves understanding the approach and getting the details right. Here are four reasons that make this recipe work brilliantly:

1. Use of Russet Potatoes:
Russet potatoes are starchy and have a high dry matter content, ensuring your fries are crispy on the outside and fluffy on the inside. No other potato can achieve that delightful texture.

2. Double-Frying Technique:
This method is a game changer. First, the fries are cooked at a lower temperature to soften them. Then they undergo a second fry at a higher temperature, resulting in an extra crispy surface. It’s the secret to perfection.

3. Seasoning It Right:
A simple pinch of sea salt enhances the natural flavor of the potatoes without overpowering them. This simple seasoning unlocks the true potential of your fries.

4. Right Oil Temperature:
Using vegetable oil at the proper temperature ensures the fries fry evenly and don’t absorb excess oil, keeping them light and crispy throughout.

How Does It Taste Like?

The experience of biting into a Jollibee French fry is one for the books. It’s a crunch that transforms the average fast food fare into something memorable. Each fry has a subtly sweet and earthy flavor, driven by the quality of the russet potatoes. 

When lightly salted, the natural flavors are amplified. Whether you decide to dip them in creamy gravy or just enjoy them as-is, you’ll find them to be satisfyingly addictive.

What Sets This Recipe Apart?

While countless recipes aim to replicate French fries, what makes this homage to Jollibee’s version stand out? It’s in the details.

The crispy texture: Achieved through the double-frying method, it ensures that each bite is satisfyingly crunchy.

Freshly cut and fried: Homemade fries guarantee freshness that fast-food counterparts can’t beat. You’ll enjoy the pleasure of frying your own potatoes, making it a more wholesome choice.

Simplicity of ingredients: You will not find a laundry list of additives or preservatives here. Just three main ingredients result in a nourishing and genuine taste.

The Ingredients

Making Jollibee French fries at home requires only a handful of ingredients. Here’s what you need:

  • 1 tablespoon fresh rosemary, finely chopped
  • 1 teaspoon garlic powder
  • 7 medium-sized russet potatoes, peeled
  • A pinch of sea salt
  • 4 cups vegetable oil

This straightforward list not only makes it easy to assemble but also ensures you’re using wholesome ingredients!

Jollibee French Fries Recipe

Instructions

Let’s get into the cooking process. Follow each step carefully and relish the journey to your fries!

Step 1: Preparation of Potatoes

Start by peeling the russet potatoes. Once peeled, cut them into long strips. Aim for ¼-inch thickness, ensuring they are uniform for even cooking.

Step 2: Rinsing

Once cut, place the potato strips in a bowl of cold water. Rinse them several times to remove excess starch. This step is key to a crispy fry. After a good rinse, let them soak for about 30 minutes.

Step 3: Drying the Potatoes

Drain the soaking water and pat the potatoes dry with paper towels. The drier your fries are, the better they will fry. Moisture is the enemy of crispiness!

Step 4: First Frying

In a large pot, heat the vegetable oil to 325°F (160°C). Fry the potatoes in batches for about 3-4 minutes. You want them to soften, not brown. Once done, remove them and let them drain on a paper towel.

Step 5: Cooling

Allow the fries to cool down. This cooling period lets moisture escape, preparing them for the final fry.

Step 6: Second Frying

Heat the oil up to 375°F (190°C). Fry the cooled potatoes in batches until golden brown and crispy, about 2-3 minutes. Remove them and let them drain again.

Step 7: Seasoning

While the fries are still warm, sprinkle them with the sea salt, fresh rosemary, and garlic powder. Toss gently to coat evenly.

Step 8: Enjoy!

Serve the fries immediately. Pair them with your favorite dip or dish; the taste will leave you yearning for more.

Notes

Here are five essential tips for making the best Jollibee French fries:

  • Use a thermometer: Maintaining the right oil temperature is crucial for achieving that desired crunch.
  • Don’t overcrowd the pot: Frying in smaller batches allows for better heat retention and even cooking.
  • Experiment with seasonings: While the classic pairings are fantastic, try adding your favorite spices for a personalized touch!
  • Store properly: If you’ve made a large batch, store leftovers in an airtight container in the fridge. Reheat in the oven for optimal crispiness.
  • Consider safety: Always keep an eye on your frying oil temperature to avoid burning or accidents.
Easy Jollibee French Fries Recipe

How Do You Store Jollibee French Fries?

If you’re lucky enough to have leftovers, storing them properly is key to maintaining their crunch. Allow the fries to cool completely. Place them in an airtight container layered between paper towels. This will help absorb any moisture. Store in the refrigerator for up to 3 days. For best results, reheat in an oven set to 400°F (200°C) until they regain their crispiness.

Sides for Jollibee French Fries

Pairing sides with your French fries can elevate your meal. Here are three suggestions:

1. Chickenjoy:
Jollibee’s fried chicken is iconic. The juicy, flavorful chicken works perfectly with crispy fries, balancing the meal.

2. Jolly Spaghetti:
Sweet and savory, this Filipino-style spaghetti is a delightful counterpart. The sweetness of the sauce contrasts beautifully with the fries.

3. Burger Steak:
This dish features beef patties drenched in mushroom gravy. The savory gravy pairs ideally when drizzled over fries, creating a flavor explosion.

What Alternatives Can You Use for the Ingredients?

If you find yourself missing some ingredients, don’t worry. Here are some alternatives:

1. Potato Alternatives:
If you don’t have russet potatoes, you can use Yukon Gold potatoes. They provide a buttery flavor.

2. Rosemary:
Fresh rosemary can be substituted with dried rosemary for a different flavor profile, though sprinkle lightly.

3. Garlic Powder:
If you’re out of garlic powder, minced fresh garlic works well, although you might need to sauté it briefly to release the flavors.

4. Oil Alternatives:
While vegetable oil is recommended, you can use canola oil or even peanut oil, as they both have high smoke points suitable for frying.

Easy Jollibee French Fries Recipe

Jollibee French Fries Recipe

Tina Cooper
Celebrated for its unique menu and playful ambiance, Jollibee stands tall in the fast-food industry. The restaurant hails from the Philippines and has captured the hearts of food enthusiasts worldwide. 
Prep Time 30 minutes
Cook Time 15 minutes
Total Time 45 minutes
Course Side Dish
Cuisine Filipino
Servings 5 Servings
Calories 446 kcal

Equipment

  • Large pot

Ingredients
  

  • 1 tablespoon fresh rosemary finely chopped
  • 1 teaspoon garlic powder
  • 7 medium-sized russet potatoes peeled
  • A pinch of sea salt
  • 4 cups vegetable oil

Instructions
 

  • Let’s get into the cooking process. Follow each step carefully and relish the journey to your fries!

Step 1: Preparation of Potatoes

  • Start by peeling the russet potatoes. Once peeled, cut them into long strips. Aim for ¼-inch thickness, ensuring they are uniform for even cooking.

Step 2: Rinsing

  • Once cut, place the potato strips in a bowl of cold water. Rinse them several times to remove excess starch. This step is key to a crispy fry. After a good rinse, let them soak for about 30 minutes.

Step 3: Drying the Potatoes

  • Drain the soaking water and pat the potatoes dry with paper towels. The drier your fries are, the better they will fry. Moisture is the enemy of crispiness!

Step 4: First Frying

  • In a large pot, heat the vegetable oil to 325°F (160°C). Fry the potatoes in batches for about 3-4 minutes. You want them to soften, not brown. Once done, remove them and let them drain on a paper towel.

Step 5: Cooling

  • Allow the fries to cool down. This cooling period lets moisture escape, preparing them for the final fry.

Step 6: Second Frying

  • Heat the oil up to 375°F (190°C). Fry the cooled potatoes in batches until golden brown and crispy, about 2-3 minutes. Remove them and let them drain again.

Step 7: Seasoning

  • While the fries are still warm, sprinkle them with the sea salt, fresh rosemary, and garlic powder. Toss gently to coat evenly.

Step 8: Enjoy!

  • Serve the fries immediately. Pair them with your favorite dip or dish; the taste will leave you yearning for more.

Notes

Here are five essential tips for making the best Jollibee French fries:
  • Use a thermometer: Maintaining the right oil temperature is crucial for achieving that desired crunch.
  • Don’t overcrowd the pot: Frying in smaller batches allows for better heat retention and even cooking.
  • Experiment with seasonings: While the classic pairings are fantastic, try adding your favorite spices for a personalized touch!
  • Store properly: If you’ve made a large batch, store leftovers in an airtight container in the fridge. Reheat in the oven for optimal crispiness.
  • Consider safety: Always keep an eye on your frying oil temperature to avoid burning or accidents.
 

Nutrition

Serving: 118gCalories: 446kcalCarbohydrates: 14gProtein: 2gFat: 43.7gSodium: 4mgFiber: 1g
Keyword Jollibee French Fries Recipe
Tried this recipe?Let us know how it was!

Frequently Asked Questions

1. How Can I Make These Fries Healthier?

A healthier approach would be to bake your fries instead of frying them. Toss the cut potatoes in a little olive oil, season as desired, and bake at 425°F (220°C) until crisp, turning occasionally.

2. Can I freeze these fries before cooking?

Absolutely! After the first frying, let the fries cool completely, then freeze them in a single layer on a baking sheet. Once frozen, transfer to an airtight container. When ready to eat, fry them directly from frozen—just adjust the frying time.

3. Is it possible to replicate Jollibee’s unique flavor?

While it may not be a perfect match, using fresh ingredients, high-quality potatoes, and the right frying method will help you come close. The joy of eating homemade fries is that you have control over the seasoning and overall quality.

4. What if I want to make sweet potato fries instead?

Good question! You can substitute russet potatoes with sweet potatoes. Just keep in mind, sweet potatoes tend to cook faster, so monitor the frying time closely.

Conclusion

The journey to making Jollibee French fries at home taught me the importance of quality ingredients and thoughtful techniques. It’s about more than just achieving that perfect crunch; it’s about creating a little piece of joy in your kitchen. 

Armed with this guide, you’ll not only satisfy your cravings but also enjoy the fun of cooking.

So the next time you’re itching for a tasty snack or a side, fire up the skillet and recreate those addictive fries that have charmed so many. Trust me, you won’t regret it!

You’ll also like these latest recipes!

Jollibee Lumpiang Shanghai Recipe – Yum Yarns

Best Jollibee Lumpiang Shanghai Recipe

You might be wondering what pairs well with Jollibee Lumpiang Shanghai. Picture this: a bustling family gathering, laughter ringing through the air. As the grill sizzles nearby, you’ll want something crispy and delightful to complement the festivities. 

Lumpiang Shanghai is the perfect match. You can serve it alongside steaming bowls of sweet and sour sauce for dipping or present it with a fresh salad to balance the flavors. Each bite beckons more—a true crowd-pleaser.

Best Jollibee Lumpiang Shanghai Recipe

Growing up in a Filipino household, gatherings often revolved around food. My fondest memories were made around the dining table, feasting on a palette of vibrant flavors. Among my favorites is a dish that resonates with many Filipinos—Jollibee Lumpiang Shanghai. 

This isn’t just a dish; it’s a staple of Filipino celebrations. Whether it’s a birthday, Christmas, or just a casual Sunday get-together, Lumpiang Shanghai takes center stage.

I remember the first time I tried Jollibee Lumpiang Shanghai. The crunch, the savory filling, coupled with a hint of garlic and soy sauce—it was an explosion of flavor. I fell in love right then and there. With its golden, crispy exterior and delicious filling, it’s no wonder it has earned such a loyal following.

So, what’s the fuss about? What makes this simple spring roll so special? Let’s dive into the details and find out!

You will also like the following Delicious recipes!

What is Jollibee Lumpiang Shanghai?

Lumpiang Shanghai is the Filipino version of spring rolls, often filled with a mixture of ground pork, vegetables, and seasonings, all wrapped in thin spring roll wrappers. 

The dish is often served as an appetizer, and its appeal lies not just in the taste but also in its versatility. While Jollibee has mastered this dish, teaching us just how spectacular it can be when done right, you can replicate this beloved recipe at home.

Why Does This Recipe Work?

The beauty of Lumpiang Shanghai lies in its simplicity yet complex flavors. The combination of ground pork with garlic, onion, and carrots creates a filling that is both savory and slightly sweet. The use of spring roll wrappers ensures that each piece is perfectly crispy when fried. 

This recipe works because it balances textures and flavors seamlessly, making it satisfying in every bite. Whether as a snack, a party platter or a simple meal side, it captures the essence of Filipino cuisine.

What You’ll Need to Make This Dish

Before we get to the cooking part, let’s gather our ingredients. Here’s what you’ll need:

  • 1 large egg: This will help seal the wrappers.
  • 10 spring roll wrappers: Get the thinner ones for the ultimate crispness.
  • Neutral cooking oil: For frying; think canola or vegetable oil.

For the filling:

  • 1 lb ground pork: The main protein source.
  • 3 tablespoons minced garlic: This adds rich flavor.
  • 4 tablespoons finely diced carrot: For a touch of sweetness and color.
  • 2 tablespoons finely chopped yellow onion: Essential for flavor.
  • 2 tablespoons light soy sauce: For umami richness.
  • ¼ teaspoon freshly ground black pepper: A little kick.
  • 1 teaspoon sea salt: Enhances flavor.
  • 1 teaspoon sesame oil (optional): Adds a lovely roasted flavor.
Jollibee Lumpiang Shanghai Recipe

How to Make Jollibee Lumpiang Shanghai?

Making Lumpiang Shanghai is straightforward. You’ll blend flavorful ingredients into a filling, wrap them up in delicate spring roll wrappers, and fry them to crispy perfection. Ready? Let’s go step by step.

Step 1: Prepare the Filling

Start by mixing the ground pork, minced garlic, diced carrots, chopped onions, soy sauce, black pepper, sea salt, and sesame oil in a bowl. Combine them well with a spatula or your hands; the goal is a cohesive mixture.

Step 2: Wrap the Lumpiang Shanghai

Take a spring roll wrapper and lay it out in a diamond shape. Add about a tablespoon of the filling near the bottom edge. Roll the wrapper tightly, tucking in the sides as you go. Use the beaten egg to seal the edge of the wrapper, ensuring it doesn’t open during frying.

Step 3: Heat the Oil

In a large frying pan, heat your neutral cooking oil over medium-high heat. You’ll know it’s ready when it starts to shimmer or when you drop a small piece of filling into the oil and it sizzles.

Step 4: Fry the Rolls

Carefully place a few wrapped rolls into the hot oil, avoiding overcrowding. Fry them until they turn golden brown on all sides, usually about 3-4 minutes. Use a slotted spoon to remove them and let them drain on paper towels.

Step 5: Enjoy and Serve

Once drained, they’re ready to enjoy! Serve these crispy delights with dipping sauces like sweet chili or vinegar-based sauces.

Tips for Perfection

  • Ensure Proper Oil Temperature: If your oil isn’t hot enough, the rolls will absorb too much oil and become soggy.
  • Don’t Overfill: A tablespoon is usually enough. Overfilling can cause the rolls to burst while frying.
  • Seal Well: Use egg to seal the edges tightly, preventing any openings during cooking.
  • Fry in batches: This allows the oil to remain hot, ensuring a crispy texture.
  • Serve Immediately: These rolls are best enjoyed hot and fresh from the pan.
Easy Jollibee Lumpiang Shanghai Recipe

How to Store Leftovers?

If you find yourself with leftovers (though this might be rare!), let them cool completely, then place in an airtight container. Store in the refrigerator for up to three days. Reheat in the oven to retain crispness.

How Would I Recommend Serving Jollibee Lumpiang Shanghai?

Serving this dish can be as creative as your heart desires. Here are four delightful suggestions:

  • With Sweet Chili Sauce: This tangy and sweet sauce pairs beautifully with the savory flavors of Lumpiang Shanghai. It adds a different dimension that elevates the dish.
  • Alongside a Fresh Green Salad: A refreshing garden salad brings balance to the crunchiness. Pair it with a simple vinaigrette, allowing the Lumpiang Shanghai to shine alongside lighter fare.
  • As a Mini Tapas Platter: Combine with other Filipino snacks like Pancit or grilled skewers. This creates a vibrant spread for parties and gatherings.
  • In a Fun Barbecue Setup: Imagine offering a platter of Lumpiang Shanghai at a barbecue. Guests can enjoy these crispy rolls with different dips, making it a fun experience.

What Alternatives Can You Use for the Ingredients if Not Available?

If any ingredients prove elusive, fear not! Here are some alternatives:

  • Ground Chicken or Turkey: If pork isn’t available, you can easily swap it for ground chicken or turkey for a leaner version.
  • Spring Roll Wrappers: If you can’t find traditional wrappers, rice paper can be a suitable substitute. Just soak it briefly in water before rolling.
  • Vegetable Oil: Don’t have neutral oil? Olive oil works too, though it can add a distinct flavor.
  • Soy Sauce: In a pinch for soy sauce? Tamari can be used to make the dish suitable for gluten-sensitive individuals.
Jollibee Lumpiang Shanghai Recipe

Jollibee Lumpiang Shanghai Recipe

Tina Cooper
Growing up in a Filipino household, gatherings often revolved around food. My fondest memories were made around the dining table, feasting on a palette of vibrant flavors.
Prep Time 25 minutes
Cook Time 20 minutes
Total Time 45 minutes
Course Appetizer
Cuisine Filipino
Servings 30 Servings
Calories 220 kcal

Equipment

  • large frying pan

Ingredients
  

  • 1 large egg
  • 10 spring roll wrappers
  • Neutral cooking oil for frying

Filling:

  • 1 lb ground pork
  • 3 tablespoons minced garlic
  • 4 tablespoons finely diced carrot
  • 2 tablespoons finely chopped yellow onion
  • 2 tablespoons light soy sauce
  • ¼ teaspoon freshly ground black pepper
  • 1 teaspoon sea salt
  • 1 teaspoon sesame oil optional, for extra flavor

Instructions
 

  • Making Lumpiang Shanghai is straightforward. You’ll blend flavorful ingredients into a filling, wrap them up in delicate spring roll wrappers, and fry them to crispy perfection. Ready? Let’s go step by step.

Step 1: Prepare the Filling

  • Start by mixing the ground pork, minced garlic, diced carrots, chopped onions, soy sauce, black pepper, sea salt, and sesame oil in a bowl. Combine them well with a spatula or your hands; the goal is a cohesive mixture.

Step 2: Wrap the Lumpiang Shanghai

  • Take a spring roll wrapper and lay it out in a diamond shape. Add about a tablespoon of the filling near the bottom edge. Roll the wrapper tightly, tucking in the sides as you go. Use the beaten egg to seal the edge of the wrapper, ensuring it doesn’t open during frying.

Step 3: Heat the Oil

  • In a large frying pan, heat your neutral cooking oil over medium-high heat. You’ll know it’s ready when it starts to shimmer or when you drop a small piece of filling into the oil and it sizzles.

Step 4: Fry the Rolls

  • Carefully place a few wrapped rolls into the hot oil, avoiding overcrowding. Fry them until they turn golden brown on all sides, usually about 3-4 minutes. Use a slotted spoon to remove them and let them drain on paper towels.

Step 5: Enjoy and Serve

  • Once drained, they’re ready to enjoy! Serve these crispy delights with dipping sauces like sweet chili or vinegar-based sauces.

Notes

  • Ensure Proper Oil Temperature: If your oil isn’t hot enough, the rolls will absorb too much oil and become soggy.
  • Don’t Overfill: A tablespoon is usually enough. Overfilling can cause the rolls to burst while frying.
  • Seal Well: Use egg to seal the edges tightly, preventing any openings during cooking.
  • Fry in Batches: This allows the oil to remain hot, ensuring a crispy texture.
  • Serve Immediately: These rolls are best enjoyed hot and fresh from the pan.

Nutrition

Calories: 220kcalCarbohydrates: 16gProtein: 14gFat: 12gSodium: 400mg
Keyword Jollibee Lumpiang Shanghai Recipe
Tried this recipe?Let us know how it was!

Frequently Asked Questions

1. Can I bake Lumpiang Shanghai instead of frying?

Yes! Baking is a healthier alternative. Brush the rolls with oil and bake at 375°F for about 20-25 minutes, flipping halfway through to ensure even browning.

2. How do I make Lumpiang Shanghai vegetarian?

To make a vegetarian version, substitute the ground pork with an equal amount of finely chopped mushrooms and add additional veggies, such as bell peppers or zucchini.

3. Can I freeze Lumpiang Shanghai?

Definitely! After wrapping but before frying, you can freeze them. Just layer with parchment paper in an airtight container. When ready, fry them straight from the freezer—there’s no need to thaw!

4. What dipping sauces can I make at home?

Common sauces include a simple mix of soy sauce with vinegar for a traditional taste, or a sweet chili sauce that can be made with crushed red pepper, sugar, and vinegar.

5. How long can I keep Lumpiang Shanghai leftovers?

In an airtight container in the fridge, they can last up to three days. For the best quality, consume within one to two days.

6. What is the best way to reheat leftover Lumpiang Shanghai?

For optimum crispness, reheat them in the oven at 350°F for about 10-15 minutes instead of the microwave.

Conclusion

Jollibee Lumpiang Shanghai is more than just a dish; it’s a piece of home. Every bite is woven with memories and traditions. Whether you’re hosting a gathering, enjoying a quiet night in, or simply wanting to treat yourself, this dish fits perfectly into any scenario. 

Using quality ingredients, a little know-how, and a splash of love, you can create your very own version of this iconic delicacy.

With its delightful crunch and savory filling, I guarantee you’ll find yourself reaching for another piece, unwilling to admit how many you’ve eaten. Now, gather your ingredients, bring your loved ones together, and celebrate with Lumpiang Shanghai—just like I did in my childhood. Happy cooking!

You’ll also like these latest recipes!

Pollo Tropical Corn Fritters Recipe – Yum Yarns

Best Pollo Tropical Corn Fritters Recipe

If you’re planning on enjoying Pollo Tropical Corn Fritters, you might wonder what to serve alongside these delights. Here are a few recommendations that complement their flavor beautifully:

The smoothness of avocado dip cuts through the fritters’ crunch. You can simply mash ripe avocados with lime juice, garlic, and cilantro. This adds a refreshing element that contrasts nicely with the fritters.

A tangy, crunchy slaw made with cabbage, carrots, and a zesty dressing offers a delightful textural balance. Adding a splash of vinegar brightens the entire meal.

Bursting with flavors, a black bean salad with corn, tomatoes, and lime juice pairs well. The hearty beans complement the fritters, making the meal filling and satisfying.

Best Pollo Tropical Corn Fritters Recipe

Picture yourself at a sun-drenched picnic on a lazy Saturday afternoon. The smell of something frying fills the air, mingling with laughter and chatter. Suddenly, you spot the golden-brown Pollo Tropical Corn Fritters

These little bites not only look inviting but promise to delight your taste buds. As I took that first bite, it was an explosion of sweet corn flavor, with a crunchy exterior that gave way to a soft inside.

Small wonder these fritters are a hit at gatherings! As I delve into this recipe, you’ll discover just how simple and satisfying they can be, along with tips to elevate the dish to new heights. So grab your apron and let’s jump into the deliciousness that is Pollo Tropical Corn Fritters!

You will also like the following Sauce recipes!

What Are Pollo Tropical Corn Fritters?

Pollo Tropical Corn Fritters are savory snacks made primarily of corn blended with a few simple ingredients. They can be enjoyed as an appetizer, side dish, or even a main course when paired strategically. The beauty of these fritters lies in their versatility and ease of preparation.

Why This Recipe Works

1. Simple Ingredients: This recipe requires just a handful of common pantry items. You won’t need to scour specialty grocery stores to find what you need. The straightforward list keeps it accessible for anyone.

2. Quick Cooking Time: They fry up in minutes. You can whip them up for a sudden craving or unexpected guests without much fuss. Who doesn’t love a meal that is quick to make and packed with flavor?

3. Mouthwatering Flavor: The combination of corn, spices, and a hint of sweetness offers a delightful bite every time. When done right, they boast a crispy outside that gives way to a warm, corn-filled center that leaves you wanting more.

4. Versatile Serving Options: You can enjoy fritters alone or with a variety of dips and sides. They fit seamlessly into a picnic, barbecue, or family dinner, adapting to countless occasions.

Ingredients You’ll Need to Make This Dish

To recreate these fritters, gather the following ingredients:

  • 1 cup sifted all-purpose flour
  • 1 teaspoon baking powder
  • 1/4 teaspoon granulated sugar
  • 1/2 teaspoon sea salt
  • 1/2 teaspoon ground black pepper
  • 1/4 teaspoon smoked paprika
  • 1 large egg, beaten
  • 1/2 cup whole milk
  • 1 tablespoon melted butter (substituting for shortening)
  • 1 (12-ounce) can whole kernel corn, drained
  • 3 cups vegetable oil (for frying)
Pollo Tropical Corn Fritters Recipe

How to Make Pollo Tropical Corn Fritters

Step 1: Gather Your Ingredients

Before you start, make sure you have all your ingredients ready. It can feel like a kitchen tunnel vision moment when you realize you forgot a key item halfway through!

Step 2: Mix Dry Ingredients

In a mixing bowl, combine the sifted flour, baking powder, sugar, salt, black pepper, and smoked paprika. Stir well until everything is evenly distributed. The spices will provide flavor and a touch of warmth.

Step 3: Whisk Wet Ingredients

In another bowl, beat the egg. Add the whole milk and melted butter, whisking until blended. This mixture brings moisture, binding the fritters together.

Step 4: Combine Mixtures

Slowly pour the wet mixture into the dry ingredients. Stir carefully until just combined – avoid over-mixing to keep them light and fluffy.

Step 5: Fold in the Corn

Gently fold the drained corn into the batter. Each kernel is a flavor nugget that brings joy. Mix in just enough to distribute the corn throughout without breaking the kernels.

Step 6: Heat the Oil

In a large frying pan, pour in the vegetable oil. Heat it over medium-high heat. You can test if your oil is hot enough by dropping a tiny amount of batter into it. If it bubbles, you’re go.

Step 7: Fry the Fritters

Spoon the batter into the hot oil, being careful not to overcrowd the pan. Fry until golden brown on one side, about 3-4 minutes, then flip and cook the other side. Crispiness is key!

Step 8: Drain the Fritters

Once golden brown, remove them from the oil and rest them on paper towels to absorb excess oil. This adds that last crunch you’re looking for.

Step 9: Serve and Enjoy

These fritters are best served warm alongside your favorite dipping sauce. A cool, creamy dip will balance their warmth and enrich your experience!

Tips & Tricks

  • Do Not Skimp on Oil: Ensure there’s enough oil in the pan so that your fritters can float. This helps them fry evenly.
  • Consistent Size Matters: For even cooking, use a measuring spoon to scoop out uniform amounts of batter.
  • Patience is Key: Allow the oil to reach the correct temperature. If it’s too cool, the fritters will soak up oil and become greasy.
  • Experimenting with Add-ins: Feel free to add herbs like cilantro or green onions into the batter for a unique twist.
  • Serve with a Variety of Sauces: Ketchup, ranch, or a spicy dipping sauce can elevate the experience even further.
Easy Pollo Tropical Corn Fritters Recipe

How Do You Store the Leftovers?

Should you find yourself with leftovers (though I doubt it!), allow the fritters to cool completely. Store them in an airtight container in the fridge for up to three days. 

To revive their crispiness, reheat them in the oven rather than the microwave.

What Sides Would Complement Pollo Tropical Corn Fritters?

When it comes to creating a lovely meal, sides make all the difference. Here are a few suggestions:

  • Chili Lime Salad: Toss together diced cucumbers, cherry tomatoes, and a squeeze of lime for a refreshing counterpoint. A bit of chili powder adds a touch of surprise.
  • Garlic Green Beans: Lightly sautéed green beans with minced garlic provide a crunchy and vibrant display next to the fritters.
  • Sweet Potato Fries: The sweetness from the fries pairs nicely with the savory fritters, offering a satisfying crunch.

What Alternatives Can You Use for the Ingredients If They Are Not Present in Your Kitchen?

Cooking should be flexible. Here’s what to use if you’re missing something:

  • Flour Swap: If you lack all-purpose flour, oat flour or chickpea flour can work as gluten-free alternatives.
  • Dairy-Free Options: Substitute whole milk with almond or soy milk for a dairy-free option.
  • Butter Replacement: If you’re out of butter, use olive oil or coconut oil instead. They’ll add their own unique flavors.
  • Egg Substitute: If you need a vegan version, use a flaxseed egg (1 tablespoon ground flaxseed mixed with 3 tablespoons water).
Easy Pollo Tropical Corn Fritters Recipe

Pollo Tropical Corn Fritters Recipe

Tina Cooper
If you’re planning on enjoying Pollo Tropical Corn Fritters, you might wonder what to serve alongside these delights. Here are a few recommendations that complement their flavor beautifully:
Prep Time 10 minutes
Cook Time 20 minutes
Total Time 30 minutes
Course Side Dish
Cuisine American, Caribbean
Servings 4 Servings
Calories 120 kcal

Equipment

  • large frying pan

Ingredients
  

  • 1 cup sifted all-purpose flour
  • 1 teaspoon baking powder
  • 1/4 teaspoon granulated sugar
  • 1/2 teaspoon sea salt
  • 1/2 teaspoon ground black pepper
  • 1/4 teaspoon smoked paprika
  • 1 large egg beaten
  • 1/2 cup whole milk
  • 1 tablespoon melted butter substituting for shortening
  • 1 12-ounce can whole kernel corn, drained
  • 3 cups vegetable oil for frying

Instructions
 

Step 1: Gather Your Ingredients

  • Before you start, make sure you have all your ingredients ready. It can feel like a kitchen tunnel vision moment when you realize you forgot a key item halfway through!

Step 2: Mix Dry Ingredients

  • In a mixing bowl, combine the sifted flour, baking powder, sugar, salt, black pepper, and smoked paprika. Stir well until everything is evenly distributed. The spices will provide flavor and a touch of warmth.

Step 3: Whisk Wet Ingredients

  • In another bowl, beat the egg. Add the whole milk and melted butter, whisking until blended. This mixture brings moisture, binding the fritters together.

Step 4: Combine Mixtures

  • Slowly pour the wet mixture into the dry ingredients. Stir carefully until just combined – avoid over-mixing to keep them light and fluffy.

Step 5: Fold in the Corn

  • Gently fold the drained corn into the batter. Each kernel is a flavor nugget that brings joy. Mix in just enough to distribute the corn throughout without breaking the kernels.

Step 6: Heat the Oil

  • In a large frying pan, pour in the vegetable oil. Heat it over medium-high heat. You can test if your oil is hot enough by dropping a tiny amount of batter into it. If it bubbles, you’re go.

Step 7: Fry the Fritters

  • Spoon the batter into the hot oil, being careful not to overcrowd the pan. Fry until golden brown on one side, about 3-4 minutes, then flip and cook the other side. Crispiness is key!

Step 8: Drain the Fritters

  • Once golden brown, remove them from the oil and rest them on paper towels to absorb excess oil. This adds that last crunch you’re looking for.

Step 9: Serve and Enjoy

  • These fritters are best served warm alongside your favorite dipping sauce. A cool, creamy dip will balance their warmth and enrich your experience!

Notes

  • Do Not Skimp on Oil: Ensure there’s enough oil in the pan so that your fritters can float. This helps them fry evenly.
  • Consistent Size Matters: For even cooking, use a measuring spoon to scoop out uniform amounts of batter.
  • Patience is Key: Allow the oil to reach the correct temperature. If it’s too cool, the fritters will soak up oil and become greasy.
  • Experimenting with Add-ins: Feel free to add herbs like cilantro or green onions into the batter for a unique twist.
  • Serve with a Variety of Sauces: Ketchup, ranch, or a spicy dipping sauce can elevate the experience even further.

Nutrition

Calories: 120kcalCarbohydrates: 12gProtein: 2gFat: 8gFiber: 1g
Keyword Pollo Tropical Corn Fritters Recipe
Tried this recipe?Let us know how it was!

Frequently Asked Questions

1. Can I freeze leftovers?

Yes! Fritters freeze quite well. After cooking, let them cool, then arrange them in a single layer on a baking sheet. Once frozen, store them in a freezer bag for up to three months. When you’re ready to eat, bake them straight from the freezer.

2. Can I make these without frying?

Absolutely, you can pan-fry them in a little oil, or bake them in the oven for a lighter version. Keep an eye on them as baking times will vary.

3. What other add-ins can I use for extra flavor?

Consider adding diced jalapeños for kick, cheddar cheese for richness, or herbs like basil and parsley for freshness.

4. What’s the best way to keep the fritters crispy?

Store them on a cooling rack instead of on paper towels after frying. This lets air circulate and keeps them crispy longer before serving.

5. Can I use canned corn?

Definitely! Canned corn is the quickest and easiest. Just make sure to drain it well to avoid excess moisture in your batter.

6. How do I ensure my fritters aren’t greasy?

Make sure your oil is hot enough before frying. A quick test is to drop a small amount of the batter in. If it sizzles immediately, you’re good to go!

Conclusion

Pollo Tropical Corn Fritters are not just a dish; they’re an experience. I can still hear the laughter of friends surrounding me, the crunch of each fritter as people dug in. This recipe is user-friendly, fun, approachable, and adaptable. It has become a staple at my gatherings, and with good reason. You get all the satisfaction of a fried treat without the need for culinary expertise.

Next time you’re in the mood for something exciting and delicious, give these fritters a whirl. I promise they’ll be a crowd-pleaser, crafted with care and occasionally accompanied by lively debate about the best dipping sauces. Enjoy!

You’ll also like these latest recipes!

Pollo Tropical Plantains Recipe – Yum Yarns

Best Pollo Tropical Plantains Recipe

If you’re like me, unearthing palate-pleasing dishes often comes down to knowing what pairs well with each flavor. Pollo Tropical Plantains shine when served alongside some luscious grilled chicken. This combo offers a delightful balance of savory and sweet. 

You might even throw in a tangy avocado salad or some black beans on the side to add extra layers of flavor. And let’s not overlook a refreshing beverage, such as a coconut mojito or a pineapple-infused drink, which serves to uplift the overall experience.

Now that we’ve whetted the appetite, let’s dive deeper into this tropical delight.

Best Pollo Tropical Plantains Recipe

Do you ever look at a dish and think, “That looks darn good,” before digging in? That was me the first time I encountered Pollo Tropical Plantains. Growing up in a family that embraced diverse cuisines opened my eyes to incredible flavors. 

Years later, my adventures in the kitchen led me back to these luscious plantains that perfectly encapsulate the tropics. While they might seem simple, they bring a wave of comfort and nostalgia with every bite.

In this article, we’ll explore what Pollo Tropical Plantains are, their flavor profile, unique qualities, and how to cook them at home. I promise you, this is not just another recipe; it’s a storytelling experience that brings flavor to life!

You will also like the following Delicious recipes!

What is Pollo Tropical Plantains?

Pollo Tropical Plantains are a popular dish that features perfectly fried plantains, a staple in Caribbean cuisine. Plantains, often mistaken for bananas, are starchy and less sweet. When cooked, they caramelize beautifully, providing a sweet and savory contrast. 

You may find them present in many flaming summer barbecues or family gatherings, where their versatility shines.

These plantains often accompany mouth-watering grilled chicken, seasoned to perfection. The result is a delicious blend of textures and flavors that leaves you wanting more.

What is the Flavor Profile of This Dish?

The flavor profile of Pollo Tropical Plantains can be summed up in several layers:

1. Sweetness: Fried plantains have a natural sweetness that caramelizes during cooking. It adds a delightful richness to the dish.

2. Savory Goodness: If paired with grilled chicken, the marinated seasoning combines with the plantains, enhancing the dish’s umami flavor.

3. Texture: The outside of the plantain is crispy while the inside is soft and tender, making each bite inviting.

4. Complements: When served with a zesty sauce or tangy dip, the contrast with the plantains’ sweetness creates a rewarding flavor marriage.

What Makes This Recipe Different From Other Pollo Tropical Plantains?

What sets my version of Pollo Tropical Plantains apart from others is the fusion of traditional techniques with fresh ideas. Using ripe plantains ensures maximum sweetness, and the addition of brown sugar and cinnamon in the frying process amplifies the caramelization. 

Furthermore, I’ve found that allowing the plantains to rest slightly before frying enhances their texture.

But, it’s the love and care put into each step of this recipe that makes all the difference. Every time I make these plantains, the memories of past family gatherings blend into the flavors, reminding me that food connects us all.

Ingredients You’ll Need

Here’s a simple ingredient list to get you started on making Pollo Tropical Plantains at home:

  • 2 ripe plantains: Look for ones that are yellow with a few spots of black for optimal sweetness.
  • 1 tablespoon brown sugar: This adds an enticing caramel flavor.
  • 1/2 teaspoon ground cinnamon: The warm hint of cinnamon further elevates the dish.
  • Vegetable oil: Essential for frying. You need enough to deep fry the plantains.
  • A pinch of sea salt: Just a sprinkle enhances all the flavors.
Pollo Tropical Plantains Recipe

Step by Step Directions

Let’s jump right into how to create this delicious dish. Follow these steps closely, and you’ll have a plate of Pollo Tropical Plantains that your family will rave about.

Step 1: Prepare the Plantains

Start off by peeling the plantains. A sharp knife is your best friend here. Slice off both ends and carefully take off the skin. It may take a bit of finesse, but don’t worry if they break; they’ll still taste amazing!

Step 2: Slice the Plantains

Once peeled, slice the plantains into thick diagonal pieces. I recommend aiming for about ½-inch thickness. This allows the insides to cook nicely while maintaining that crunchy exterior.

Step 3: Mix the Brown Sugar and Cinnamon

In a small bowl, combine the brown sugar and cinnamon. This blend will elevate the sweetness of your plantains.

Step 4: Heat the Oil

In a large skillet, pour vegetable oil and heat it over medium-high heat. You’re looking for shimmering oil but not smoke—just the right amount to fry without burning.

Step 5: Fry the Plantains

Once the oil is hot, carefully place the sliced plantains in the oil. Make sure not to overcrowd the pan, as that can lower the oil temperature and lead to soggy plantains. Fry for about 2-3 minutes on each side until golden brown.

Step 6: Sprinkle with Sugar and Cinnamon

As soon as the plantains come out of the oil, sprinkle them with the brown sugar-cinnamon mixture. Let the sweetness stick to those crispy edges.

Step 7: Repeat

Continue frying until all slices are golden brown. Drain them on a paper towel to absorb the excess oil.

Step 8: Serve and Enjoy

Placement is key here. Arrange the plantains on a plate and serve them hot. Pair them with grilled chicken or beans, and get ready for compliments!

Tips On Making Pollo Tropical Plantains

To ensure you nail this recipe, here are several handy tips:

– Choose the Right Plantains: Go for ripe yellow plantains with some black spots for that perfect sweetness.

– Control the Oil Temperature: Use a thermometer if you can. If the oil is too hot, plantains burn quickly. If too cool, they soak up excess oil.

– Don’t Rush the Frying: Patience pays off! Allow each piece to get golden brown before flipping.

– Adjust Sweetness to Taste: Taste the brown sugar and cinnamon mix; you can always customize it to your satisfaction.

– Experiment with Spices: Add a pinch of cayenne for heat or nutmeg for an unexpected twist.

Easy Pollo Tropical Plantains Recipe

How Can I Store This Pollo Tropical Plantains?

If you find yourself with leftover plantains (that almost never happens in my kitchen!), here’s the best way to store them:

  • Refrigeration: Place leftovers in an airtight container and store them in the fridge for up to 3 days.
  • Reheating: To bring back the crispy goodness, reheat in an oven for about 5-10 minutes at 350°F, or use an air fryer.
  • Freezing: If you’d like to freeze them, lay them out on a baking sheet till solid, then transfer to a freezer bag. They’ll keep for up to a month. Just know that the texture may change when thawed.

Substitute Options for Ingredients

What happens if you discover you don’t have plantains or other ingredients? Don’t fret! Here are some substitutes you can try:

– If you can’t find plantains, try ripe bananas instead. They won’t have the same texture, but they will give you a similar sweet flavor.

– Brown sugar can be replaced with honey or maple syrup. Use sparingly to avoid overpowering sweetness.

– Vegetable oil is versatile; feel free to use coconut oil for an added tropical flair.

Lastly, if you find yourself out of cinnamon, consider using allspice. It brings a warm flavor twist that’s quite pleasant.

Easy Pollo Tropical Plantains Recipe

Pollo Tropical Plantains Recipe

Tina Cooper
Do you ever look at a dish and think, “That looks darn good,” before digging in? That was me the first time I encountered Pollo Tropical Plantains.
Prep Time 10 minutes
Cook Time 10 minutes
Total Time 20 minutes
Course Snacks
Cuisine American, Caribbean
Servings 2 Servings
Calories 150 kcal

Equipment

  • large skillet

Ingredients
  

  • 1 tablespoon brown sugar new addition for a touch of caramel sweetness
  • 1/2 teaspoon ground cinnamon new addition for a warm, aromatic hint
  • 2 ripe plantains
  • Vegetable oil for frying
  • A pinch of sea salt

Instructions
 

  • Let’s jump right into how to create this delicious dish. Follow these steps closely, and you’ll have a plate of Pollo Tropical Plantains that your family will rave about.

Step 1: Prepare the Plantains

  • Start off by peeling the plantains. A sharp knife is your best friend here. Slice off both ends and carefully take off the skin. It may take a bit of finesse, but don’t worry if they break; they’ll still taste amazing!

Step 2: Slice the Plantains

  • Once peeled, slice the plantains into thick diagonal pieces. I recommend aiming for about ½-inch thickness. This allows the insides to cook nicely while maintaining that crunchy exterior.

Step 3: Mix the Brown Sugar and Cinnamon

  • In a small bowl, combine the brown sugar and cinnamon. This blend will elevate the sweetness of your plantains.

Step 4: Heat the Oil

  • In a large skillet, pour vegetable oil and heat it over medium-high heat. You’re looking for shimmering oil but not smoke—just the right amount to fry without burning.

Step 5: Fry the Plantains

  • Once the oil is hot, carefully place the sliced plantains in the oil. Make sure not to overcrowd the pan, as that can lower the oil temperature and lead to soggy plantains. Fry for about 2-3 minutes on each side until golden brown.

Step 6: Sprinkle with Sugar and Cinnamon

  • As soon as the plantains come out of the oil, sprinkle them with the brown sugar-cinnamon mixture. Let the sweetness stick to those crispy edges.

Step 7: Repeat

  • Continue frying until all slices are golden brown. Drain them on a paper towel to absorb the excess oil.

Step 8: Serve and Enjoy

  • Placement is key here. Arrange the plantains on a plate and serve them hot. Pair them with grilled chicken or beans, and get ready for compliments!

Notes

To ensure you nail this recipe, here are several handy tips:
– Choose the Right Plantains: Go for ripe yellow plantains with some black spots for that perfect sweetness.
– Control the Oil Temperature: Use a thermometer if you can. If the oil is too hot, plantains burn quickly. If too cool, they soak up excess oil.
– Don’t Rush the Frying: Patience pays off! Allow each piece to get golden brown before flipping.
– Adjust Sweetness to Taste: Taste the brown sugar and cinnamon mix; you can always customize it to your satisfaction.
– Experiment with Spices: Add a pinch of cayenne for heat or nutmeg for an unexpected twist.

Nutrition

Calories: 150kcalCarbohydrates: 22gProtein: 2gFat: 7gFiber: 2gSugar: 6g
Keyword Pollo Tropical Plantains Recipe
Tried this recipe?Let us know how it was!

Frequently Asked Questions

1. What type of plantains are best for frying?

Ripe plantains are ideal. Look for ones that are yellow with a few black spots. Overripe plantains can also work if you enjoy a sweeter flair. Green plantains, while tasty when cooked differently, will not provide the same level of sweetness.

2. Can I bake plantains instead of frying them?

Absolutely! You can slice them and brush with oil, then bake at 400°F for about 20-25 minutes, flipping halfway through. They’ll be softer but still delicious.

3. How can I tell when plantains are ripe?

Ripe plantains are firm yet have a slight give when squeezed. They should also be yellow with dark spots. If you see mostly black, they’re overripe but still perfect for certain recipes.

4. Is there a vegan alternative for the chicken?

Certainly! You can swap grilled chicken for tofu or cooked chickpeas. Marinate them with similar spices for a delightful vegan option that pairs wonderfully with the plantains.

5. Can I prepare plantains in advance?

You can partially prepare them! Slice them up and store covered in the fridge. However, it’s best to fry them fresh to ensure they keep their texture and flavor.

Conclusion

Making Pollo Tropical Plantains is not just about preparing food; it’s a celebration of flavors, memories, and culture. Once you master this dish, it becomes a treasured part of your culinary repertoire. The combination of sweet plantains with savory sides offers an invitation to experience something truly delightful.

So, gather your ingredients, roll up your sleeves, and embrace the magic of cooking. Share this dish with family and friends, and let the joyful conversations flow, just like the flavors in your new favorite dish! Enjoy your journey into the heart of tropical culinary bliss!

You’ll also like these latest recipes!

Pollo Tropical Grilled Wings Recipe – Yum Yarns

Best Pollo Tropical Grilled Wings Recipe

When you’re in the mood for something deliciously different, Pollo Tropical grilled wings might just be the ticket. These wings are more than just a meal; they are an experience waiting to happen. Before we dive into the nitty-gritty, let’s chat about the perfect pairings.

Grilled wings are a versatile dish. Here are a few ideas on what can accompany them: Zesty Coleslaw, Fried Plantains, Corn on the Cob and Coconut Rice.

Best Pollo Tropical Grilled Wings Recipe

As a registered dietitian and food enthusiast, I’ve spent years exploring flavors and combining ingredients to set your taste buds on fire. These grilled wings are a must-try. 

The citrusy marinade, along with the spices, brings out the chicken’s natural flavor in a way you wouldn’t believe.

Trust me; your family will be begging for seconds. Let’s explore these flavorful wings together, shall we?

You will also like the following Appetizer recipes!

What are Pollo Tropical Grilled Wings?

Pollo Tropical grilled wings are marinated chicken wings that capture the essence of Caribbean cuisine. 

They typically involve a citrus mojo marinade, honey, and a homemade Sazon seasoning blend, giving them a vibrant flavor profile. When grilled to a nice crispiness, these wings become an irresistible dish, perfect for any occasion.

What Do They Taste Like?

The first bite is a party for your taste buds. The tangy citrus from the marinade intertwines with the sweetness of honey, all complemented by the warm flavors of spices. 

Imagine the perfect blend of sweet, tangy, and slightly smoky flavors dancing in your mouth. There’s nothing else quite like it.

Why This Recipe Works

1. Flavor Explosion: The citrus mojo marinade infuses the wings with a bright, zesty flavor. Each wing is marinated long enough to soak in the goodness.
2. Juicy and Tender: Grilling helps seal in the chicken juices. The result? Wings that are both succulent and crispy, a perfect combination many crave.
3. Easy to Prepare: This recipe doesn’t involve complicated techniques. You’ll be amazed at how simple it is to create a restaurant-quality dish at home.
4. Versatile Elements: With its flexibility, you can switch up the marinade or spices to suit personal tastes. Want it spicy? Add more heat! Prefer it milder? Adjust accordingly!

Ingredients for Pollo Tropical Grilled Wings

  • 1 cup citrus mojo marinade
  • 1 tablespoon honey
  • 3 tablespoons homemade Sazon seasoning blend
  • 2 1/2 pounds chicken wings, tips trimmed, separated into drumettes and flats (about 20-25 wings)
  • 1 teaspoon smoked paprika
  • Fresh lime wedges for serving
Pollo Tropical Grilled Wings Recipe

Step-by-Step Instructions

Step 1: Marinate the Wings

Start by placing the chicken wings in a large bowl. Pour the citrus mojo marinade over the wings. Add the honey and Sazon seasoning. Toss everything together until the wings are evenly coated. Cover it and let it marinate in the fridge for at least 2 hours, or overnight for the best flavor.

Step 2: Prepare the Grill

Preheat your grill to medium-high heat. Ensure the grates are clean and lightly oiled to prevent sticking.

Step 3: Grill the Wings

Once the grill is ready, place the marinated wings on it. Grill for about 8-10 minutes on one side. Turn the wings and grill for another 8-10 minutes. Check for a nice char and internal temperature of 165°F to ensure they’re done.

Step 4: Add the Finishing Touches

Once cooked, remove the wings from the grill. Sprinkle with smoked paprika for a burst of flavor. Serve with fresh lime wedges on the side.

Notes

  • Use Fresh Ingredients: Fresh citrus and spices make all the difference in taste.
  • Don’t Rush the Marinade: Longer marination results in more flavorful wings.
  • Use a Meat Thermometer: This ensures you gnaw on properly cooked meat.
  • Grill in Batches: Overcrowding can lead to uneven cooking. Give each wing space.
  • Experiment with Marinades: Don’t hesitate to play with flavors! Add chili for some heat or garlic for depth.
Easy Pollo Tropical Grilled Wings Recipe

How to Store Leftovers?

Storing leftovers is quite simple. Place the grilled wings in an airtight container. They will keep in the fridge for 3-4 days. For longer preservation, consider freezing them. Just ensure they are well-wrapped to prevent freezer burn.

Sides for Pollo Tropical Grilled Wings

  • Creamy Potato Salad: An all-time favorite! The creaminess balances the spiciness of the wings.
  • Black Beans and Rice: This traditional side complements the Caribbean theme. It’s filling and packed with flavor.
  • Grilled Vegetables: Seasonal vegetables bring color and nutrition to the plate. Zucchini, bell peppers, and corn work perfectly.
  • Garlic Bread: Carbs alert! Garlic bread is always a hit. The buttery, garlicky goodness pairs well and ensures no sauce is left behind.

Alternative Choices to Ingredients

  • Citrus Mojo Marinade: You can make your DIY version using orange juice, garlic, and oregano.
  • Honey: Maple syrup can serve as a great substitute if you’re out of honey.
  • Sazon Seasoning: Instead of Sazon, try using a blend of cumin, coriander, garlic powder, and paprika.
  • Chicken Wings: Drumsticks or thighs work too. Just adjust the cooking time accordingly.
Easy Pollo Tropical Grilled Wings Recipe

Pollo Tropical Grilled Wings Recipe

Tina Cooper
As a registered dietitian and food enthusiast, I’ve spent years exploring flavors and combining ingredients to set your taste buds on fire. These grilled wings are a must-try. 
Prep Time 10 minutes
Cook Time 55 minutes
Total Time 1 hour 5 minutes
Course Appetizer
Cuisine American
Servings 4 Servings
Calories 407 kcal

Equipment

  • Large bowl
  • grill

Ingredients
  

  • 1 cup citrus mojo marinade
  • 1 tablespoon honey
  • 3 tablespoons homemade Sazon seasoning blend
  • 2 1/2 pounds chicken wings tips trimmed, separated into drumettes and flats (about 20-25 wings)
  • 1 teaspoon smoked paprika
  • Fresh lime wedges for serving

Instructions
 

Step 1: Marinate the Wings

  • Start by placing the chicken wings in a large bowl. Pour the citrus mojo marinade over the wings. Add the honey and Sazon seasoning. Toss everything together until the wings are evenly coated. Cover it and let it marinate in the fridge for at least 2 hours, or overnight for the best flavor.

Step 2: Prepare the Grill

  • Preheat your grill to medium-high heat. Ensure the grates are clean and lightly oiled to prevent sticking.

Step 3: Grill the Wings

  • Once the grill is ready, place the marinated wings on it. Grill for about 8-10 minutes on one side. Turn the wings and grill for another 8-10 minutes. Check for a nice char and internal temperature of 165°F to ensure they’re done.

Step 4: Add the Finishing Touches

  • Once cooked, remove the wings from the grill. Sprinkle with smoked paprika for a burst of flavor. Serve with fresh lime wedges on the side.

Notes

  • Use Fresh Ingredients: Fresh citrus and spices make all the difference in taste.
  • Don’t Rush the Marinade: Longer marination results in more flavorful wings.
  • Use a Meat Thermometer: This ensures you gnaw on properly cooked meat.
  • Grill in Batches: Overcrowding can lead to uneven cooking. Give each wing space.
  • Experiment with Marinades: Don’t hesitate to play with flavors! Add chili for some heat or garlic for depth.

Nutrition

Serving: 359gCalories: 407kcalCarbohydrates: 16gProtein: 61gFat: 10.2gCholesterol: 155mgSodium: 1450mgFiber: 2gSugar: 12g
Keyword Pollo Tropical Grilled Wings Recipe
Tried this recipe?Let us know how it was!

Frequently Asked Questions

Can I bake these wings instead of grilling them?

Yes, you can! Preheat the oven to 425°F and place the wings on a baking sheet. Bake for about 30-35 minutes, flipping halfway through for even crispiness.

How spicy are these wings?

The spice level is moderate due to the marinade. If you prefer hotter wings, feel free to add chili powder or cayenne pepper.

Can I use frozen wings for this recipe?

Absolutely! Just remember to thaw them completely before marinating. Ideally, a slow thaw in the fridge overnight works best.

Is this recipe suitable for meal prep?

Definitely! These wings reheat beautifully and can be made ahead of time. Just store them properly, and you’ll have delicious leftovers ready to go.

Conclusion

Pollo Tropical grilled wings embody the spirit of flavorful cooking. The citrusy marinade paired with the crunchy grilled texture creates a delightful experience that keeps you coming back for more. They are simple yet bursting with flavor, making them a perfect addition to your recipe repertoire.

Whether you serve them at a backyard barbecue, a family gathering, or simply as a treat for yourself, you can’t go wrong. 

So, fire up that grill, gather your family and friends, and enjoy the mouthwatering taste of these grilled wings. Trust me, once you try them, you’ll be hooked! Let’s make cooking a joyous adventure, one wing at a time!

You’ll also like these latest recipes!

Pollo Tropical Mashed Potatoes Recipe – Yum Yarns

Best Pollo Tropical Mashed Potatoes Recipe

If you’ve ever found yourself wondering what to serve alongside creamy, delicious mashed potatoes, you’re in for a treat! Pollo Tropical mashed potatoes are perfect combinations that elevate your meal. 

Tender grilled chicken marinated in a tropical blend of spices, served with these dreamy potatoes. 

Or, perhaps you prefer a vibrant side of roasted vegetables? The crunchy, caramelized edges bring an incredible contrast to the smoothness of the potatoes.

Now, let’s turn to those bold flavors. Pairs extraordinarily well with a tangy citrus salad. Tomatoes sprinkled with feta cheese and drizzled with a light vinaigrette provide a refreshing balance. For seafood lovers, consider grilled shrimp. 

The smoky flavor complements the richness of the mashed potatoes perfectly.

Best Pollo Tropical Mashed Potatoes Recipe

When it comes to comfort food, nothing beats a warm serving of mashed potatoes. Now, picture these potatoes enriched with tropical flair and bursting with flavor. 

Today, I’m thrilled to share my take on Pollo Tropical mashed potatoes, a dish that’s not just comforting but also a guaranteed crowd-pleaser. 

It’s creamy, it’s zesty, and trust me, your taste buds will thank you.

Growing up, my family often gathered around the dinner table, sharing hearty meals reminiscent of holiday feasts. 

There was always a space filled with mashed potatoes, right next to the roast. But, I wanted to give this classic dish a twist. 

This vibrant recipe incorporates elements from one of my favorite restaurants, Pollo Tropical, known for its flavorful, tropical-inspired menu items. Let’s dive into how to create this delectable dish together, shall we?

You will also like the following Dinner recipes!

What Is Pollo Tropical Mashed Potatoes?

You might be asking, what exactly are Pollo Tropical mashed potatoes? Well, they aren’t just any mashed potatoes. These spuds are transformed with rich cream, zesty seasonings, and a touch of flair inspired by Polynesian flavors. 

Creamy but not overwhelming, these potatoes incorporate ingredients that resonate warmth and a hint of adventure. You’ll find the perfect balance of flavors that complement a variety of dishes, particularly grilled meats.

This isn’t your average side dish; it’s an experience! Each bite promises to take you on a flavorful journey, while the creamy texture envelops your palate. With just the right amount of seasoning and a twist of freshness, it’s all about elevating that simple potato into a luxurious guest at the dinner table.

Why This Recipe Works?

Let’s explore why this recipe is a winner. Firstly, the combination of Yukon Gold potatoes and half-and-half results in an incredibly smooth texture. 

These potatoes have a higher natural starch content, ensuring that your mashed potatoes will be creamy without needing any complicated techniques.

Next is the seasoned chicken. Cooking the chicken with olive oil and a blend of spices before incorporating it elevates the dish to new heights. The blend of garlic powder, onion powder, smoked paprika, and black pepper creates depth. 

Each ingredient complements the others perfectly, resulting in a dish that is both cohesive and full of flavor.

Lastly, the addition of fresh chives, crème fraîche, and Parmesan cheese ties it all together. The chives provide a delicate onion flavor, adding brightness, while the Parmesan introduces a sharp, savory element.

What You’ll Need to Make This Dish?

Ready to roll up your sleeves? Here’s what you’ll need:

  • For the Chicken
  • 2 large boneless, skinless chicken breasts
  • 2-3 tbsp extra virgin olive oil
  • 1/2 tsp flaky sea salt
  • 1 tsp freshly ground black pepper
  • 1 tsp garlic powder
  • 1 tsp onion powder
  • 1/2 tsp smoked paprika
  • For the Sauce
  • 3 tbsp unsalted butter
  • 2 tbsp all-purpose flour
  • 1 cup low-sodium chicken broth (or stock)
  • 1 tsp chicken bouillon granules
  • 1/2 cup heavy cream
  • 1 tsp garlic powder
  • 1 tsp onion powder
  • 1/2 tsp Worcestershire sauce
  • 1/4 cup freshly grated Parmesan cheese
  • 1 tbsp Dijon mustard 
  • For the Mashed Potatoes
  • 3-4 medium potatoes (about 1-2 lbs), peeled and diced
  • 3/4 cup half-and-half 
  • 4 tbsp unsalted butter, softened
  • 4 tbsp crème fraîche
  • Salt and freshly cracked black pepper, to taste
  • 1-2 tbsp fresh chives, finely chopped
Pollo Tropical Mashed Potatoes Recipe

How to Make Pollo Tropical Mashed Potatoes?

This dish is straightforward and easy to prepare. As we step through the instructions, don’t worry; detailed steps will guide you all the way. The secret is simplicity, allowing the flavors to shine without fuss.

Step 1: Prepare the Chicken

Start by patting the chicken breasts dry. Then, in a bowl, coat them with olive oil, sea salt, pepper, garlic powder, onion powder, and smoked paprika.

Step 2: Cook the Chicken

Heat a skillet over medium heat. Place your seasoned chicken in the hot pan. Cook each side for about 7-8 minutes or until the internal temperature reaches at least 165°F (75°C). Once done, remove and let rest while you prepare the sauce.

Step 3: Make the Sauce

In the same skillet, melt your butter. Add the flour and whisk. Let it cook for a minute to create a roux. 

Gradually add in chicken broth, stirring continuously to prevent lumps. After a few minutes, add the heavy cream, chicken bouillon, and Worcestershire sauce. Stir until the sauce thickens a bit.

Step 4: Prepare the Mashed Potatoes

While the chicken cooks, place the diced potatoes in a pot and cover with cold water. Bring to a boil, and then cook until tender, about 15-20 minutes. Drain and return to the pot.

Step 5: Mash It Up

Add half-and-half, butter, crème fraîche, fresh chives, salt, and pepper to the drained potatoes. Use a potato masher or electric mixer to combine until creamy. Taste and adjust seasoning as needed.

Step 6: Combine and Serve

Slice the chicken, drizzle it with the sauce, and serve it over a bed of Pollo Tropical mashed potatoes. Enjoy the mix of flavors and textures!

Tips

Here are five helpful tips to perfect your Pollo Tropical mashed potatoes:

  • Use Yukon Gold Potatoes: Their creamy texture makes all the difference.
  • Don’t Overwhip the Potatoes: Otherwise, you’ll end up with gluey mashed potatoes.
  • Season at Each Step: Season the chicken, the sauce, and the potatoes for greater depth of flavor.
  • Adjust Creaminess: Depending on preference, add more or less half-and-half or crème fraîche.
  • Let Chicken Rest: Resting allows juices to redistribute, giving you juicy, tender chicken.
Easy Pollo Tropical Mashed Potatoes Recipe

How to Store Leftovers?

Leftovers can be stored in an airtight container in the refrigerator for up to 3 days. When reheating, add a splash of milk or half-and-half to maintain creaminess.

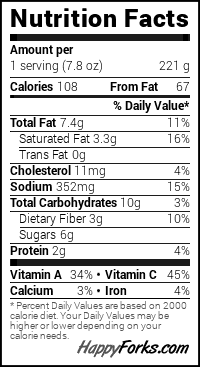
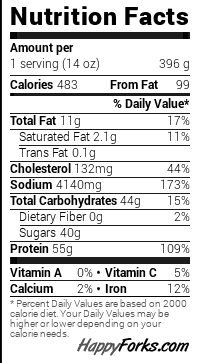
Nutrition Information

pollo tropical mashed potatoes recipe nutrition facts

How Would I Recommend Serving Pollo Tropical Mashed Potatoes?

1. As a Base for Grilled Chicken: The sauce drizzled over grilled chicken creates a winning combination. The tang of the sauce rounds out the creamy potatoes.

2. Accompanied by Roasted Vegetables: A side of roasted vegetables provides a crisp contrast. Think of carrots, zucchini, or broccoli lightly seasoned with olive oil.

3. With a Citrus Salad: Heighten the meal with a citrus salad. Greens tossed with sliced oranges and a light vinaigrette balance the richness of the potatoes.

4. For a Seafood Twist: Grilled shrimp or salmon pairs wonderfully. The fresh seafood complements the tropical flavors beautifully.

What Alternatives Can You Use for the Ingredients If Not Available?

Sometimes you might find yourself missing an ingredient. No problem! Here are some substitutes:

  • Chicken Breasts: Thighs can be used for a richer flavor. They retain moisture well.
  • Heavy Cream: Coconut milk works well for a dairy-free alternative with a hint of tropical flavor.
  • Yukon Gold Potatoes: Try Russet potatoes if Yukon gold is missing. They’ll be slightly fluffier.
  • Crème Fraîche: Sour cream acts as an excellent stand-in with similar tanginess.
Pollo Tropical Mashed Potatoes Recipe

Pollo Tropical Mashed Potatoes Recipe

Tina Cooper
If you’ve ever found yourself wondering what to serve alongside creamy, delicious mashed potatoes, you’re in for a treat! Pollo Tropical mashed potatoes are perfect combinations that elevate your meal. 
Prep Time 15 minutes
Cook Time 20 minutes
Total Time 35 minutes
Course Skillet
Cuisine American
Servings 4 Servings
Calories 835 kcal

Equipment

  • Skillet

Ingredients
  

For the Chicken

  • 2 large boneless skinless chicken breasts
  • 2-3 tbsp extra virgin olive oil
  • 1/2 tsp flaky sea salt
  • 1 tsp freshly ground black pepper
  • 1 tsp garlic powder
  • 1 tsp onion powder
  • 1/2 tsp smoked paprika

For the Sauce

  • 3 tbsp unsalted butter
  • 2 tbsp all-purpose flour
  • 1 cup low-sodium chicken broth or stock
  • 1 tsp chicken bouillon granules
  • 1/2 cup heavy cream
  • 1 tsp garlic powder
  • 1 tsp onion powder
  • 1/2 tsp Worcestershire sauce
  • 1/4 cup freshly grated Parmesan cheese
  • 1 tbsp Dijon mustard
  • For the Mashed Potatoes
  • 3-4 medium potatoes about 1-2 lbs, peeled and diced
  • 3/4 cup half-and-half
  • 4 tbsp unsalted butter softened
  • 4 tbsp crème fraîche
  • Salt and freshly cracked black pepper to taste
  • 1-2 tbsp fresh chives finely chopped

Instructions
 

  • This dish is straightforward and easy to prepare. As we step through the instructions, don’t worry; detailed steps will guide you all the way. The secret is simplicity, allowing the flavors to shine without fuss.

Step 1: Prepare the Chicken

  • Start by patting the chicken breasts dry. Then, in a bowl, coat them with olive oil, sea salt, pepper, garlic powder, onion powder, and smoked paprika.

Step 2: Cook the Chicken

  • Heat a skillet over medium heat. Place your seasoned chicken in the hot pan. Cook each side for about 7-8 minutes or until the internal temperature reaches at least 165°F (75°C). Once done, remove and let rest while you prepare the sauce.

Step 3: Make the Sauce

  • In the same skillet, melt your butter. Add the flour and whisk. Let it cook for a minute to create a roux.
  • Gradually add in chicken broth, stirring continuously to prevent lumps. After a few minutes, add the heavy cream, chicken bouillon, and Worcestershire sauce. Stir until the sauce thickens a bit.

Step 4: Prepare the Mashed Potatoes

  • While the chicken cooks, place the diced potatoes in a pot and cover with cold water. Bring to a boil, and then cook until tender, about 15-20 minutes. Drain and return to the pot.

Step 5: Mash It Up

  • Add half-and-half, butter, crème fraîche, fresh chives, salt, and pepper to the drained potatoes. Use a potato masher or electric mixer to combine until creamy. Taste and adjust seasoning as needed.

Step 6: Combine and Serve

  • Slice the chicken, drizzle it with the sauce, and serve it over a bed of Pollo Tropical mashed potatoes. Enjoy the mix of flavors and textures!

Notes

Here are five helpful tips to perfect your Pollo Tropical mashed potatoes:
  • Use Yukon Gold Potatoes: Their creamy texture makes all the difference.
  • Don’t Overwhip the Potatoes: Otherwise, you’ll end up with gluey mashed potatoes.
  • Season at Each Step: Season the chicken, the sauce, and the potatoes for greater depth of flavor.
  • Adjust Creaminess: Depending on preference, add more or less half-and-half or crème fraîche.
  • Let Chicken Rest: Resting allows juices to redistribute, giving you juicy, tender chicken.

Nutrition

Calories: 835kcal
Keyword Pollo Tropical Mashed Potatoes Recipe
Tried this recipe?Let us know how it was!

Frequently Asked Questions

1. Can I make this recipe ahead of time?

Absolutely! Prepare the mashed potatoes and sauce ahead. Store separately in the fridge, then reheat when ready to serve.

2. Can I freeze the mashed potatoes?

Yes, but note that they might lose some texture upon thawing. It’s best to consume within 1 month of freezing.

3. How can I make this dish spicy?

Add a pinch of cayenne pepper or chili flakes to the chicken seasoning. It’ll kick things up a notch.

4. Can I make these potatoes vegan?

Certainly! Use vegetable broth for the sauce, and substitute potatoes with almond milk or a similar product for a creamy texture.

5. What if I don’t have fresh herbs?

Dried herbs work too. Use half the amount when substituting since dried herbs are more concentrated.

6. Is this dish gluten-free?

You can make it gluten-free by using cornstarch instead of flour in the sauce.

Conclusion

Pollo Tropical mashed potatoes are not just a stylish side dish; they are a celebration of flavor! With their creamy texture and spices that tickle the taste buds, they have the potential to be the star of any meal. 

This recipe reflects my journey as a food enthusiast and a registered dietitian, merging nutrition with deliciousness. And when you have a dish that pairs beautifully with so many flavors, you know you’ve hit the jackpot.

So grab your ingredients, roll up your sleeves, and start cooking. Your family and friends will appreciate the effort. 

This creamy, tropical mash is bound to take its rightful place at your dinner table. Happy cooking!

You’ll also like these latest recipes!