Cacio e Pepe pairs beautifully with a fresh arugula salad. The peppery greens, shaved Parmesan, and a squeeze of lemon brighten the richness of the creamy pasta, adding balance and freshness.
Grilled vegetables like zucchini, bell peppers, and eggplant bring a smoky contrast to the dish. Lightly charred and drizzled with olive oil, they enhance the simple flavors without overpowering the pasta.
A crisp, dry white wine such as Pinot Grigio complements the meal perfectly. Its acidity cuts through the cheese’s creaminess, making each bite more vibrant and enjoyable.

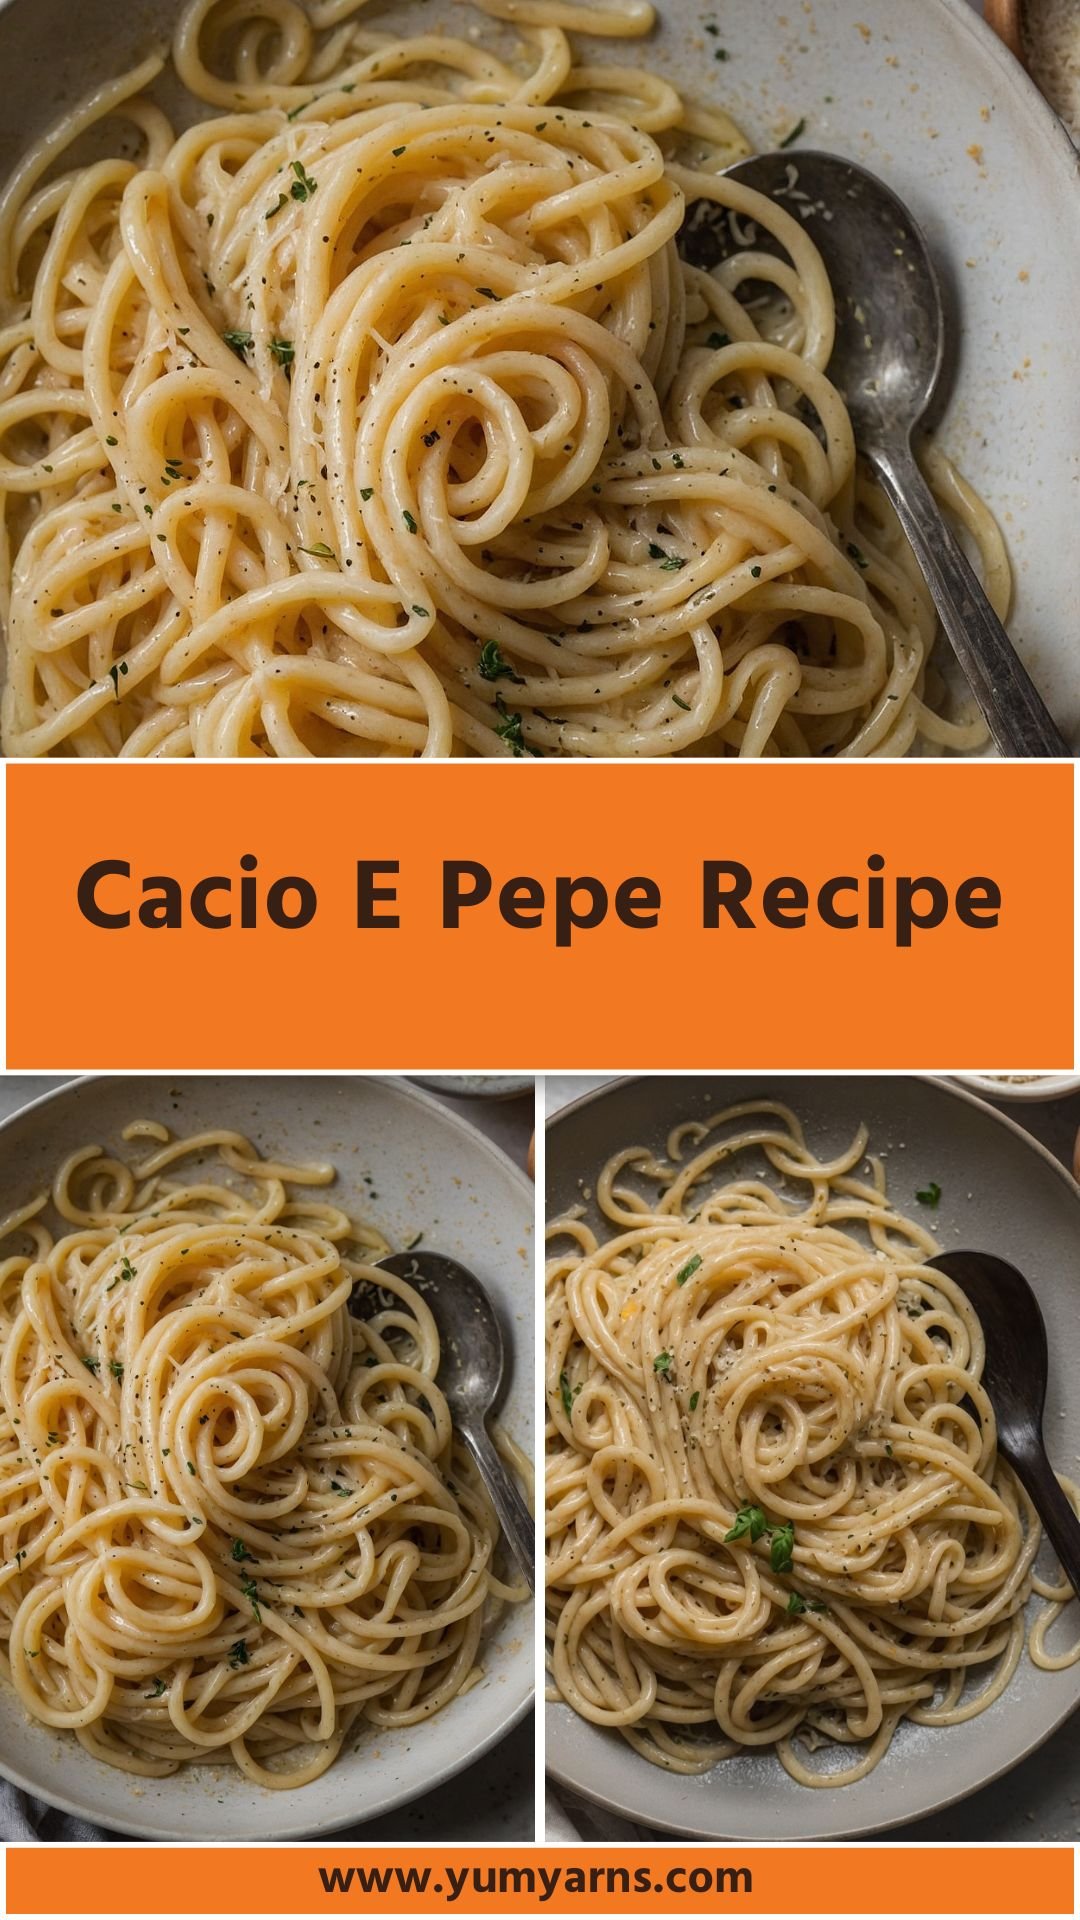
Just saying the name makes my heart flutter. This Roman classic combines the simplest of ingredients: pasta, pepper, and cheese. Anyone can make it, yet it holds a special place in Italian cuisine, inviting both home cooks and chefs to dance with its flavors.
I discovered Cacio E Pepe during a trip to Rome. Staying in a cozy trattoria, I ordered it without knowing what to expect.
Dishes like this remind us that food can tell a story—of tradition, culture, and love. With a few simple ingredients, you can create something magical in your own kitchen.
Today, I’m excited to guide you through making this delightful dish. Let me share insights, tips, and a sprinkle of my own enthusiasm to ensure your Cacio E Pepe turns out perfectly every time.
Why This Recipe Works?
Understanding why this recipe is a winner can help any cook appreciate the beauty behind its simplicity. Here are four key reasons:
High-Quality Ingredients Shine
Cacio E Pepe’s success lies in its ingredients. With just three main components—Pasta, Pecorino Romano, and black pepper—each one plays a significant role.
Using high-quality Pecorino Romano cheese elevates the flavor, while freshly cracked black pepper adds a zing that awakens the palate.
Technique Enhances Flavor
The preparation technique is crucial. The trick lies in the pasta water, which is starchy and perfect for creating a creamy sauce.
Tossing the hot pasta with cheese and pepper leads to a luscious, silky texture that can turn any meal into an occasion.
Cultivates Comfort
This dish is comfort food at its best. It’s simple yet satisfying, with a creaminess that wraps around you like a warm hug. Cacio E Pepe is perfect for a cozy night in or a special gathering with friends.
Versatile Base for Creativity
While traditionalists may balk at additions, this dish provides a fantastic base for customization. Want to add sautéed greens or crispy pancetta?
Go for it! The original recipe leaves room for personal touches while celebrating its authentic roots.
You will also like the following Lunch and Dinner recipes!
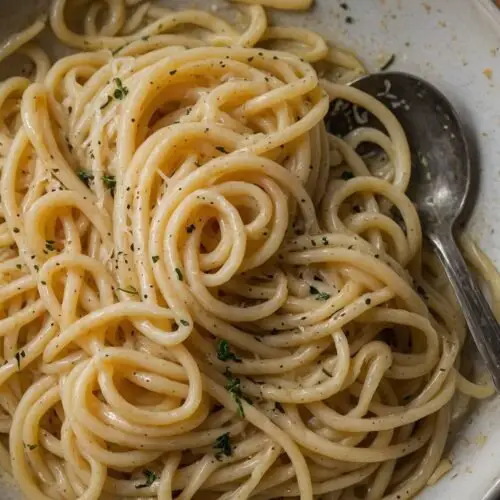
How Does It Taste Like?
Cacio E Pepe offers a delightful balance of flavors. The cheese brings a rich, nutty taste while the black pepper adds warmth and a hint of spice.
Imagine a pillow of pasta lightly coated with a creamy cheese sauce, where every bite melds the sharpness of Pecorino Romano with the kick of freshly cracked pepper. It’s an interplay of flavors that can take you straight to the cobblestone streets of Rome.
What Sets This Recipe Apart from Other Cacio E Pepe Variations?
Many variations of Cacio E Pepe exist, each with its own twist. However, what makes my version stand out is its commitment to tradition combined with practicality.
Simplicity with Quality
Unlike versions that complicate with unnecessary ingredients or overly complex techniques, my recipe ensures that anyone can replicate the authentic Italian experience with ease.
Adjustable Creaminess
I demonstrate how to achieve the perfect creaminess by skillfully using pasta water. You control the consistency to suit your preference, which makes this version as accessible as it is flavorful.
Real-Time Tips
I share insights gathered from years of cooking experience and feedback from readers. These tried-and-true tips help avoid common pitfalls, ensuring you’re set up for success each time you make it.
Incorporation of Fresh Ingredients
I encourage the use of freshly cracked pepper and high-quality cheese. These components will elevate your dish from ordinary to extraordinary.
The Ingredients
Here are the ingredients for making the best Cacio E Pepe:
1 teaspoon freshly cracked black pepper
Freshly cracked is key. It provides a more vigorous flavor compared to pre-ground versions. Feel free to adjust based on your heat preference.
8 ounces dry pasta
Traditional choices include spaghetti or tonnarelli. Choose the type you enjoy most.
2 ounces finely grated Pecorino Romano cheese
Use quality cheese. It makes a big difference in flavor. Avoid pre-grated cheese; you want that fresh, creamy taste.
1 teaspoon extra virgin olive oil
A touch of oil helps to enhance the flavor, but use it sparingly—it’s not the star here.
2 tablespoons butter, cut into 1-tablespoon pieces
Butter aids in the creaminess. Cut it into small pieces for easier melting.
1 small garlic clove, minced (optional)
While traditional recipes may not include garlic, I love its warmth.

Instructions
Let’s get down to the cooking. Follow these straightforward steps:
Step 1: Boil the Pasta
Bring a large pot of salted water to a rolling boil. Add the pasta and cook according to package instructions until al dente. Remember, save about 1 cup of pasta water before draining!
Step 2: Toast the Pepper
In a large skillet, over medium heat, add the black pepper. Toast it for about 1 minute, until fragrant. This step unlocks its beautiful flavor, setting the stage for your dish.
Step 3: Combine Pasta and Pepper
Transfer the drained pasta to the skillet with the toasted pepper. Toss well to coat the pasta. You’re creating a heavenly combination right now, trust me.
Step 4: Create the Sauce
Add the butter and half of the cheese, then pour in ½ cup of reserved pasta water. Stir vigorously until the cheese melts and combines with the pasta. If the sauce is too thick, add more pasta water until you reach your desired creaminess.
Step 5: Finish with Cheese and Olive Oil
Off the heat, stir in the rest of the cheese and a drizzle of olive oil. Toss thoroughly. A final crack of pepper on top for garnish seals the deal.
Step 6: Serve Immediately
Plate the pasta and don’t be shy with the cheese. Decorate with additional cracked pepper. Enjoy with a glass of white wine or your favorite beverage.
Notes
Here are five valuable tips to ensure your Cacio E Pepe shines:
Freshly Grate the Cheese Again: Always grate cheese fresh. It melts better and provides a creamier texture. Those bags of pre-grated cheese just don’t cut it.
Reserve Pasta Water Smartly: When saving pasta water, have a cup handy and don’t just pour it all out at once. It’s better to add it gradually.
Adjust the Pepper: If you’re sensitive to spice, begin with half the amount of pepper and add more based on your taste.
Use Sturdy Pasta: Pasta shapes like tonnarelli or spaghetti work best due to their ability to hold onto the sauce.
Eat it Fresh: Cacio E Pepe is best served fresh. If you let it sit too long, the sauce can thicken and lose that luscious texture.
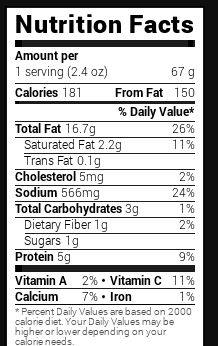
Nutrition Information
Cacio E Pepe Recipe Nutrition Facts

How Do You Store This Cacio E Pepe?
If you find yourself with leftover pasta (a rarity, but it happens!), store it in an airtight container in the fridge. It can last up to three days. To reheat, add a splash of water to the pasta in a pan over low heat and stir continuously to bring back some of the creamy consistency.

Sides for Cacio E Pepe
To create a well-rounded meal, consider adding a few sides. Here are some suggestions:
Grilled Shrimp: Marinate shrimp with olive oil, garlic, and lemon zest. Grill them for a few minutes for a seafood pairing that complements the pasta beautifully.
Roasted Broccoli: Toss broccoli florets with olive oil, garlic, and a pinch of salt, then roast until crispy. It offers a crunchy contrast to the creamy pasta.
Caprese Salad: Fresh mozzarella, tomatoes, and basil drizzled with balsamic glaze creates a refreshing bite. Its lightness is a lovely counterbalance.
Ingredient Alternatives
Not all kitchens are stocked with everything. Here are some substitutions you can consider:
Pasta Alternatives: Use gluten-free pasta or whole wheat pasta if needed. Both options work well and absorb the sauce nicely.
Cheese Choices: Pecorino Romano is traditional, but Parmigiano-Reggiano or Grana Padano can work in a pinch for a slightly different flavor profile.
Pepper Variations: If you can’t handle black pepper, try white pepper for a milder flavor. It still adds that essential heat without overwhelming the dish.
Butter Alternatives: For a dairy-free version, you could use vegan butter or coconut oil, though it will slightly alter the taste.
Cacio E Pepe Recipe
Equipment
- Skillet
Ingredients
- 1 teaspoon freshly cracked black pepper
- 8 ounces dry pasta
- 2 ounces finely grated Pecorino Romano cheese
- 1 teaspoon extra virgin olive oil
- 2 tablespoons butter cut into 1-tablespoon pieces
- 1 small garlic clove minced
Instructions
Step 1: Boil the Pasta
- Bring a large pot of salted water to a rolling boil. Add the pasta and cook according to package instructions until al dente. Remember, save about 1 cup of pasta water before draining!
Step 2: Toast the Pepper
- In a large skillet, over medium heat, add the black pepper. Toast it for about 1 minute, until fragrant. This step unlocks its beautiful flavor, setting the stage for your dish.
Step 3: Combine Pasta and Pepper
- Transfer the drained pasta to the skillet with the toasted pepper. Toss well to coat the pasta. You’re creating a heavenly combination right now, trust me.
Step 4: Create the Sauce
- Add the butter and half of the cheese, then pour in ½ cup of reserved pasta water. Stir vigorously until the cheese melts and combines with the pasta. If the sauce is too thick, add more pasta water until you reach your desired creaminess.
Step 5: Finish with Cheese and Olive Oil
- Off the heat, stir in the rest of the cheese and a drizzle of olive oil. Toss thoroughly. A final crack of pepper on top for garnish seals the deal.
Step 6: Serve Immediately
- Plate the pasta and don’t be shy with the cheese. Decorate with additional cracked pepper. Enjoy with a glass of white wine or your favorite beverage
Notes
- Freshly Grate the Cheese Again: Always grate cheese fresh. It melts better and provides a creamier texture. Those bags of pre-grated cheese just don’t cut it.
- Reserve Pasta Water Smartly: When saving pasta water, have a cup handy and don’t just pour it all out at once. It’s better to add it gradually.
- Adjust the Pepper: If you’re sensitive to spice, begin with half the amount of pepper and add more based on your taste.
- Use Sturdy Pasta: Pasta shapes like tonnarelli or spaghetti work best due to their ability to hold onto the sauce.
- Eat it Fresh: Cacio E Pepe is best served fresh. If you let it sit too long, the sauce can thicken and lose that luscious texture
Nutrition
Frequently Asked Questions
1. Can Cacio E Pepe be made vegan?
Yes, you can make a vegan version using nutritional yeast instead of cheese for flavor. Pair that with plant-based butter and a vegan pasta. It won’t be the same, but it’ll give you a cheesy flavor without dairy.
2. Is there a way to make this dish ahead of time?
While it’s best enjoyed fresh, you can prepare the sauce in advance and store it in the fridge. When ready to eat, cook pasta, combine it with the sauce, and add some reserved pasta water for creaminess.
3. What is the best pasta shape to use?
Traditionally, tonnarelli or spaghetti work best, but feel free to experiment with shapes like fettuccine or linguine for a unique twist!
4. Is using garlic in Cacio E Pepe traditional?
While not traditional, adding garlic can enhance the flavor profile if you enjoy it. Just remember, it’s not authentic, but cooking is about enjoyment and personalization!
Conclusion
Cacio E Pepe is more than just a dish; it’s a celebration of simplicity and flavors. With just a few basic ingredients, you can create a warm, comforting meal that speaks to the soul. The magic lies in the preparation and the love you put into it.
Now, armed with this knowledge and recipe, you’re ready to create something spectacular in your kitchen. Let the rich, cheesy flavors and the enticing aroma fill your home as you serve this beautiful dish to your family and friends.
Whether you’re recreating a piece of Rome or simply whipping up a quick dinner, Cacio E Pepe will undoubtedly impress. Dive in, enjoy, and remember—it’s all about the joy of cooking. Buon Appetito!