When it comes to enjoying a delightful dish like seafood carbonara, the right pairings can elevate flavors and create a well-rounded meal. Here are a few ideas that can enhance your dining experience:
- Crisp White Wine: A chilled glass of Sauvignon Blanc or Pinot Grigio complements the rich seafood in carbonara beautifully. These wines have the acidity to cut through the creamy sauce.
- Garlic Bread: Nothing beats the allure of golden garlic bread. Not only does it serve as the perfect vessel for mopping up any leftover sauce, but it also adds a delightful crunch to your meal.
- Simple Arugula Salad: A fresh arugula salad with lemon vinaigrette can provide a refreshing contrast to the rich carbonara. The peppery taste of arugula kicks in a vibrant pop that balances the creaminess of the dish.
- Lemon Sorbet: For dessert, serving lemon sorbet can cleanse the palate nicely after a hearty seafood carbonara. It’s light, refreshing, and provides just the right sweetness to end your meal.

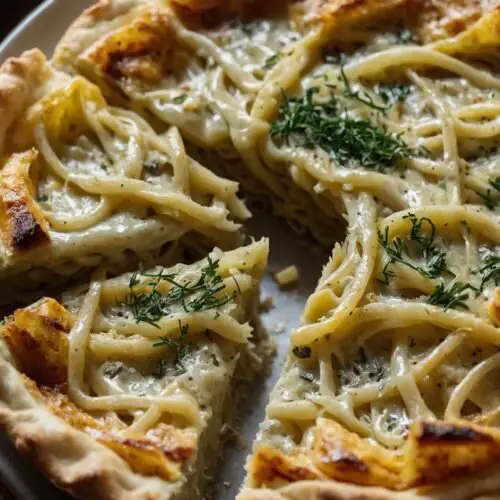
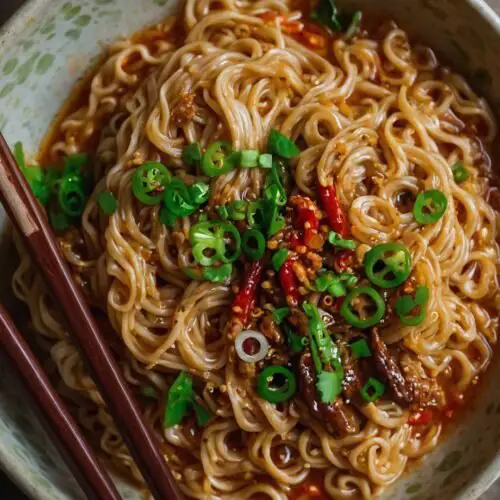
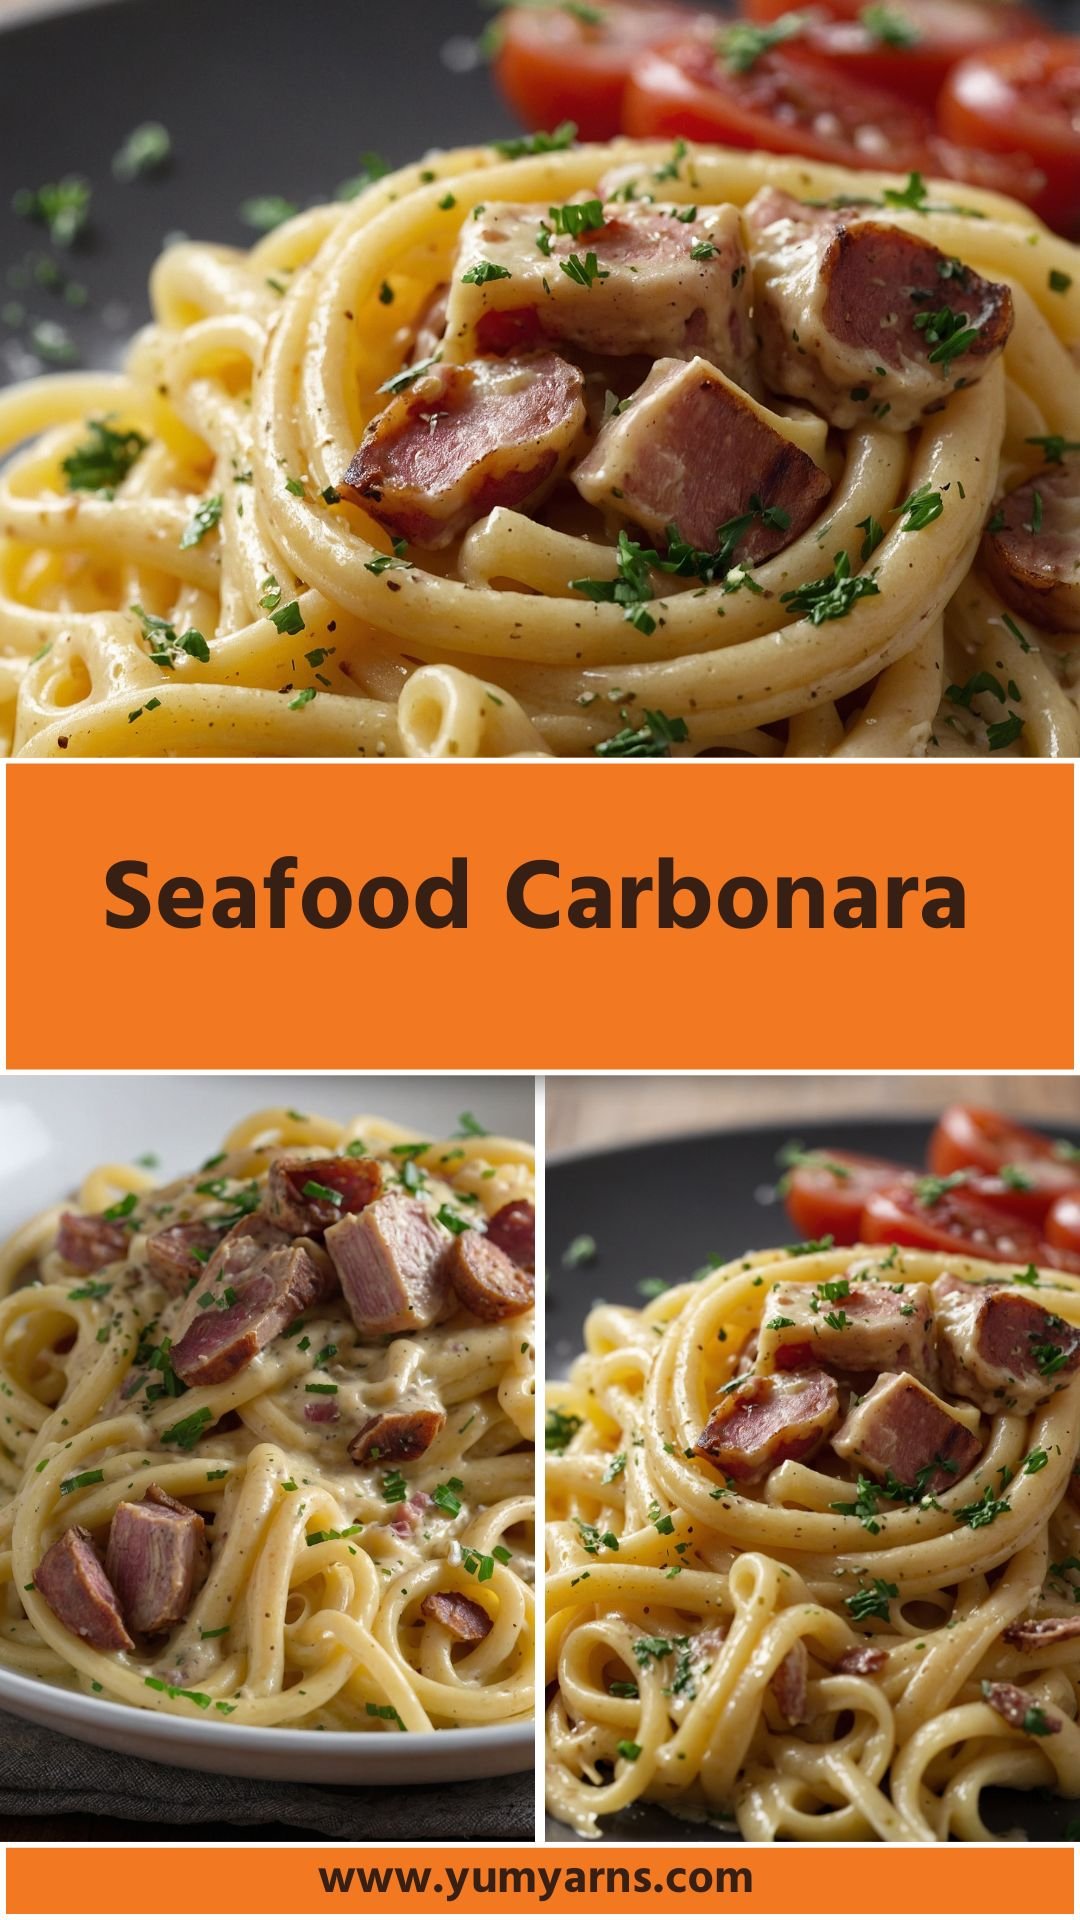
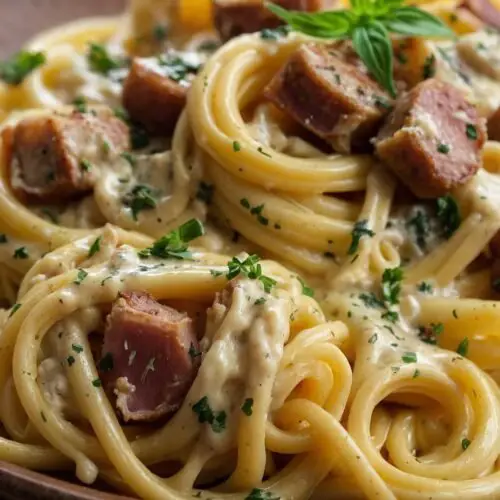
Let me take you on a culinary adventure that marries the sea with a beloved Italian classic—seafood carbonara. Imagine strands of perfectly cooked spaghetti enveloped in a creamy sauce embellished with fresh seafood. It’s a dish that sings of simplicity yet packs a punch of flavor.
Although the traditional carbonara boasts crispy pancetta and egg yolks, I’ve swapped in succulent pieces of fish and tuna for a unique twist. As you gather your ingredients, picture the warm glow of your kitchen, the scents wafting through the air, and the joy on your friends’ and family’s faces as they gather to enjoy a tasty meal.
What Is Seafood Carbonara?
Seafood carbonara is an innovative take on the traditional Italian carbonara. Instead of using the typical pork products, this version features an array of seafood like salmon and tuna.
The dish maintains carbonara’s beloved creaminess, achieved with egg yolks and a splash of dry white wine. It showcases the kind of comfort food that transports you straight to the picturesque coastline of Italy.
Why This Recipe Works?
This recipe works for many reasons. First, the balance of flavors is spot on. The richness of the seafood creates a beautiful harmony with the creamy sauce while the Parmigiano Reggiano adds a layer of depth.
Second, you can whip it up in a mere 30 minutes. It’s an easy indulgence for a busy weeknight or a stunning dish to dazzle your dinner guests. Finally, the freshness of the ingredients shines through. You can feel confident knowing that you’re serving a meal that not only tastes great but offers nutritional benefits from the seafood.
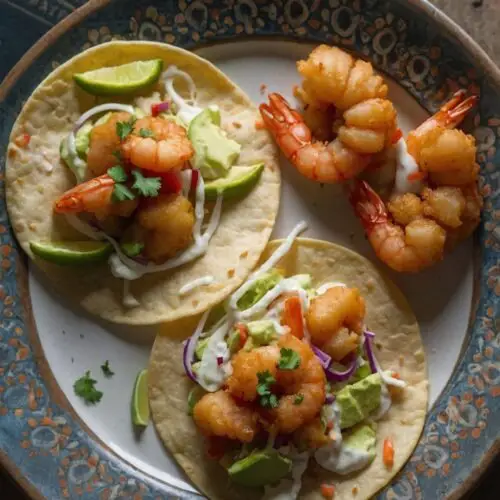
You will also like the following Lunch and Dinner recipes!
What You’ll Need to Make This Dish
Before you start cooking, gather your ingredients. Having everything on the counter makes the cooking process smooth and enjoyable:
- 6 egg yolks – Lightly beaten, these will form the creamy base.
- 11 oz (320 g) spaghetti pasta – This is a classic choice for carbonara.
- 3.5 oz (100 g) fresh salmon fillet, diced – A delightful source of healthy fats.
- 3.5 oz (100 g) canned tuna, drained – Adds convenience while still delivering flavor.
- Extra virgin olive oil, as needed – A high-quality oil makes a difference.
- ¼ cup (60 ml) dry white wine – This adds a depth of flavor.
- 3.5 oz (100 g) fresh swordfish fillet, diced – Another tasty seafood option.
- ½ cup (60 g) grated Parmigiano Reggiano cheese – For richness and umami.
- Freshly ground black pepper, to taste – A staple seasoning.
- Fine sea salt, to taste – Enhances flavors.
- 6 fresh thyme sprigs – Fresh herbs elevate the dish.
- 1 teaspoon lemon zest – Adds a bright note.
- 1 garlic clove, minced – Provides aromatic depth.
- 1 tablespoon freshly chopped flat-leaf parsley – For finishing touches.

How to Make Seafood Carbonara?
Ready to dive into the cooking process? Making seafood carbonara is straightforward, making this dish approachable for both novice and seasoned cooks. With a few simple steps, you will create a delicious meal. So let’s get cooking!
Step by Step Instructions
Step 1: Cook the Pasta
Bring a large pot of salted water to a rolling boil. Add the spaghetti and cook according to the package instructions until al dente. Stir occasionally to prevent sticking. Reserve about 1 cup of pasta water before draining.
Step 2: Prepare the Seafood
While your pasta cooks, heat a large skillet over medium heat. Add a drizzle of extra virgin olive oil. After a few moments, add the diced salmon and swordfish to the pan. Cook for about 4-5 minutes until the fish is opaque throughout. Then stir in the drained canned tuna.
Step 3: Create the Sauce
In a large bowl, combine the egg yolks, grated Parmigiano Reggiano, minced garlic, lemon zest, and a generous pinch of black pepper. Whisk until smooth. The warmth of the pasta will gently cook the egg mixture, giving you a creamy sauce.
Step 4: Combine the Ingredients
Once the pasta is drained, add it directly to the skillet with the seafood. Pour in the dry white wine and add the thyme sprigs. Cook for about 1-2 minutes to evaporate some of the alcohol.
Step 5: Mixing the Sauce and Pasta
Remove the skillet from heat. Quickly pour the egg mixture over the pasta. Toss everything gently, adding reserved pasta water a little at a time until the desired consistency is reached. The heat from the pasta will thicken the sauce without scrambling the eggs.
Step 6: Final Touches
Finishing touches are paramount. Season with fine sea salt, and add more black pepper if needed. Finally, sprinkle fresh parsley over the top before serving.
Tips
Here are some additional insights to make your carbonara experience even better:
- Quality Matters: Always use high-quality extra virgin olive oil; it enhances flavors significantly.
- Pasta Water is Key: The starchy water helps bind the sauce and create creaminess. Don’t skip this step!
- Enjoy Fresh Herbs: Fresh thyme and parsley offer vibrant flavors. Don’t be shy with herbs!
- Egg Temperature: Use eggs at room temperature to help with emulsification.
- Mix Quickly: When combining the egg mixture and pasta, work quickly to avoid cooking the eggs too much.
How to Store Leftovers?
If you happen to have leftovers, you can store them in an airtight container in the fridge for up to 2 days. Reheat gently in a skillet, adding a splash of water or olive oil to loosen the sauce. Avoid using the microwave if possible, as it can overcook the eggs and alter the texture.
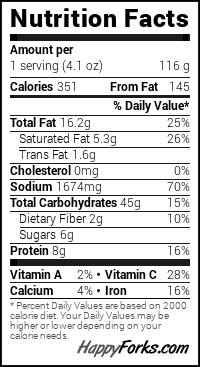
Nutrition Information
For those watching their nutrition, here’s a quick breakdown of the key information per serving:
- Calories: Approx. 450
- Protein: 27g
- Carbohydrates: 45g
- Fats: 18g
- Fiber: 2g
This dish is packed with protein from the seafood and nutrients from fresh ingredients, making it a filling yet healthy option.

How Would I Recommend Serving Seafood Carbonara?
When it comes to serving seafood carbonara, presentation is vital. Here are some suggestions to impress your guests:
- Garnish with Fresh Herbs: Finish each plate with chopped parsley and additional thyme sprigs. It adds color and freshness.
- Serve with Lemon Wedges: Offering lemon wedges on the side allows guests to add a bit of brightness. A squeeze of lemon can elevate the overall dish.
- Elegant Dishes: Present the carbonara in warm, shallow bowls. Not only does this enhance visual appeal, but it also keeps the dish warm longer.
- Accompany with White Wine: Pair with chilled white wine like Pinot Grigio or Sauvignon Blanc. This pairing is perfect for complementing the seafood flavors.
What Alternatives Can You Use for the Ingredients If Not Available?
Sometimes, you may not have all the ingredients on hand. Here are some substitutes that work well:
- Other Pastas: Fettuccine or linguine can replace spaghetti. These shapes hold onto the sauce beautifully while providing a different texture.
- Other Seafood: Shrimp or scallops can be substituted for the salmon and swordfish, creating a delicious variation.
- Alternate Cheeses: Pecorino Romano works in lieu of Parmigiano Reggiano, offering a sharper flavor.
- Non-Alcoholic Options: Replace white wine with low-sodium chicken or vegetable broth if avoiding alcohol. It still adds flavor without creating any cooking issues.
Seafood Carbonara
Equipment
- Skillet
Ingredients
- 6 egg yolks – Lightly beaten these will form the creamy base.
- 11 oz 320 g spaghetti pasta – This is a classic choice for carbonara.
- 3.5 oz 100 g fresh salmon fillet, diced – A delightful source of healthy fats.
- 3.5 oz 100 g canned tuna, drained – Adds convenience while still delivering flavor.
- Extra virgin olive oil as needed – A high-quality oil makes a difference.
- ¼ cup 60 ml dry white wine – This adds a depth of flavor.
- 3.5 oz 100 g fresh swordfish fillet, diced – Another tasty seafood option.
- ½ cup 60 g grated Parmigiano Reggiano cheese – For richness and umami.
- Freshly ground black pepper to taste – A staple seasoning.
- Fine sea salt to taste – Enhances flavors.
- 6 fresh thyme sprigs – Fresh herbs elevate the dish.
- 1 teaspoon lemon zest – Adds a bright note.
- 1 garlic clove minced – Provides aromatic depth.
- 1 tablespoon freshly chopped flat-leaf parsley – For finishing touches.
Instructions
Step 1: Cook the Pasta
- Bring a large pot of salted water to a rolling boil. Add the spaghetti and cook according to the package instructions until al dente. Stir occasionally to prevent sticking. Reserve about 1 cup of pasta water before draining.
Step 2: Prepare the Seafood
- While your pasta cooks, heat a large skillet over medium heat. Add a drizzle of extra virgin olive oil. After a few moments, add the diced salmon and swordfish to the pan. Cook for about 4-5 minutes until the fish is opaque throughout. Then stir in the drained canned tuna.
Step 3: Create the Sauce
- In a large bowl, combine the egg yolks, grated Parmigiano Reggiano, minced garlic, lemon zest, and a generous pinch of black pepper. Whisk until smooth. The warmth of the pasta will gently cook the egg mixture, giving you a creamy sauce.
Step 4: Combine the Ingredients
- Once the pasta is drained, add it directly to the skillet with the seafood. Pour in the dry white wine and add the thyme sprigs. Cook for about 1-2 minutes to evaporate some of the alcohol.
Step 5: Mixing the Sauce and Pasta
- Remove the skillet from heat. Quickly pour the egg mixture over the pasta. Toss everything gently, adding reserved pasta water a little at a time until the desired consistency is reached. The heat from the pasta will thicken the sauce without scrambling the eggs.
Step 6: Final Touches
- Finishing touches are paramount. Season with fine sea salt, and add more black pepper if needed. Finally, sprinkle fresh parsley over the top before serving.
Notes
- Quality Matters: Always use high-quality extra virgin olive oil; it enhances flavors significantly.
- Pasta Water is Key: The starchy water helps bind the sauce and create creaminess. Don’t skip this step!
- Enjoy Fresh Herbs: Fresh thyme and parsley offer vibrant flavors. Don’t be shy with herbs!
- Egg Temperature: Use eggs at room temperature to help with emulsification.
- Mix Quickly: When combining the egg mixture and pasta, work quickly to avoid cooking the eggs too much.
Nutrition
Frequently Asked Questions
Can I make seafood carbonara ahead of time?
Yes, while it’s best enjoyed fresh, you can prepare the seafood and sauce in advance and cook the pasta just before serving.
Can I use frozen seafood?
Absolutely! Just ensure it’s thawed and drained properly before adding it to the dish.
Is seafood carbonara a kid-friendly meal?
Yes! Kids often love pasta, and the seafood can be a fun surprise. If your child is not keen on fish, you can opt for milder seafood options like shrimp.
Can I make this dish dairy-free?
Yes! You can replace the cheese with nutritional yeast and use a dairy-free cream substitute to achieve a similar creamy texture.
How do I know when the pasta is al dente?
It should be firm to the bite but cooked through. For spaghetti, check a couple of minutes before the package suggests, tasting for doneness.
What is the best method for reheating leftovers?
The stovetop is ideal. Add a splash of water or olive oil and reheat gently to avoid overcooking the eggs.
Conclusion
Seafood carbonara is more than just a dish; it’s a culinary celebration that showcases the fantastic flavors of the ocean paired with rich, creamy goodness. Its simplicity and versatility make it a must-try in any home kitchen. As you gather your loved ones around the table, this meal will surely be the highlight of the evening. So go ahead—dive into the inviting world of flavors. With every bite, you’ll serve up happiness and comfort while leaving a lasting impression.
Now, grab your apron and get cooking! The taste of the coast is just a dish away.