Cheesy Buttery Jalapeno Corn Cakes – Yum Yarns

Cheesy Buttery Jalapeno Corn Cakes

Before diving into the vibrant world of cheesy buttery jalapeno corn cakes, let’s set the scene with what to enjoy alongside this tasty treat. The rich flavor of these corn cakes pairs wonderfully with a variety of sides and accompaniments.

1. Fresh Garden Salad: The crispness of a fresh garden salad balances the richness of the corn cakes beautifully. Mix greens with cherry tomatoes, cucumbers, and a light vinaigrette for a refreshing contrast.

2. Spicy Salsa or Guacamole: A side of spicy salsa or creamy guacamole can elevate your meal. The cool and creamy notes manage the heat from the jalapeño perfectly.

3. Grilled Shrimp or Chicken: Protein options like grilled shrimp or chicken add substance to your meal. The smoky flavors from the grill will complement the sweetness of corn.

4. Cilantro-Lime Rice: A side of cilantro-lime rice with a zesty kick goes hand in hand with corn cakes. It adds a lovely burst of flavor without stealing the show.

Ready to learn about these savory delights?

Cheesy Buttery Jalapeno Corn Cakes

I am thrilled to share with you my favorite recipe: cheesy buttery jalapeno corn cakes. These little gems hit all the right notes—crunchy, cheesy, and with a hint of spice. Picture hosting a casual gathering with friends. Someone suggests snacks. What do you whip out? These corn cakes. Trust me, they’ll be the star of the show.

My culinary journey began in my grandmother’s kitchen, where I learned the true value of fresh ingredients. The flavors of her cooking still inspire me today. My quest for creating memorable meals continues, and some of my best recipes come from simple, flavorful combinations—just like this one.

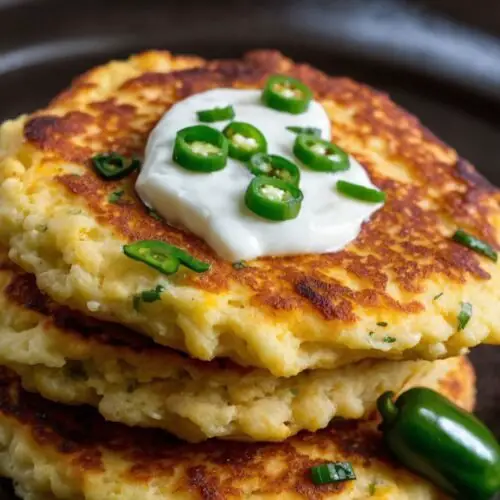
So, what exactly are cheesy buttery jalapeno corn cakes? They are golden, crispy delights made from sweet corn, cheese, and fresh jalapeño peppers. Let’s dig deeper.

What Are Cheesy Buttery Jalapeno Corn Cakes?

These tasty cakes are made from fresh corn kernels, enriched with cheese and jalapeños to provide a satisfying crunch and a slight kick. When cooked, they develop a golden-brown exterior, while remaining soft, buttery, and cheesy on the inside.

Think of them as a fusion between cornbread and a savory pancake. You can serve them warm as a side dish or enjoy them as a snack. They are fantastic with a dollop of sour cream or a sprinkling of fresh herbs.

You will also like the following Side Dishes recipes!

Why This Recipe Works?

Here’s why cheesy buttery jalapeno corn cakes are a must-try. Each point illustrates the magic behind the recipe.

1. Flavor Balance: The combination of sweet corn, sharp cheddar, and spicy jalapeños creates a delightful balance. You get sweetness from the corn, salty creaminess from the cheese, and that unmistakable kick from the jalapeño.

2. Versatile Ingredients: This recipe utilizes ingredients commonly found in many pantries. Fresh corn, cheese, and jalapeños can be swapped with whatever you have on hand, making flexibility a key strength.

3. Easy Preparation: The straightforward steps involved in making these corn cakes means you don’t need to be a chef to impress your guests. It’s simple, fun, and requires minimal culinary experience.

4. Crowd-Pleasing Dish: Whether you’re serving them for brunch, lunch, or as a snack, cheesy buttery jalapeno corn cakes spark joy for everyone. They’re perfect for gatherings where everyone loves a tasty appetizer.

Ingredients You’ll Need

To make these flavorful treats, gather the following ingredients:

2 large eggs, lightly beaten
3/4 cup plain all-purpose flour
1/4 cup cold water
1/2 teaspoon sea salt
1/2 teaspoon garlic, finely minced
1/2 teaspoon crushed red chili flakes
3 ears of corn, kernels removed (about 2 1/2 cups)
1 small jalapeño, deseeded and finely chopped
1/2 cup sharp cheddar cheese, shredded
3 green onions, white and green parts thinly sliced
1/4 cup fresh flat-leaf parsley, chopped

For Frying:
3 tablespoons neutral vegetable oil (canola or sunflower)

Garnish:
Fresh chopped herbs (cilantro or parsley)
Sour cream
Fresh peaches and blueberries
1 teaspoon lime zest

How to make Cheesy Buttery Jalapeno Corn Cakes

How to Make These?

Grab your apron and let’s get cooking! Follow these steps for perfect cheesy buttery jalapeno corn cakes.

Step 1: Prep the Ingredients

Start with fresh corn. Remove the kernels from the ears. It’s easy. Just take a sharp knife and run it down the side. Collect about 2 1/2 cups of corn kernels.

Step 2: Mix the Batter

In a large bowl, beat the eggs. Add in the cold water and mix until combined. Gradually fold in the flour, salt, garlic, and red chili flakes. Stir until the mixture is smooth.

Step 3: Add the Good Stuff

Now for the exciting part! Fold in the corn kernels, chopped jalapeño, cheddar cheese, green onions, and parsley. This is where the color and flavor come alive. Stir well to combine everything.

Step 4: Heat the Pan

In a skillet, heat the vegetable oil over medium heat. You want just enough oil to cover the bottom. Wait until it’s hot but not smoking.

Step 5: Cook the Cakes

Scoop about 1/4 cup of the mixture onto the skillet for each cake. Flatten them slightly with the back of a spatula. Cook for 3–4 minutes or until golden brown. Flip and repeat on the other side.

Step 6: Serve Warm

Once cooked, transfer the corn cakes to a plate and keep them warm. Top with fresh herbs, a dollop of sour cream, some peaches, blueberries, and lime zest for that extra zing!

Tips

Here are some handy tips to help you master these corn cakes:

Use Fresh Corn: Fresh corn gives the best flavor. If it’s off-season, frozen corn works too. Just ensure to thaw it before using.

Adjust the Spice Level: If you prefer less heat, remove the seeds from the jalapeño completely.

Don’t Rush the Cooking: Take your time frying the cakes. Cooking them on medium heat allows them to develop a nice crust.

Keep Them Warm: If you’re making a big batch, keep the cooked corn cakes in a warm oven until ready to serve.

Experiment with Cheese: While sharp cheddar offers great flavor, feel free to experiment with pepper jack or even crumbled feta for a different twist.

Nutrition Information

Per serving (1 corn cake), here’s a rough breakdown of the nutrition:

Calories: 150
Protein: 5g
Carbohydrates: 18g
Fat: 6g
Fiber: 2g

These cakes are not only packed with flavor but also provide a decent amount of protein and fiber.

Cheesy Buttery Jalapeno Corn Cakes Copycat recipe

How to Store The Leftovers?

If you’re lucky enough to have leftovers, here’s how to store them:

Refrigerate: Place cooled corn cakes in an airtight container. They will keep in the fridge for 3–4 days.

Freeze: For longer storage, freeze them in a single layer, then transfer to a freezer bag. They will last about 2–3 months.

When reheating, a quick pan fry will restore the crunch.

What Are Some Recommended Side Dishes for Cheesy Buttery Jalapeno Corn Cakes?

Pairing these corn cakes with the right sides can elevate your meal experience. Here are some delicious options:

1. Black Bean Salad: A zesty black bean salad with corn, bell peppers, cilantro, and lime complements the corn cakes splendidly.

2. Coleslaw: A crunchy coleslaw is refreshing. It adds a perfect contrast to the warm, cheesy cakes. Try adding some sliced jalapeños for an extra kick.

3. Roasted Vegetables: Seasoned and roasted vegetables bring out natural sweetness. Think bell peppers, zucchini, or asparagus.

4. Tomato Salsa: Fresh tomato salsa bursting with ripe tomatoes, garlic, onions, and lime juice equals a fresh accompaniment, cutting through rich flavors.

Substitute Options for the Ingredients

If you’re missing any ingredients, don’t stress. Here are some substitutes:

1. Eggs: If you’re looking for an egg-free solution, flaxseed meal mixed with water (1 tablespoon flaxseed meal + 3 tablespoons water) can act as a binding agent.

2. All-Purpose Flour: For gluten-free options, almond flour or oat flour can work as an alternative, though with slightly different textures.

3. Cheddar Cheese: If sharp cheddar isn’t available, try mozzarella or even a dairy-free cheese option to keep it vegan.

4. Jalapeños: If jalapeños are unavailable, diced bell peppers or even diced green chiles can substitute for flavor without too much heat.

Cheesy Buttery Jalapeno Corn Cakes Copycat recipe

Cheesy Buttery Jalapeno Corn Cakes

Before diving into the vibrant world of cheesy buttery jalapeno corn cakes, let’s set the scene with what to enjoy alongside this tasty treat. The rich flavor of these corn cakes pairs wonderfully with a variety of sides and accompaniments.
Prep Time 15 minutes
Cook Time 15 minutes
Total Time 30 minutes
Course Side Dish
Cuisine American
Servings 8
Calories 150 kcal

Equipment

  • Skillet
  • Bowl

Ingredients
  

  • 2 large eggs lightly beaten
  • 3/4 cup plain all-purpose flour
  • 1/4 cup cold water
  • 1/2 teaspoon sea salt
  • 1/2 teaspoon garlic finely minced
  • 1/2 teaspoon crushed red chili flakes
  • 3 ears of corn kernels removed (about 2 1/2 cups)
  • 1 small jalapeño deseeded and finely chopped
  • 1/2 cup sharp cheddar cheese shredded
  • 3 green onions white and green parts thinly sliced
  • 1/4 cup fresh flat-leaf parsley chopped

For Frying:

  • 3 tablespoons neutral vegetable oil canola or sunflower

Garnish:

  • Fresh chopped herbs cilantro or parsley
  • Sour cream
  • Fresh peaches and blueberries
  • 1 teaspoon lime zest

Instructions
 

Step 1: Prep the Ingredients

  • Start with fresh corn. Remove the kernels from the ears. It’s easy. Just take a sharp knife and run it down the side. Collect about 2 1/2 cups of corn kernels.

Step 2: Mix the Batter

  • In a large bowl, beat the eggs. Add in the cold water and mix until combined. Gradually fold in the flour, salt, garlic, and red chili flakes. Stir until the mixture is smooth.

Step 3: Add the Good Stuff

  • Now for the exciting part! Fold in the corn kernels, chopped jalapeño, cheddar cheese, green onions, and parsley. This is where the color and flavor come alive. Stir well to combine everything.

Step 4: Heat the Pan

  • In a skillet, heat the vegetable oil over medium heat. You want just enough oil to cover the bottom. Wait until it’s hot but not smoking.

Step 5: Cook the Cakes

  • Scoop about 1/4 cup of the mixture onto the skillet for each cake. Flatten them slightly with the back of a spatula. Cook for 3–4 minutes or until golden brown. Flip and repeat on the other side.

Step 6: Serve Warm

  • Once cooked, transfer the corn cakes to a plate and keep them warm. Top with fresh herbs, a dollop of sour cream, some peaches, blueberries, and lime zest for that extra zing!

Notes

  • Use Fresh Corn: Fresh corn gives the best flavor. If it’s off-season, frozen corn works too. Just ensure to thaw it before using.
  • Adjust the Spice Level: If you prefer less heat, remove the seeds from the jalapeño completely.
  • Don’t Rush the Cooking: Take your time frying the cakes. Cooking them on medium heat allows them to develop a nice crust.
  • Keep Them Warm: If you’re making a big batch, keep the cooked corn cakes in a warm oven until ready to serve.
  • Experiment with Cheese: While sharp cheddar offers great flavor, feel free to experiment with pepper jack or even crumbled feta for a different twist.

Nutrition

Calories: 150kcalCarbohydrates: 18gProtein: 5gFat: 6gFiber: 2g
Keyword Cheesy Buttery Jalapeno Corn Cakes
Tried this recipe?Let us know how it was!

Frequently Asked Questions

1. Can I make these corn cakes ahead of time?

 Absolutely! Prepare the batter and refrigerate it for up to 24 hours. Cook them when you’re ready to serve.

2. Are these corn cakes suitable for freezing?

 Yes! They freeze well. Just make sure to cool them completely first, wrap them tightly, and store them in freezer bags.

3. Can I bake these instead of frying?

 You can, but baking will yield a different texture. Preheat the oven to 400°F. Shape the cakes and place them on a greased baking sheet, then bake for about 20 minutes, flipping halfway.

4. How can I make these corn cakes healthier?

 Consider reducing the cheese or increasing the vegetable content. You can also use whole wheat flour for added fiber.

5. What’s the best way to reheat leftovers?

 For the best texture, reheat in a skillet over medium heat until warmed through. You could also use an air fryer for a crispy finish.

Conclusion

Cheesy buttery jalapeno corn cakes are not just another recipe; they are an experience filled with taste, texture, and warmth. They remind us of sunny days, laughter, and gatherings. Whether served at a barbecue, family dinner, or on a cozy night in, they never disappoint. Grab your ingredients, start cooking, and dazzle your friends and family. Happy cooking!

You’ll also like these latest recipes!

Panko Crusted Lamb Chops – Yum Yarns

Panko Crusted Lamb Chops

Before diving into the delightful world of panko crusted lamb chops, let’s consider what can accompany this dish beautifully. Pairing lamb chops with the right side dishes can elevate your dining experience significantly. Here are some suggestions that won’t disappoint:

Roasted Vegetables: Toss sweet potatoes, carrots, and Brussels sprouts in olive oil, salt, and rosemary, then roast until caramelized. This adds a sweet and earthy element to your meal.
Creamy Mashed Potatoes: Creamy mashed potatoes drizzled with a bit of gravy are comfort food at its finest. This classic pairing adds a satisfying heartiness.
Garlic Herb Couscous: Light, fluffy couscous flavored with garlic and fresh herbs offers a nice contrast to the rich flavor of lamb.
Tabbouleh Salad: This fresh salad made from parsley, mint, tomatoes, and bulgur adds a vibrant, refreshing crunch that lifts the entire dish.
Red Wine: A glass of red wine, particularly a robust Cabernet Sauvignon or a lighter Pinot Noir, beautifully complements the richness of lamb.

With these pairings in mind, let’s embark on the delicious journey of making panko crusted lamb chops. Grab your apron, and let’s create something unforgettable.

Panko Crusted Lamb Chops

An evening spent enjoying a well-cooked meal can lift the spirits. Growing up, my family often gathered around the table to share recipes that did more than just satisfy hunger. Panko crusted lamb chops have become one of those cherished recipes for me. The crispy exterior envelops the tender, juicy meat, creating a bite that’s nothing short of spectacular.

But how did I come to adore this dish? It all started with a dinner party invitation from a friend who insisted on this decadent dish. It was crispy, flavorful, and, believe it or not, surprisingly easy to prepare. That night marked a turning point in my culinary adventures. These lamb chops were now a staple for gatherings and the perfect showstopper for any feast.

What is Panko Crusted Lamb Chops Recipe?

At its core, the concept of panko crusted lamb chops is simple yet sophisticated. Panko breadcrumbs, hailing from Japan, provide an extra crunch compared to regular breadcrumbs. This crunch is the game changer in the dish, contributing a delightful texture to the succulent lamb. The preparation involves coating lamb chops in a seasoned mixture that typically includes flour, eggs, and panko crumbs combined with cheese and aromatic herbs.

The vibrant flavors are amplified by ingredients like garlic powder and smoked paprika, making each bite a delightful experience.

You will also like the following Appetizer recipes!

How Does It Taste Like?

If you’re wondering how it all comes together in terms of flavor, picture this: the first bite reveals a perfectly crunchy exterior, while the heart of the meat is soft and juicy. The seasoning brings a savoriness that complements rather than overpowers the natural flavor of the lamb. The freshness from the herbs and the zing of lemon zest add an exciting undertone that keeps your palate engaged. It’s a symphony of textures and flavors that sings in harmony.

Why You’ll Love This?

Easy to Prepare: Even if you are a beginner in the kitchen, this recipe is straightforward. Each step is simple and easy to follow.
Impressive Presentation: The golden-brown crust looks stunning, making it perfect for dinner parties or special occasions.
Versatile: This dish can be paired with a range of sides, adapting to various dietary preferences and themes.
Flavorful: The combination of herbs and spices ensures you won’t forget the flavor of these lamb chops!

Ingredients

Here’s what you’ll need to gather before getting started:

1 rack of lamb chops, trimmed and cut into single ribs
Salt and freshly ground black pepper, to taste
2 large eggs, lightly beaten
2/3 cup plain all-purpose flour
2/3 cup crispy Panko bread crumbs
1/3 cup freshly grated Parmesan cheese
2 teaspoons garlic powder seasoning
1 1/2 teaspoons smoked paprika spice
1 1/2 tablespoons finely minced fresh tarragon
1 1/2 tablespoons delicately sliced fresh chives
1 teaspoon Dijon mustard
1 teaspoon lemon zest
1/2 cup neutral cooking oil (such as canola or vegetable)

How to make Panko Crusted Lamb Chops

Step by Step Directions

Step 1: Prepare the Lamb Chops

Begin by preheating your oven to 400°F (200°C). Trim the lamb chops if necessary, removing any excess fat. Season both sides generously with salt and freshly ground black pepper.

Step 2: Set Up the Breading Stations

You’ll create three distinct stations for the breading process. In one shallow dish, place the flour. In a second dish, add the beaten eggs. In a third dish, mix the panko breadcrumbs, Parmesan cheese, garlic powder, smoked paprika, tarragon, chives, Dijon mustard, and lemon zest.

Step 3: Dredge the Lamb

Take each lamb chop and coat it in flour first, shaking off any excess. Next, dip it into the egg mixture, ensuring it is well-coated. Finally, press it into the breadcrumb mixture, covering it thoroughly.

Step 4: Heat the Oil

In a large oven-safe skillet, heat the neutral cooking oil over medium-high heat. You want enough oil to sear the lamb chops effectively.

Step 5: Sear the Lamb Chops

Once the oil is hot, carefully place the breaded lamb chops in the skillet. Sear them for about 2-3 minutes on each side until they become golden brown. This adds a beautiful color and flavor.

Step 6: Bake

After searing, transfer the skillet to the preheated oven. Bake for 10-15 minutes, or until the internal temperature reaches 145°F (medium rare) to 160°F (medium). Keep an eye on them!

Step 7: Rest and Serve

Remove the lamb chops from the oven and let them rest for at least 5 minutes. This ensures the juices redistribute throughout the meat. Serve with your chosen sides and enjoy!

Tips on Making Panko Crusted Lamb Chops Recipe

Choose the Right Lamb: Look for lamb that is bright red and has a bit of marbling. This adds flavor and juiciness.
Don’t Rush the Bread Crumbs: Press the chops gently into the breadcrumb mixture so that it adheres well. A good crust is key.
Quality Ingredients Matter: Use fresh herbs and good quality Parmesan for the best taste. Don’t skimp here!
Let It Rest: After cooking, allowing the meat to rest is essential. This step prevents juices from spilling out when you cut into the lamb.
Serve Immediately: These lamb chops are best enjoyed fresh out of the oven while they’re still crispy.

Nutrition Information

A serving of panko crusted lamb chops approximately contains:

Calories: 350
Total Fat: 22 g
Saturated Fat: 7 g
Cholesterol: 75 mg
Sodium: 600 mg
Total Carbohydrates: 10 g
Dietary Fiber: 1 g
Sugars: 0 g
Protein: 30 g

Note that these values may vary based on specific ingredients used and portion sizes.

Panko Crusted Lamb Chops Copycat recipe

How Do You Store This Panko Crusted Lamb Chops Recipe?

To store leftover lamb chops, allow them to cool completely before placing them in an airtight container. They should be refrigerated and consumed within 3-4 days for the best quality. If you wish to keep them longer, consider freezing them for up to 3 months. To reheat, place in a preheated oven at 350°F (175°C) for about 10-15 minutes. This method retains some crustiness.

What Other Substitutes Can You Use in Panko Crusted Lamb Chops Recipe?

Chicken Chops: Swap lamb for chicken breasts or thighs for a milder flavor. Chicken tends to be more universally liked and can still be deliciously crispy with the panko.
Herb Variations: Use other herbs such as rosemary or oregano instead of tarragon or chives. Each lends a different flavor profile that could enhance your meal.
Cheese Alternatives: Instead of Parmesan, try Pecorino Romano. It provides a bit more saltiness and tang.
Gluten-Free Option: Substitute regular flour and panko with almond flour or gluten-free breadcrumbs. The technique remains the same.
Different Proteins: You can also use pork chops or firm tofu for a vegetarian twist. They also benefit greatly from the crunchy coating.

Panko Crusted Lamb Chops Copycat recipe

Panko Crusted Lamb Chops

Before diving into the delightful world of panko crusted lamb chops, let’s consider what can accompany this dish beautifully. Pairing lamb chops with the right side dishes can elevate your dining experience significantly.
Prep Time 15 minutes
Cook Time 10 minutes
Total Time 25 minutes
Course Appetizer, Main Course
Cuisine American
Servings 4
Calories 350 kcal

Equipment

  • Skillet

Ingredients
  

  • 1 rack of lamb chops trimmed and cut into single ribs
  • Salt and freshly ground black pepper to taste
  • 2 large eggs lightly beaten
  • 2/3 cup plain all-purpose flour
  • 2/3 cup crispy Panko bread crumbs
  • 1/3 cup freshly grated Parmesan cheese
  • 2 teaspoons garlic powder seasoning
  • 1 1/2 teaspoons smoked paprika spice
  • 1 1/2 tablespoons finely minced fresh tarragon
  • 1 1/2 tablespoons delicately sliced fresh chives
  • 1 teaspoon Dijon mustard
  • 1 teaspoon lemon zest
  • 1/2 cup neutral cooking oil such as canola or vegetable

Instructions
 

Step 1: Prepare the Lamb Chops

  • Begin by preheating your oven to 400°F (200°C). Trim the lamb chops if necessary, removing any excess fat. Season both sides generously with salt and freshly ground black pepper.

Step 2: Set Up the Breading Stations

  • You’ll create three distinct stations for the breading process. In one shallow dish, place the flour. In a second dish, add the beaten eggs. In a third dish, mix the panko breadcrumbs, Parmesan cheese, garlic powder, smoked paprika, tarragon, chives, Dijon mustard, and lemon zest.

Step 3: Dredge the Lamb

  • Take each lamb chop and coat it in flour first, shaking off any excess. Next, dip it into the egg mixture, ensuring it is well-coated. Finally, press it into the breadcrumb mixture, covering it thoroughly.

Step 4: Heat the Oil

  • In a large oven-safe skillet, heat the neutral cooking oil over medium-high heat. You want enough oil to sear the lamb chops effectively.

Step 5: Sear the Lamb Chops

  • Once the oil is hot, carefully place the breaded lamb chops in the skillet. Sear them for about 2-3 minutes on each side until they become golden brown. This adds a beautiful color and flavor.

Step 6: Bake

  • After searing, transfer the skillet to the preheated oven. Bake for 10-15 minutes, or until the internal temperature reaches 145°F (medium rare) to 160°F (medium). Keep an eye on them!

Step 7: Rest and Serve

  • Remove the lamb chops from the oven and let them rest for at least 5 minutes. This ensures the juices redistribute throughout the meat. Serve with your chosen sides and enjoy!

Notes

  • Choose the Right Lamb: Look for lamb that is bright red and has a bit of marbling. This adds flavor and juiciness.
  • Don’t Rush the Bread Crumbs: Press the chops gently into the breadcrumb mixture so that it adheres well. A good crust is key.
  • Quality Ingredients Matter: Use fresh herbs and good quality Parmesan for the best taste. Don’t skimp here!
  • Let It Rest: After cooking, allowing the meat to rest is essential. This step prevents juices from spilling out when you cut into the lamb.
  • Serve Immediately: These lamb chops are best enjoyed fresh out of the oven while they’re still crispy.

Nutrition

Calories: 350kcalCarbohydrates: 10gProtein: 30gFat: 22gSaturated Fat: 7gCholesterol: 75mgSodium: 600mgFiber: 1g
Keyword Panko Crusted Lamb Chops
Tried this recipe?Let us know how it was!

Frequently Asked Questions

1. Can I make panko crusted lamb chops ahead of time?

Yes! You can bread the lamb chops and store them in the refrigerator up to 24 hours before cooking. Just make sure to cover them securely. Bake them fresh for the crispiest outcome.

2. Can I air fry these lamb chops instead of baking?

Absolutely! Preheat your air fryer to 400°F (200°C). Cook for about 10-12 minutes, flipping halfway through. This method will also yield a crisp crust.

3. What if I don’t have Panko breadcrumbs?

You can use regular breadcrumbs but consider mixing them with a little cornstarch for an extra crunch. Alternatively, crushed cornflakes work well, too!

4. Can I use other meats for this recipe?

Yes! As mentioned, chicken, pork, and even fish can be used as substitutes. Adjust cooking times according to the meat you choose for optimal results.

5. How do I know when my lamb is cooked?

Using a meat thermometer is the best way to check. For lamb, medium-rare is about 145°F (63°C) and medium is 160°F (71°C) internally.

6. Can I add more spices to the coating?

Certainly! Feel free to get creative with spices such as cayenne pepper, cumin, or Italian seasoning for added flavor depth.

Conclusion

Panko crusted lamb chops are more than just a meal; they’re an experience. From the crunch of the coating to the rich tenderness inside, each bite is thrilling. It’s a dish that impresses, satisfies, and brings friends and family together. Whether you’re hosting a gathering or enjoying a quiet night in, these lamb chops become the highlight of your meal. With the right sides and a bit of creativity, you can make every occasion special. 

So next time you find yourself in the kitchen, remember this recipe and let it inspire you to create something wonderful. Happy cooking!

You’ll also like these latest recipes!

Crispy Chicken and Green Onion Pot Stickers – Yum Yarns

Crispy Chicken and Green Onion Pot Stickers

Crispy chicken and green onion pot stickers are a fantastic dish that can be enjoyed as a snack, appetizer, or even a main course. But what should you serve alongside these delectable pockets of goodness? Let me share a few pairings that will elevate your pot sticker experience:

1. Dipping Sauces: A tangy soy sauce blended with rice vinegar and chili oil can take your pot stickers to the next level. For those who enjoy a kick, add a dash of Sriracha!

2. Steamed Broccoli: A side of steamed broccoli offers a crunchy, healthy contrast to the soft, crispy pot stickers. Plus, the vibrant green color brightens up your plate.

3. Thai Mango Salad: This refreshing salad balances the savory flavor of pot stickers. The sweetness of the mango combined with the zesty lime dressing adds a lovely contrast.

4. Fried Rice: A light vegetable or chicken fried rice complements the pot stickers beautifully. It provides that extra heartiness, making for a satisfying meal.

Crispy Chicken and Green Onion Pot Stickers

Pot stickers are one of those magical dishes that pack deliciousness into a simple package. The process of cooking them combines frying and steaming, resulting in a delightful contrast of textures. As someone who loves to experiment in the kitchen, I can assure you that finding the

perfect combination of filling and cooking method can turn an ordinary meal into something special.

Being a registered dietitian and food enthusiast, I have dabbled in numerous recipes over the years. Each dish tells a story, and every bite can transport you to a different place. Cooling pots of boiling water, sizzling pans, and the aroma of spices wafting through the kitchen—they all evoke memories of family meals and gatherings. Today, I’m excited to share my favorite recipe for crispy chicken and green onion pot stickers.

What Are Crispy Chicken and Green Onion Pot Stickers?

Crispy chicken and green onion pot stickers are a type of dumpling commonly found in Asian cuisine. They consist of a thin wrapper filled with a mixture of ground chicken, fresh green onions, and spices. The dish is typically pan-fried to create a golden, crispy bottom layer while keeping the filling moist and flavorful.

Traditionally, these pot stickers are shaped into half-moons before cooking and can be served with a variety of dipping sauces. Their combination of textures and flavors makes them crowd-pleasers, whether at a family dinner or a casual gathering with friends.

You will also like the following Appetizer recipes!

Why This Recipe Works

What’s the secret sauce behind this pot sticker recipe? Here are a few reasons why I believe this dish is a winner:

1. Flavorful Filling
The filling combines ground chicken breast, garlic, ginger, and toasted sesame oil. These ingredients work together to provide a punch of flavor that tantalizes the taste buds. The minced shallots add sweetness and depth, while the green onions contribute a fresh, vibrant note.

2. Perfectly Crispy Texture
Achieving that crispy bottom with a soft, steamed top is an art. This recipe utilizes a combination of frying and steaming, ensuring that your pot stickers have that coveted golden crust without being overly greasy.

3. Versatile and Customizable
This recipe serves as a base you can adapt to your liking. Feel free to swap out the ground chicken for turkey or even tofu for a vegetarian option. You can also play with the seasonings, adding more chili for heat or different vegetables for texture.

4. Make Ahead Convenience
Pot stickers are perfect for meal prep. You can assemble them in advance and freeze them. When you’re ready to eat, simply cook straight from the freezer. This makes for a quick and satisfying weeknight dinner.

Ingredients You’ll Need To Make Crispy Chicken and Green Onion Pot Stickers

For the stuffing:

  • 1 pound ground chicken breast
  • 1 small shallot, finely minced
  • 1 garlic clove, minced
  • 1 teaspoon freshly grated ginger
  • 3 green onions, sliced thinly
  • 1 tablespoon toasted sesame oil
  • 1/2 teaspoon soy sauce
  • Salt and freshly ground black pepper to taste
  • 1 teaspoon chili garlic sauce

For assembly:

  • 40 round wonton wrappers
  • 1 large egg, lightly beaten
  • 7 ½ tablespoons vegetable oil, divided
How to make Crispy Chicken and Green Onion Pot Stickers

How To Make These?

Now, let’s get cooking! Here’s a step-by-step guide to preparing these scrumptious pot stickers.

Step 1: Prepare the Filling

In a large mixing bowl, combine the ground chicken, minced shallot, minced garlic, grated ginger, sliced green onions, toasted sesame oil, soy sauce, salt, pepper, and chili garlic sauce. Use your hands or a spatula to mix everything thoroughly until well combined. The mixture should be cohesive but not too dense.

Step 2: Assemble the Pot Stickers

Take a wonton wrapper and place a heaping teaspoon of the filling in the center. Use your finger to brush the outer edge of the wrapper with the beaten egg. This will help seal the pot sticker. Fold the wrapper in half to form a semi-circle, pressing out any air as you go. Make sure the edges are sealed well to prevent leakage during cooking. Repeat this process until all the filling is used.

Step 3: Cook the Pot Stickers

In a large frying pan, heat 1 tablespoon of vegetable oil over medium-high heat. Add the pot stickers in a single layer, ensuring they are not overcrowded. Fry them for about 2-3 minutes, or until the bottoms are golden brown.

Step 4: Steam the Pot Stickers

Once the bottoms are crispy, carefully pour in about 1/4 cup of water into the skillet and immediately cover with a lid. This will create steam that cooks the filling. Reduce the heat to medium and let the pot stickers steam for about 5-7 minutes. Once the water has evaporated, remove the lid and let them cook for an additional minute to re-crisp the bottoms.

Step 5: Serve

Once cooked, remove your pot stickers from the skillet and serve them hot with your favorite dipping sauce. A mixture of soy sauce, rice vinegar, and chili oil is a classic choice.

Tips

Don’t Overfill: When adding the filling to your wrappers, avoid overfilling. A teaspoon is usually sufficient. Overfilled pot stickers may burst during cooking.

Keep Wrappers Covered: Wonton wrappers can dry out quickly. Keep them covered with a damp towel while you assemble the pot stickers to prevent them from becoming brittle.

Test First: Before cooking all of the pot stickers, consider frying one as a test. This allows you to adjust the seasoning if needed.

Use Nonstick Spray: If you’re worried about sticking, spritz your frying pan lightly with nonstick cooking spray before adding the oil.

Batch Cooking: Make a large batch and freeze the extra pot stickers. They can be cooked straight from the freezer when you need a quick meal.

Nutrition Information

Each crispy chicken and green onion pot sticker contains approximately:

  • Calories: 65
  • Protein: 4g
  • Fat: 4g
  • Carbohydrates: 5g
  • Fiber: 0.5g

These values can vary based on ingredient brands and preparation.

Crispy Chicken and Green Onion Pot Stickers Copycat recipe

How to Store the Leftovers?

If you happen to have any leftovers (which is rare!), allow the pot stickers to cool completely. Store them in an airtight container in the fridge for up to 3 days. To reheat, pan-fry them briefly until they’re heated through, or you can pop them in the microwave, though you may lose some crispiness.

Recommended Side Dishes for Crispy Chicken and Green Onion Pot Stickers

Pair your pot stickers with these fantastic side dishes:

1. Cucumber Salad
A light cucumber salad can provide a refreshing bite. Sliced cucumbers tossed in rice vinegar, sesame oil, and sesame seeds balance the richness of the pot stickers perfectly.

2. Edamame
Steamed edamame pods, sprinkled with sea salt, make a healthy and protein-rich side. They’re simple to prepare and add a nice crunch.

3. Vegetable Stir-Fry
A quick vegetable stir-fry with bell peppers, snap peas, and carrots complements the pot stickers well. Toss them in a light soy sauce to tie the dish together.

4. Miso Soup
A warm bowl of miso soup can round out the meal beautifully. Its savory umami flavors can harmonize with the taste of pot stickers.

Substitute Options for Ingredients

If you’re missing some ingredients from the pantry, here are some substitutions:

1. Ground Chicken
Use ground turkey or ground pork if chicken isn’t on hand. Both alternatives provide great flavors and textures.

2. Green Onions
Scallions or chopped chives can work in a pinch. They offer a similar taste profile.

3. Garlic
Garlic powder can be a substitute if you don’t have fresh garlic. About 1/4 teaspoon should suffice.

4. Wonton Wrappers
If wonton wrappers are unavailable, try using egg roll wrappers cut into circles, or you can make your own dough using flour and water.

Crispy Chicken and Green Onion Pot Stickers Copycat recipe

Crispy Chicken and Green Onion Pot Stickers

Crispy chicken and green onion pot stickers are a fantastic dish that can be enjoyed as a snack, appetizer, or even a main course. But what should you serve alongside these delectable pockets of goodness
Prep Time 30 minutes
Cook Time 10 minutes
Total Time 40 minutes
Course Appetizer
Cuisine Asian
Servings 10
Calories 65 kcal

Equipment

  • Frying pan

Ingredients
  

For the stuffing:

  • 1 pound ground chicken breast
  • 1 small shallot finely minced
  • 1 garlic clove minced
  • 1 teaspoon freshly grated ginger
  • 3 green onions sliced thinly
  • 1 tablespoon toasted sesame oil
  • 1/2 teaspoon soy sauce
  • Salt and freshly ground black pepper to taste
  • 1 teaspoon chili garlic sauce

For assembly:

  • 40 round wonton wrappers
  • 1 large egg lightly beaten
  • 7 ½ tablespoons vegetable oil divided

Instructions
 

Step 1: Prepare the Filling

  • In a large mixing bowl, combine the ground chicken, minced shallot, minced garlic, grated ginger, sliced green onions, toasted sesame oil, soy sauce, salt, pepper, and chili garlic sauce. Use your hands or a spatula to mix everything thoroughly until well combined. The mixture should be cohesive but not too dense.

Step 2: Assemble the Pot Stickers

  • Take a wonton wrapper and place a heaping teaspoon of the filling in the center. Use your finger to brush the outer edge of the wrapper with the beaten egg. This will help seal the pot sticker. Fold the wrapper in half to form a semi-circle, pressing out any air as you go. Make sure the edges are sealed well to prevent leakage during cooking. Repeat this process until all the filling is used.

Step 3: Cook the Pot Stickers

  • In a large frying pan, heat 1 tablespoon of vegetable oil over medium-high heat. Add the pot stickers in a single layer, ensuring they are not overcrowded. Fry them for about 2-3 minutes, or until the bottoms are golden brown.

Step 4: Steam the Pot Stickers

  • Once the bottoms are crispy, carefully pour in about 1/4 cup of water into the skillet and immediately cover with a lid. This will create steam that cooks the filling. Reduce the heat to medium and let the pot stickers steam for about 5-7 minutes. Once the water has evaporated, remove the lid and let them cook for an additional minute to re-crisp the bottoms.

Step 5: Serve

  • Once cooked, remove your pot stickers from the skillet and serve them hot with your favorite dipping sauce. A mixture of soy sauce, rice vinegar, and chili oil is a classic choice.

Notes

  • Don’t Overfill: When adding the filling to your wrappers, avoid overfilling. A teaspoon is usually sufficient. Overfilled pot stickers may burst during cooking.
  • Keep Wrappers Covered: Wonton wrappers can dry out quickly. Keep them covered with a damp towel while you assemble the pot stickers to prevent them from becoming brittle.
  • Test First: Before cooking all of the pot stickers, consider frying one as a test. This allows you to adjust the seasoning if needed.
  • Use Nonstick Spray: If you’re worried about sticking, spritz your frying pan lightly with nonstick cooking spray before adding the oil.
  • Batch Cooking: Make a large batch and freeze the extra pot stickers. They can be cooked straight from the freezer when you need a quick meal.v

Nutrition

Calories: 65kcalCarbohydrates: 5gProtein: 4gFat: 4gFiber: 0.5g
Keyword Crispy Chicken and Green Onion Pot Stickers
Tried this recipe?Let us know how it was!

Frequently Asked Questions

1. Can I freeze uncooked pot stickers?

 Absolutely! Assemble the pot stickers, single layer them on a baking sheet, and freeze until solid. After that, transfer them to a freezer bag for long-term storage.

2. How can I make the pot stickers gluten-free?

 You can use gluten-free wonton wrappers or make your own using gluten-free flour. The filling is naturally gluten-free, so it’s easy to adapt.

3. What if I don’t have toasted sesame oil?

 If you lack toasted sesame oil, regular sesame oil or peanut oil can serve as a substitute. The flavor might change slightly, but they will work.

4. Can I bake instead of frying?

 Yes, you can! Brush the pot stickers with oil and bake them at 400°F for 15-20 minutes or until crispy. They won’t have the same texture, but they will still be delicious.

5. How do I keep the pot stickers warm until serving?

 Cover them with a kitchen towel or place them in a warmed oven set to low heat to keep the pot stickers warm without cooking them further.

Conclusion

There you have it! Crispy chicken and green onion pot stickers are a delightful dish you can not only enjoy right away but also customize according to your tastes. With a burst of flavor in every bite and a perfect mixture of textures, pot stickers are sure to impress family and friends alike.

So, get cooking, find your perfect dipping sauce, and enjoy every moment. Whether you serve them at a gathering or whip them up for a cozy night in, these pot stickers will have everyone coming back for seconds. Happy cooking!

You’ll also like these latest recipes!

Mini Crunchwrap Supreme Recipe – Yum Yarns

Mini Crunchwrap Supreme Recipe

Food is all about exploration and creativity. It’s about combining flavors, textures, and memories. As a huge fan of hands-on cooking, I discovered the joy of making Mini Crunchwrap Supremes on a lazy afternoon. These little pockets are not just delightful bites; they evoke a sense of nostalgia for me. I remember the first time I had a Crunchwrap Supreme during a late-night run to a fast-food joint. Who wouldn’t love those layers of crunchy, cheesy goodness?

Now, let’s spice things up. These Mini Crunchwrap Supremes come together quickly and offer a fun way to get everyone in the kitchen. You can pair them with a side salad or some homemade salsa. Grab your favorite guacamole and maybe even a cold drink to wash it all down.

Mini Crunchwrap Supreme Recipe

What is a Mini Crunchwrap Supreme?

The Mini Crunchwrap Supreme is a playful twist on a taco fan-favorite. It consists of layers of seasoned meat, cheese, crispy tortilla chips, fresh veggies, and sour cream, all wrapped neatly in a tortilla. The mini version is perfect for those days when you’re craving a snack but still want that fulfilling crunch. It’s like a big hug for your taste buds, reminding you of lazy weekends and movie nights.

How Does It Taste?

The first bite is a burst of flavors. You’ll experience the robust seasoning from the meat that warms your palate. The melted cheese adds a creamy texture, while the crunchy tortilla chips bring a satisfying crunch. Fresh veggies add a bite and balance out the richness, and the sour cream gives a cool finish. You’ll find yourself reaching for seconds, I guarantee it.

You will also like the following Appetizer recipes!

Why You’ll Love This?

1. Quick and Easy: This recipe is straightforward and doesn’t keep you slaving away in the kitchen.
2. Customizable: You can adjust the ingredients to suit your tastes.
3. Kid-Friendly: My kids love these; it’s a fun way for them to experience making their own food.
4. Portable: Great for picnics, school lunches, or even road trips.
5. Tasty: There’s no denying how delicious they are.

Ingredients

Diving into the ingredients, let’s keep things simple yet flavorful:

  • 1 pound lean ground beef
  • 1 tablespoon extra-virgin olive oil
  • 1 packet taco seasoning mix
  • ¼ cup water
  • 1 teaspoon smoked paprika (optional)
  • 1 tablespoon unsalted butter
  • 1 tablespoon all-purpose flour
  • 1 cup whole milk
  • 4 ounces sharp cheddar cheese, shredded
  • 20 round tortilla chips
  • 20 teaspoons sour cream, divided
  • 2 Roma tomatoes, seeded and diced
  • 1 ½ cups finely shredded iceberg or romaine lettuce
  • 40 (5-inch) flour tortillas
  • ½ teaspoon finely chopped fresh cilantro (optional)
How to make Mini Crunchwrap Supreme Recipe

Step-by-Step Directions

Step 1: Cook the Meat

Start by heating the olive oil in a skillet over medium heat. Add the ground beef, breaking it up with a spatula. Cook it until browned. Add the taco seasoning and water, letting it simmer for about five minutes. Stir in smoked paprika for an extra kick.

Step 2: Prepare the Cheese Sauce

In a small saucepan, melt the butter over medium heat. Once melted, whisk in the flour to create a roux. Gradually add the milk while whisking continuously. Bring to a gentle simmer, and then add the shredded cheese, stirring until it’s melted and smooth.

Step 3: Assemble the Crunchwraps

Now comes the fun part! Take a tortilla and spread a teaspoon of sour cream in the center. Layer a tablespoon of cooked beef on top, followed by a bit of cheese sauce, three tortilla chips, diced tomatoes, and lettuce.

Step 4: Folding the Crunchwrap

This step might take a bit of practice, but it’s fun! Gently fold the edges of the tortilla inward, forming pleats. It should look like a little pocket. You want to keep everything tucked neatly, so have a bit of patience.

Step 5: Cook the Crunchwrap

Heat a frying pan on medium heat. Spray lightly with cooking oil, then place the folded crunchwrap seam-side down in the pan. Cook for about two to three minutes on each side or until golden brown. You’ll love the sound of that crunch!

Step 6: Serve and Enjoy!

Once you’ve cooked all the crunchwraps, serve them warm. Feel free to add extra toppings or dips like guacamole or more salsa.

Tips On Making Mini Crunchwrap Supremes

Use Fresh Ingredients: Fresh veggies enhance the flavors significantly.
Customize the Meat: Feel free to use chicken, turkey, or even beans if you want a vegetarian option.
Temperature Matters: Make sure your cheese sauce is warm and gooey for easy layering.
Get Creative: Add your favorite toppings—black olives, jalapeños, or avocado work beautifully.
Practice Your Folding: The more you do it, the easier it gets to fold those little pockets!

Nutrition Information

While we’re having fun, it’s essential to keep in mind the nutrition aspect. Each mini crunchwrap, when made with lean beef and fresh veggies, provides a balanced meal. You’re looking at approximately 250 calories per wrap, with protein, fats, and carbs nicely represented.

Mini Crunchwrap Supreme copycat  Recipe

How Do You Store This Mini Crunchwrap Supreme?

Uncooked, you can refrigerate your assembled crunchwraps for up to two days. Just make sure to keep them wrapped tightly in plastic wrap. Cooked leftovers can last for about three days in the fridge. Just reheat in a skillet for the best results, ensuring the crunch returns!

What Other Substitutions Can You Use in Mini Crunchwrap Supremes?

1. Ground Turkey: A lean alternative that provides a lighter flavor.
2. Black Beans: Perfect for a vegetarian option, packed with fiber.
3. Spinach: Add a handful of fresh spinach for a pop of color and nutrients.
4. Corn: Sweet corn adds extra texture and sweetness.
5. Gluten-Free Tortillas: If you’re gluten-sensitive, various brands offer delicious gluten-free options that taste great.

How to make Mini Crunchwrap Supreme Recipe

Mini Crunchwrap Supreme Recipe

Food is all about exploration and creativity. It’s about combining flavors, textures, and memories. As a huge fan of hands-on cooking, I discovered the joy of making Mini Crunchwrap Supremes on a lazy afternoon.
Prep Time 10 minutes
Cook Time 15 minutes
Total Time 25 minutes
Course Appetizer
Cuisine American
Servings 20
Calories 250 kcal

Equipment

  • Whisk
  • Saucepan

Ingredients
  

  • 1 pound lean ground beef
  • 1 tablespoon extra-virgin olive oil
  • 1 packet taco seasoning mix
  • ¼ cup water
  • 1 teaspoon smoked paprika
  • 1 tablespoon unsalted butter
  • 1 tablespoon all-purpose flour
  • 1 cup whole milk
  • 4 ounces sharp cheddar cheese shredded
  • 20 round tortilla chips
  • 20 teaspoons sour cream divided
  • 2 Roma tomatoes seeded and diced
  • 1 ½ cups finely shredded iceberg or romaine lettuce
  • 40 5-inch flour tortillas
  • ½ teaspoon finely chopped fresh cilantro

Instructions
 

Step 1: Cook the Meat

  • Start by heating the olive oil in a skillet over medium heat. Add the ground beef, breaking it up with a spatula. Cook it until browned. Add the taco seasoning and water, letting it simmer for about five minutes. Stir in smoked paprika for an extra kick.

Step 2: Prepare the Cheese Sauce

  • In a small saucepan, melt the butter over medium heat. Once melted, whisk in the flour to create a roux. Gradually add the milk while whisking continuously. Bring to a gentle simmer, and then add the shredded cheese, stirring until it’s melted and smooth.

Step 3: Assemble the Crunchwraps

  • Now comes the fun part! Take a tortilla and spread a teaspoon of sour cream in the center. Layer a tablespoon of cooked beef on top, followed by a bit of cheese sauce, three tortilla chips, diced tomatoes, and lettuce.

Step 4: Folding the Crunchwrap

  • This step might take a bit of practice, but it’s fun! Gently fold the edges of the tortilla inward, forming pleats. It should look like a little pocket. You want to keep everything tucked neatly, so have a bit of patience.

Step 5: Cook the Crunchwrap

  • Heat a frying pan on medium heat. Spray lightly with cooking oil, then place the folded crunchwrap seam-side down in the pan. Cook for about two to three minutes on each side or until golden brown. You’ll love the sound of that crunch!

Step 6: Serve and Enjoy!

  • Once you’ve cooked all the crunchwraps, serve them warm. Feel free to add extra toppings or dips like guacamole or more salsa.

Notes

  • Use Fresh Ingredients: Fresh veggies enhance the flavors significantly.
  • Customize the Meat: Feel free to use chicken, turkey, or even beans if you want a vegetarian option.
  • Temperature Matters: Make sure your cheese sauce is warm and gooey for easy layering.
  • Get Creative: Add your favorite toppings—black olives, jalapeños, or avocado work beautifully.
  • Practice Your Folding: The more you do it, the easier it gets to fold those little pockets!

Nutrition

Calories: 250kcal
Keyword Mini Crunchwrap Supreme Recipe
Tried this recipe?Let us know how it was!

Frequently Asked Questions

1. Can I make Mini Crunchwrap Supremes ahead of time?

 Absolutely! Assemble them, keep them wrapped in the fridge, and cook them just before serving for the best results.

2. What dips pair well with these crunchwraps?

 Guacamole and salsa are excellent choices. You might also enjoy a zesty ranch dressing for a twist.

3. Can I freeze these?

Yes, you can freeze unassembled crunchwraps. Just freeze them flat, then transfer them to an airtight container after they’ve hardened.

4. Are there vegetarian options for this recipe?

 Definitely! Substitute the meat with beans, lentils, or add extra veggies for a satisfying crunchwrap.

5. How can I make this recipe healthier?

 Opt for whole wheat tortillas and use less cheese. You can also load up on more veggies to enhance the nutritional value.

6. What snacks pair well with Mini Crunchwrap Supremes?

 Consider pairing them with tortilla chips and salsa or a refreshing fruit salad to balance the flavors.

Conclusion

Mini Crunchwrap Supremes are a delightful twist on a classic that’s adaptable, fun, and downright delicious. Whether you’re making them for a family meal or a gathering with friends, they are sure to be a hit. They embrace the spirit of culinary creativity, all while allowing you to savor every bite.

So there you go—simple, satisfying, and scrumptious. Enjoy creating a meal that feels special without spending your entire day in the kitchen. These little delights are sure to become a go-to, and I’d love to hear about your experiences making them! Snuggle in and let those taste buds rejoice.

You’ll also like these latest recipes!

Mini Cheesy Hasselback Potatoes – Yum Yarns

mini cheesy hasselback potatoes Recipe

When you’re ready to take a culinary journey that packs flavor into every bite, mini cheesy hasselback potatoes deserve to be at the center of your dinner table. But let’s be honest—what on earth should you serve them with?

Picture this: a plate filled with juicy grilled chicken drizzled with a zesty lemon sauce, or perhaps some beautifully seared salmon with a hint of dill. You could even whip up a vibrant salad bursting with seasonal vegetables. Now, if you want to kick things up a notch, a tangy coleslaw could add that crunchy texture that complements the creamy cheese and soft potato.

Feeling adventurous? A dipping sauce such as garlic aioli or a spicy chili mayo can elevate this dish, providing that extra bite. Trust me; you won’t be short of options. Let’s get into why these mini cheesy hasselback potatoes are perfect for your next gathering.

mini cheesy hasselback potatoes Recipe

Why the Mini Cheesy Hasselback Potatoes Are Perfect for You

So, why should you care about this recipe? For starters, it’s easy to make. The beauty of these little wonders lies in their simplicity without sacrificing flavor. With their crispy edges and gooey cheese, they offer a mouthwatering experience that’s hard to resist.

Plus, they are just so darn cute! Presentation matters, especially when entertaining guests. When I place these mini cheesy hasselback potatoes on the table, I can feel the anticipation in the air. Everyone’s excited to dig in.

As someone who has spent countless evenings experimenting in the kitchen, I can assure you that the satisfaction of slicing into one of these bite-sized beauties is incredible. The ingredients in this recipe aren’t just thrown together; they create a rich tapestry of taste and texture.

Let’s break down exactly what we need to make these little delights.

You will also like the following Side Dishes recipes!

Ingredients List with Measurements

Here’s what you’ll need:

  • Potatoes: 20 baby new potatoes. These little gems are tender and have a creamy texture when cooked.
  • Cheese: 1 ½ cups sharp cheddar, freshly shredded. This cheese melts beautifully and adds that irresistible cheesiness.
  • Butter: 1/4 cup (1/2 stick) unsalted butter, softened. This enhances both flavor and helps the cheese develop that delicious crust.
  • Garlic: 2 garlic cloves, finely minced. Garlic adds a punch of flavor that’s hard to beat.
  • Smoked Paprika: 1 teaspoon. This new addition provides a subtle depth, giving the potatoes a unique twist.
  • Seasoning: A pinch of sea salt and freshly ground black pepper to elevate the overall taste.
  • Garnish: 3 tablespoons thinly sliced fresh chives for that beautiful finish and a burst of freshness.

With these ingredients, we’re poised to create something superb. Now, let’s dive into the how-to!

how to make mini cheesy hasselback potatoes Recipe

How to Make Mini Cheesy Hasselback Potatoes

Step 1: Preheat Your Oven

Begin by preheating your oven to 400°F (200°C). The right temperature is crucial for achieving that golden crispy exterior that we all love.

Step 2: Prepare Your Potatoes

Rinse the baby new potatoes under cold water to remove any dirt. Pat them dry with a clean kitchen towel. If you’re like me, you may even marvel at how cute these tiny potatoes are—it’s hard to resist their charm! Make a series of shallow cuts along the length of each potato. Aim for about 1/8-inch apart. This creates plenty of surface area for the cheese to melt into.

Step 3: Make the Garlic Butter Mixture

In a mixing bowl, combine the softened unsalted butter and the finely minced garlic. Use a fork or spoon to mix until combined. Then, add the smoked paprika, a pinch of sea salt, and freshly ground black pepper. Stir it all around until it’s a cohesive mixture that looks so good you might want to taste it (I won’t tell!).

Step 4: Coat the Potatoes

Place the prepared potatoes on a baking sheet lined with parchment paper. With a brush, generously coat the sides and alternating cuts of the potatoes with the garlic butter mixture. This step will impart incredible flavor as the potatoes roast.

Step 5: Bake the Potatoes

Now, pop the baking sheet into the preheated oven. Let those potatoes roast for about 30 to 35 minutes. You want them fork-tender but not mushy.

Step 6: Add the Cheese

After 30 minutes of baking, remove the potatoes from the oven. Here comes the fun part! Sprinkle the freshly shredded sharp cheddar generously over the top of the potatoes. Return them to the oven and bake for an additional 10 to 15 minutes. This step will let the cheese melt and get bubbly and maybe even slightly crispy—heaven!

Step 7: Garnish and Serve

Once the cheese is nicely melted and a bit golden, take them out of the oven. As a final flourish, sprinkle chopped fresh chives on top. The green color pops against the cheesy goodness, and it’s practically irresistible. Serve them with your favorite dipping sauce if you wish, and watch them disappear!

Nutrition Information

mini cheesy hasselback potatoes copycat Recipe

Recipe Notes

Potatoes

These baby new potatoes are perfect for this dish. Their size makes them easy to manage and perfect for stuffing cheese into all those little cuts.

Cheese

Sharp cheddar is my go-to here, but feel free to experiment with other cheese types—think Mozzarella for a gooey pull or Gruyère for a nutty flavor.

Butter

Unsalted butter is preferred to keep control over the saltiness of the dish. Remember, you can’t take salt out once it’s in, but you can add more seasoning later.

Garlic

The more garlic, the better, in my opinion. If you love a strong garlic flavor, feel free to adjust the quantity.

Smoked Paprika

This spice adds warmth without being overpowering. It’s a game changer for depth of flavor, bringing richness that takes these potatoes up a notch.

Chives

Fresh chives provide a mild onion flavor that’s a great balance with the rich cheese. They’re also a visually appealing garnish!

Recipe Variations

  1. Cheesy Bacon Hasselback Potatoes: Add crumbled crispy bacon between potato slices for a savory crunch that enhances the dish magnificently.
  2. Herbed Hasselback Potatoes: Blend your butter with fresh herbs such as rosemary or thyme. This addition will elevate the flavor with a vibrant, fresh taste.
  3. Spicy Hasselback Potatoes: For those who want a kick, consider adding diced jalapeños or a sprinkle of cayenne into the cheese.
  4. Vegan Version: Substitute dairy with plant-based cheese and vegan butter. The texture may vary, but the taste will still delight.
  5. Mediterranean Twist: Top with feta instead of cheddar, and add kalamata olives and sun-dried tomatoes. A new spin that’s just as satisfying!
  6. Loaded Hasselbacks: Top with sour cream, diced green onions, and serve with chili for a hearty dish.
mini cheesy hasselback potatoes copycat Recipe

Mini Cheesy Hasselback Potatoes

When you're ready to take a culinary journey that packs flavor into every bite, mini cheesy hasselback potatoes deserve to be at the center of your dinner table
Prep Time 10 minutes
Cook Time 45 minutes
Total Time 55 minutes
Course Side Dish
Cuisine Swedish
Servings 4
Calories 1564 kcal

Equipment

  • Baking sheet
  • Oven

Ingredients
  

  • 20 baby new potatoes
  • 1 ½ cups sharp cheddar
  • 1/4 cup 1/2 stick unsalted butter
  • 2 garlic cloves
  • 1 teaspoon of potatoes
  • A pinch of sea salt
  • 3 tablespoons thinly sliced fresh chives

Instructions
 

Step 1: Preheat Your Oven

  • Begin by preheating your oven to 400°F (200°C). The right temperature is crucial for achieving that golden crispy exterior that we all love.

Step 2: Prepare Your Potatoes

  • Rinse the baby new potatoes under cold water to remove any dirt. Pat them dry with a clean kitchen towel. If you’re like me, you may even marvel at how cute these tiny potatoes are—it’s hard to resist their charm! Make a series of shallow cuts along the length of each potato. Aim for about 1/8-inch apart. This creates plenty of surface area for the cheese to melt into.

Step 3: Make the Garlic Butter Mixture

  • In a mixing bowl, combine the softened unsalted butter and the finely minced garlic. Use a fork or spoon to mix until combined. Then, add the smoked paprika, a pinch of sea salt, and freshly ground black pepper. Stir it all around until it’s a cohesive mixture that looks so good you might want to taste it (I won’t tell!).

Step 4: Coat the Potatoes

  • Place the prepared potatoes on a baking sheet lined with parchment paper. With a brush, generously coat the sides and alternating cuts of the potatoes with the garlic butter mixture. This step will impart incredible flavor as the potatoes roast.

Step 5: Bake the Potatoes

  • Now, pop the baking sheet into the preheated oven. Let those potatoes roast for about 30 to 35 minutes. You want them fork-tender but not mushy.

Step 6: Add the Cheese

  • After 30 minutes of baking, remove the potatoes from the oven. Here comes the fun part! Sprinkle the freshly shredded sharp cheddar generously over the top of the potatoes. Return them to the oven and bake for an additional 10 to 15 minutes. This step will let the cheese melt and get bubbly and maybe even slightly crispy—heaven!

Step 7: Garnish and Serve

  • Once the cheese is nicely melted and a bit golden, take them out of the oven. As a final flourish, sprinkle chopped fresh chives on top. The green color pops against the cheesy goodness, and it’s practically irresistible. Serve them with your favorite dipping sauce if you wish, and watch them disappear!

Notes

Potatoes

These baby new potatoes are perfect for this dish. Their size makes them easy to manage and perfect for stuffing cheese into all those little cuts.

Cheese

Sharp cheddar is my go-to here, but feel free to experiment with other cheese types—think Mozzarella for a gooey pull or Gruyère for a nutty flavor.

Butter

Unsalted butter is preferred to keep control over the saltiness of the dish. Remember, you can’t take salt out once it’s in, but you can add more seasoning later.

Garlic

The more garlic, the better, in my opinion. If you love a strong garlic flavor, feel free to adjust the quantity.

Smoked Paprika

This spice adds warmth without being overpowering. It’s a game changer for depth of flavor, bringing richness that takes these potatoes up a notch.

Chives

Fresh chives provide a mild onion flavor that’s a great balance with the rich cheese. They’re also a visually appealing garnish!

Nutrition

Serving: 1955gCalories: 1564kcalCarbohydrates: 339gProtein: 40gFat: 9.5gSaturated Fat: 5.3gCholesterol: 15mgSodium: 122mgFiber: 43gSugar: 15g
Keyword Mini Cheesy Hasselback Potatoes
Tried this recipe?Let us know how it was!

Frequently Asked Questions

1. How do I store leftover mini cheesy hasselback potatoes?

To store leftovers, let the potatoes cool down to room temperature. Place them in an airtight container and refrigerate for up to three days. Reheat in the oven for the best texture.

2. Can I use other types of potatoes for this recipe?

Absolutely! While baby new potatoes are ideal, you could easily substitute with fingerling or even larger potatoes, adjusting the cooking time as necessary.

3. What kind of herbs can I use to enhance the flavor?

Fresh herbs would be fantastic! Consider using rosemary, thyme, or even parsley. Adding them can give an aromatic lift that pairs wonderfully with the cheese.

4. How do I prevent the cheese from burning while baking?

Keeping an eye on the potatoes during the last few minutes of baking is wise. If the cheese is browning too quickly, simply cover the baking dish with a piece of aluminum foil until it’s done.

5. Can I prepare them ahead of time?

Yes, you can prep the potatoes up to the baking stage. Just store them in the refrigerator covered until you’re ready to bake. Add 5 to 10 extra minutes to the baking time if they are cold.

6. What’s the best way to serve them?

These mini cheesy hasselback potatoes are a fantastic side dish for grilled meats, barbecued vegetables, or as part of a buffet table. They’re also delightful as a stand-alone snack.

Conclusion

There you have it—mini cheesy hasselback potatoes that are easy to make and taste fantastic. These delightful little bites can adorn your dinner table, making any meal feel special. With their crispiness, gooey cheese, and aromatic garlic, they’re a crowd-pleaser every time.

So grab your ingredients and unleash your inner chef. Remember, cooking should be enjoyable! Mixing flavors, trying new things, and sharing them with friends and family is what it’s all about. I’ll tell you from experience; your kitchen will always feel warm with love and laughter when these potatoes are involved. Enjoy the process, and watch as these mini cheesy hasselback potatoes become a staple in your cooking repertoire. Happy cooking!

You’ll also like these latest recipes!

Dehydrated Citrus Wheels Recipe – Yum Yarns

dehydrated citrus wheels Recipe

When I first discovered dehydrated citrus wheels, my kitchen transformed overnight. I found these vibrant little rounds to be a sensational addition for both embellishment and flavor enhancement. Whether you’re dressing up a cocktail or adding a touch of zing to your water, these citrus wonders are a game-changer. Before delving into the heart of the matter, let me share some delightful pairings for dehydrated citrus wheels.

dehydrated citrus wheels Recipe

Perfect Pairings

Imagine brightening up a refreshing salad or elevating a simple dessert with these wheels. Here are some suggestions to inspire your culinary creativity:

Gourmet Cocktails: Add a dehydrated lemon wheel to your gin and tonic for a refreshing twist. It’s a conversation starter.
Zesty Salads: Toss dehydrated orange wheels into mixed greens with a light vinaigrette. It brings a burst of flavor.
Flavor-Infused Water: Modifying regular water by adding these flavorful slices makes hydration exciting.
Cheese Boards: They add a pop of color and a tangy flavor that complements creamy cheeses beautifully.

The Journey Begins: What Are Dehydrated Citrus Wheels?

Dehydrated citrus wheels are simply slices of citrus fruits that have had their moisture removed. This process intensifies their flavors and changes their texture. They become chewy yet crisp. The flavors of oranges, lemons, and grapefruits deepen, making them perfect for garnishing dishes or infusing beverages.

You will also like the following Appetizers recipes!

Why This Recipe Works

1. Visual Appeal: The vibrant colors of citrus fruits make for an eye-catching presentation. Serving food that looks great can elevate the dining experience significantly.

2. Versatility: These wheels can be used in both savory and sweet dishes. From cocktails to salads, the uses are endless.

3. Flavor Enhancement: The dehydration process concentrates the sweetness and tanginess. Every bite is a burst of flavor, making even the simplest dish extraordinary.

4. Long Shelf Life: Once properly dehydrated, citrus wheels can last a long time. They make for an excellent pantry staple, always ready when creative inspiration strikes.

Ingredients You’ll Need to Make Dehydrated Citrus Wheels

Let’s take a closer look at the ingredients required for this delightful treat:

Ruby Red Grapefruits: Slice these into ¼-inch rounds, showcasing their beautiful colors.
Fresh Pineapple Rings: These add a tropical twist, also cut in ¼-inch slices.
Blood Oranges: Their striking hue can make an impressive statement.
Tangerines: Smaller yet so sweet, perfect for a mix.
Pink Lady Apples (Optional): Sweet and crisp, enhancing flavors.
Lemons or Meyer Lemons: A classic choice, balancing sweetness and zest.
Tangelos: Their juiciness adds another flavor dimension.
Limes: Cut into just as thick rounds; they’ll bring a lovely sharpness.

how to make dehydrated citrus wheels Recipe

How to Make These?

Now, let’s get into the nitty-gritty of creating your dehydrated citrus wheels. Follow these straightforward steps.

Step 1: Prepare Your Ingredients

Start by washing the citrus fruits thoroughly. This ensures cleanliness. Next, using a sharp knife, cut the fruits into ¼-inch-thick slices. Aim for uniformity in thickness for consistent dehydration.

Step 2: Arrange on a Dehydrator Tray

Once sliced, lay the wheels flat on a dehydrator tray. Make sure they are spaced apart. Overlapping will lead to uneven drying.

Step 3: Dehydrate

Set your dehydrator to 135°F (57°C). Allow the citrus wheels to dehydrate for about 6-8 hours. Check periodically until they are dry but still slightly pliable. If you don’t have a dehydrator, you can use an oven at its lowest setting.

Step 4: Cool and Store

After dehydration, let the slices cool completely. This step is vital for achieving the right texture. Once cool, store them in an airtight container away from direct sunlight.

Tips for Success

Choose Fresh Fruits: Ensure your citrus fruits are ripe. The flavors shine through when you start with quality produce.
Experiment with Time: Some citrus fruits may take longer to dry than others. Keep an eye on them.
Stay Consistent with Thickness: Aim for uniform slices to prevent some wheels from being over-dried while others are still soggy.
Add Spice: For a twist, sprinkle some cinnamon or cayenne pepper before dehydration. It infuses an exciting flavor.
Check Regularly: Depending on humidity and fruit type, check the slices frequently to avoid over-drying.

Nutrition Information

Your dehydrated citrus wheels are not just tasty; they’re also nutritional powerhouses. Here’s a general breakdown for a serving of 10 slices (calculated using grapefruit and orange):

How to Store the Leftovers?

If you have any wheels left, or perhaps you’ve made a larger batch, store them in a cool, dry place. An airtight container is your best friend here. They’ll last for months if protected from moisture and sunlight. Just check periodically for freshness.

dehydrated citrus wheels copycat  Recipe

Recommended Side Dishes for Dehydrated Citrus Wheels

The beauty of dehydrated citrus wheels lies in their versatility. Here are four suggested side dishes that pair excellently:

Quinoa Salad with Veggies: Toss in some dehydrated lemon slices for a fresh kick in your grain salad.
Cilantro Lime Rice: Pair the dehydration technique with delicious lime and rice, which will scream summer.
Crisp Lettuce Wraps: The tanginess from oranges can elevate your greens game immensely.
Spicy Roasted Chickpeas: Add a sprinkling of dehydrated grapefruit zest to make roasted chickpeas pop with flavor.

Ingredient Substitutions

Not all ingredients may be ready at hand. Here are some great alternatives to keep your recipe flowing:

Grapefruit: Swap in oranges or even tangerines if you want a sweeter alternative.
Blood Oranges: Classic oranges still provide excellent color and taste.
Lemons: If out, feel free to use a dash of vinegar with some citrus for acidity.
Fresh Pineapple: Canned pineapple, without syrup, can do the trick, but it may change the flavor slightly.

dehydrated citrus wheels copycat Recipe

Dehydrated Citrus Wheels Recipe

When I first discovered dehydrated citrus wheels, my kitchen transformed overnight. I found these vibrant little rounds to be a sensational addition for both embellishment and flavor enhancement.
Prep Time 10 minutes
Cook Time 9 hours
Total Time 9 hours 10 minutes
Course decor
Cuisine American
Servings 2
Calories 11 kcal

Equipment

  • Baking sheet
  • Cooling rack

Ingredients
  

  • Slice these into ¼-inch rounds showcasing their beautiful colors.
  • Fresh pine-apples cut in ¼-inch slices.
  • Blood Oranges
  • Sweet and crisp enhancing flavors.
  • Lemons or Meyer Lemons
  • Tangelos
  • Limes

Instructions
 

Step 1: Prepare Your Ingredients

  • Start by washing the citrus fruits thoroughly. This ensures cleanliness. Next, using a sharp knife, cut the fruits into ¼-inch-thick slices. Aim for uniformity in thickness for consistent dehydration.

Step 2: Arrange on a Dehydrator Tray

  • Once sliced, lay the wheels flat on a dehydrator tray. Make sure they are spaced apart. Overlapping will lead to uneven drying.

Step 3: Dehydrate

  • Set your dehydrator to 135°F (57°C). Allow the citrus wheels to dehydrate for about 6-8 hours. Check periodically until they are dry but still slightly pliable. If you don’t have a dehydrator, you can use an oven at its lowest setting.

Step 4: Cool and Store

  • After dehydration, let the slices cool completely. This step is vital for achieving the right texture. Once cool, store them in an airtight container away from direct sunlight.

Notes

  • Choose Fresh Fruits: Ensure your citrus fruits are ripe. The flavors shine through when you start with quality produce.
  • Experiment with Time: Some citrus fruits may take longer to dry than others. Keep an eye on them.
  • Stay Consistent with Thickness: Aim for uniform slices to prevent some wheels from being over-dried while others are still soggy.
  • Add Spice: For a twist, sprinkle some cinnamon or cayenne pepper before dehydration. It infuses an exciting flavor.
  • Check Regularly: Depending on humidity and fruit type, check the slices frequently to avoid over-drying.

Nutrition

Serving: 45gCalories: 11kcalFat: 0.1gSodium: 1mgSugar: 1g
Keyword Dehydrated Citrus Wheels Recipe
Tried this recipe?Let us know how it was!

Frequently Asked Questions

Can I dehydrate citrus fruits without a dehydrator?

 Yes! An oven at low heat can be used. Just keep the door slightly ajar to allow moisture to escape.

How can I use dehydrated citrus in baking?

 Chop them finely and incorporate them into batter for cakes or muffins. They add a delightful surprise.

Are there health benefits to consuming dehydrated citrus?

 Absolutely! They are rich in vitamins and antioxidants. Just be mindful of sugar content as it concentrates during the drying process.

Can I rehydrate the wheels for a different texture?

 Yes! Soak them in water for about 30 minutes. You’ll create a chewy fruit snack or a flavorful garnish.

How long do dehydrated citrus wheels last?

 When stored properly, they can last up to six months without losing their charm.

Conclusion

Embracing the art of dehydrated citrus wheels not only enhances your dishes but also adds to your culinary toolkit. Whether you are sprucing up a dish or creating a vibrant snack, these wheels bring the sunshine indoors. With simple steps and fresh ingredients, you have the power to create something extraordinary. So, roll up your sleeves, gather your fruits, and dive into this delightful journey. Your kitchen awaits!

You’ll also like these latest recipes!

Bocadillo Bites – Yum Yarns

bocadillo bites

Before we dive into the world of bocadillo bites, let’s chat about what pairs perfectly with this Spanish specialty. Whether you’re hosting a casual gathering or a festive dinner, these delicious bites can be complemented by various sides and drinks. Here are a few suggestions:

Spanish Red Wine: A robust Rioja or a smooth Tempranillo can enhance the savory flavors of the bocadillos. The natural acidity of these wines cuts through the richness of the ham and cheese.

Craft Beer: If wine’s not your thing, a crisp lager or a malty amber ale can work wonders. The carbonation provides a refreshing contrast to the salty ingredients.

Olives and Pickles: Serving a variety of olives, such as Kalamata and green olives, along with pickles can create a delightful charcuterie spread. They add a briny kick that balances well with the main dish.

Fresh Salad: A simple salad with arugula, cherry tomatoes, and a light vinaigrette can provide a refreshing bite against the rich flavors.

Now, let’s embark on a flavorful journey through bocadillo bites!

bocadillo bites

Imagine a bite-sized marvel that carries the sun-drenched essence of Spain. Bocadillo bites are more than just a dish; they are a celebration of flavors and tradition. Picture this: thinly sliced Serrano ham paired with aged Manchego cheese, nestled within a soft, fresh roll. Each bite delivers a burst of salty, creamy goodness that tantalizes your taste buds. I’ve often found that these little delights are a hit at any gathering. Their simplicity and flavor make them incredibly appealing to friends and family alike.

But what exactly are bocadillo bites? Traditionally a Spanish sandwich, the bocadillo is often filled with cured meats, cheeses, and other ingredients, all enveloped in crusty bread. In this article, I’ll walk you through my take on bocadillo bites and share tips, tricks, and insights that elevate this humble dish to something extraordinary.

Why This Recipe Works?

So, what’s the secret sauce behind these bocadillo bites? Here are four compelling reasons to give this recipe a whirl:

1. Balanced Flavors: Each ingredient in these bocadillo bites harmonizes beautifully. The salty richness of Serrano ham pairs delightfully with the nutty notes of aged Manchego. Add peppery arugula and the tang of pickled cherry peppers, and you’ve got a full flavor profile that dances on the palate.

2. Easy Preparation: This dish demands minimal prep time and effort. With just a few slices of ham, cheese, and fresh bread, you can whip up a fantastic appetizer. You’re not slaving in the kitchen for hours, yet the results will impress your guests.

3. Versatile Ingredients: While the classic variations focus on ham and cheese, this recipe is open to customization. If you’re feeling adventurous, you can swap in different meats, cheeses, or veggies. This adaptability means you can cater to different tastes and dietary needs easily.

4. Make Ahead Option: Bocadillo bites can be assembled in advance, making them perfect for any occasion. Just stack them in the fridge and pull them out when your guests arrive. They taste fantastic even after chilling, which minimizes last-minute stress.

How Does It Taste?

What do bocadillo bites taste like? In a word: enticing. The first bite delivers a harmonious explosion of flavors. The Serrano ham is salty and savory, while the Manchego cheese adds creamy, nutty undertones. 

The pickled cherry peppers introduce a zingy freshness. If you opt for arugula, its slight pepperiness gives an added layer that rounds out the flavors beautifully. Together, these ingredients create a taste sensation that’s hard to resist.

You will also like the following Appetizers recipes!

What Sets This Recipe Apart?

Bocadillo bites can be found in many kitchens and restaurants. However, what makes this version stand out?

Firstly, attention to the ingredients. This recipe leans heavily on high-quality, authentic Spanish ingredients. The focus is on selecting fresh, local products. The Serrano ham should be paper-thin, rich in flavor, and aged to perfection. The Manchego cheese adds depth in texture and taste.

Secondly, the balance of textures is crucial. With a crunchy crust from the hoagie rolls and creamy filling, the contrast delights the texture-lovers among us. This balance ensures each bite is as thrilling as the last.

Finally, it’s all about the process. Creating these bites doesn’t rush the flavors. Each ingredient is given space to shine, allowing you to savor the experience completely. This approach transforms a simple sandwich into an extraordinary culinary masterpiece.

The Ingredients

Ready to gather what you need? Here’s your shopping list for these divine bocadillo bites:

  • 12-14 ounces Serrano ham, paper-thin slices: Look for a high-quality brand that highlights its authenticity.
  • 4-5 ounces aged Manchego cheese, thinly sliced: The nutty flavor of this cheese truly elevates the dish.
  • Martin’s freshly baked hoagie rolls: The ideal vessel for these bites; soft yet sturdy.
  • 3 1/2 tablespoons cold-pressed extra virgin olive oil: Essential for a drizzle that brings everything together.
  • 6-8 pickled cherry peppers, seeds removed and sliced: These add a zesty kick.
  • Sea salt and freshly ground black pepper, to taste: To amplify the flavors.
  • 1 small handful arugula (optional): For an extra zing.
how to make bocadillo bites

Instructions

Let’s break it down into easy-to-follow steps. Follow along to create these delightful bocadillo bites:

Step 1: Prepare the Bread

Start with the Martin’s hoagie rolls. Slice each roll open gently, ensuring you don’t cut all the way through. You want a pocket that can hold your tasty fillings. This step is crucial since it impacts how well the ingredients hold together.

Step 2: Layer Your Ingredients

Begin layering with the Serrano ham. Use 2-3 slices per roll, depending on how hearty you want each bite. Next, add the aged Manchego cheese. The cheese should be thinly sliced so that it melds seamlessly with the ham.

Step 3: Add the Veggies

Place a few slices of pickled cherry peppers on top of the cheese. If using arugula, add a small handful for that fresh, peppery note. This combination not only adds color but also enhances the overall flavor profile dramatically.

Step 4: Drizzle the Olive Oil

Using a spoon or a small drizzler, pour a little extra virgin olive oil over the layered ingredients. This step isn’t just for moisture; the oil ties the flavors together, adding richness.

Step 5: Season It Up

Sprinkle a pinch of sea salt and freshly ground black pepper. Don’t overdo it here; the ham is already salty and rich. You want to brighten the flavors without overpowering them.

Step 6: Serve or Store

At this point, you can serve immediately or wrap them up to chill in the fridge for later. If serving later, it’s best to keep them stored in an airtight container.

Notes

Here are a few handy tips to make your bocadillo bites shine:

  • Quality Matters: Opt for authentic Spanish products to replicate the true bocadillo experience.
  • Don’t Rush: Allow the flavors to sit for a while if you’re making these ahead of time. They develop depth over a few hours.
  • Slice Right: Use a serrated knife when cutting the bread to avoid squashing it.
  • Taste as You Go: Adjust seasoning based on your palate. If you love spice, consider adding some sliced jalapeños.
  • Experiment: Feel free to try different combos, such as chorizo or different cheeses, to find your perfect match.

Nutrition Information

Curious about the nutritional content? Here’s a rough breakdown per serving (based on a standard serving of two bocadillo bites):

  • Calories: 350-400
  • Protein: 20-25g
  • Fat: 18-22g
  • Carbohydrates: 30-35g
  • Fiber: 2-3g
  • Sodium: 800-900mg

Keep in mind, modifications like using less cheese or opting for whole-grain bread can alter the nutrition.

bocadillo bites copycat recipe

How Do You Store These Bocadillo Bites?

Store any leftover bocadillo bites in an airtight container in the fridge. They’ll keep well for up to three days. Be mindful that while they can be refrigerated, the bread may soften over time. To preserve the texture, enjoy them fresh if you can!

Sides for Bocadillo Bites

You can level up your bocadillo bites by pairing them with complementary sides. Here are three suggestions:

Spanish Potatoes (Patatas Bravas): Crispy potatoes tossed in spicy tomato sauce offer a delightful contrast. The texture and kick from the sauce balance well with the savory bites.

Garlic Shrimp: Sizzling shrimp, kissed with garlic and olive oil, create a deliciously rich companion. Their tender, juicy nature pairs well with the saltiness of the ham.

Charred Veggies: Grilled or lightly charred vegetables, such as zucchini or bell peppers, bring a sweet, smoky flavor. They offer a fresh counterpoint to the salty bites.

What Alternatives Can You Use for the Ingredients?

Not every ingredient may be at your fingertips. Here are alternatives you can use:

For Serrano Ham: Prosciutto could be a suitable substitute, though it’s slightly sweeter. If you prefer a vegetarian option, try marinated artichoke hearts.

For Manchego Cheese: Aged Gouda or aged cheddar makes for a snappy replacement. Cream cheese can also work well if you are looking for something spreadable.

For Hoagie Rolls: Any crusty bread works; baguettes, ciabatta, or sourdough can add a unique twist to the texture.

For Pickled Cherry Peppers: Banana peppers or sliced jalapeños can provide a similar taste with varying levels of heat.

how to make bocadillo bites

Bocadillo Bites

Before we dive into the world of bocadillo bites, let’s chat about what pairs perfectly with this Spanish specialty. Whether you’re hosting a casual gathering or a festive dinner, these delicious bites can be complemented by various sides and drinks.
Prep Time 10 minutes
Total Time 10 minutes
Course Appetizer
Cuisine Spanish
Servings 7
Calories 400 kcal

Equipment

  • Spoon

Ingredients
  

  • 12-14 ounces Serrano ham paper-thin slices: Look for a high-quality brand that highlights its authenticity.
  • 4-5 ounces aged Manchego cheese thinly sliced: The nutty flavor of this cheese truly elevates the dish.
  • Martin’s freshly baked hoagie rolls: The ideal vessel for these bites; soft yet sturdy.
  • 3 1/2 tablespoons cold-pressed extra virgin olive oil: Essential for a drizzle that brings everything together.
  • 6-8 pickled cherry peppers seeds removed and sliced: These add a zesty kick.
  • Sea salt and freshly ground black pepper to taste: To amplify the flavors.
  • 1 small handful arugula optional: For an extra zing.

Instructions
 

Step 1: Prepare the Bread

  • Start with the Martin’s hoagie rolls. Slice each roll open gently, ensuring you don’t cut all the way through. You want a pocket that can hold your tasty fillings. This step is crucial since it impacts how well the ingredients hold together.

Step 2: Layer Your Ingredients

  • Begin layering with the Serrano ham. Use 2-3 slices per roll, depending on how hearty you want each bite. Next, add the aged Manchego cheese. The cheese should be thinly sliced so that it melds seamlessly with the ham.

Step 3: Add the Veggies

  • Place a few slices of pickled cherry peppers on top of the cheese. If using arugula, add a small handful for that fresh, peppery note. This combination not only adds color but also enhances the overall flavor profile dramatically.

Step 4: Drizzle the Olive Oil

  • Using a spoon or a small drizzler, pour a little extra virgin olive oil over the layered ingredients. This step isn’t just for moisture; the oil ties the flavors together, adding richness.

Step 5: Season It Up

  • Sprinkle a pinch of sea salt and freshly ground black pepper. Don’t overdo it here; the ham is already salty and rich. You want to brighten the flavors without overpowering them.

Step 6: Serve or Store

  • At this point, you can serve immediately or wrap them up to chill in the fridge for later. If serving later, it’s best to keep them stored in an airtight container.

Notes

  • Quality Matters: Opt for authentic Spanish products to replicate the true bocadillo experience.
  • Don’t Rush: Allow the flavors to sit for a while if you’re making these ahead of time. They develop depth over a few hours.
  • Slice Right: Use a serrated knife when cutting the bread to avoid squashing it.
  • Taste as You Go: Adjust seasoning based on your palate. If you love spice, consider adding some sliced jalapeños.
  • Experiment: Feel free to try different combos, such as chorizo or different cheeses, to find your perfect match.

Nutrition

Calories: 400kcalCarbohydrates: 35gProtein: 25gFat: 22gSodium: 800mgFiber: 2g
Keyword Bocadillo Bites
Tried this recipe?Let us know how it was!

Frequently Asked Questions

1. Can I make bocadillo bites gluten-free?

 Absolutely! Substitute traditional rolls with gluten-free options, like gluten-free hoagie rolls or even lettuce wraps if you’re craving something lighter.

2. How can I make this recipe vegetarian?

 To make a vegetarian version, simply leave out the Serrano ham. You can compensate with roasted vegetables or avocado for added creaminess.

3. Can I offer these bites cold?

 Yes! Bocadillo bites can be delicious served cold or at room temperature, making them perfect for picnics or potlucks.

4. How do I make them spicier?

 Add jalapeños or a drizzle of hot sauce before serving. You can also opt for a spicy cheese, like pepper jack.

Conclusion

As I wrap this culinary journey, I hope you feel inspired to create your own bocadillo bites. This recipe captures the essence of simplicity and flavor, showcasing quality ingredients in a way that appeals to everyone. Perfectly paired with a side or two, these bites will undoubtedly steal the show at any meal.

Whether you’re treating yourself or impressing guests, I promise these bocadillo bites will delight! Gather your ingredients and take those first delicious bites—you won’t regret it. Happy cooking!

You’ll also like these latest recipes!

Smashed Potatoes – Yum Yarns

smashed potatoes

When you think about crispy smashed potatoes, your mind might drift to straightforward mains like roasted chicken or grilled steak, but don’t stop there. This dish is surprisingly versatile. Picture a vibrant summer barbecue with friends and family, or perhaps a cozy dinner with your loved ones.

Imagine crispy smashed potatoes served alongside juicy burgers, fresh from the grill. Or pair them with a herb-infused salmon, the spices of the salmon contrasting perfectly with the crispy potatoes. 

You could also opt for a garden-fresh salad drenched in zesty vinaigrette—a delightful balance of warmth and crunch. The options are nearly endless, creating a dish that truly elevates any meal.

smashed potatoes

Crispy smashed potatoes are more than just a side dish; they’re a celebration of flavor and texture. This simple yet innovative method of preparing potatoes ensures each bite offers an irresistible crunch followed by a soft, creamy interior. It’s like a hug for your taste buds!

If you’ve ever found yourself rummaging through your pantry, unsure of what to prepare, this recipe has your back. These potatoes check all the boxes: they’re easy to make, allow for personalization, and are always a crowd-pleaser.

What is the Smashed Potatoes Recipe?

Crispy smashed potatoes consist of whole or halved potatoes that are boiled until tender and then flattened before a quick roast in the oven. The result is a crispy exterior, packed with flavor and a soft, fluffy center.

You will also like the following Side Dishes recipes!

Why This Recipe Works

1. Simplicity in Preparation
You don’t need to be a culinary genius to whip up crispy smashed potatoes. They involve a handful of ingredients and a straightforward process. If you can boil water, you can make this dish.

2. Flavor Explosion
The combination of garlic powder, smoked paprika, and a touch of salt amplifies the natural taste of the potatoes. The drizzle of extra virgin olive oil adds richness, making each bite a delight.

3. Versatile Pairing Options
Whether it’s meat, fish, or veggies, these potatoes adapt to any meal. You can serve them at a casual family dinner or fancy gathering without breaking a sweat. They cater to both simple and elaborate cuisines.

4. Texture that Excites
Smashed potatoes offer that coveted contrast: a crispy shell with a tender, creamy interior. This blend of textures is what keeps eaters coming back for seconds (or thirds!).

Ingredients You’ll Need to Make This Dish

Gathering ingredients is half the fun! Here’s what you’ll need to create these crispy smashed potatoes:

  • 1–1.2 kg / 2–2.4 lbs medium potatoes (about 6–8), peeled and quartered if large
  • 700g / 1.4 lbs baby potatoes (about 12–14), whole or halved depending on size
  • ¾ tsp fine sea salt (for seasoning)
  • 1 tbsp coarse salt (for boiling water)
  • 30g / 2 tbsp unsalted butter, gently melted
  • ½ tsp smoked paprika
  • 1 tbsp extra virgin olive oil
  • ¼ tsp freshly ground black pepper
  • 1 tsp garlic powder
how to make smashed potatoes

How To Make This Crispy Smashed Potatoes Recipe

Now, let’s dive into the process! This is where the magic happens.

Step 1: Choose Your Potatoes

Whether you opt for medium potatoes or baby potatoes, they should be firm and free from blemishes. Their size will dictate the overall cooking time—just keep that in mind!

Step 2: Boil the Potatoes

Fill a large pot with water, adding a tablespoon of coarse salt. Bring it to a boil. Add the potatoes and cook until fork-tender, about 15-20 minutes. You want them soft enough to smash, but not so soft that they fall apart.

Step 3: Preheat the Oven

While your potatoes are boiling, preheat your oven to 220°C (425°F). A hot oven means crispy potatoes. If you want to add a little flair, line a baking sheet with parchment paper for easier cleanup.

Step 4: Smash the Potatoes

Once boiled, drain the potatoes and let them cool for a minute. Using the bottom of a sturdy cup or a potato masher, gently press down on each potato until it flattens to about half an inch thick. Be careful not to obliterate them; you want that delightful texture!

Step 5: Season the Potatoes

Place the smashed potatoes on the prepared baking sheet. In a bowl, mix the melted butter, olive oil, garlic powder, paprika, salt, and pepper. Brush this seasoned mixture generously over each potato. Make sure to coat every nook and cranny.

Step 6: Bake to Perfection

Now comes one of the most crucial parts. Roast the potatoes in your preheated oven for about 20-25 minutes, or until golden brown and crispy. You’ll want to flip them halfway through to ensure even crispiness. Watch them like a hawk; nobody likes burnt potatoes!

Step 7: Serve and Enjoy!

Once they’re golden and crisp, serve your crispy smashed potatoes hot. Enjoy with friends, family, or even all by yourself. I won’t tell!

Tips & Tricks

Here are some additional insights to help you nail this recipe:

  • Choose the Right Potato: Waxy potatoes like Yukon Golds hold their shape better, while starchy potatoes like Russets yield a fluffier interior.
  • Don’t Skip the Soaking: If you have extra time, soaking the potatoes in cold water for 30 minutes can help remove excess starch, leading to crispier results.
  • Experiment with Spices: Feel free to mix and match spices like Italian seasoning, onion powder, or even chili flakes for a little kick.
  • Keep Them Hot: If you’re making these for a gathering, keep the potatoes warm in the oven on a very low setting until it’s time to serve.
  • Don’t Overcrowd the Pan: Give each potato enough space to breathe on the baking sheet. This ensures they don’t steam but rather crisp up beautifully.

Nutrition Information

Here’s a rough estimate of the nutrition per serving (assuming six servings):

  • Calories: 250
  • Protein: 3g
  • Carbohydrates: 35g
  • Dietary Fiber: 3g
  • Sugars: 1g
  • Total Fat: 12g
  • Saturated Fat: 6g
  • Sodium: 400mg

Note that nutritional values may vary based on the exact ingredients and quantities used.

smashed potatoes copycat recipe

How Do You Store the Leftovers?

Leftover crispy smashed potatoes, if you have any (which is debatable), can be stored in an airtight container in the refrigerator for up to three days. For best results, reheat in an oven or air fryer to retain that crispy texture. Microwaving is convenient but know that the crunchiness will be compromised.

What Sides Would Compliment Crispy Smashed Potatoes?

Crispy smashed potatoes can amplify any meal. Here are a few sides to consider:

1. Grilled Chicken Thighs
Juicy, succulent chicken thighs marinated in herbs or barbecue sauce pair perfectly with the crunchy potatoes. The flavors meld beautifully, creating a delightful experience.

2. Roasted Asparagus
This green veggie adds a fresh, vibrant touch to your plate. Drizzle with lemon juice for an extra zing. The contrast between the hot, crispy potatoes and the tender asparagus is quite the dynamic duo.

3. Classic Caesar Salad
Crisp romaine, creamy dressing, and crunchy croutons make for a refreshing side. The richness of the salad balances the potatoes’ texture, making every mouthful a pleasure.

What Alternatives Can You Use for the Ingredients?

Sometimes you don’t have every ingredient at hand. Here are some swaps that’ll work just as well:

1. Different Types of Potatoes
If you don’t have baby potatoes or medium ones, sweet potatoes can work too. They cook similarly and add a nice sweetness to your dish.

2. Olive Oil Swap
Feel free to substitute olive oil with avocado oil or melted coconut oil, which add different flavors but maintain healthy fat content.

3. Seasoning Variations
If you’re out of garlic powder, fresh minced garlic will do just fine. Chop it up fine and toss it in. If paprika isn’t available, try cayenne pepper for a distinct kick.

4. Vegan Option
For a plant-based version, substitute butter with vegan butter or omit it entirely. The olive oil alone will still lend rich flavor.

smashed potatoes copycat recipe

Smashed Potatoes

When you think about crispy smashed potatoes, your mind might drift to straightforward mains like roasted chicken or grilled steak, but don’t stop there. This dish is surprisingly versatile.
Prep Time 10 minutes
Cook Time 1 hour 30 minutes
Total Time 1 hour 40 minutes
Course Side Dish
Cuisine American
Servings 12
Calories 250 kcal

Equipment

  • Baking sheet
  • Oven

Ingredients
  

  • 1 –1.2 kg / 2–2.4 lbs medium potatoes about 6–8, peeled and quartered if large
  • 700 g / 1.4 lbs baby potatoes about 12–14, whole or halved depending on size
  • ¾ tsp fine sea salt for seasoning
  • 1 tbsp coarse salt for boiling water
  • 30 g / 2 tbsp unsalted butter gently melted
  • ½ tsp smoked paprika
  • 1 tbsp extra virgin olive oil
  • ¼ tsp freshly ground black pepper
  • 1 tsp garlic powder

Instructions
 

Step 1: Choose Your Potatoes

  • Whether you opt for medium potatoes or baby potatoes, they should be firm and free from blemishes. Their size will dictate the overall cooking time—just keep that in mind!

Step 2: Boil the Potatoes

  • Fill a large pot with water, adding a tablespoon of coarse salt. Bring it to a boil. Add the potatoes and cook until fork-tender, about 15-20 minutes. You want them soft enough to smash, but not so soft that they fall apart.

Step 3: Preheat the Oven

  • While your potatoes are boiling, preheat your oven to 220°C (425°F). A hot oven means crispy potatoes. If you want to add a little flair, line a baking sheet with parchment paper for easier cleanup.

Step 4: Smash the Potatoes

  • Once boiled, drain the potatoes and let them cool for a minute. Using the bottom of a sturdy cup or a potato masher, gently press down on each potato until it flattens to about half an inch thick. Be careful not to obliterate them; you want that delightful texture!

Step 5: Season the Potatoes

  • Place the smashed potatoes on the prepared baking sheet. In a bowl, mix the melted butter, olive oil, garlic powder, paprika, salt, and pepper. Brush this seasoned mixture generously over each potato. Make sure to coat every nook and cranny.

Step 6: Bake to Perfection

  • Now comes one of the most crucial parts. Roast the potatoes in your preheated oven for about 20-25 minutes, or until golden brown and crispy. You’ll want to flip them halfway through to ensure even crispiness. Watch them like a hawk; nobody likes burnt potatoes!

Step 7: Serve and Enjoy!

  • Once they’re golden and crisp, serve your crispy smashed potatoes hot. Enjoy with friends, family, or even all by yourself. I won’t tell!

Notes

  • Choose the Right Potato: Waxy potatoes like Yukon Golds hold their shape better, while starchy potatoes like Russets yield a fluffier interior.
  • Don’t Skip the Soaking: If you have extra time, soaking the potatoes in cold water for 30 minutes can help remove excess starch, leading to crispier results.
  • Experiment with Spices: Feel free to mix and match spices like Italian seasoning, onion powder, or even chili flakes for a little kick.
  • Keep Them Hot: If you’re making these for a gathering, keep the potatoes warm in the oven on a very low setting until it’s time to serve.
  • Don’t Overcrowd the Pan: Give each potato enough space to breathe on the baking sheet. This ensures they don’t steam but rather crisp up beautifully.

Nutrition

Calories: 250kcalCarbohydrates: 35gProtein: 3gFat: 12gSaturated Fat: 6gSodium: 400mgFiber: 3gSugar: 1g
Keyword Smashed Potatoes
Tried this recipe?Let us know how it was!

Frequently Asked Questions

1. Can I prep these potatoes in advance?

 Absolutely! You can boil and smash the potatoes a day ahead. Store them in the fridge, then finish the roasting step just before serving.

2. Can I freeze smashed potatoes?

 Yes, you can freeze them before baking. Make sure they’re fully cooled then place them in a freezer bag. Bake them from frozen; just add about 10 minutes to the cooking time.

3. How do I make them crispy without an oven?

 You can use an air fryer instead! Cook for about 15-20 minutes at 200°C (392°F), flipping them halfway through.

4. What about adding cheese?

 Top the potatoes with cheese a few minutes before they’re done roasting. Cheddar, parmesan, or feta would work wonders.

5. Are there any health benefits?

 Potatoes are a fantastic source of vitamins and minerals, particularly vitamin C and potassium. They’re also filling, making them great for satisfying hunger.

6. Can they be made spicy?

 For a spicy twist, sprinkle some crushed red pepper flakes or drizzle your favorite hot sauce on them after roasting!

Conclusion

Crispy smashed potatoes have a special place in any kitchen. This recipe serves up satisfaction with minimal stress. Whether you’re hosting a summer barbecue or simply enjoying dinner at home, these potatoes will shine on your table.

As you roll up your sleeves and embark on this culinary adventure, remember: experimentation is key. Taste, tweak, and make it your own. After all, there’s nothing quite like a dish that brings everyone together, garnished with love and laughter. So, what are you waiting for? Let’s get cooking!

You’ll also like these latest recipes!

Pizza Wheels – Yum Yarns

pizza wheels

Pizza wheels are a fantastic dish that can steal the spotlight at any gathering. Imagine serving them alongside a crisp, refreshing italian pasta salad, bursting with vegetables and drizzled with a homemade zesty dressing. Or picture a vibrant veggie platter with dips that complement the cheesy goodness. Perhaps some warm marinara sauce for dipping? The choices are endless, and they all enhance the joy of indulging in pizza wheels.

Now, let’s dive into the details of this delectable dish.

pizza wheels

Picture this: a warm summer evening, friends gathering around, laughter filling the air, and an irresistible scent wafting from the kitchen. You pull out a tray of golden-brown pizza wheels, and the smiles appear instantly. It’s not just food; it’s a moment, a shared experience. This dish isn’t merely a recipe; it’s a celebration of flavors and togetherness.

What are Pizza Wheels?

Pizza wheels are bite-sized snacks made from an easy-to-handle dough, filled with cheese, pepperoni, and spices. Think of them as the perfect finger food that brings the excitement of pizza in a compact form. They’re great for parties, game days, or a cozy family movie night.

The best part? They are simple to make, don’t require any special skills, and can be customized with your favorite fillings.

Why This Recipe Works?

This recipe triumphs due to its simplicity and flavor profile. The crescent roll dough provides a flaky texture, which perfectly complements the gooey mozzarella and the savory pepperoni. The sprinkle of Italian seasoning adds an aromatic element that intensifies the dish’s appeal. Moreover, you can make them in advance and pop them in the oven whenever the craving strikes.

You will also like the following Appetizer recipes!

What You’ll Need to Make This Dish

Ingredients

  • 2 cups shredded whole milk mozzarella cheese
  • 1 (8-ounce) can refrigerated crescent roll dough
  • ½ cup sliced black olives, pitted and drained
  • 24 thin slices of pepperoni
  • 1 teaspoon dried Italian seasoning blend

These ingredients come together to create a magical bite that’s both cheesy and flavorful.

how to make pizza wheels

How to Make Pizza Wheels

Crafting pizza wheels is an approachable process that anyone can master. Let’s briefly overview how to make these delicious treats before diving into the details.

Step-by-Step Instructions

Step 1: Preheat the Oven

Begin by preheating your oven to 375°F (190°C). This ensures that your pizza wheels bake evenly and turn golden brown.

Step 2: Prepare the Dough

Open the can of crescent roll dough and carefully unroll it onto a clean, flat surface. Try to keep it in one full sheet rather than separating the triangles.

Step 3: Layer the Ingredients

Sprinkle the shredded mozzarella cheese evenly over the dough. Follow this by layering the pepperoni slices and black olives atop the cheese. Finally, dust the Italian seasoning blend over everything. This adds a burst of flavor that is crucial for that authentic pizza taste.

Step 4: Roll It Up

Starting from one end, gently roll the dough into a tight log. Make sure the filling stays inside; it can get a bit tricky, but take your time. A nice, tight log will ensure your wheels hold their shape as they bake.

Step 5: Cut into Wheels

Using a sharp knife, slice the dough log into 1-inch thick pieces. Each slice will reveal a mouthwatering swirl of pizza goodness.

Step 6: Bake the Pizza Wheels

Place the slices on a baking sheet lined with parchment paper, ensuring they are spaced apart. Bake them in the preheated oven for about 15-20 minutes, or until they are golden and bubbly.

Step 7: Cool and Serve

Once baked, remove the pizza wheels from the oven and allow them to cool for a few minutes. Serve warm for the best experience.

Tips for Making the Best Pizza Wheels

  • Use Fresh Ingredients: Fresh mozzarella and freshly sliced pepperoni elevate the flavors.
  • Customize Fillings: Feel free to add bell peppers, mushrooms, or any vegetables you enjoy.
  • Monitor Baking Time: Every oven is different. Keep an eye on the wheels to ensure they don’t overbake.
  • Experiment with Dips: Serve alongside ranch, marinara, or spicy garlic sauce for added excitement.
  • Make Extras: These freeze well. Prepare a double batch and freeze them for quick snacks later.

How to Store Leftovers

If you have leftovers (which is unlikely, but just in case), let them cool completely. Store them in an airtight container in the refrigerator for up to three days. When ready to enjoy again, reheat them in the oven to regain their crispiness.

Nutrition Information

While these pizza wheels are a fun indulgence, let’s break down the nutrition:

  • Calories: Approximately 180 per serving (2 wheels).
  • Fat: 10g
  • Carbohydrates: 15g
  • Protein: 7g

They’re not the lightest snack, but they offer substantial satisfaction!

pizza wheels copycat recipe

How Would I Recommend Serving Pizza Wheels?

Here are several ideas to host the perfect pizza wheels experience:

  1. As a Party Snack
    Serve pizza wheels on a large platter with a variety of dips. Guests can mix and match the flavors, making it a fun interactive experience.
  2. Game Day Treat
    These wheels are ideal finger food while cheering on your favorite team. Pair them with some craft beer for a festive touch.
  3. Movie Night Delight
    Create a cozy atmosphere with dim lighting and blankets. Pizza wheels and a bowl of popcorn make for a perfect couple for movie lovers.
  4. Lunchbox Surprise
    Pack these for school lunches or picnics. They are easy to eat and will keep kiddos happy and satisfied!

What Alternatives Can You Use for the Ingredients if Not Available?

Not every ingredient may be readily available, but don’t fret! Here are some substitutes:

  • Cheese: Cheddar or Provolone can be used in place of mozzarella to add a different flavor profile.
  • Dough: If pre-made crescent dough is unavailable, pizza dough or tortilla can work well for a fun twist.
  • Pepperoni: For a healthier option, try using turkey or chicken pepperoni as a substitute.
  • Olives: If black olives are not your thing, sliced green olives or even pickled jalapeños can add a zesty flavor.
how to make pizza wheels

Pizza Wheels

Pizza wheels are a fantastic dish that can steal the spotlight at any gathering. Imagine serving them alongside a crisp, refreshing italian pasta salad, bursting with vegetables and drizzled with a homemade zesty dressing.
Prep Time 20 minutes
Cook Time 12 minutes
Total Time 32 minutes
Course Appetizer, Snack
Cuisine American
Servings 8
Calories 180 kcal

Equipment

  • Oven
  • Knife

Ingredients
  

  • 2 cups shredded whole milk mozzarella cheese
  • 1 8-ounce can refrigerated crescent roll dough
  • ½ cup sliced black olives pitted and drained
  • 24 thin slices of pepperoni
  • 1 teaspoon dried Italian seasoning blend

Instructions
 

Step 1: Preheat the Oven

  • Begin by preheating your oven to 375°F (190°C). This ensures that your pizza wheels bake evenly and turn golden brown.

Step 2: Prepare the Dough

  • Open the can of crescent roll dough and carefully unroll it onto a clean, flat surface. Try to keep it in one full sheet rather than separating the triangles.

Step 3: Layer the Ingredients

  • Sprinkle the shredded mozzarella cheese evenly over the dough. Follow this by layering the pepperoni slices and black olives atop the cheese. Finally, dust the Italian seasoning blend over everything. This adds a burst of flavor that is crucial for that authentic pizza taste.

Step 4: Roll It Up

  • Starting from one end, gently roll the dough into a tight log. Make sure the filling stays inside; it can get a bit tricky, but take your time. A nice, tight log will ensure your wheels hold their shape as they bake.

Step 5: Cut into Wheels

  • Using a sharp knife, slice the dough log into 1-inch thick pieces. Each slice will reveal a mouthwatering swirl of pizza goodness.

Step 6: Bake the Pizza Wheels

  • Place the slices on a baking sheet lined with parchment paper, ensuring they are spaced apart. Bake them in the preheated oven for about 15-20 minutes, or until they are golden and bubbly.

Step 7: Cool and Serve

  • Once baked, remove the pizza wheels from the oven and allow them to cool for a few minutes. Serve warm for the best experience.

Notes

  • Use Fresh Ingredients: Fresh mozzarella and freshly sliced pepperoni elevate the flavors.
  • Customize Fillings: Feel free to add bell peppers, mushrooms, or any vegetables you enjoy.
  • Monitor Baking Time: Every oven is different. Keep an eye on the wheels to ensure they don’t overbake.
  • Experiment with Dips: Serve alongside ranch, marinara, or spicy garlic sauce for added excitement.
  • Make Extras: These freeze well. Prepare a double batch and freeze them for quick snacks later.

Nutrition

Calories: 180kcalCarbohydrates: 18gProtein: 7gFat: 10g
Keyword Pizza Wheels
Tried this recipe?Let us know how it was!

Frequently Asked Questions

1. Can I make pizza wheels without meat?

Absolutely! You can load up on veggies like spinach, mushrooms, or bell peppers, and still maintain that delicious pizza flavor.

2. Are there gluten-free options available?

Yes, many brands offer gluten-free pizza dough or wraps that work great for this recipe.

3. How can I spice them up?

To add some heat, incorporate crushed red pepper flakes or use spicy pepperoni slices.

4. Can I prep these ahead of time?

Definitely! You can prepare them, slice them, and store them in the fridge for up to a day before baking them.

5. What can I use as a dipping sauce?

The classics work! Marinara sauce, ranch dressing, or even garlic butter dip pairs wonderfully.

6. Can pizza wheels be baked in an air fryer?

Yes, they can! Set your air fryer to 375°F and cook for about 8-10 minutes, monitoring closely.

Conclusion

Pizza wheels are not just food; they’re an experience and a celebration of flavors. Simple to make yet bursting with taste, this dish can elevate any gathering. You can customize it to suit your palate and needs. From parties to cozy movie nights, these delightful bites pave the way for good times and lasting memories.

So roll up your sleeves, gather your ingredients, and give these pizza wheels a whirl. Trust me; they’ll become a favorite in your home, resulting in smiles and happy bellies. Enjoy the journey into the flavorful world of pizza wheels!

You’ll also like these latest recipes!

Animal Style Fries In-N-Out Copycat  – Yum Yarns

animal style fries in n out copycat

Before we dive into the delightful world of Animal Style Fries, let’s talk about what pairs well with this mouth-watering dish. Imagine having a refreshing burger on the side, perhaps a classic cheeseburger or a grilled chicken sandwich, loaded with all your favorite toppings. The juicy patty and the crunchy fries complement each other beautifully. 

A side of coleslaw can add a nice crunch and some creaminess that offsets the savory fries. And let’s not forget about a cold drink. A fizzy soda or perhaps a sweet iced tea can wash down those rich flavors perfectly. These pairings are not just suggestions; they enhance the overall tasting experience.

animal style fries in n out copycat

Animal Style Fries from In-N-Out are legendary, aren’t they? If you’ve ever had the pleasure of biting into those crispy fries drenched in a special sauce, smothered with cheese, and topped with grilled onions, you know exactly what I’m talking about. These fries transform a simple side into something unforgettable. 

But what if I told you, you could recreate this magic right in your own kitchen? In today’s post, I’m sharing my favorite copycat recipe for Animal Style Fries. Get ready to dive in, because this dish will not only satisfy your cravings but also impress your friends and family.

Why This Recipe Works

1. Familiar Flavors with a Twist
This recipe captures the essence of the original dish while adding a personal touch. Using creamy mayonnaise combined with tangy pickle relish mirrors that secret sauce you adore. The flavors each contribute to a delightful experience.

2. Perfect Texture
The texture is key when it comes to fries; they need to be crispy but still hold onto that special sauce. Frozen fries, when baked or fried correctly, become a crispy canvas that can support all the toppings we’re adding.

3. Homemade Sauce
There’s something about a homemade sauce that elevates a dish. The blend of mayonnaise, mustard, and relish creates a creamy mixture that’s not just tasty but also straightforward to whip up. You’ll love knowing exactly what goes into it.

4. Customizable
This recipe allows you to tweak the flavors according to your preference. Not a fan of grilled onions? Skip them. Want more cheese? Go for it! It’s flexible, making it great for families or gatherings.

How Does It Taste?

Imagine biting into a warm, crispy fry that gives just the right amount of crunch against your teeth. As you chew, the creamy sauce mingles with the golden cheese, creating this comforting richness. 

The grilled onions bring a sweet depth, while the slight tang from the sauce rounds everything out. It’s the perfect balance of flavors and sensations.

You will also like the following Appetizers recipes!

What Sets This Recipe Apart?

Many copycat recipes stick closely to the original, which is great, but often they lack that personal touch that makes a dish unique. This version of Animal Style Fries incorporates a few twists that make it special. 

One, the use of smoked paprika adds a subtle smokiness that enhances the overall taste. Two, this recipe streamlines preparation, so you can focus less on fuss and more on enjoying your food. Lastly, it’s made for sharing—both in flavor and technique. After all, cooking is best when you can bring others into the experience.

The Ingredients

Here’s what you’ll need for this indulgent recipe:

  • 2/3 cup creamy mayonnaise
  • 1 tablespoon classic yellow mustard
  • 3 tablespoons sweet dill pickle relish
  • 1 teaspoon distilled white vinegar
  • 1 teaspoon smoked paprika (adds that delightful smokiness)
  • 2 tablespoons neutral vegetable oil, plus extra for greasing baking sheets
  • 2 medium yellow onions, finely diced
  • Kosher salt, to taste
  • 1/4 cup tangy ketchup
  • 1 tablespoon finely chopped fresh chives (for a punch of freshness)
  • 32 ounces frozen crispy French fries (keep them frozen)
  • 6 slices American processed cheese
how to make animal style fries in n out

Instructions

Step 1: Bake or Fry the Fries

Preheat your oven according to the package instructions for the French fries, or heat your oil in a deep fryer if you prefer frying. Lay those frozen fries in a single layer on a greased baking sheet or drop them carefully into hot oil. You’ll want them golden brown and crispy—this is crucial.

Step 2: Make the Sauce

While the fries cook, it’s time to whip up the sauce. In a medium bowl, combine the mayonnaise, mustard, pickle relish, vinegar, and smoked paprika. Stir until well mixed. This creamy concoction is your secret weapon.

Step 3: Cook the Onions

In a separate pan, heat 2 tablespoons of vegetable oil over medium heat. Add the finely diced onions, sprinkle with a bit of kosher salt, and cook them until they become translucent and start to caramelize, stirring occasionally. This should take about 8-10 minutes.

Step 4: Assemble the Fries

Once your fries are cooked, place them on a serving platter. While they’re still hot, sprinkle the fries with salt to taste. Immediately drape the slices of American cheese over the fries, allowing it to melt slightly.

Step 5: Add the Sauce and Onions

Spoon generous amounts of the prepared sauce over the cheesy fries. Top it all with those beautifully caramelized onions. If you’re feeling fancy, finish with a sprinkle of chopped chives for an extra layer of flavor.

Notes

Here are some tips to ensure your Animal Style Fries turn out perfect:

  • Use a good-quality mayonnaise. It really enhances the flavor.
  • Don’t overcrowd your baking sheet. This ensures fries stay crispy.
  • Experiment with cheese. While American cheese is classic, cheddar or pepper jack can add a fun twist.
  • Keep an eye on the onions. You want them caramelized, not burnt.
  • Serve immediately. These fries are best enjoyed fresh while they’re hot and crispy.

Nutrition Information

While it’s important to enjoy your food, understanding the nutrition facts can help you make informed choices. This recipe serves about four people. Each serving is approximately:

  • Calories: 570
  • Total Fat: 40g
  • Saturated Fat: 10g
  • Carbohydrates: 41g
  • Protein: 10g

(Note: These numbers can vary based on cooking methods and brands.)

animal style fries in n out copycat recipe

How Do You Store Animal Style Fries?

If you find yourself with leftovers (though that’s rare!), store them in an airtight container in the fridge for up to 2 days. Reheating can be tricky since fries tend to lose their crispiness. The oven might be your best option—reheat them in a preheated oven at 375°F until warmed through, and then add fresh toppings before serving.

Sides for Animal Style Fries

For a complete meal, consider pairing these fries with some sides:

  • Classic Burger
    A simple beef patty topped with cheese, lettuce, and tomato. This staple fits perfectly.
  • Grilled Chicken Sandwich
    Marinated chicken breast sandwiched between soft bread. Add some spicy mayo for a kick.
  • Coleslaw
    A refreshing, crunchy salad that balances the richness of the fries. It adds a delightful contrast to your meal.

Ingredient Alternatives

If you’re missing some ingredients, don’t sweat it. Here are some alternatives:

  • Greek Yogurt for Mayonnaise
    Want a healthier option? Use Greek yogurt; it provides creaminess with added protein.
  • Yellow Mustard for Dijon
    If you only have Dijon on hand, go for it. It provides a more intense flavor.
  • Red Onion for Yellow Onion
    Red onions can be used if you prefer a sharper taste, plus they add a nice pop of color.
  • Mozzarella for American Cheese
    Melted mozzarella gives a gooey texture. It might change the flavor, but it still works well.
how to make animal style fries in n out

Animal Style Fries In-N-Out Copycat

Before we dive into the delightful world of Animal Style Fries, let’s talk about what pairs well with this mouth-watering dish.
Prep Time 10 minutes
Cook Time 30 minutes
Total Time 40 minutes
Course Appetizer
Cuisine American
Servings 8
Calories 570 kcal

Equipment

  • pan
  • Oven

Ingredients
  

  • 2/3 cup creamy mayonnaise
  • 1 tablespoon classic yellow mustard
  • 3 tablespoons sweet dill pickle relish
  • 1 teaspoon distilled white vinegar
  • 1 teaspoon smoked paprika adds that delightful smokiness
  • 2 tablespoons neutral vegetable oil plus extra for greasing baking sheets
  • 2 medium yellow onions finely diced
  • Kosher salt to taste
  • 1/4 cup tangy ketchup
  • 1 tablespoon finely chopped fresh chives for a punch of freshness
  • 32 ounces frozen crispy French fries keep them frozen
  • 6 slices American processed cheese

Instructions
 

Step 1: Bake or Fry the Fries

  • Preheat your oven according to the package instructions for the French fries, or heat your oil in a deep fryer if you prefer frying. Lay those frozen fries in a single layer on a greased baking sheet or drop them carefully into hot oil. You’ll want them golden brown and crispy—this is crucial.

Step 2: Make the Sauce

  • While the fries cook, it’s time to whip up the sauce. In a medium bowl, combine the mayonnaise, mustard, pickle relish, vinegar, and smoked paprika. Stir until well mixed. This creamy concoction is your secret weapon.

Step 3: Cook the Onions

  • In a separate pan, heat 2 tablespoons of vegetable oil over medium heat. Add the finely diced onions, sprinkle with a bit of kosher salt, and cook them until they become translucent and start to caramelize, stirring occasionally. This should take about 8-10 minutes.

Step 4: Assemble the Fries

  • Once your fries are cooked, place them on a serving platter. While they’re still hot, sprinkle the fries with salt to taste. Immediately drape the slices of American cheese over the fries, allowing it to melt slightly.

Step 5: Add the Sauce and Onions

  • Spoon generous amounts of the prepared sauce over the cheesy fries. Top it all with those beautifully caramelized onions. If you’re feeling fancy, finish with a sprinkle of chopped chives for an extra layer of flavor.

Notes

  • Use a good-quality mayonnaise. It really enhances the flavor.
  • Don’t overcrowd your baking sheet. This ensures fries stay crispy.
  • Experiment with cheese. While American cheese is classic, cheddar or pepper jack can add a fun twist.
  • Keep an eye on the onions. You want them caramelized, not burnt.
  • Serve immediately. These fries are best enjoyed fresh while they’re hot and crispy.

Nutrition

Calories: 570kcalCarbohydrates: 41gProtein: 10gFat: 40gSaturated Fat: 10g
Keyword Animal Style Fries In-N-Out Copycat
Tried this recipe?Let us know how it was!

Frequently Asked Questions

1. Can I make these fries healthier?

 Absolutely! You can opt for baked fries instead of fried. Whole wheat or vegetable-based fries can also be great choices. Using a lighter sauce, such as Greek yogurt-based dressing, will reduce calories.

2. How can I make these vegetarian-friendly?

 This recipe is naturally vegetarian if you skip any meat. You could also throw in some veggies, like diced bell peppers or jalapenos, before topping with chees

3. What variations of toppings can I try?

 Experiment! Adding bacon bits, jalapenos, or a drizzle of hot sauce could create a unique flavor profile. The possibilities are endless.

4. Can I prepare this in advance?

 While the fries are best served immediately, you can prepare the sauce and cook the onions ahead of time. When ready, just cook the fries and assemble everything together.

Conclusion

There you have it—a comprehensive guide to making your very own Animal Style Fries at home. With simple ingredients and straightforward steps, this dish can bring fast-food nostalgia directly to your kitchen. 

So, fire up your oven or fryer and unleash your inner chef! Your taste buds and friends will thank you. Enjoy the cooking, the eating, and all the delightful moments that come with it!

You’ll also like these latest recipes!