Before we dive into the details, let’s talk about what you can enjoy alongside kimbap to elevate your culinary experience. Here are some great options:
- Kimchi: This staple side dish, with its spicy and tangy flavors, beautifully complements the mild taste of kimbap. The crunch and zest of fermented vegetables provide a delightful contrast.
- Japchae: These sweet potato noodles stir-fried with vegetables and a subtle sesame oil flavor make an excellent pairing. The chewy texture of japchae adds an enjoyable variety to your meal.
- Pickled Vegetables: A selection of pickled vegetables (like pickled radish) can add that necessary crunch and tanginess that balances the flavors in kimbap, making your meal feel complete.

Growing up, I was always fascinated by food. Kimbap was one of those dishes that captured my heart. The first time I tried it, I was at a bustling market in Seoul. The vibrant colors and enticing aromas instantly grabbed my attention. I didn’t know much about it then, but I knew I was in for a treat.
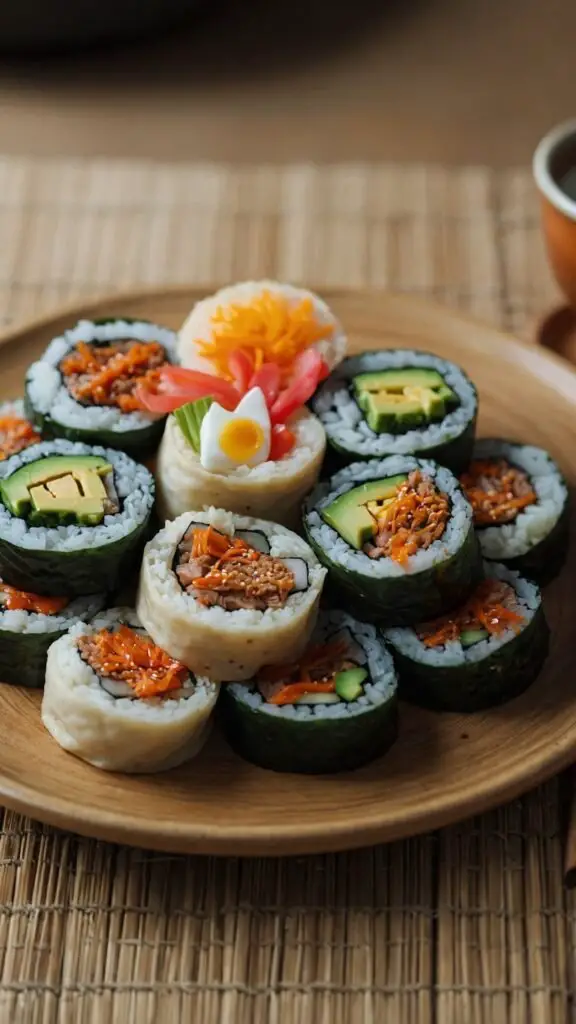
Kimbap, often dubbed the Korean sushi roll, is not just a meal; it’s an experience wrapped in seaweed. It holds a story in every bite. It represents more than taste—each roll brings together tradition, love, and creativity. As a food enthusiast, I’m excited to share not just the recipe but everything that makes this dish special.
What is Kimbap?
Kimbap is a traditional Korean dish made of rice, vegetables, and sometimes meat or fish, all wrapped in seaweed. Unlike sushi, which often includes raw fish and vinegared rice, kimbap uses simple ingredients and is typically served cold. It embodies a perfect balance of flavors and textures, making it a satisfying meal all on its own.
You will also like the following Appetizer recipes!
Why This Recipe Works?
Creating the perfect kimbap at home is easier than you might think. Here’s why this recipe stands out:
1. Simple Ingredients: The components are likely already in your pantry. Short-grain rice, fresh veggies, and seaweed are staples that bring out the best flavors without requiring complicated cooking methods.
2. Endless Customization: You can customize kimbap with your favorite fillings. Meat, seafood, or just vegetables—all work beautifully and caters to any dietary preference.
3. Meal Prep Friendly: Kimbap is perfect for meal prep. You can make a batch at once, store them in the fridge, and grab them when you need a quick snack or lunch.
4. Nutritionally Balanced: Kimbap is rich in various nutrients. The rice provides carbs, the fillings give you a variety of vitamins, and the seaweed adds minerals, making it a wholesome meal choice.
Ingredients You’ll Need To Make This Dish
To whip up some delightful kimbap, gather the following ingredients:
- Rice: 1.5 cups of uncooked short-grain rice.
- Vegetables: 1 bunch of fresh spinach, 2 medium julienned carrots, and 4 strips of pickled radish.
- Proteins: 8 ounces of lean tender beef, which can be substituted with bulgogi or even ground beef.
- Seasoning: 2 teaspoons of soy sauce (preferably low sodium), 1 teaspoon of sesame oil, and 1 teaspoon of sugar.
- For the Egg: 2 large eggs will add a rich flavor.
- Seaweed: 4 sheets of dried seaweed (gim or nori).
- Optional garnishes include toasted sesame seeds and finely sliced green onions.
How To Make This Kimbap?
Now, let’s roll up our sleeves and get cooking! Here’s a step-by-step guide to perfecting this dish.
Step 1: Preparing the Rice
First, cook the rice according to your preferred method. Rinse the rice under cold water until the water runs clear, which helps to remove excess starch. Cook the rice in a rice cooker or on the stove with the right amount of water until fluffy.
Step 2: Sauté the Vegetables
While the rice cooks, sauté your vegetables. Heat 1 teaspoon of sesame oil in a pan and add your julienned carrots. Cook for about 2-3 minutes until they’re tender but still vibrant. Add washed spinach and sauté just until wilted. Set aside to cool.
Step 3: Cook the Beef
In the same pan, now add your thinly sliced beef. Mix in the soy sauce, sugar, and sesame oil. Stir-fry for about 5 minutes until the beef is cooked through and nicely caramelized. Remove from heat.
Step 4: Prepare the Eggs
In a separate pan, whisk the eggs and cook them flat to create a thin omelet. Once cooked, let it cool, and then slice it into thin strips.
Step 5: Assemble the Kimbap
Lay a sheet of seaweed on a bamboo mat. Spread a thin layer of rice across the seaweed, leaving about an inch at the top. Place your beef, vegetables, and egg strips in a line across the rice. Now, it’s rolling time!
Step 6: Roll It Up
Using the bamboo mat, start rolling from the bottom tightly, ensuring everything stays in place. Keep rolling until you reach the bare edge of the seaweed. Use a little water to seal it.
Step 7: Slice and Serve
With a sharp knife, slice your kimbap rolls into bite-sized pieces. Enjoy fresh or chilled!
Tips & Tricks
- Use Short-grain Rice: This sticky rice binds well together, making slicing easier.
- Don’t Overfill: It’s tempting to add too much of everything, but a little goes a long way. Less is often more!
- Seal Properly: Make sure to seal your rolls tightly to prevent them from falling apart during slicing.
- Use Fresh Ingredients: Fresh vegetables will enhance the flavor immensely, so don’t skimp here!
- Perfect the Slice: Wet your knife before slicing the kimbap rolls. This ensures clean cuts without tearing.
Nutrition Information
Kimbap provides a diverse nutritional profile. A standard serving may contain:
These numbers will vary based on the specific ingredients and portions used.
How Do You Store The Leftovers?
Leftover kimbap can be stored in an airtight container in the refrigerator. It’s best eaten within a day or so for optimal freshness. If you need to store for longer, consider freezing the uncut rolls. Thaw and slice before serving.

What Sides Would Complement Kimbap?
Here are some fantastic side dishes to consider:
- Kimchi: Spicy, tangy, and nearly a must with any Korean meal. The cooling crunch of kimchi contrasts beautifully with kimbap’s soft texture.
- Miso Soup: A warm bowl of miso soup can balance out the meal’s cold elements perfectly. Serve on the side for a hearty combo.
- Fruit Salad: A light fruit salad can cleanse your palate between bites. The sweetness provides a great finish to a savory meal.
What Alternatives Can You Use for the Ingredients?
Sometimes, you might not have every ingredient available. Here are some alternatives:
- Rice: Use quinoa or brown rice if you want a healthier option or if you’re avoiding white rice.
- Beef: Substitute with tofu or tempeh for a vegetarian option.
- Vegetables: Zucchini, cucumber, or bell peppers can be great fillers if you don’t have spinach or carrots.
- Seaweed: If nori is unavailable, try using blanched collard greens or lettuce for a crunchy wrap.

Kimbap Recipe
Ingredients
- 1.5 cups of uncooked short-grain rice
- 1 bunch of fresh spinach 2 medium julienned carrots
- 8 ounces of lean tender beef
- 4 sheets of dried seaweed
- 2 large eggs
- 1 tbs of sesame sugar
Instructions
Step 1: Preparing the Rice
- First, cook the rice according to your preferred method. Rinse the rice under cold water until the water runs clear, which helps to remove excess starch. Cook the rice in a rice cooker or on the stove with the right amount of water until fluffy.
Step 2: Sauté the Vegetables
- While the rice cooks, sauté your vegetables. Heat 1 teaspoon of sesame oil in a pan and add your julienned carrots. Cook for about 2-3 minutes until they’re tender but still vibrant. Add washed spinach and sauté just until wilted. Set aside to cool.
Step 3: Cook the Beef
- In the same pan, now add your thinly sliced beef. Mix in the soy sauce, sugar, and sesame oil. Stir-fry for about 5 minutes until the beef is cooked through and nicely caramelized. Remove from heat.
Step 4: Prepare the Eggs
- In a separate pan, whisk the eggs and cook them flat to create a thin omelet. Once cooked, let it cool, and then slice it into thin strips.
Step 5: Assemble the Kimbap
- Lay a sheet of seaweed on a bamboo mat. Spread a thin layer of rice across the seaweed, leaving about an inch at the top. Place your beef, vegetables, and egg strips in a line across the rice. Now, it’s rolling time!
Step 6: Roll It Up
- Using the bamboo mat, start rolling from the bottom tightly, ensuring everything stays in place. Keep rolling until you reach the bare edge of the seaweed. Use a little water to seal it.
Step 7: Slice and Serve
- With a sharp knife, slice your kimbap rolls into bite-sized pieces. Enjoy fresh or chilled!
Notes
- Use Short-grain Rice: This sticky rice binds well together, making slicing easier.
- Don’t Overfill: It’s tempting to add too much of everything, but a little goes a long way. Less is often more!
- Seal Properly: Make sure to seal your rolls tightly to prevent them from falling apart during slicing.
- Use Fresh Ingredients: Fresh vegetables will enhance the flavor immensely, so don’t skimp here!
- Perfect the Slice: Wet your knife before slicing the kimbap rolls. This ensures clean cuts without tearing.
Nutrition
Frequently Asked Questions
1. Can I make kimbap vegetarian or vegan?
Absolutely! You can exclude the meat and include more vegetables, tofu, or other plant-based options.
2. How do you prevent kimbap from getting soggy?
Ensure your ingredients are dry and avoid adding wet fillings. Using a sushi mat helps keep things tight.
3. Is kimbap healthy?
Kimbap can be quite healthy, especially if you use lean proteins and lots of vegetables.
4. Can I make kimbap in advance?
Yes! Kimbap can be made a day ahead, but it’s best eaten fresh as the seaweed can soften.
5. What if I don’t have a bamboo mat?
You can roll kimbap with parchment paper or even a clean kitchen towel. Just take extra care to keep things tight.
6. Can I customize the kimbap for kids?
Definitely! Kids may enjoy simpler fillings like egg and cucumber or even grilled chicken for variety.
Conclusion
Kimbap is so much more than just food; it’s a delicious vessel for creativity and flavor. Whether you’re indulging alone or sharing with friends, each roll tells a story. The beauty of kimbap lies in its unparalleled versatility and nutrition. I invite you to try out this delightful dish, making it your own as you go. It’s a fantastic opportunity to explore tastes and textures while celebrating the joy of cooking. Dive in, get creative, and enjoy this friendly, approachable dish that brings a taste of Korea right to your table. Happy cooking!