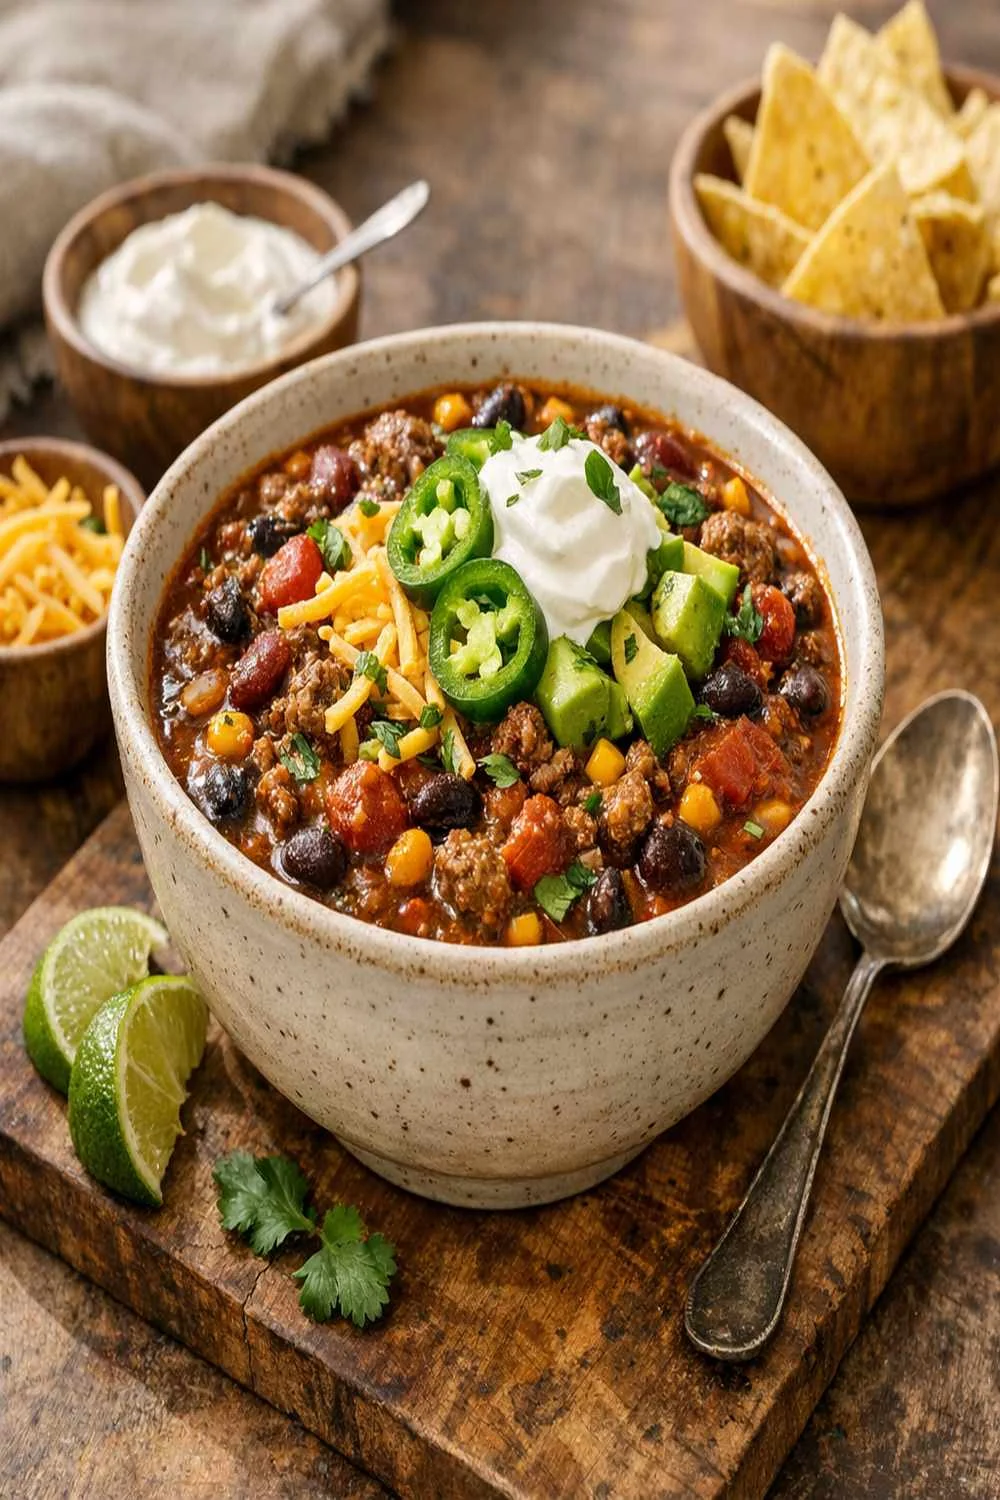
There’s something deeply satisfying about a warm bowl of chili on a crisp evening. This bison chili recipe brings together lean, nutrient-rich meat with layers of warm spices that make your kitchen smell absolutely divine. If you’re looking for ways to incorporate more protein into your weekly meals, I’d also recommend exploring options like Fajita Shredded Chicken or even lighter fare like Fish Taco Cod Recipe for variety throughout your week.
A Pot That Brought Our Family Together
I remember the first time my grandmother made chili in her cast-iron Dutch oven—it was a winter afternoon in the 1980s, and I was standing on a stool in her kitchen, barely tall enough to see over the counter’s edge. She didn’t follow a recipe; she cooked by feel and intuition, tasting as she went, adjusting the spices with the kind of confidence that only comes from decades in the kitchen.
Years later, when I became a registered dietitian, I realized that what my grandmother was doing went far beyond just making food. She was teaching me about balance—balancing bold flavors with wholesome ingredients, blending different textures and nutritional profiles into something that felt like home. This bison chili recipe is my modern twist on that memory, using leaner, more nutrient-dense meat while honoring the warmth and comfort that made those afternoons so special.
What is Bison Chili Recipe?
Bison chili is a hearty, one-pot meal built on ground bison meat—a protein source that deserves more attention in our kitchens. Bison has been part of North American cuisine for centuries, valued by Indigenous peoples and early settlers alike for its incredible nutritional profile and rich flavor.
What makes this recipe special is the combination of bison’s naturally lean composition with warming spices like cumin, chili powder, and garlic. The addition of multiple types of beans creates a complete protein when combined with the meat, making this dish both satisfying and incredibly nourishing. Unlike traditional beef chili, bison brings a slightly sweeter, more tender quality that doesn’t require hours of simmering to develop deep flavor.
This recipe uses fresh onions as your aromatic base, combined with canned tomatoes and green chiles for convenience without sacrificing nutritional value. The result is a chili that comes together in under an hour but tastes like it’s been lovingly tended all day.
Why You’ll Love This Bison Chili Recipe
- Exceptional Protein Quality – Bison meat contains more omega-3 fatty acids and fewer calories than beef, making it a dietitian-approved choice for heart health and muscle recovery without the heavy feeling of traditional chili.
- Complete Plant and Animal Proteins – The combination of bison with kidney beans and chili beans creates all nine essential amino acids, making this a complete protein meal that keeps you satisfied for hours.
- Naturally Low in Fat – Bison is inherently leaner than beef, so you’ll use less added fat and still achieve incredible depth of flavor and richness.
- One-Pot Simplicity – Everything comes together in a single Dutch oven with minimal active prep time, making this perfect for busy weeknights or meal prep sessions.
- Packed with Phytonutrients – The green chiles, tomatoes, and spices are loaded with antioxidants, vitamins, and minerals that support overall wellness.
- Freezer-Friendly – This chili actually improves as flavors meld and becomes an easy grab-and-go meal for future weeks.
The Ingredients
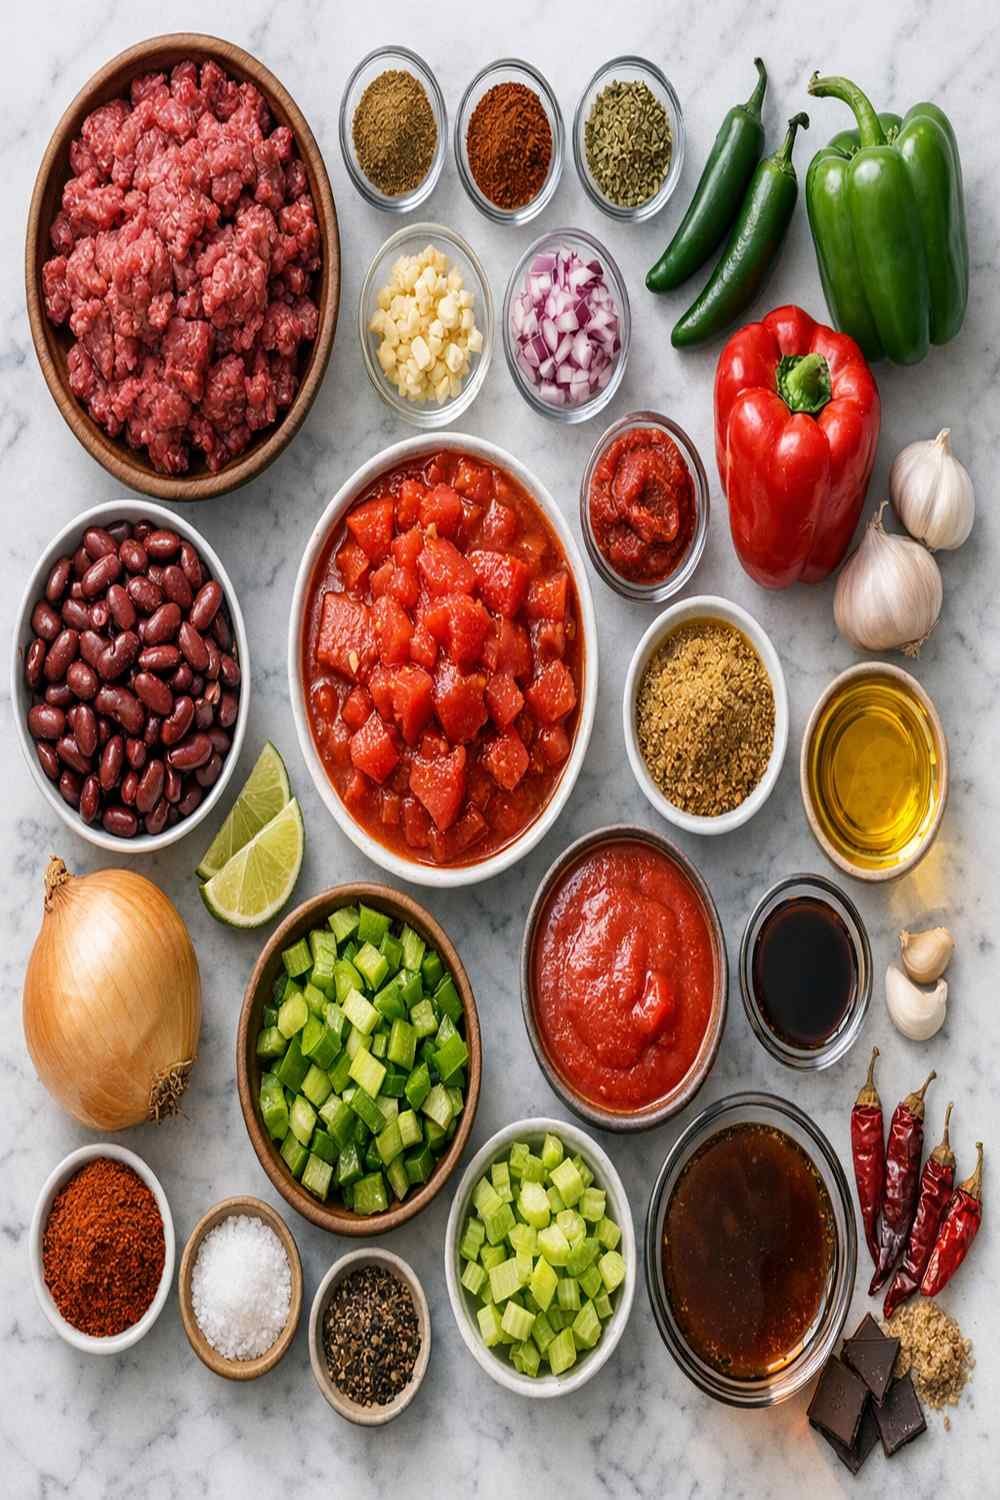
I’ve carefully selected each ingredient in this recipe to balance nutrition, accessibility, and authentic flavor. You’ll find most of these items in any well-stocked grocery store, though I do recommend seeking out high-quality bison from your local butcher or a specialty market when possible. Makes approximately 6-8 servings depending on portion size.
- 32 ounces tomato sauce (no added sugar, just tomatoes and salt)
- 1 pound ground bison (grass-fed when possible for optimal omega-3 content)
- Shredded sharp cheddar or cotija cheese for serving (optional)
- 1 teaspoon fine sea salt (adjust to taste at the end)
- 1 can roasted green chiles and diced tomatoes (about 10 ounces, including the liquid)
- Fresh diced avocado for garnish (optional, adds healthy fats)
- 2 tablespoons avocado oil (high heat-stable and nutrient-rich alternative to vegetable oil)
- 2 tablespoons chili powder (a good quality blend makes all the difference)
- ½ teaspoon onion powder (adds subtle depth without overpowering)
- ½ medium yellow onion (diced into roughly quarter-inch pieces)
- 2 tablespoons fresh lime juice (optional but brightens the finish beautifully)
- 1 can chili beans (15 ounces, with sauce included)
- 1 teaspoon ground cumin (freshly ground tastes noticeably better)
- 1 teaspoon freshly cracked black pepper (coarse pepper matters here)
- 1 teaspoon garlic powder (not garlic salt)
- 1 can dark red kidney beans (15 ounces, drained and rinsed thoroughly)
How to Make Bison Chili Recipe?
This recipe is straightforward enough for beginner cooks but sophisticated enough to impress family and friends. The key is patience during the simmering phase—this is when flavors truly marry and develop. I’ve broken down each step with specific timing and visual cues to help you succeed.
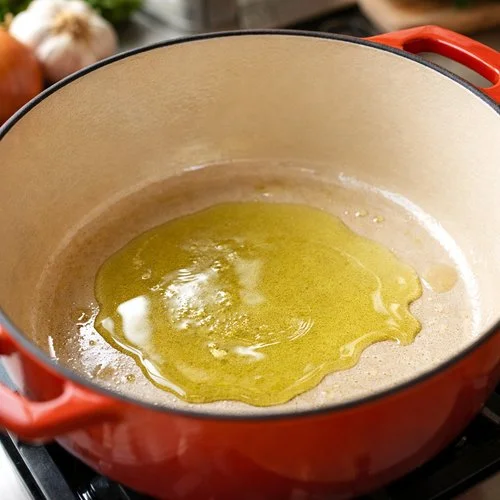
Step 1: Heat Your Oil and Prepare the Aromatics
Place your Dutch oven or large heavy-bottomed pot over medium heat. Pour in the avocado oil and let it warm for about 1-2 minutes until it shimmers slightly. This is your signal that the pan is ready—oil at the proper temperature creates better browning and flavor development.
Once the oil is hot, add your diced onion to the pot. You’ll hear a gentle sizzle, which tells you the vegetables are starting to release their moisture. Stir occasionally and let the onions cook for 3-4 minutes until they become translucent with just a hint of golden color at the edges. This develops their natural sweetness and removes any harsh raw bite.
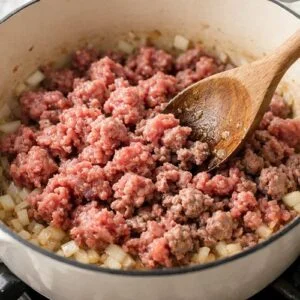
Step 2: Brown the Bison Meat
Add the ground bison to the pot with the softened onions. Using a wooden spoon or spatula, break the meat into small, bite-sized pieces as it cooks. This step is crucial—you want small, individual pieces rather than large clumps. Cook for 7-8 minutes, stirring frequently, until the meat loses its pink color and develops a rich brown exterior.
You should see the meat release its liquid initially, then as it cooks further, that liquid will evaporate and the meat will begin to brown. This browning stage creates what we call the Maillard reaction—a chemical process that develops complex, savory flavors you simply cannot achieve without it.

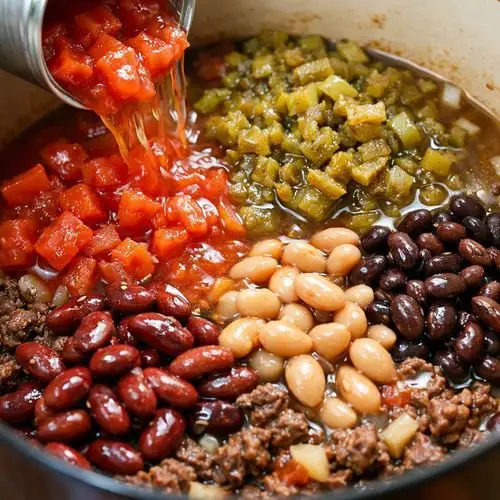
Step 3: Add the Liquids and Beans
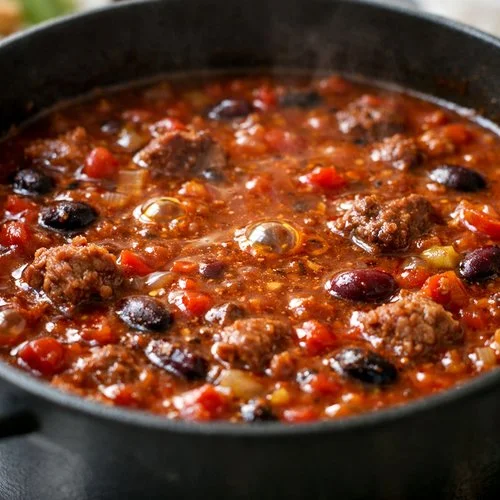
Pour the entire can of roasted green chiles and diced tomatoes directly into the pot with the browned bison and onions—yes, include all the liquid. Follow this with the tomato sauce, stirring gently to combine everything. The color will shift to a beautiful russet red.
Now add your chili beans with all their sauce, along with the drained and rinsed kidney beans. The reason I drain the kidney beans is to reduce excess sodium and any metallic flavor that comes from the canning liquid. Stir everything together thoroughly, ensuring nothing sticks to the bottom of the pot. You should have a thick, cohesive mixture that bubbles gently at this point.
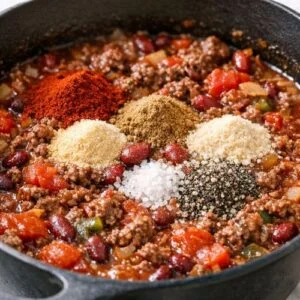
Step 4: Season With Warm Spices
Sprinkle the chili powder, garlic powder, cumin, onion powder, salt, and pepper over the surface of the chili. Rather than dumping all the seasonings in at once, I like to scatter them and stir well—this prevents clumping and ensures even distribution. Stir thoroughly until you don’t see any dry spice streaks and everything is well combined.
Take a moment to smell the pot—you should notice the spices awakening, releasing their aromatic oils. This tells you the seasoning is integrating properly with the dish.

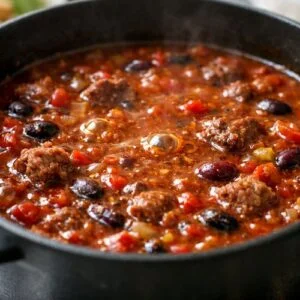
Step 5: Simmer Low and Slow
Reduce heat to low and let the chili simmer gently. You want to see just a few lazy bubbles breaking the surface every few seconds—not a rolling boil, which can cause the beans to break down too much. Cover the pot partially with a lid, leaving it slightly ajar to allow some steam to escape.
Let it cook for at least 15-20 minutes for a quick weeknight version, though I genuinely recommend 30-45 minutes to a few hours on low heat if your schedule allows. The longer it simmers, the more the spices meld and develop. Stir occasionally and taste as you go, adjusting salt and pepper to your preference in the final minutes.
Just before serving, stir in the fresh lime juice if using—it adds a bright, finishing note that elevates the entire dish without making it taste obviously citrusy.
Tips and Tricks
- Choose Quality Bison – Source your bison from a reputable butcher or specialty grocery. Grass-fed bison has superior nutritional content with higher omega-3 levels compared to grain-fed options.
- Don’t Skip the Browning Step – Even though bison is lean, taking time to properly brown it creates depth. This Maillard reaction cannot be rushed without sacrificing flavor.
- Taste and Adjust – Spice preferences vary wildly. Always taste your chili in the final minutes and adjust seasonings. You can always add more chili powder or salt, but you can’t remove it.
- Use Fresh Spices – Ground spices lose potency over time. If your chili powder or cumin has been in your cabinet for over a year, consider replacing them—fresh spices make an enormous difference.
- Make it Ahead – Prepare this chili completely, cool it, and refrigerate up to 3 days before reheating. The flavors actually deepen as it sits, making it perfect for meal prep.
- Control Your Heat – If you prefer spicier chili, use hot green chiles instead of mild, or add a pinch of cayenne pepper. Start conservatively—you can always add more heat.
Expert’s Nutritional Tip
As a registered dietitian, I’m genuinely excited about bison as a protein choice. Compared to conventional beef, bison contains approximately 2.4 grams of omega-3 fatty acids per 3.5 ounces, compared to beef’s 0.1 grams. These omega-3s are the same anti-inflammatory compounds found in fatty fish, supporting heart and brain health.
The fat profile matters tremendously for health outcomes, and bison’s naturally lower fat content means you’re getting protein without excess saturated fat. This makes bison chili an excellent choice for anyone managing cardiovascular health or simply seeking to optimize their diet for longevity and vitality.
Make-Ahead Guide
Prepare the Day Before: Dice your onions and place them in an airtight container. Brown your bison completely and let it cool, storing it separately. These components keep refrigerated for up to 24 hours.
Assemble and Cook: The next day, simply heat your Dutch oven, combine all ingredients starting with the pre-cooked bison and onions, then proceed with simmering. This cuts down active cooking time to about 20 minutes.
Freeze in Portions: Cool the finished chili completely, then portion into freezer-safe containers. It keeps beautifully for up to 3 months frozen. Thaw overnight in the refrigerator and reheat gently over medium heat, adding a splash of water if it seems too thick.
Common Mistakes to Avoid
- Overcrowding the Pan When Browning Meat: Adding all the meat at once lowers the temperature and causes steaming rather than browning. Work in two batches if your pot isn’t large enough—proper browning is worth the extra step.
- Cooking on Heat That’s Too High: High heat causes beans to break apart and creates a mushy texture. Low and slow is truly the way with chili.
- Not Rinsing Canned Beans: The liquid in canned beans contains excess sodium and starch that can make your chili gummy. Rinse thoroughly under cold water (except the chili beans, which benefit from their sauce).
- Using Old Spices: Stale chili powder and cumin create flat, one-dimensional flavor. Replace them every 12 months for best results.
Seasonal Variations
Fall and Winter: Add 1 tablespoon of cocoa powder in the final stages of cooking. This deepens the chili’s complexity without making it taste sweet—a tradition borrowed from Mexican cuisine that creates subtle sophistication.
Spring and Summer: Use fresh jalapeños instead of canned green chiles, roughly 2-3 peppers diced fine. Add them when browning the onions for maximum freshness. Serve your chili over greens instead of in bowls, creating a warm protein salad.
Year-Round Addition: Stir in roasted root vegetables like diced sweet potato or butternut squash during the final 15 minutes of simmering. This adds fiber and natural sweetness while boosting micronutrient content.
Can I Store Bison Chili Recipe?
Absolutely, and I genuinely encourage you to make extra for future meals. Once cooled to room temperature, store your chili in airtight containers in the refrigerator for up to 4 days. The flavors actually improve as they meld together—day two or three often tastes better than day one.
For longer storage, freeze in portions for up to 3 months. I prefer using glass containers or heavy-duty freezer bags. Thaw overnight in the refrigerator, then reheat gently over medium heat, stirring occasionally. If it thickens too much during storage, add a splash of vegetable broth or water to reach your preferred consistency.
This chili also freezes beautifully in individual portions for quick grab-and-go lunches throughout the month. Simply reheat in the microwave for 2-3 minutes or on the stovetop for 5 minutes.
Nutrition Information
Per serving (makes 6-8 servings; calculated for 1 of 6 servings), this bison chili provides approximately 320 calories, 28 grams protein, 12 grams fat, and 28 grams carbohydrates, with 8 grams of dietary fiber. Based on USDA FoodData Central databases, this represents an excellent macronutrient balance for a complete meal.
The protein comes from two sources—the bison meat and the beans—creating complete amino acid profiles without excess saturated fat. The fiber from beans supports digestive health and stabilizes blood sugar throughout the afternoon. Iron content is substantial at approximately 4.2 milligrams per serving, particularly important for those following plant-forward diets or managing iron levels.
Key micronutrients include potassium (850mg per serving) for cardiovascular health, magnesium (95mg) for muscle function, and various B vitamins for energy metabolism. The antioxidants from chili powder and tomatoes provide phytonutrient benefits that extend beyond basic macronutrient calculations.
What Can I Serve With Bison Chili Recipe?
This bison chili shines as a centerpiece, but the right sides complete the meal. Consider pairing it with cooling, fresh companions that balance its warm spice profile. If you’re enjoying lighter fare on other nights, try complementary recipes like my weeknight pasta as a vegetable-forward option, or explore Goat Cheese Appetizer Bites as elegant starters for entertaining.
- Cornbread or Jalapeño Cornbread – The slight sweetness and tender crumb provide textural contrast to the hearty chili and soak up every delicious drop.
- Spanish Rice – Seasoned with cumin and cilantro, rice adds substance and helps stretch the meal further if feeding a crowd.
- Simple Green Salad – Mixed greens with lime vinaigrette brighten the palate and provide fresh vegetables to balance the rich, spiced chili.
- Creamy Coleslaw – The coolness and slight tang cut through richness beautifully. Make yours with Greek yogurt instead of mayo for added protein.
- Baked Sweet Potato – Topped with a dollop of Greek yogurt or a sprinkle of cheese, sweet potatoes round out the meal with natural sweetness and extra fiber.
- Cilantro-Lime Cauliflower Rice – For a lower-carb option that still feels substantial and delicious.
- Avocado Slices and Fresh Lime Wedges – Simple and perfect. Creamy, healthy fats from avocado balance the spiced heat beautifully.
Substitutes
- Ground Beef Instead of Bison – Use the same amount of extra-lean ground beef (90% lean or higher) if bison is unavailable. Understand you’ll lose some nutritional advantage in terms of omega-3 content and will have slightly more saturated fat.
- Ground Turkey – Works well and remains lean, though the flavor is milder. Use the same amount, but consider adding an extra ½ teaspoon of garlic powder to compensate for the lighter taste profile.
- Canned Tomato Paste Instead of Tomato Sauce – If you prefer a thicker chili, use 6 tablespoons tomato paste mixed with ½ cup water instead of the 32 ounces tomato sauce. The flavor will be more concentrated.
- Fresh Poblano Peppers Instead of Canned Green Chiles – Roast 2-3 fresh poblanos, peel away the skin, and chop them. Add during the final simmering stage for fresher, more vibrant flavor during peak pepper season.
- Pinto or Black Beans Instead of Kidney Beans – Either works beautifully and won’t noticeably change the final dish. Use the same quantities.
- Coconut Oil Instead of Avocado Oil – Use refined coconut oil for a neutral flavor, or embrace unrefined for a subtle coconut background note that actually complements the spices.

Bison Chili Recipe
Ingredients
- 32 ounce tomato sauce no added sugar, just tomatoes and salt
- 1 pound ground bison grass-fed when possible for optimal omega-3 content
- Shredded sharp cheddar or cotija cheese for serving optional
- 1 teaspoon fine sea salt adjust to taste at the end
- 1 can roasted green chiles and diced tomatoes about 10 ounces, including the liquid
- Fresh diced avocado for garnish optional, adds healthy fats
- 2 tablespoon avocado oil high heat-stable and nutrient-rich alternative to vegetable oil
- 2 tablespoon chili powder a good quality blend makes all the difference
- ½ teaspoon onion powder adds subtle depth without overpowering
- ½ medium yellow onion diced into roughly quarter-inch pieces
- 2 tablespoon fresh lime juice optional but brightens the finish beautifully
- 1 can chili beans 15 ounces, with sauce included
- 1 teaspoon ground cumin freshly ground tastes noticeably better
- 1 teaspoon freshly cracked black pepper coarse pepper matters here
- 1 teaspoon garlic powder not garlic salt
- 1 can dark red kidney beans 15 ounces, drained and rinsed thoroughly
Instructions
Step 1: Heat Your Oil and Prepare the Aromatics
- Place your Dutch oven or large heavy-bottomed pot over medium heat. Pour in the avocado oil and let it warm for about 1-2 minutes until it shimmers slightly. This is your signal that the pan is ready—oil at the proper temperature creates better browning and flavor development. Once the oil is hot, add your diced onion to the pot. You'll hear a gentle sizzle, which tells you the vegetables are starting to release their moisture. Stir occasionally and let the onions cook for 3-4 minutes until they become translucent with just a hint of golden color at the edges. This develops their natural sweetness and removes any harsh raw bite.

Step 2: Brown the Bison Meat
- Add the ground bison to the pot with the softened onions. Using a wooden spoon or spatula, break the meat into small, bite-sized pieces as it cooks. This step is crucial—you want small, individual pieces rather than large clumps. Cook for 7-8 minutes, stirring frequently, until the meat loses its pink color and develops a rich brown exterior. You should see the meat release its liquid initially, then as it cooks further, that liquid will evaporate and the meat will begin to brown. This browning stage creates what we call the Maillard reaction—a chemical process that develops complex, savory flavors you simply cannot achieve without it.
Step 3: Add the Liquids and Beans
- Pour the entire can of roasted green chiles and diced tomatoes directly into the pot with the browned bison and onions—yes, include all the liquid. Follow this with the tomato sauce, stirring gently to combine everything. The color will shift to a beautiful russet red. Now add your chili beans with all their sauce, along with the drained and rinsed kidney beans. The reason I drain the kidney beans is to reduce excess sodium and any metallic flavor that comes from the canning liquid. Stir everything together thoroughly, ensuring nothing sticks to the bottom of the pot. You should have a thick, cohesive mixture that bubbles gently at this point.

Step 4: Season With Warm Spices
- Sprinkle the chili powder, garlic powder, cumin, onion powder, salt, and pepper over the surface of the chili. Rather than dumping all the seasonings in at once, I like to scatter them and stir well—this prevents clumping and ensures even distribution. Stir thoroughly until you don't see any dry spice streaks and everything is well combined. Take a moment to smell the pot—you should notice the spices awakening, releasing their aromatic oils. This tells you the seasoning is integrating properly with the dish.
Step 5: Simmer Low and Slow
- Reduce heat to low and let the chili simmer gently. You want to see just a few lazy bubbles breaking the surface every few seconds—not a rolling boil, which can cause the beans to break down too much. Cover the pot partially with a lid, leaving it slightly ajar to allow some steam to escape. Let it cook for at least 15-20 minutes for a quick weeknight version, though I genuinely recommend 30-45 minutes to a few hours on low heat if your schedule allows. The longer it simmers, the more the spices meld and develop. Stir occasionally and taste as you go, adjusting salt and pepper to your preference in the final minutes. Just before serving, stir in the fresh lime juice if using—it adds a bright, finishing note that elevates the entire dish without making it taste obviously citrusy.
Notes
Nutrition
FAQs
Can I Make This Chili Vegetarian?
You certainly can, though the dish becomes more of a bean and vegetable chili rather than a traditional chili. Replace the bison with 2 cups cooked lentils or an additional 2 cans of beans, using a mixture of varieties. Add 1 cup of finely diced mushrooms (cremini or portobello work beautifully) to the onions while sautéing—they provide an umami depth that somewhat mimics the savory quality of meat. Increase your spices slightly since you’re losing the richness from the meat. You’ll still have a delicious, protein-packed meal, just different in character.
How Spicy Is This Chili?
This recipe is moderate in heat level, assuming you use mild roasted green chiles. Most home cooks find it pleasantly warm without being overwhelming. If you’re sensitive to spice, use the mildest chiles available. If you love heat, swap for hot or habanero chiles, or add ¼ to ½ teaspoon cayenne pepper during the seasoning step. Remember that you can taste and adjust as it simmers, so start conservative and build heat gradually.
Why Use Bison Instead of Beef?
As a dietitian, I’m particularly enthusiastic about bison because of its superior nutritional profile. It contains significantly more omega-3 fatty acids, less saturated fat, and fewer calories per ounce than conventional beef. It’s also more sustainable—bison grazes on natural grasslands and requires fewer resources than cattle ranching. The flavor is slightly sweeter and more tender, particularly when prepared with proper technique. If you have access to grass-fed bison, the nutritional advantage becomes even more pronounced.
Can I Slow Cooker or Instant Pot This Recipe?
Yes, absolutely. For a slow cooker: Brown the bison and onions on the stovetop first (this step really matters for flavor), then transfer everything to your slow cooker with all remaining ingredients. Cook on low for 6-8 hours or high for 3-4 hours. For an Instant Pot: Use the sauté function to brown the bison and onions, then add all remaining ingredients and pressure cook on high for 15 minutes. Both methods work, though I prefer the traditional stovetop method because you maintain better control over consistency and can adjust seasoning more easily throughout cooking.
What Should I Do If My Chili Is Too Thick or Too Thin?
If it’s too thick, simply stir in ¼ cup vegetable broth or water at a time until you reach your preferred consistency. If it’s too thin, you have a few options: let it simmer uncovered for 15-20 minutes to evaporate excess liquid, stir in 2 tablespoons tomato paste to add body and flavor, or make a slurry by mixing 1 tablespoon cornstarch with 2 tablespoons cold water and stir it in while the chili simmers. The slurry thickens without adding flavor, which I prefer when the seasoning is already perfect.
More Recipes You’ll Love
- this simple cake – Start your morning with protein-rich pancakes that fuel you through to lunch
- Fajita Shredded Chicken – Another versatile lean protein dish that makes excellent meal prep for the week ahead
- Fried Salmon Tacos – Incorporate omega-3s from a different protein source with this vibrant, satisfying recipe
- Fresh Shiitake Spring Rolls – Light, fresh vegetables provide balance after enjoying hearty chili
There’s a reason my grandmother’s kitchen became a gathering place—it wasn’t just about the food, though that mattered. It was about creating moments of warmth and nourishment that brought people together. This bison chili recipe carries that same spirit into your home. Whether you’re cooking for yourself, your family, or a gathering of friends, you’re creating memories with every spoonful.
I hope this recipe becomes as cherished in your kitchen as it has in mine. Make it your own by adjusting spices to your preference, adding seasonal vegetables that speak to you, and serving it with sides that bring you joy. There’s genuine magic in a pot of chili simmering on the stove—the aroma alone communicates love and care to everyone in your home.
Happy Cooking! With love, Tina Cooper.