
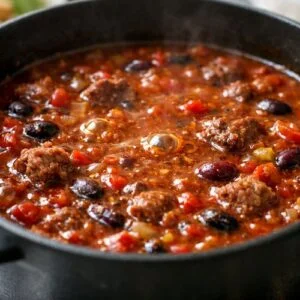
Bison Chili Recipe
There's something deeply satisfying about a warm bowl of chili on a crisp evening. This bison chili recipe brings together lean, nutrient-rich meat with layers of warm spices that make your kitchen smell absolutely divine. If you're looking for ways to incorporate more protein into your weekly meals, I'd also recommend exploring options like Fajita Shredded Chicken or even lighter fare like Fish Taco Cod Recipe for variety throughout your week.
Ingredients
- 32 ounce tomato sauce no added sugar, just tomatoes and salt
- 1 pound ground bison grass-fed when possible for optimal omega-3 content
- Shredded sharp cheddar or cotija cheese for serving optional
- 1 teaspoon fine sea salt adjust to taste at the end
- 1 can roasted green chiles and diced tomatoes about 10 ounces, including the liquid
- Fresh diced avocado for garnish optional, adds healthy fats
- 2 tablespoon avocado oil high heat-stable and nutrient-rich alternative to vegetable oil
- 2 tablespoon chili powder a good quality blend makes all the difference
- ½ teaspoon onion powder adds subtle depth without overpowering
- ½ medium yellow onion diced into roughly quarter-inch pieces
- 2 tablespoon fresh lime juice optional but brightens the finish beautifully
- 1 can chili beans 15 ounces, with sauce included
- 1 teaspoon ground cumin freshly ground tastes noticeably better
- 1 teaspoon freshly cracked black pepper coarse pepper matters here
- 1 teaspoon garlic powder not garlic salt
- 1 can dark red kidney beans 15 ounces, drained and rinsed thoroughly
Instructions
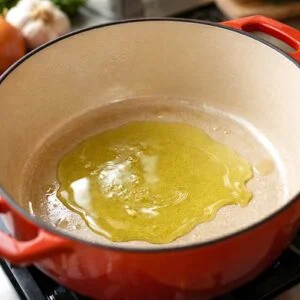
Step 1: Heat Your Oil and Prepare the Aromatics
- Place your Dutch oven or large heavy-bottomed pot over medium heat. Pour in the avocado oil and let it warm for about 1-2 minutes until it shimmers slightly. This is your signal that the pan is ready—oil at the proper temperature creates better browning and flavor development. Once the oil is hot, add your diced onion to the pot. You'll hear a gentle sizzle, which tells you the vegetables are starting to release their moisture. Stir occasionally and let the onions cook for 3-4 minutes until they become translucent with just a hint of golden color at the edges. This develops their natural sweetness and removes any harsh raw bite.
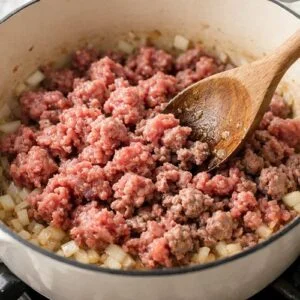
Step 2: Brown the Bison Meat
- Add the ground bison to the pot with the softened onions. Using a wooden spoon or spatula, break the meat into small, bite-sized pieces as it cooks. This step is crucial—you want small, individual pieces rather than large clumps. Cook for 7-8 minutes, stirring frequently, until the meat loses its pink color and develops a rich brown exterior. You should see the meat release its liquid initially, then as it cooks further, that liquid will evaporate and the meat will begin to brown. This browning stage creates what we call the Maillard reaction—a chemical process that develops complex, savory flavors you simply cannot achieve without it.
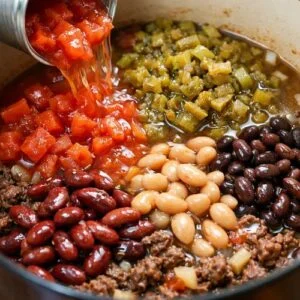
Step 3: Add the Liquids and Beans
- Pour the entire can of roasted green chiles and diced tomatoes directly into the pot with the browned bison and onions—yes, include all the liquid. Follow this with the tomato sauce, stirring gently to combine everything. The color will shift to a beautiful russet red. Now add your chili beans with all their sauce, along with the drained and rinsed kidney beans. The reason I drain the kidney beans is to reduce excess sodium and any metallic flavor that comes from the canning liquid. Stir everything together thoroughly, ensuring nothing sticks to the bottom of the pot. You should have a thick, cohesive mixture that bubbles gently at this point.
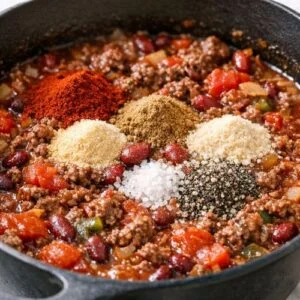
Step 4: Season With Warm Spices
- Sprinkle the chili powder, garlic powder, cumin, onion powder, salt, and pepper over the surface of the chili. Rather than dumping all the seasonings in at once, I like to scatter them and stir well—this prevents clumping and ensures even distribution. Stir thoroughly until you don't see any dry spice streaks and everything is well combined. Take a moment to smell the pot—you should notice the spices awakening, releasing their aromatic oils. This tells you the seasoning is integrating properly with the dish.
Step 5: Simmer Low and Slow
- Reduce heat to low and let the chili simmer gently. You want to see just a few lazy bubbles breaking the surface every few seconds—not a rolling boil, which can cause the beans to break down too much. Cover the pot partially with a lid, leaving it slightly ajar to allow some steam to escape. Let it cook for at least 15-20 minutes for a quick weeknight version, though I genuinely recommend 30-45 minutes to a few hours on low heat if your schedule allows. The longer it simmers, the more the spices meld and develop. Stir occasionally and taste as you go, adjusting salt and pepper to your preference in the final minutes. Just before serving, stir in the fresh lime juice if using—it adds a bright, finishing note that elevates the entire dish without making it taste obviously citrusy.
Notes
- Choose Quality Bison - Source your bison from a reputable butcher or specialty grocery. Grass-fed bison has superior nutritional content with higher omega-3 levels compared to grain-fed options.
- Don't Skip the Browning Step - Even though bison is lean, taking time to properly brown it creates depth. This Maillard reaction cannot be rushed without sacrificing flavor.
- Taste and Adjust - Spice preferences vary wildly. Always taste your chili in the final minutes and adjust seasonings. You can always add more chili powder or salt, but you can't remove it.
- Use Fresh Spices - Ground spices lose potency over time. If your chili powder or cumin has been in your cabinet for over a year, consider replacing them—fresh spices make an enormous difference.
- Make it Ahead - Prepare this chili completely, cool it, and refrigerate up to 3 days before reheating. The flavors actually deepen as it sits, making it perfect for meal prep.
- Control Your Heat - If you prefer spicier chili, use hot green chiles instead of mild, or add a pinch of cayenne pepper. Start conservatively—you can always add more heat.
Nutrition
Calories: 342kcalCarbohydrates: 26gProtein: 21gFat: 18gSaturated Fat: 6gCholesterol: 53mgSodium: 1795mgFiber: 7gSugar: 12g
Tried this recipe?Let us know how it was!